All Activity
- Today
-

Power Steering Rebuilding
JerWass82 replied to JerWass82's topic in Old Gen.: 80's GL/DL/XT/Loyales...
Very true. Rubber has a lifespan regardless. I’d bet even NOS boots would be running on borrowed time. I’d recommend trying the beck arnley boots. You can get them off amazing for about $20 a pop. -

Power Steering Rebuilding
SuspiciousPizza replied to JerWass82's topic in Old Gen.: 80's GL/DL/XT/Loyales...
I used Lemforder 3015501 boots. I just replaced them a month ago so I cannot attest to their durability. They did feel and appear to be of OEM quality. They withstood my manhandling when installing (IYKYK) without cracking or tearing. -

Power Steering Rebuilding
bushytails replied to JerWass82's topic in Old Gen.: 80's GL/DL/XT/Loyales...
Good used 40 year old boots won't be good much longer... lol. I tried the ones O'Reilly sells, and they cracked almost immediately. The ones when I got a rack rebuilt by Phoenix Rack And Axle lasted six months. Have been once again driving with open boots... -
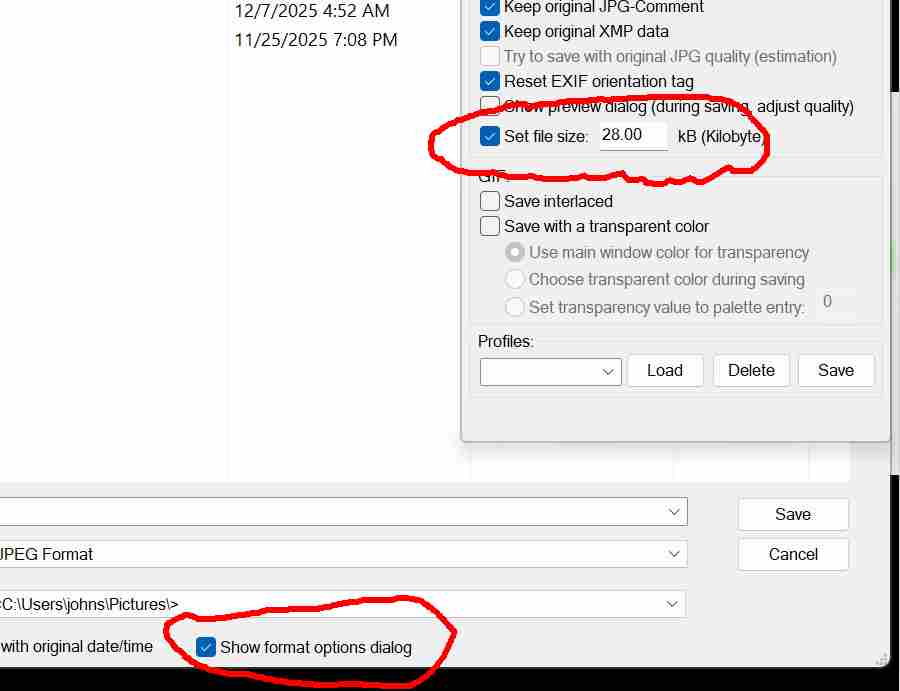
 IrfanView is a free download. If you show format options, you can magically set the file size to whatever you want, and the pictures still look ok.
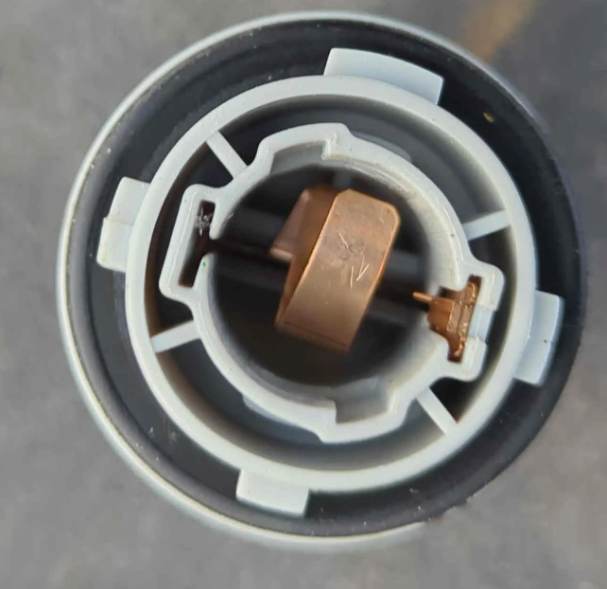
-
Power Steering Rebuilding
JerWass82 replied to JerWass82's topic in Old Gen.: 80's GL/DL/XT/Loyales...
I do have good used ones but they come with the racks that I rebuild. Have you tried the beck arnley ones? They don’t have the vent hole but I have a couple friends who’ve had good luck with them. -
Power Steering Rebuilding
bushytails replied to JerWass82's topic in Old Gen.: 80's GL/DL/XT/Loyales...
Do you have good boots for power steering racks, that have the vent line fitting, AND last more than a year? Both of the last options I tried cracked in six months after install. -
Hey all, Hope everyone is doing well. I’m new to this forum so bear with me. Thought I’d put up a post in case anyone is looking for a rebuilder of power steering pump and racks; specifically for the 1980-1985 gen2 series Brats, GL, and DL’s. I got into this hobby because I wanted to put power steering on my own car and because of that, I now do this for other people. Here’s prices in case anyone is interested: Power steering pump: $250 plus shipping and core Power steering rack: $250 plus shipping and core Power steering swap kit: $1000 plus shipping I have loads of other stuff too so if you’re looking for something, reach out. It takes me lots of time sourcing parts and rebuilding them. I bench test every piece to verify proper operation and no leaks. If you’re interested, let me know. Happy to answer any questions. Thanks! Jeremy
-
wavewhaler changed their profile photo
- Yesterday
-

Looking for a driver side rear door shell
moosens replied to SubsPNW's topic in Old Gen.: 80's GL/DL/XT/Loyales...
Car-parts.com Has to be one on the west coast. -
Door Trim Repair
SuspiciousPizza replied to SuspiciousPizza's topic in Old Gen.: 80's GL/DL/XT/Loyales...
I got a bumper but the only one available is in very rough condition. The car it came off of clearly had a front end wreck. The metal has a lot of deformations. So I may not use the metal of the bumper. I'm thinking a rectangular tube structure that uses the bumper mount locations. The bull bar is mounted to this structure with the bushings. Then I'll modify the plastic portion of the wrecked bumper to fit over the rectangular tube structure. This way it looks like the factory bumper, but it uses a different metal reinforcement. I'd probably make this out of aluminum. I cannot find the clips on the inside of the door. They're covered by a stamped piece of metal that runs the length of the door. -
wavewhaler joined the community
-
Door Trim Repair
bushytails replied to SuspiciousPizza's topic in Old Gen.: 80's GL/DL/XT/Loyales...
The factory option bullbar is impressively flimsy. It would not provide any protection against hitting anything larger than a flying squirrel. I assume it's to keep weight down. I broke mine using it to pull myself up from a kneel... The plastic clips holding the trim on are likely very brittle. Be careful removing them. -
Looking for a driver side rear door shell
bushytails replied to SubsPNW's topic in Old Gen.: 80's GL/DL/XT/Loyales...
I have a driver's side rear door I pulled off someone's parts car a while back. I can't remember which part I needed out of it now. lol. Metallic red. It has some rust and probably isn't a good pick for a clean low mileage car. I wouldn't be able to ship it until next month, or even get at it to take pictures. But, if you can't find any other options, it's here. Body shops have networks of junkyards and such that can find parts, if they're going to do the work. The insurance company is going to tell you the car is worth $2. You'll need to find ebay etc listings of super clean ones going for $6000. This may involve showing them to a judge. Insurance companies suck. -
 Hello, I am trying to save a 1983 Subaru GL 4 door that was recently hit in the driver side rear door. Car has 137,000+ miles, 5 speed, FWD, is super clean (no rust). The driver side rear door took the brunt of the impact so not really repairable at this time. We would like to save the car if possible but the insurance company of course would like to total. Does anyone have a driver side rear door shell for sell? Thanks!
 -
'79 Brat EJ22 Retrofit Build Thread
moosens replied to mka's topic in Historic Subaru Forum: 50's thru 70's
Sweet! Little at a time. My first thought on the brakes was wondering if anyone has done inboard disks somehow. That would probably take too much money but I am thinking if axles are cut down maybe they could be adapted at the inner ends to accept a disk. Or an existing setup like from a Lotus etc. as an example. Pardon my freaky thought in the middle of your hard work. Inboard brakes at the diff, big bash plate to shield it all. Anyways , cool to see as usual and who knows I could maybe copy you or use the knowledge to take a different approach etc. 73 Coupe over the Impreza and just bump out the fenders and quarters with obnoxious looking flares. We’ll see. I’m years away from that project more than likely. But I’d want to keep it thrifty too. -
SubsPNW joined the community
-
 Captain Ford joined the community
 -
 SamNoHam joined the community
 -
 Bigweld56 joined the community
 -
 HuntersSubaruTown joined the community
 -
 Roman9324765 joined the community
 -
 KarikYeld joined the community
 -

'79 Brat EJ22 Retrofit Build Thread
mka replied to mka's topic in Historic Subaru Forum: 50's thru 70's
Busy workweek this week - but I got some really wonderful weather today and took the opportunity to get the next notable step dealt with - making the threaded mounting points for the impreza diff subframe. Also before I get too far into it, a protip/safety tip: if someone finds themselves recreating this, or if I decide to do it again - make sure you're using plain, non-galvanized tubing. I'm sure someone has spotted that already and was kind enough to keep their yap shut about it 😅 I used what I have on hand and looking back at it the prep work involved to safely weld this stuff with my setup quickly wiped out any minor cash savings I made by not just going to buy another stick of tubing. I'm sure I don't have to go into details about the dangers of working with galvanized material, but it's worth repeating that Zinc is bad for you in gaseous form and if you're gonna encounter it to take the proper safety precautions. With that out of the way - the photo essay goods: After everything was tacked up and nominally square - I clamped the new frame in its place on top of the bushings, and marked the first hole location for the threaded inserts ( M16 nuts I'm welding in), then center punched and drilled out the hole. I had access to weld the outer half of the nut since it's pretty close to the end of the tube and I used a technique i learned involving some clever placement of smaller access holes to get the inside faces of the nuts fused in. Like the other channels, this will all get boxed in and closed up when i'm happy with the fitment. After this I continued marking and drilling one hole at a time, using the Impreza subframe as a jig to make sure things ended up where they needed to be. I also drilled these holes slightly oversize so that I have a little wiggle room in their placement. Their final positions were dictated with tacks on the welder and then fully welded off of the impreza subframe so as not to melt or damage the bushings. After the new weldment and sheet metal subframe were temporarily assembled together, I put the diff back in it, put it on the transmission jack and then bolted the diff to the front mounts under the car. The original holes and features made for a really handy reference mark and wouldn't you know it, things came out super even. So even in fact, I couldn't help but loosely bolt the lateral links in, prop the trailing arm up, and lean the coilovers (not pictured) up in there without any bolts to get an idea of how things are going to sit. I can almost see it on the ground again! (It'll still be a while). I don't know if I'll be able to narrow the rear wheelbase quite as much as I'd have originally liked, though with a quick google having a slightly wider rear track isn't uncommon and can actually help with certain handling characteristics. I might have to flare my rear fenders, as I do not think I'm going to be able to reduce the rear width the full 9" (4.5" on each side) or so I originally measured without some pretty significant clearancing wizardry beween subframe and coil. I'll have a better plan of attack here once I've got everything semi-permanently affixed to the frame but either way what this is telling me is that I'll probably need to refrain from fully welding in this frame modification until I've got the suspension completely located. I'm also eyeballing putting in a set of rear discs rather than these drums, as I'm not a huge fan of drum brakes and well... I'm already really in the weeds so why not just do it from the ground up? Might get a little more in on this over the weekend, but I'll be playing that by ear. Until the next one! -M - Last week
-
 If that device on the dryer is good it sounds like you have a bad contact - or not the correct amount of refrigerant in the system. You should have two electrical devices in the system - a low pressure switch and and high pressure switch. Either of these will disable the system to protect it from damage when the gas pressures aren’t correct/within an operational range.
- 1 reply
-
- 1
-

-
 My '92 Legacy hasn't had working AC in a long time. However, I recently brought it to my mechanic and he tracked the issue to a couple connectors under the hood. The receiver/drier has an electrical connector coming off it that connects with a different connector right next to it. He disconnected them, jumped two of the contacts on one of the connectors with a piece of spare wire, and BAM, the compressor turned on and the car started blowing cold air. My mechanic said at one point he was able to get it working without jumping the contacts by simply disconnecting and reconnecting the two connectors, but that was short loved and now isn't working that way. What exactly do I need to fix here and where can I find replacement wires or connectors? I'm not sure where to start. Attached is a photo of the problematic connectors coming off the receiver/drier.
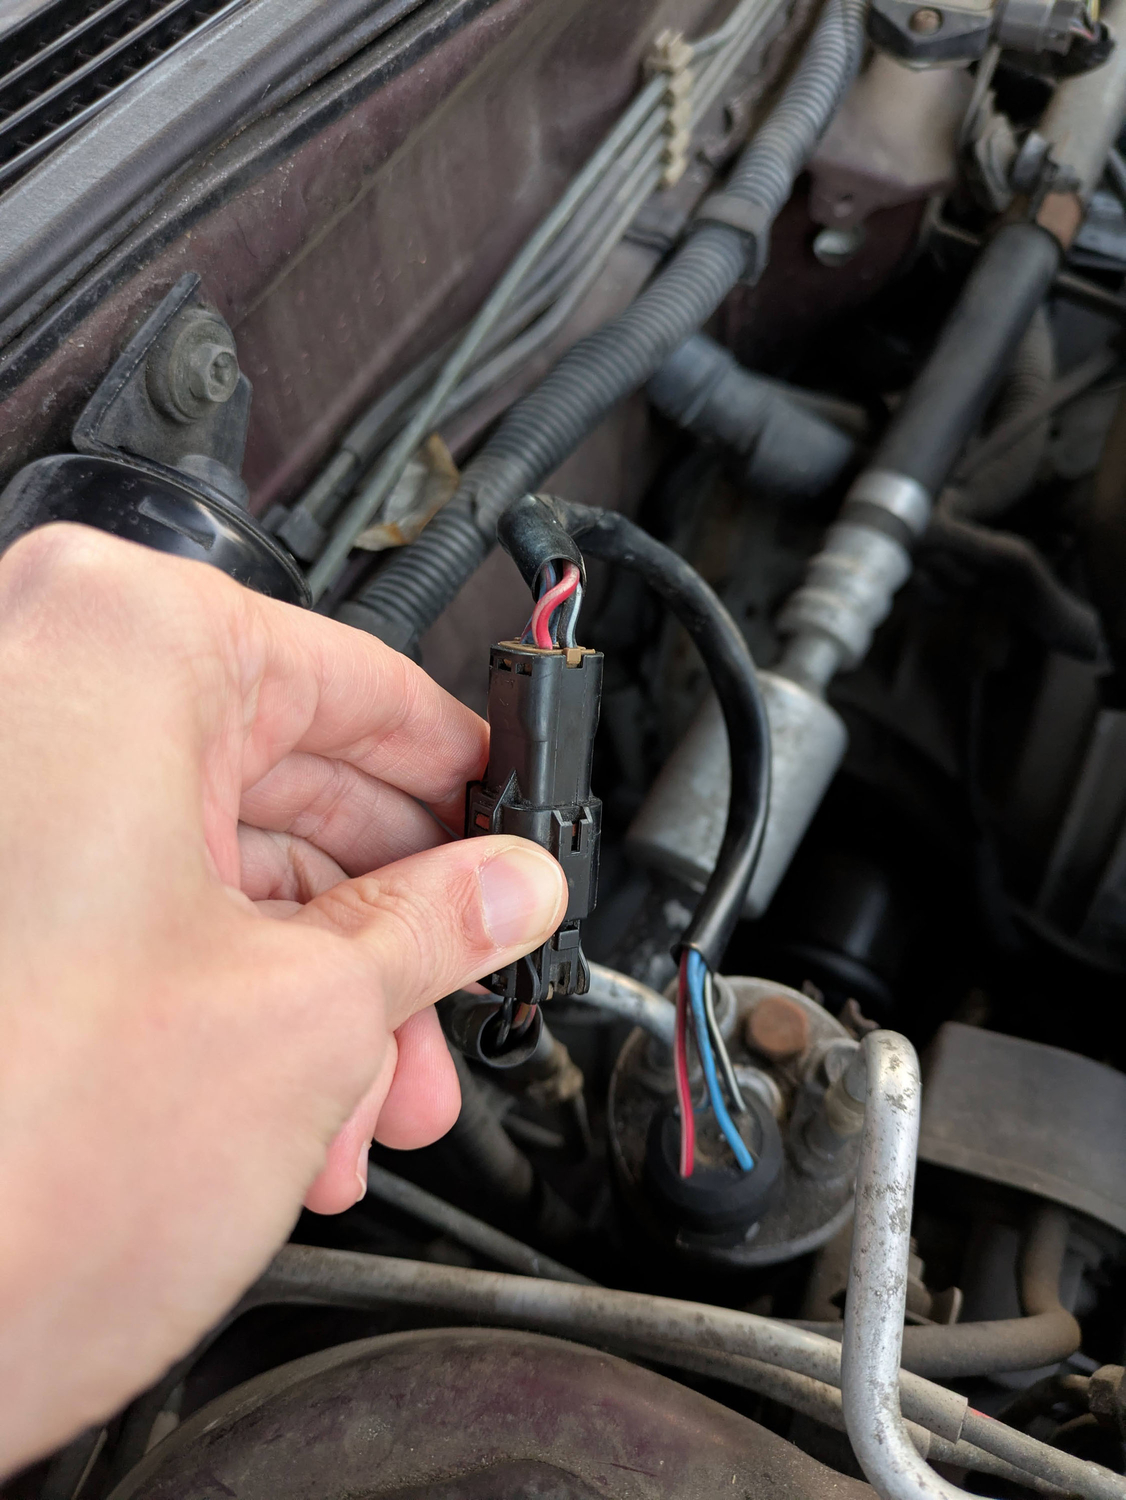
-

3-Time Owner Looking To Get Back In the Game
newmexguy replied to WYLDE007's topic in Meet n' Greet. Your USMB Welcome Center
Offed a southern NM bodied five speed 4 x 4 wagon body three or so years ago. Simply too far from the "buyers", wherever "buyers" may be. Put it on craigslist several times over. A young man from Ruidoso came and bought the carcass for $300, he had previously bought the 49K spare EA82 engine I had. Threw in many of the extra parts, as finding homes for them is certainly not easy. Believe his name was "Wyatt" I might have his contact info, in one of my old phones. He might have other stuff, including southern NM hulks. You could also try the AZ user, here, "azdave". Am sure something could be uncovered in metro Phoenix. -
 Hoping someone on here can either point me in the right direction, or has some that are laying around that they are willing to part with? There’s a couple numbers thrown around as far as flow goes, 450cc,440cc under usdm testing standards. I’ve also heard them described as 380cc under jdm, not trying to start an argument on flow, anyways just trying to get my hands on some injectors. I believe they are the OR05 from what I’ve gathered. I’ve tried eBay but I’m not sure if they just put the pictures of the right injectors on there and send you spoob, so was trying to find a good source before sending Australia 300 bucks. Thank you!
 -
long travel Outbacks or making Subarus faster and more reliable offroad
el_freddo replied to pontoontodd's topic in Off Road
Yeah I’m well aware of this. In some ways I’m jealous. And in other ways, seeing what dipsh!ts have made regardless of our modification laws, part of me is glad we’re not a free for all! Sounds like you have it licked, should be good once it’s all setup! -
 Load Ground Power. You need a good complete circuit. Since this started when you changed the battery cable, I'd back up to there!
 -
Door Trim Repair
SuspiciousPizza replied to SuspiciousPizza's topic in Old Gen.: 80's GL/DL/XT/Loyales...
I've been looking at the rally Leones and their brush guards and I was thinking something inspired by that. Something that mounts to the bumper and wraps around the side to cover the running lights. I'm buying a spare bumper from my parts guy so I don't have to modify my factory bumper. I plan on using industrial rubber vibration dampeners (originally designed to be placed between heavy machinery and a concrete pad to absorb vibrations). Hopefully these will act as a bushing to absorb impact. Otherwise I'd have to figure out some sort of suspension system for it. The rubber dampeners seemed to be the simplest solution. Otherwise I could make the mount out of aluminum tubing and bolt that to the chrome moly guard. The aluminum would act as a sacrificial absorber. -
Rich Mixture, Misfire, Stalling
SuspiciousPizza replied to SuspiciousPizza's topic in Old Gen.: 80's GL/DL/XT/Loyales...
I believe not all SPFI cars here in the US came with an O2 sensor. California has more strict emissions regulations than the rest of the nation. The California cars got O2 sensors, the cars sold in all other states do not have O2 sensors. I believe. Regardless, not all SPFI cars have O2 sensors from factory. I have found it interesting that despite my car originally being sold in California, it doesn't have California-spec emissions equipment. It has the national standard emissions equipment. I believe the national standard is just an EGR setup and a charcoal canister. No O2 sensor and no EGR temp sensor. -
 In case you hadn't noticed we have a lot more options for vehicle modifications than Australia. These pumps are 255lph. Assuming this extra tank is 10 gallons that would take about nine minutes. Could have it going before you even start filling the main tank. Worst case you fill up the main tank, pull off to the side for ten minutes, then go back to the pump. Guess I'll find out. I think this will be the simplest way. One hose connecting the tops of the tanks for venting. One hose connecting the bottom of the secondary tank going down through one of the access panels and down to the bottom of the main tank. Have two fuel pumps side by side teed into that bottom hose one pointing each direction. One of those pumps could run the engine in a pinch. Definitely looking forward to the magically increased range.
 -
Find out where that crackling electrical noise is coming from. Try squeezing/wiggling the wiring loom in various areas to see if anything changes, you could have a break of some sort Weird that everything is rhythmical/at a set time interval - almost like your test connectors are still connected. Are you in the rust belt area? It could be worth going over your earths and ensuring they’re clean if not done already.