Leaderboard


Popular Content
Showing content with the highest reputation since 03/18/24 in all areas
-
B assembled the rear suspension on the Impreza. To make the Mustang rear calipers fit the Subaru front rotors I turned the rotors a little thinner, about a millimeter total. Second side I had to run a lot slower than the first. Since the opposite side of the rotor wasn't up against the jaws it was chattering at anything above about 100rpm. Also we only had one banjo bolt so I made another one. Will probably eventually get legit banjo bolts and better caliper mounting bolts but they all work well enough for now. Rear suspension and brakes assembled. ABS sensors and parking brake cables just zip tied up for now. Will eventually remove ABS cables and make brackets to connect parking brake cables. Black stuff running down exhaust is carbon washed out of the engine by excessively rich mixture when we first got the engine running. I cleaned up the wiring in the engine compartment, still some work to do there. Ditto the interior. Ready for the first test drive, just have to lower the car. Been on jackstands for way too long. For some reason the cam signal issue is back. Engine still runs but not as smooth as it has been, so I probably need to call Haltech again. On the plus side we drove the car around the block and everything important seems to work. All three pedals, shifter, and steering seem to do what they should. Didn't notice any tire rubbing or bad noises or vibrations. Didn't leak a drop either.4 points
-
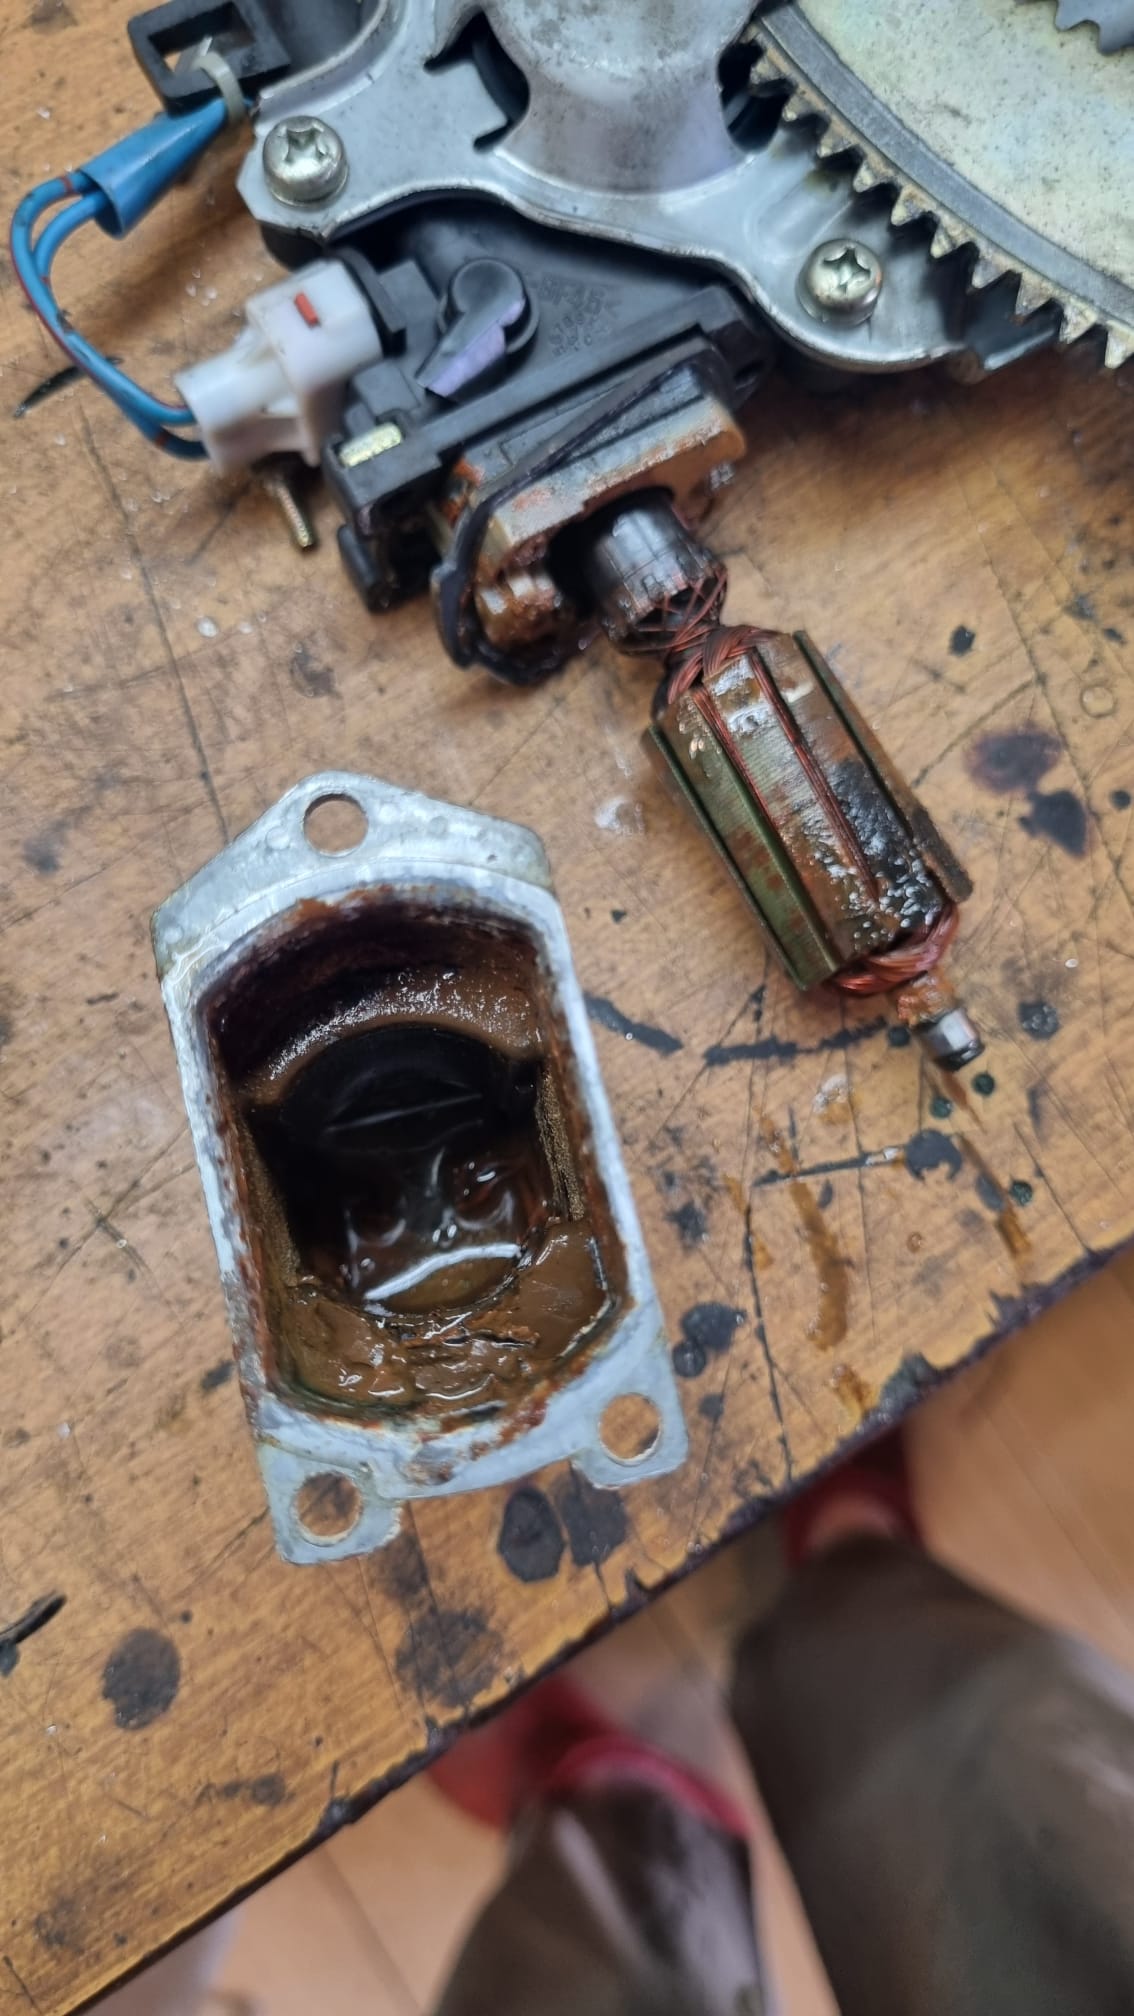
it was one of those rare cases where id say: easier done than said even with the window stuck on up. all done in 20 minutes. in the name of science, opened the old motor, all damage was due to water ingression, god knows how it got there
 3 points
 -
Likely need to swap the crank and LH cam sprocket from the old engine. The tone wheels for the crank and cam sensors are part of those sprockets, and there are a couple different patterns.3 points
-
A lot of these pictures are going to be just admiration shots. I'm sure everybody will understand. Both '87s! Fun fact, that's not actually an El Camino, it's the lesser known GMC version, the Caballero. So I finally got a little time to give the BRAT a quick look over. Well first and foremost, I need to get some tires on this thing. At first glance I saw the last two date code numbers on the tires (all four matching btw) was '18' so I knew they were old but not ancient and should be replaced in due time. WELL I didn't notice the date code was only three digits long.... That means the manufacture date is actually *1998* ....🤦 Oi vey. So tires are now a very high priority. The e-brake is not hooked up on either front caliper. I went to attach them because everything seems to be in order but it seems like the lever on each caliper is in the wrong position. Something is definitely not right, when I bolt the e-brake cable bracket to the caliper the cable is way too Forward and not lining up with the lever. In brief glancing it seems to me that if I could re-clock the position of the lever coming off each caliper about 20 degrees toward the rear of the vehicle, everything will line up. As it is right now the lever on the calipers will actually come into contact with the metal bracket the cable passes through. The front left strut is broken. It is detached from the top hat. The weight of the front end holds it all together, but this is a very not ideal situation. I will need to fix that. The rust is there but not terminal. That can be addressed later. The braking system and exhaust system need gone through. They both function but are not very well repaired; more hacked together. All things in time. It still looks great, eh? 210 miles on it so far. 22 mpg avg.2 points
-
Probably overthinking it, I've taken them apart and put them back randomly with no issues.2 points
-
Silicone is a no-go for gasoline applications. The best material I have found is Nitrile rubber sheets (aka Buna-N, NBR, etc.) and it is approved for gasoline and many other oils and fuels. I laser cut it to make fuel pump diaphragms for mechanical fuel pumps in my older classic cars. You can get plain sheets or Nylon cloth infused sheets if you need extra strength. I've bought from ebay, McMaster-Carr, Amazon and Grainger in the past. Plain Nitrile should be fine for your fuel tank sender gasket.2 points
-
Thought at first maybe a cam skipped timing or something but at least according to the Haltech they were still all good. Compression test isn't easy on these as you probably know. Haven't heard back from Haltech yet, will probably call them tomorrow. Will fire it up first, wouldn't be surprised if it runs OK after sitting.1 point
-
We got the Impreza back together. While it was apart I tried to do some wiring with mixed results. We did get the reverse lights working. Spliced a connector on the wires that normally go to the auto trans to a connector that plugs into the 6MT harness. Both bulbs were a little corroded. Then it seemed like we had to shift it in and out of reverse a few times before they'd consistently light up, maybe the switch on the trans was a little sticky or dirty. Was going to splice the VSS in but the Impreza speedo appears to take a reluctor (2 wire) signal, VSS on the 6MT is 3 wire so I assume Hall effect. Will probably run the VSS signal to the Haltech and then hopefully a signal out from that to the speedo. I did swap the coolant temp sensor from the EZ30 in. It's 3 pin vs the EZ36 2 pin. Was hoping this would make the ECU read the temp more accurately since that's the actual sensor it's set up for but it still reads 200-210F while running which I think is higher than actual. Then I ran a wire from the other pin on the sensor to the temp gauge but unfortunately the temp gauge just reads high all the time now when the ignition is on. So much for Subarus being Legos. At least it's not a cable speedo I guess. Will post more details and pictures on the wiring when I figure out a little more. Still other wiring to figure out, fuel gauge still isn't working even though I don't think we did anything to that wiring. Need to get cruise working before any road trips. Also would be nice to have AC but still not sure if we can just give the solenoid on this compressor 12VDC indefinitely. I did clean up the wiring more, it's almost all in loom now, getting closer to being able to put the dash back in. The biggest improvement was in the shifting. The reverse lockout finally works consistently. Even better than that, with no slop it's a lot easier to find the gear you want. I think before there was more slop than actual shifter travel at least side to side. Engine was running great for about a half hour while we were doing some street tuning.We were lugging it up some hills (third gear full throttle 500RPM) to tune for low RPM high load. Stalled it a few times and after one rough stall I restarted the engine and it ran rough. No alarms/codes, air fuel seemed decent, cam timing looked decent. Cruised around town a bit, restarted it a few times, kept running rough. Not terrible but noticeably rougher idle and down on power. Probably unrelated since it was doing this before it started running rough but the ignition timing only matches the map at 2-3000RPM+. Anything below that it was around 3 or 5 degrees even though that part of the map is 10 to 20 degrees. Wondering if there some correction factor I'm missing or if this all some kind of idle region where the timing isn't following the base map. We tried it with and without the long term knock correction, no difference there in timing or whether it ran rough. Sent a log to Haltech, hopefully they see something. I did try reloading the older map and it still ran rough. Other than that everything seemed to work well, still doesn't leak a drop except from the one control arm bushing. We adjusted all the struts for maximum negative camber (didn't actually measure, probably not much less than zero since it sits so high) and the toe seems perfect at both ends. I hadn't really hit any obstacles since the gauge cluster is just sitting on the dash bar but I hit a small speed bump without thinking and the front end completely soaked it up. Rear end kicked a bit but more sound than feel (pile of plastic interior bits in the back). That will be better with a few hundred pounds of cargo in the back. So then of course I started hitting every speed bump and pothole I could find, it soaked them up nicely. It is a little bouncy on relatively smooth pavement, I think due to the relatively stiff springs for the weight. Will see how it sits loaded but might go with softer springs in the rear eventually. This set of struts has the valving a shock tuning expert suggested to us. Should be interesting to trail ride now with this Impreza, B's Forester, and Z's Forester all with significantly different shock valving but the same springs, wheel and tire sizes, wheelbase, and weight.1 point
-
Check the hood emissions hose chart. It may have it. Looks like there is enough material there that you could go to ACE Hardware and get a brass fitting that is a barb on one side and and pipe thread on the other. Get the correct tap and thread it.1 point
-
Finally. Fine-all-LEE. I snagged one. 😁 I mean, I'm in South Central Pennsylvania, and I've been looking for a brat within my budget for almost 10 years. Everything I'd come across was either too far gone; Or just way too expensive ( >10k!) Then it finally happened and, in my usual casual browsing of Face-space market world, I came across the BRAT in the lead picture. The price was good. I had a really nice 96 Brighton I built up over the last 3 or so years, and I listed it on marketplace to fund my pipe dream. It sold in 3 days. On day 4 I was out my door at 4:30 in the morning and on the road in my 1st gen legacy wagon with a dolly in tow, and beginning my 230 mile journey to my destination BRAT. Once there (about 10 after 8 in the morning) I got my first look at the truck in person and it was good. Not perfect, but good. It has a bull -bar on the front that looks pretty bad-rump roast and I'd love to know more about it (dealer option? Aftermarket?), and a rear bumper with a tow hitch and missing the end caps. Speaking of caps, all the center caps were present too, and as an added bonus at some point in the truck's life somebody added seats to the back (this being an 87 model, the only year they didn't come with the seats in the US as far as I know, also why it doesn't have the built in step in the rocker behind the door). The original seats (interior ones) were replaced with some newer model Subaru seats, but the guy still had them. I started it up, drove it up and down the driveway, checked the 4wd worked, made sure nothing was gonna fall off of it, threw the original seats in the back of the wagon, strapped the truck up and hit the road! (Look what followed me home!)1 point
-
A few STI 6MT assembly tips and questions. So it seems the reverse lockout arm should be spring loaded towards the front of the car as shown in the picture above. Then the cable at its normal length will hold that arm so the hole is lined up with the case and it will be locked out of reverse. Pull on the cable and the arm will swing out of the lockout position. Had a heck of a time getting these lugs lined up to put the bolts in them through the side of the case. Finally I propped the lower one up with this little scrap of sheet metal. Got the bolts started and then opened the case just enough to pull it out with a tweezers. Main shift shaft has this large ball spring loaded against it but no notches. Is this just to add friction? There is a mark on the shaft where it looks like the ball was rubbing before, I don't think I've assembled it incorrectly. There's a notch in it towards the top that is for the neutral(?) sensor. Shift yoke roll pin hole is very oversized. Seems round, not worn, probably for a different trans? Welded the holes on both sides and ground them out to about the same size as the selector shaft on the trans. Hammered the roll pins in, no slop now.1 point
-
Good time to paint your rims if getting new tyres - do it with the old tyres fitted so you don’t need to stress about overspray on the tyre itself. You should know glamour shots are ALWAYS welcome/appreciated! Cheers Bennie1 point
-
Sounds right in line with any east coast find Subaru of the 70’s or 80’s. Pretty much the items that make it stand and stop. And maybe add in occasional fuel delivery if a true rust bucket or longtime sitter. Those black round things I think tofu won’t have as hard of a time if you go with the 165’s Good luck, and enjoy! Similar situation here with my 79. So if the stars align, where do me meet up? Barrens? Carlisle? Most of the northeast vintage Subaru people keep real low profiles. There’s a good amount but getting folks gathered is like herding cats. So I’ve heard.1 point
-
when i was poorer i made my own with a piece of thick wall pipe, some drifts done on a lathe and the biggest threaded rod i could find, think it was a M14 or M18. it wasnt fun, a bit sketchy too, but it did the job, Where there's a will, there's a way1 point
-
I know which one is pick out of that bunch! And your worst nightmare - filling that thing up with fuel must cost an absolute packet! Plus it’s not where near as cool as the BRAT! Cheers Bennie1 point
-
About 250 miles after getting this OB running, alternator belt squeal made itself known at engine startup and beginning of turns. Found that the PS pump elbow o-rings had hardened allowing air to be sucked in. Found metric o-rings of 13mm ID x 1.5mm CS at my local Ace Hardware for $0.65 each! Added a very small bead of Loctite 517 flange sealant to face of elbow just above top o-ring groove to make sure no air gets in. No more squeal! Found that driver side crankcase breather hose connector on H4 airbox had cracked. Tried JB quickweld but that didn't hold. 30 M1 carbine brass is just right OD to fit inside this plastic nub and GOOP plastic weld bonds well with airbox. Saved a trip to find a replacement H4 California only airbox!1 point
-
Youse guys down under are absolutely nuts. That whole country/Continent (countrinent? Continry?) sounds insane and full of ways to be killed lol, cheers to you all.1 point
-
And you’re about right with the cow catcher. I’m sure the five poster came from mustering cattle in old jeeps and land cruisers way back in the day - then they made their way to the front of road going vehicles. You can buy them for newer model vehicles too. I’d love a set of scrub bars for mine that then drop down below the door sill. And it looks heavy, but it’s not. I’d say several kg heavier than an alloy bullbar that’s commonly seen on Brumby’s over here. Cheers Bennie1 point
-
Like I said I prefer the exhaust as quiet as possible. I know it won't be like a stock EJ22 but for long road trips quiet is best. I am using a standalone because I wanted to use an EZ36 and as far as I know that's the only way to do it with the variable cam timing. You could maybe swap the entire wiring harness out of a donor car but the standalone is probably easiest. I expected wiring issues and troubleshooting but so far it hasn't been too bad. Overall I'm not sure which is more complicated (the first time), the harness merge we did with the EZ30 or this standalone wiring job. The standalone is more expensive but also allows you to tune the engine and do all kinds of other things. B and I did a little more tuning and then decided to take a break. When I went to back the car out of the garage it kept popping out of reverse. By trying to hold it in reverse it would kind of work but still kept popping out. I'm guessing the root of the problem is we've never had the reverse lockout working properly (in this car or the black Outback) and it's seen one too many grinds. We think we have the cable adjusted right but need a spring and probably a bracket to get it working right. We checked some things and accepted it was probably in the trans so we removed that. I had bought a mostly complete but not fully assembled 6MT from a local shop a few years ago fairly cheap. The reverse synchros and fork in that looked fresh so I figured we probably have all the parts we need to fix it. Got the trans out of the Impreza mostly apart but couldn't get the gear stack out last night. This morning I looked it up and found you have to remove the oil pump to get at a snapring that holds the input shaft in place. Synchro teeth on reverse are definitely worn. For reference, good synchro teeth. I think the biggest issue is probably the plastic pads on the fork being worn off. Even the center pad is worn. For reference, good stock fork. So I get to reassemble and reinstall that. Two steps forward one step back or something. While it's out it should be fairly easy to make a bracket and add a spring for the reverse lockout. Before we pulled the trans we did weigh the car. Fairly complete, full tank of gas, 3245# total. 1900# front, 1345# rear. About 250# more weight on the front axle and 100# more than the rear compared to stock. With a few hundred pounds of cargo and a heavier rear bumper the weight bias shouldn't be too bad. I haven't pushed it yet but the cornering seems decent. Rear brakes definitely lock up first but it has bigger diameter rear rotors than front. Will probably eventually put bigger rotors on the front (second gen Legacy/first gen Forester, same as the rotors we're using in the rear).1 point
-
Thanks bud. Harold was pretty clean when we picked him up in 2022, but you know how car guys are, we had to bring him up to the next level. We had heaps of help from a lot of really good people along the way. I had folks from all over the world send us parts, the fellow who helped with the paint and body work was a real legend, and the guy who reproduced the graphics was amazing. Believe it or not, the hardest bit to find here in the states was a matching set of front factory mud flaps. The Subaru color was number 243, "Cosmic Blue", and the closest match after 40 years of paint fade from being in the high desert was actually a late 1990's Volvo color. Our paint guy spent many hours tweaking it, so it matched from every angle. I had no idea, the "flop" as it is called (the shimmer from the metal flake) looks different on different parts of the car, and in different light. Part science, part art, and part voodoo. I'm pretty handy with a wrench, but there are two things that I'm afraid of... one is body work, and the other is automatic transmissions. Thankfully Harold is a four speed manual, and the only bit of electronics is the silly digital clock mounted in the dash. I appreciate the kind words.1 point
-
Thanks for the tips, mate! That 5 post is nuts, and what's that quote from? Canonball run? That bull bar like like what we call a cow catcher that would be on the front of a train 🤣 The brakes actually feel pretty good, but I look forward to looking over the rear brakes as well as the rest of the vehicle when I can, I wish I had the time. So far I've literally just replaced the battery, changed the belt, replaced the brake hose, filled the gas tank, checked the tire pressure, and drove it. 60 miles about now. Those rear manual adjusters sound just like the ones they put on the 2wd Leone's/loyalest. I'm familiar with them. I love the adjustable suspension set up on these things. Super cool (along with the rest of the truck) The one thing I look forward to getting sorted sooner rather than later will be the lack of emergency brake.1 point
-
Congratulations again and great to see more classics in the northeast. Enjoy! Post back your car show trophies.1 point
-
You guys got all the cool colours over there! We got white, red, beige and a silver one that I believe was a limited run. Also interesting to see you have a bumper mounted side indicator rather than having it in the front guards/fenders. All of ours are in the guards. Very tidy looking unit! I love that desert fox decal down the side. Cheers Bennie1 point
-
I forgot to add that the brake sponginess is most likely due to the rear brake shoes needing adjustment. They’re manually adjust via a small square headed boot on the diff side of the backing plate, under the bearing. If you’re really lucky you’ll have the factory rubber cover on them still. If not no stress. Spray them with some penetrative lube and let them sit, repeat several times of they’re stuck good. You can adjust the brakes with the wheels in the air, this will let you know if they’re too tight or not. The bolt will roll over with a lumpy feel to it. This ensures the bolt can’t back out and loosen off your brakes. That will make a huge difference to the feel of your brake pedal. It could be worth removing the drums to clean out the years of crap that will be in there. Also a good time to inspect for slave cylinder leaks and the general condition of the brake shoes. Cheers Bennie1 point
-
Awe geez you found your way into the great USMB. Get your ticket for the WBM yet ? Welcome or welcome back whichever may apply. Car looks great!1 point
-
Looks good l75eya! Bit of rust that us Aussies baulk at but seems to be no issue on your side of the world. I’ve not seen a rear bar like that before, looks tidy even without the bumperettes to finish off the sides. Good score on the targa top too - not really a targa as I found out last year but that’s what they’re know as over here. If you’ve still got the instruction sticker on the roof lining panel the roof glass is referred to as a “fun top”. And I have to say it - modifying a classic quote from a classic Aussie movie you guys would probably know… “That’s not a bullbar… …THAT’S a bullbar.” I’m sure if you can weld in new panels to fix that rust you could weld up one of these five posters while you’re at it I’m looking forward to seeing where you go with this one! Cheers Bennie1 point
-
After another 230 miles of mostly mountains (Leggo did great!), I got it home. When I finally got some time to give it a little attention I looked it over a bit and found the alternator belt was WAY too loose. The wrong belt was on the car, seemingly. This brat has no AC and no power steering and I think the belt was for a power steering equipped model so that was the first order of business. After getting the right belt on there, I felt confident in it enough to take it for a test drive. That was all going great until I had to cycled the brakes a few times and noticed the pedal ongetting progressively more stiff and the motor laboring more and more to keep moving the car. The brakes (at least one of em) were hanging up bad. Pulled over and it became very apparent the front left wheel was super warm and smelled like brake pad. I made it half a mile! Lol Fortunately I happened to be looking through rock auto a couple days prior and noticed a front brake hose on wholesale closeout and decided to buy it completely unknowingly and just because it was super cheap ($3!) that worked out well because it came in the next day, I slapped that SOB in there, bled the line, and hit the road again! Checked the air in the tires, filled the tank, hit the car wash. In all it's glory. And here is the earliest service record I was able to find. This explains the relatively good condition it's in. She's a WEST SIDE unit.1 point
-
Moosens described checking if the cam timing is correct My bet is that the crank and LH cam sprockets are incorrect. Pull the covers and check the crank sprockets (can be done without removing the timing belt) between the 2 engines. But yea, swap the manifold gaskets for the correct ones. Pull trouble codes before taking stuff apart.1 point
-
Its best to start a.new thread for your problem. Things that can cause bad running- first things to check, in no particular order - Bad fuel, Bad coolant temp sensor. Low fuel pressure, blocked cat.1 point
-
Think I found a big part of my problems. That's the signal wire for the main cam. The purple wire next to it is the temp sensor which was bouncing around the last time I ran it. With that wire fixed it now picks up the main cam signal pretty consistently. Coolant temp is reading steady. Fuel injected is back to a reasonable amount too, still not sure what was causing the super rich mixture. One exhaust cam isn't reading consistently, checked that but it looked and maybe felt a little bit loose, crimped it more and felt solid but still losing that cam signal occasionally. Ran a lot better but broke up around 3000rpm. Low range works. Put the cam timing base maps and duty cycles back to their starting points. Tuned the duty cycles a bit so the cam angles followed the target fairly close. Ran better, pulls strong but seems to be running pretty lean under load. Got the brake lights and turn signals working (simple fixes) but gas gauge still isn't working. Put it on my insurance. Still needs more work but nice to have it running and driving well finally.1 point
-
If you have the space, a 20 ton press from harbor freight is handy for older wheel bearings, I've done a few. There's a used KD hub tamer on Ebay, might be missing the two-jaw puller, same set also on CL for over a month, but I've not used one before.1 point
-
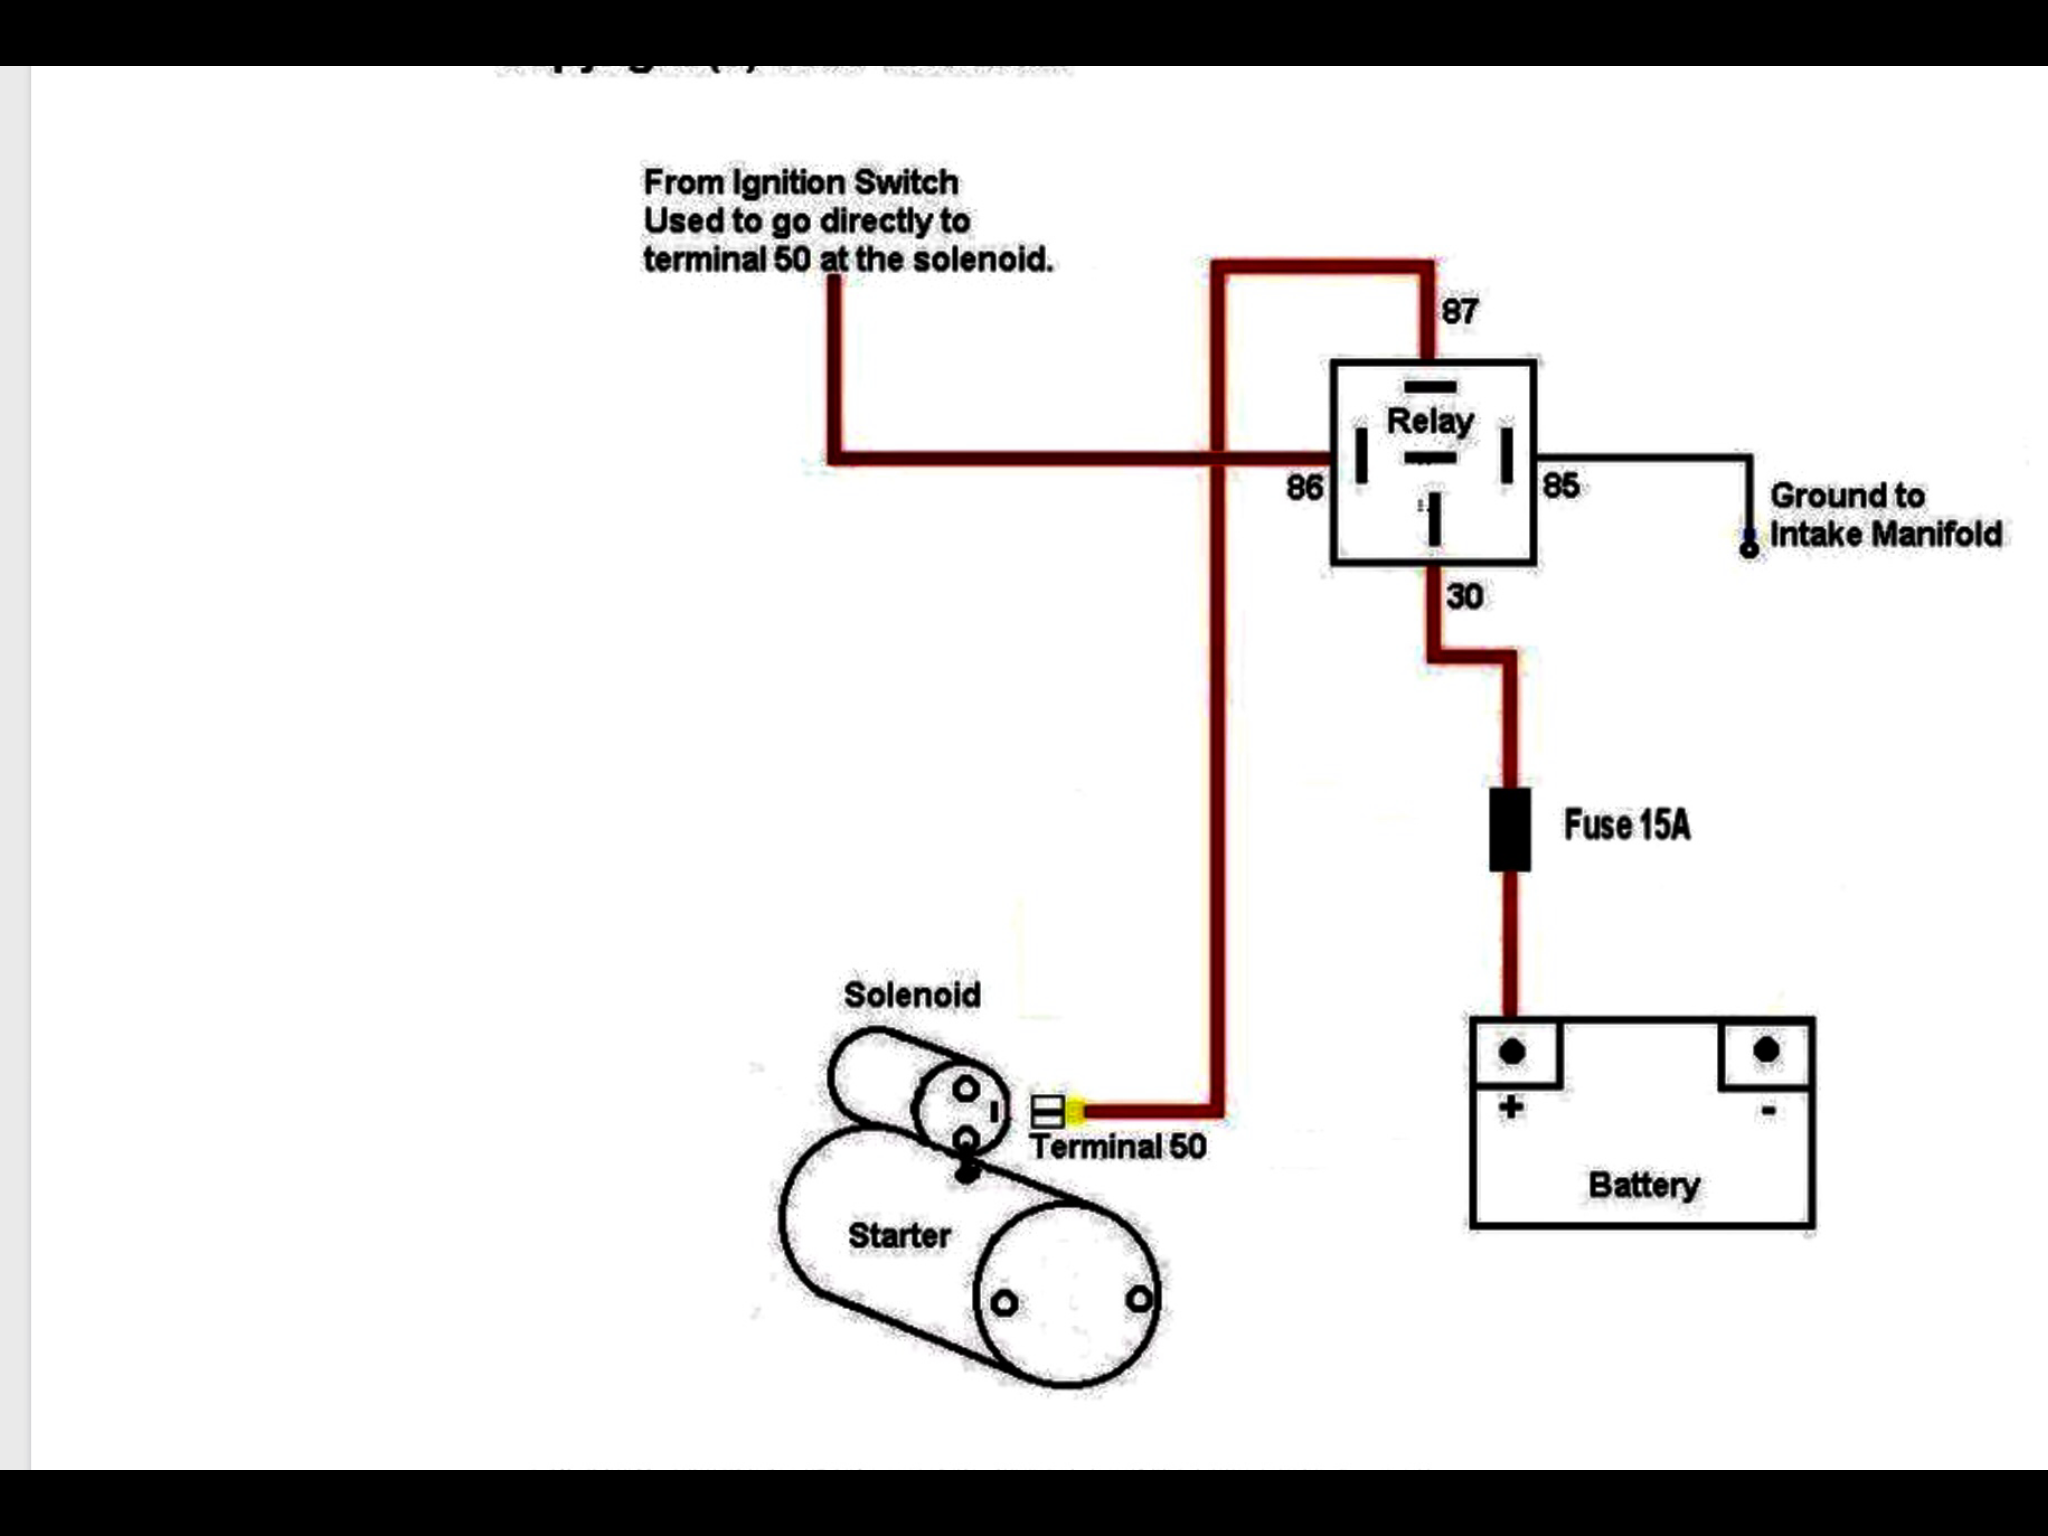
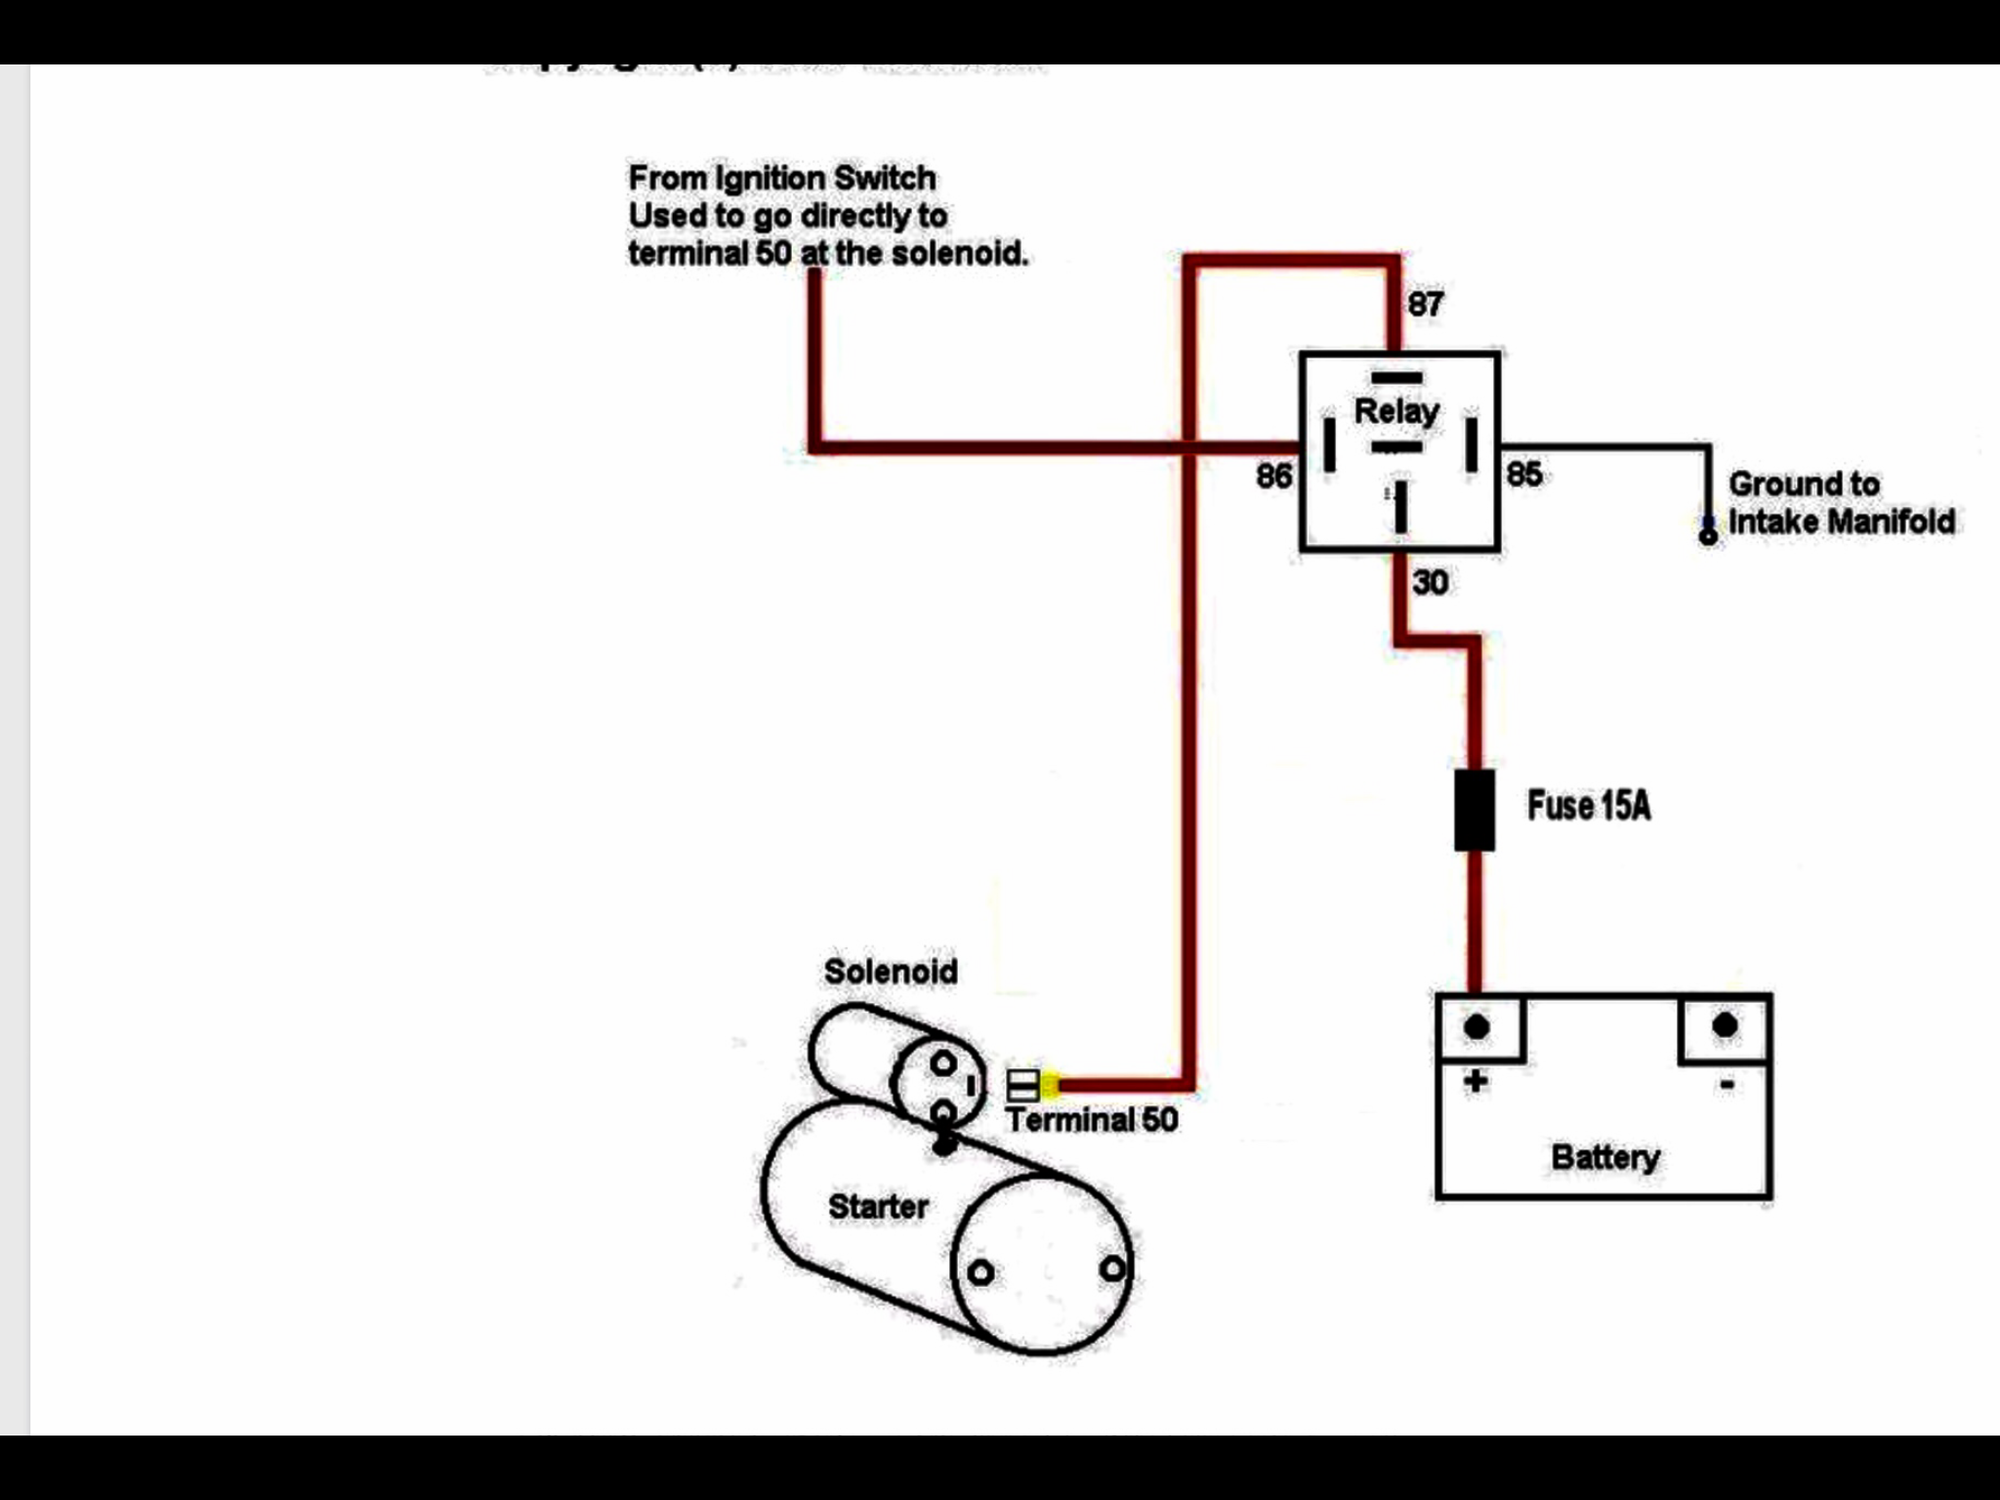
So they sent me the wrong switch (or I just ordered the wrong size) but still plugged in. After that the voltage jumped up to 5v in the ignition coil. Spend some more time messing around and found that the fuses I bought were another problem because they were slightly skinnier and longer than the original ones so replaced that and it would start and run on her own! But I had to jump the starter still. So I replaced the starter to see if that was it and no it wasn’t so then I did the extra relay solution and now it works great. Just in time for the snow we got! Thanks for the help Brennan.1 point
-
Ignition switch should be held in by two Phillips head screw/bolts opposite to the side that the key goes into. You should only need to remove the steering column cowling and maybe drop the steering column off it’s mount bolts to get more access. You don’t have to pull the ignition barrel out to replace the ignition switch! That has the funny looking bolts without a head on them. They’re designed to snap off once torqued up so the ignition barrel can’t be easily removed by thieves. I’m not sure that the starter relay mod will dive this issue since you mentioned it cranks over fine and will run in the start position but die in the ON position. You’d only need a 30a horn relay - same as what you hook driving lights up with. Cheers Bennie1 point
-
Adding a relay to the ignition circuit may help.
 1 point
 -
(the subtitle "safe highway speeds" in the title pertains to engine rpm, not what one's opinion on what speeds are considered safe to travel. This thread isn't about driving habits or opinions on that matter, it is about information regarding gear ratios and engine reliability, maintainance, and engine speed sustainability) Over the years it's come to my attention on many occasions that a lot of people are put off by the (relatively) archaic gearing ea82 body cars have. I can't tell you how many posts I've seen on here of people questioning the high RPMS their car is turning at highway speeds (especially those with the 3 speed automatic transmission) I wanted to make this thread to document certain things I know through my own personal experience to be true, as well as to qualm any fears some people may have in regards to their vehicle and its ability to "Keep up with traffic" on today's highways. I've been driving ea82 vehicles for about 10 years now, and in those 10 years I've driven a good variety of their different formats: A 93 3 speed FWD SPFI Loyale I drove around for a good 6 years or so, both on the highway and in city driving. I took it to Canada and back from New Jersey An 87 dual range 4WD 5 speed carby GL I drove around for 3 years, both on the highway and in city driving. I drove that car across the country four times. An 86 push button 4WD 3 speed MPFI turbo GL-10 that is a current project I have that I have driven on the highway a few times and around town every now and then a 93 5 speed FWD SPFI Loyale that is currently my daily driver. I drive this car on the highway a-LOT, and around town a-LOT. In fact I drive this car....a-LOT. I've put 16,xxx on it over the past 10 months and 700+ miles on it just this past weekend. I am also an automotive mechanic and I am the sole person who has maintained each and every one of the above cars while they were owned by me. The key component to driving any of these old subarus around so much is to have confidence in them, and, knowing that I am the person responsible for their upkeep, that confidence is something I have never lacked, and I drive my cars accordingly. That being said; Regarding the 3 speed automatic cars, yes, you can do 70 mph in it. It's not going to explode. At least not unless it was going to for some reason or another anyway. I recommend that you stay on top of your oil changes (I use mobil 1 conventional 10/30 or 10/40 oil + filters year round in all my vehicles), and that you are confident in the condition of your timing belts and components. The issue here is that at 70 mph you're going to be running that lil ea82 at about 4,100 RPM. Now that's no big deal to the short stroke boxer motor itself (these engines are used in airplanes where they run high RPM for hours), but it's your alternator, your waterpump, and your timing belts and their pulleys and idlers that may complain here. If you just picked up a 92 Loyale with 38,000 miles on it that means it has slept a lot in it's 25 year existence. The bearings in that original alternator aren't going to like being subjected to you running the motor at 4,000 rpm for long. Neither is that super dried out and old timing belt. This goes for any other car, but the 3 speeds especially because of how poorly they are geared for highway use. So basically what I'm saying is that if you plan on using your 3 speed car on the highway, please make sure important components such as those I've mentioned are in good shape, and/or have spares at the ready. Also make sure the transmission fluid is in decent condition and the differential oil is as well. My real world experience with the 3 speed car on the highway is well over 10,000 miles. I drove that 3 speed loyale from NJ to Toronto doing 65-70 mph basically the whole way. It took a long time, but that was hours and hours and hours of sustained 4,000-ish rpms. And it'll get about 25 mpg at those speeds. I've also peaked a 3 speed auto at 100 mph @ 6,400 rpms. Out of curiosity. I've also driven a 3 speed auto car at speeds in excess of 75 mph for over 3 hours straight. Moving on to the 5 speed dual range 2 things; It is awesome. Please check your gear oil. I burned mine up because I drove it across the country twice without following my own advice. That being said it had no problem running 65, 70, 75, 80, 85 mph but my god the thing was gutless climbing those mountains out there. 3rd gear with my foot to the floor barely maintaining 55. This car taught me the lessons about low mile cars. I bought this 87 GL in 2012 and it only had 46,000 miles on it. I slapped plates on it, loaded it with people and stuff and took it from NJ to Nevada twice. The first trip I had 2 things happen; the water pump gave up the ghost as soon as my 5,000+ mile trip concluded and I was back in my hometown, and the 28 year old gear oil had (unbeknownst to me) turned to water and I fried the trans. I took it across the country again with fresh gear oil a second time and had no trouble, other than noise. Risky, but it did it. I still have that trans, and it still worked when I pulled it, just made lots of noise. I'm not even going to touch on the 3 speed push button in the turbo car because I don't drive it much. All I can say is that it seems to be geared differently than the FWD naturally aspirated car. 4,000 rpm is about 73 or so mph in it, whereas that would be 68-70mph in the FWD car. Last, and most extensively researched but surely not least is the FWD 5 speed in my daily driver Loyale. I have numbers due to recent curiosity: (All numbers are while in 5th gear) 3,450 rpm - 78 MPH 3,600 rpm - 80 MPH 3,900 rpm - 86 MPH 4,200 rpm - 89 MPH 4,500 rpm - 95 MPH 4,900 rpm - 98 MPH 4,950 rpm - 100 MPH 5,100 rpm - 106 MPH I find myself typically cruising at about 80-85 mph and my ea82 is humming along comfortably in the 3,600 - 3,900 rpm range. Right where the old 3 speed auto I used to drive would comfortably sit while I jostled along at 65 hahaha I find this convenient because anytime I notice I'm around 4,000 rpm, I know I'm going a bit *too* fast. I honestly find myself looking at the tach more than the speedometer. Once you get past that 4,500 rpm threshold though, two things happen: You lose the ability to (relatively) easily maintain speed (You can hold 95 without having to have your foot to the floor the entire time) and, you really start pushing the limits of your motor. I've run these engines at over 5,000 rpm for a couple hours and nothing catastrophic occurred, but I really would advise against anything over 4,500. Not to mention, there's no more power up there anyway. It all starts around 4,000 rpm and just rapidly drops off over 4,500. So to recap; 4,000 rpm = OK 4,500 rpm = Still OK! Over 4,500 rpm = Not smart. Make sure your timing belts and pulleys are good Maintain your vehicle HAVE GOOD TIRES (don't go flying around on dry-rotted tires from 1996) And every bit of information I shared in this post is entirely based on my personal experiences with various ea82 subaru vehicles over the course of the past decade. Your mileage very well may vary (And it probably will as the FSM shows a good bit of gearing variation through the 1985-1994 ea82 run).1 point
-
I don't know about newer axles, but for 2007 and earlier were all made by NTN. Look for the NTN stamped on the cup. If the axle doesn't have a name stamping or serial number, it's an el cheapo.1 point
-
hold onto the bad trans until you know the donor trans pan isn’t dented and it doesn’t have toque bind. And it’s not missing the torque converter, stubby shafts, or shift switch on the passengers side. Usualky they just come with all that stuff but I’ve seen all of those missing or damaged before too. but in general, Nope. They’re basically the same trans with slightly different guts inside and all that stuff usually stays with the trans Torque bind isn’t uncommon so if you wanted you could save the rear extension housing (it’s like 6 or 8 easy bolts and it pops right off). It has the 4WD clutches and solenoid. Or just hold onto the trans At least until you drive it and verify the donor trans doesn’t have torque bind. Then throw it away or keep the rear housing if you have room. make sure he knows how to properly seat the torque converter, if you don’t the oil pump will crack inside the trans. The torque converter and flex plate should not touch when the trans is bolted up to the engine and installed. The flex plate bolts will draw them together.1 point
-
I would simply top off the oil at every other tank fill rather than risk all that can go wrong having someone swap in another block. Plenty of things can go wrong after an engine swap on a used car and then the blame game begins. I agree with thicker oil as well.1 point
-
Should be.1 point
-
Sounds like it may need to go to the dealer. Was the windshield replaced recently?1 point
-
Probably transfer clutches. Get them new, and fix it. You don't have to pull the transmission, and a used trans is likely to also have worn clutches. Also inspect all rear suspension and diff bushings. AWD could be engaging normally, but a bushing is clunking when it's loaded.1 point
-
Not seeing a lot online when I helped a friend do this, so my .02 for posterity. Disclaimer - If you work on your own car, you're also RESPONSIBLE for what you do, as I'm 100% NOT RESPONSIBLE for you. Be smart and safe! - Started with an '03 Legacy wagon. The 'Special Edition' model that was actually the standard for the '03 MY, for the Sedan and Wagon - Cars101.com. This should apply to any '00-'04 model and as far as I've seen the sedan uses the same suspension setup. - I spent some time trying to discern if the strut body or the spring or both raised the REAR of the Outback/OB - along w/the sub-frame spacers. The online Subaru parts catalogs were no help as they showed the same part numbers for the strut AND spring for "L" and "OB", which was confusing. Not sure what - if anything - I was doing wrong. But I did note that KYB sold different part numbers for the L and OB strut. Here's a comparison of the the 'L' on the left and 'OB' on the right. Looks like it's the 'strut' that provides the lift - not the spring - although the OB is heavier, so maybe the springs are stiffer? - Originally thought about adding spacers to the OB front and rear struts/shocks, but the type the owner bought required spring compressors. ---------------------------------------- - Ended up with the OB struts front and rear - for now. May add the spacers later. - Owner bought some OB 'quick struts' for the Front, which I had my concerns as most of the aftermarket options are not high-quality. But KYB didn't make a set for the front or rear. - I grabbed a set of used OB Rear struts from the local yard. ---------------------------------------- - Installing the front struts is an easy process - just remember to mark the head of the top bolt's (at the hub/knuckle) orientation to keep the alignment (camber at least) close. ---Sidenote: Don't bother removing the brake lines on the older Subarus ('99 and older). Pull the retaining clip (note how it attaches!), dremel or hacksaw the bracket on the outer edge, bend it out of the way, remove the brake line, install new strut, install the line, realign the bracket, and pull the line's hose fitting into the bracket toinstall the clip. - The rears were more of a challenge, mainly because it can be a 2-person job to jack up the rear and align the bottom bolt at the same time. - A couple different ways to do it after installing the top and screwing on the nuts: -Jack up the knuckle just outside of the mount point, which worked for us. -Use the car's scissor jack between the car's body and subframe to spread it up and down at the same time. We didn't try this but worked for others. CAREFUL as the scissor jack could slip! -Torque everything down - look up specs online. Edit: With the 215/65R16 General Grabber tires installed. They are ~ 1/2" taller than the stock OB 225/60R16 tire. ---------------------------------------- For Tires, owner is looking at an AT tread - likely a Yokohama G015 or the ubiquitous (at least on Subarus) Falken Wildpeak. Looks like a 215/65R16 will fit best and it has the most tire options, but could go to either a 225/65R16 or even a 215/70R16, if they can find an AT tire in those size. But those do make a tight fit on the rear fenders. Spare tire- I brought along a 225/60R16 to use as a spare - IT DOESN'T FIT in the Legacy's rear tire well, and I'm guessing that means the OB must have a temporary spare, too. Kinda sucks.1 point
-
I swapped the stock fuel pump out for this Deatschwerks pump a few weeks ago. Will keep stock one as a spare. Z wired some plugs on my light bars that plug into the stock fog light plugs. Engine compartment is getting close. Have to mount the PS reservoir and clean up wiring. Got the cam sensors to show up on the Haltech but the engine won't run with any of them connected to the main cam signal, waiting to hear back from them on ideas there. Also have to have super low values in the VE table to run close to 15:1 at idle but we have gotten it to do that now and it runs pretty smooth and smoke free. Got the parts back from paint. B installed bushings in the various rear suspension components. Used Whiteline mainly for ease of assembly. Ordered some R180 inner CV dust shields and another wheel bearing, then should be able to assemble all that. Fuel tank guards installed. Transmission crossmember/skid went in much more easily than we expected. Usually after removing these things and welding them off the car there is some amount of bending and hole slotting required. Middle portion of exhaust not fully installed, might have to come back out to install stock shifter. Waiting on bushings and roll pin for that. Front skid installed. A little bending and slotting was required to get that to bolt up to the bumper but not too much. Front bumper and lights installed. Car is getting really close to driving but there will still be a lot of things to do.1 point
-
1 point
-
@Uberoo - going on from protontodd’s thread: you asked me about strengthening the L chassis after I made some comments about this. Below is what was shared with me. That’s all I’ve got and it’s not great quality in terms of sharp detail. Hopefully that gives you an idea of what was done for the rally vehicle setup Apologies for the delay in digging this up. It’s been in the back of my mind for a long time! Cheers Bennie1 point
-
updated the link1 point
-
The AUDM series 1 RX turbo TPSwitch has A22-610 972 stamped in its backing plate. Its three pins not marked but manuals indicate if you look at pins with plug locator central slide alignment guide bottom central, they are A C B In that order C common black ecu ground in centre A &C is idle switch C & B is flat out switch that operates @32° (or 47° AUDM only) Now curious as to Series 1 Vortex XT non turbo were1 point
-
The front drivers side is like a 2.5"x3.5" - there's no direct replacement availible. The passenger side front is like a 3"x4.5" or some stupid thing - nothing for that either. Also - you can't use the factory wireing because it's common ground, so you'll have to rewire anyway. Might as well replace those crappy speaks with something else while your at it. I got some speakers that were close in size, and just MADE them fit - lots of work with a dremel - they are in, but it was a pain in the rump roast (talking about my Brat here). On my wagon, I just disconnected them, and put the tweeters on the A pillar, and the mids in the forward section of the door. Problem with the door speakers is they are really shallow, and anything you get that will fit in there is going to be deeper, so you'll have to space them out. The factory location is REALLY bad as it projects the sound right into the seats :-\ I built custom boxes and mounted them further forward after removing the map pockets. It's a pain to wire in decent stereos into these cars, but it can be done. Had my car ripped up for days doing this.... GD1 point


.thumb.jpg.96479a473cd1ed4b8bac667c0ee181f5.jpg)