illanrob
-
Posts
36 -
Joined
-
Last visited
Content Type
Profiles
Forums
Gallery
Store
Everything posted by illanrob
-
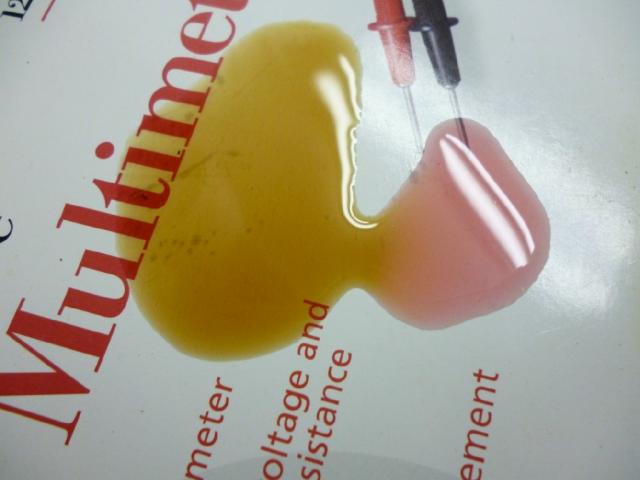
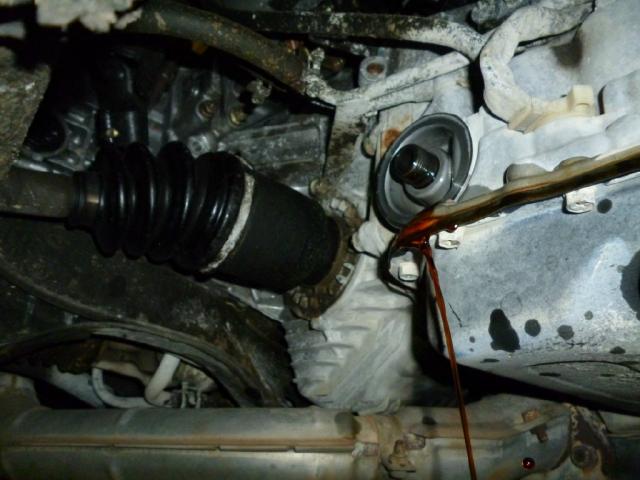
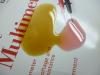
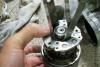
See photo of old 95Kmi transmission oil/fluid (trans tranny fluid) sample on left vs new Dextron III sample on the right and 2nd photo of oil dripping from removed filter connection. Drain 17MM hex bolt/plug is off view to the right of the filter side.

-
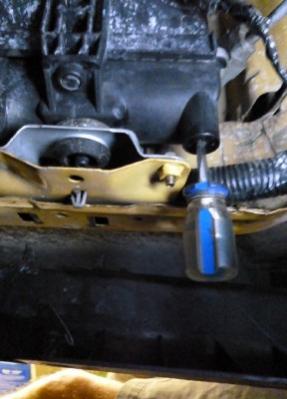
2003 Baja has poor access to the radiator drain plug, the 1/2 inch hole on the under carriage shield would certainly help and provide a better angle to twist the plug back in, else remove the 3 12MM bolts on the front of shield and the extra 3 inches gives enough clearance to get a small screw driver. In the photo a flat screwdriver sticks well in the phillips slot.

-
Looks like you drove the car from the shop, then drove it for a few days and now it will not start. Could be a loose connector: air mass sensor, crank sensor,....these control spark. You should be able to verify if the fuel pump is working, disconnect the ignition coil connector, to inhibit a spark, disconnect the fuel line at the fuel filter just before the injector, then turn the key and look for fuel. You could verify a spark, remove a sparkplug, connect plug cable, let it make contact with chassis ground, turn the key and look for a spark on the plug.
-
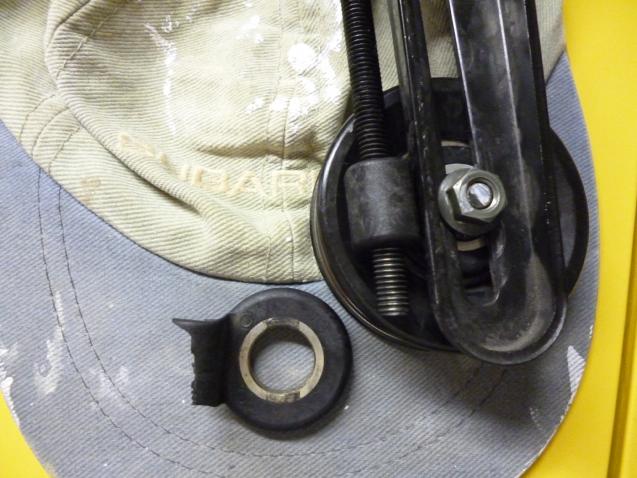
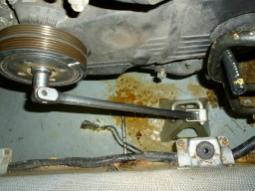
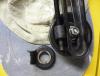
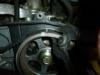
The alternator/power steering pump/crankshaft belt has a metal adjuster while the AC compressor tensioner adjuster is plastic ($12 expensive for a plastic part) which can easily break. See photo of broken adjuster next to tensioner assembly.
-
I go back to the mid 70 Subs 1.6L with the non-interference engines lasted 24 years just waited for things to brake and used a stethoscope with every oil change. The timing pulley bearings on my 93 Legacy 2.2L were good except for the lower cogged, it was replace in 2011 at 195kmi when the head gasket leaked. The bearing was spinning loosely and some grease was leaking. The water pump on the 93 failed at 140Kmi ( was noisier and noisier) and then again at 180Kmi (weep hole leak). The 2.2L belts had 60kmi replacements vs the 03 2.5L 105Kmi. I think that 105Kmi belt replacement is just too long. The 93 Leg 5spd AC never failed too bad that I could not get that head gasket repaired as I did with the '76 L wagon. I must be loosing my touch. On the new car, the 03 Baja, the bearings were good after 9.5 years and low miles. The water pump should last to 150 or 160Kmi and it should give a warning, get noisier. I anticipate running trouble free for the next 50Kmi after I fix the boot on the 2nd axle. All my Subs had axle boot failures at 100Kmi. Then comes the high failure period 150K to 200K.
-
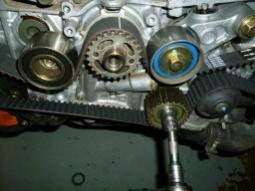
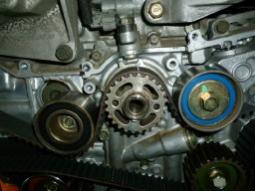
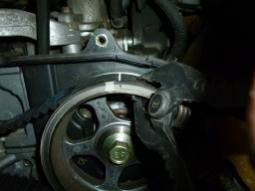
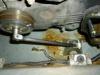
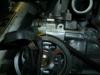
First mayor maintenance on the 2003 Baja the timing belt. Repairs thus far front brake rotors, the axle boot. Removed under carriage cover, radiator (somehow it did not come out easy) and both accessories belts. Crankshaft bolt removal: Used the starter on engine to turn motor over ClockWise while supporting a breaker bar to a jackstand. Disconnected the ignition coil to assure that engine will not start. Removed the crank pulley, easy. Rotated crankshaft until the the two cam and crackshaft timing marks are pointing up. Removed the tensioner, used a vise to press the rod and pin. The compared to 1993 Subarus pin hole is small and the diameter over an inch and can easily bend a nail and extend reducing the available belt slack. Removed the lower passenger side idler and lower driver cog pulley. Reinstall lower pass last. If the tensioner pin rod bends there is less slack and it is more difficult install these two. Attached belt and held with clamps. The driver cam pulley in under tension and if it slips will rotate 180 degrees either way, be carefull here. Notice on the attached photos that the timing marks do not lineup properly. The Dayco belt in not a genuine Sub part. The car started and idled just fine with the timing alignment shown. Good acceleration and my two week old Centric slotted front rotors are great. Where is my K&N air filter maintenance kit?


-
Seven years ago my 93 Leg L 2.2L 5spd was idling poorly from a cracked intake manifold gasket (had two sequential gasket cracks: could still drive with the first crack, then the 2nd gasket crack barely got home by revving the engine high during idle periods) and lifting the intake manifold up 1/2 to 1 inch or so to replace the gasket was difficult for the drivers side in particular. I did not see an easy way to completely remove the manifold without removing the fuel injector rail. At the time I removed a number of brackets or stiffeners to loosen the manifold and did not replaced these pieces. Did not want to create fuel leak issues on this gasket repair and preferred to leave the fuel rails alone. Managed to replace the two gaskets and the engine worked just fine on the first attempt. Seven years later the instructions on the head gasket replacement require to remove the intake manifold. Do I really need the intake manifold off to do this work? Do the heads have to be pulled up? Would there be a photo on what the top of the 2.2L engine looks like just before the heads are removed? I did a head gasket replacement on a '76 Subaru L 1.6L carbureted engine in 1993 (RIP in 2000) or so and that engine had no intake manifold issues.
-
The timing belt change is due at 210K 3rd belt, the car has almost 200K, the water pump replaced at 160K 4 years ago. The old water pump was very noisy as it approached total failure and is located on the driver side head. This leak is from the bottom of the block just in front of the oil pan, an is at the water pump. All 6 bolts were loose, my doing althouth it lasted several years. I got disoriented looking up and confused the two pumps thus posted on this forum for a sanity check. Thanks for the reply. Note that the manual does have a water pump tightening sequence 1 (upper driverside) clockwise to 6 (upper passenger side) bolt order. A 22MM socket takes the crank pulley off.
-
1993 Legacy 2.2L 5spd has a coolant leak at the bottom part of water pump gastek after replacing the radiator cap, the old had 0lbs the new has 9lbs. The pump bolts were loose and the gasket replaced 60Kmi ago turned to mush. Just a steady and fast coolant leak until radiator runs dry. The new gasket with carefully torqued bolts 7ft-lbs did better but still has a leak a drop a second from the same spot. Could the water pump be warped? Will try to check with a straight edge for flatness.
-
Just came to me. When the '93-9X Legacy AC compressor is ON it remains ON until you drive up a hill with the pedal to the metal. This AC cut off switch is intended to give max horsepower to the engine, hence AC goes OFF until you back off the accelerator pedal The fans may run ON/OFF to keep the condenser in balance, but the compressor is "ALLWAYS ON". The windshield defrost works similarly compressor would allways be on and may need to blend in some heat at times.
-
See a good explanation on the txv. I would still say the compressor stays ON, then you blend heat or wear a coat. High AC means in a Legacy that no outside air is coming INTO the cabin, get a bigger coat. Thermal expansion valve From Wikipedia, the free encyclopedia Jump to: navigation, search Thermostatic expansion valve A thermal expansion valve (often abbreviated as TXV or TX valve) is a component in refrigeration and air conditioning systems that controls the amount of refrigerant flow into the evaporator thereby controlling the superheating at the outlet of the evaporator. Thermal expansion valves are often referred to generically as "metering devices". Flow control, or metering, of the refrigerant is accomplished by use of a temperature sensing bulb filled with a similar gas as in the system that causes the valve to open against the spring pressure in the valve body as the temperature on the bulb increases. As temperatures in the evaporator decrease, so does the pressure in the bulb and therefore on the spring causing the valve to close. An air conditioning system with a TX valve is often more efficient than other designs that do not use one.[1] A thermal expansion valve is a key element to a refrigeration cycle; the cycle that makes air conditioning, or air cooling, possible. A basic refrigeration cycle consists of four major elements, a compressor, a condenser, a metering device and an evaporator. As a refrigerant passes through a circuit containing these four elements, air conditioning occurs. The cycle starts when refrigerant enters the compressor in a low pressure, low temperature, gaseous form. The refrigerant is compressed by the compressor to a high pressure and temperature gaseous state. The high pressure and temperature gas then enters the condenser. The condenser precipitates the high pressure and temperature gas to a high temperature liquid by transferring heat to a lower temperature medium, usually ambient air. The high temperature liquid then enters the expansion valve where the TX valve allows a portion of the refrigerant to enter the evaporator. In order for the higher temperature fluid to cool, the flow must be limited into the evaporator to keep the pressure low and allow expansion back into the gas phase. [2]
-
Why is the compressor cycling ON and OFF normal on a '95 Legacy? My '93 Leg AC has been operating without being serviced for 18 years using R-12 freon. When the AC button on the '93 is ON the compressor never stops and unless some heat is blended in with the AC or its 100F I will need a coat. Blending heat with AC is the way to control cabin temp. The compressor should only stop if there is a problem: high pressure-> cut off the compressor or there is moisture in the system and it freezes, pressure builds up then -> cut off the compressor.
-
No just replaced the two bearings $20, and put back the worn brushes (did not get a price for the two 5MM by 8MM by ~22MM but was hoping that they be less than the ~$20 brush assembly) after being adviced that they are still good. Neither did I try to polish the 1MM worn in diameter slip ring. Notes: 1. Could not remove the four small interior hex bolts with a phillips screwdriver damage all the slots, used a socket instead maybe ~3.5MM or was that 5MM and the socket is a tight fit with the adjacent structures. 2.When tightening the four bolts holding the alternator assembly together, I may have over torque them and the alternator did not fit the mounting bracket. Then I backed out the bolts 1/2 turn, then it fit over the bracket. 3. If the brushes stick out 1/4 inch out of their housing to contact the slip rings and have good spring force let them be.
-
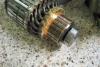
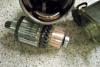
The alternator was noisy, had a burning smell, the bearings were both worn (they would spin on their own like a bicycle wheel, say one extra turn or so unlike the new bearing which just do not spin by themselves). Ended replacing both front and back alternator bearings with 190Kmi, $20 for both from an auto electric shop, after advised to keep the current original half worn brushes. I managed to give myself extra work disassembling the brush assembly anticipating that the 5MM by 8MM by 22MM brushes were a cheaper repair than the complete assembly, about $20. The hardest task in the alternator bearing disassembly was removing the front alternator pulley 24MM nut, followed by the rear small bearing removal with rather large axle size pullers. The front bearing just falls off, that was easy, and the rear bearing hammers on the shaft rather easy, 2 minutes. Another hard task was the soldering of the spring loaded brush wire tails and dressing the wires so the brushes spring out when the external retaining clip is removed after complete reassembly. Some photos for you all.
-
GD, I saw a U-Tube video on replacing alternator bearings including using a plastic injector with needle to add grease to what appears to be a new sealed bearing, since I could not see the balls in the bearing. The video also showed how to pin the alternator brushes for the rebuild looks encouraging. Replacing a pressed bearing requires a press. I figure that greasing the bearing is a first easy step. Servicing Sub alternators seems an easy job.
-
Notice a humming sound from the engine while parking in the garage, then openned the hood while the engine is still idling, and sounds like its from the alternator, and there is a slight burning smell. Started the engine the next day, can 't say that the humming is still the same loudness or less. Maybe the 100F temp made it louder while the 80F garage is quieter. Got a stethoscope later to listen to all top engine bearings. Sure enough the alternator rear bearing has more noise than any other bearing such as front alternator or, power steering. Remove the belt and spun the alternator pulley by hand and sure enough the rear is noisy without the stetoscope but not horribly so and there is no play in the pulley/shaft. The alternator burning smell is not so much Has anyone just tried to grease the alternator rear bearing with good results for noise?
-
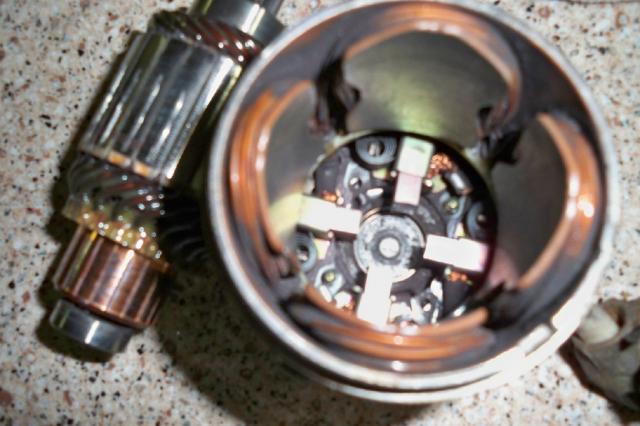
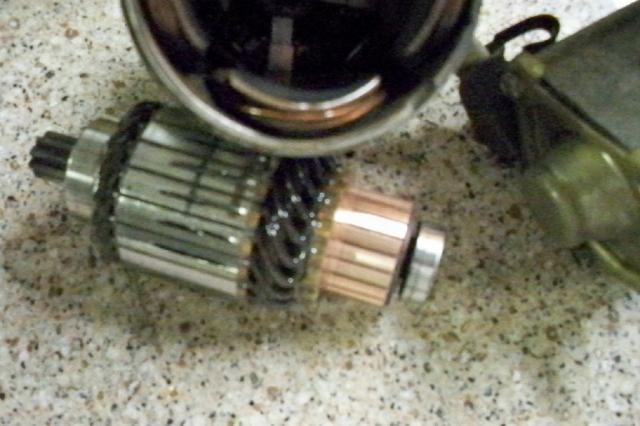
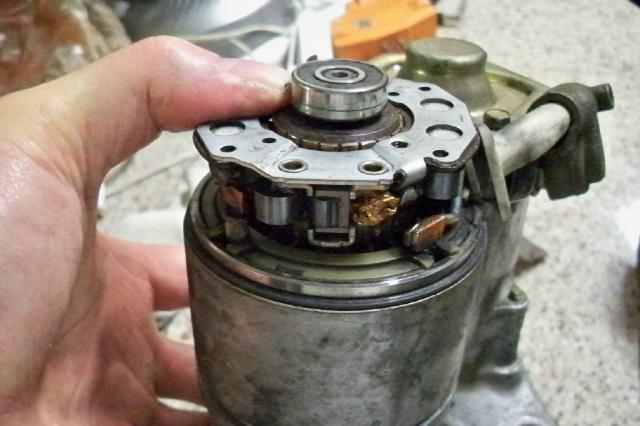
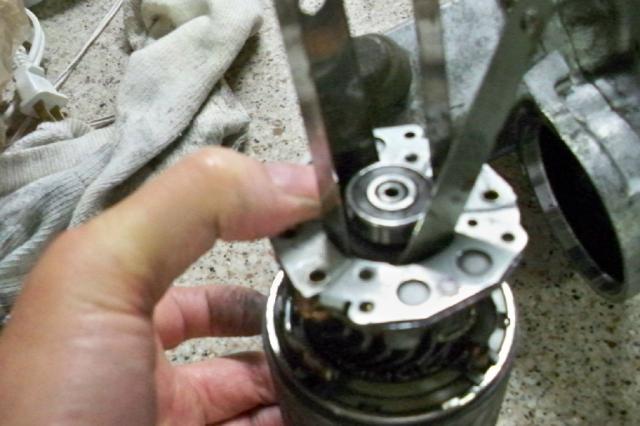
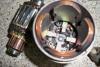
This 93 Legacy L 2wd 5spd w/ +180Kmi had trouble since last year starting the car. Last year refurbished the starter solenoid contacts. Filed the contacts with an emery board. The car started well after that. Then 7 months later again trouble starting the car once more. The solenoid still was clicking as it should but starter motor failed to engage on most tries. The car would eventualy always start. This year disassembled the starter commutator and brushes assembly. Cleaning the commutator dirty contacts with wet 180 grit sand paper ( see before and after photos) brought the shine back to these contacts and the car started immediately 20 mins later. See photos of somewhat complicated scheme to reassemble the 4 tight fitting brushes over the commutator. Used spark plug feeler guages to push simultaneously the 4 spring tensioned to spread over the contacts. Then pulled the guages out carefully and done.

-
Does the whinning stop when warmer, >30DegFah? Can you here it in the cabin with windows up?
-
Normally when the AC is running but not cooling properly, you can look at the sight glass on the receiver/drier. If you see many bubbles after the AC has been running a while, then it is low on freon, R22 or 412 whichever. A few bubbles is OK. Just my experience with a 91 190E Mercedes which had an AC leak for the last 9 years of its life. Every summer I would just look at the bubble count diminish when recharging with a $24 freon 412 can.
-
The trouble with running the 93 Legacy 5spd started when the negative battery cable was disconnected while cleaning the starter solenoid contacts, solenoid would click but starter motor did not run. The Engine Computer still knew how to keep the engine in fast idle 1200rpm during the first minute or so but did not know how to set the idle after that and the car would stall repeatedly. The disconnect the positive battery cable for 1 hr did some good, idle OK 1st minute, not good next 2 mins, and OK thereafter when engine warm. The reset the computer with the under dash green and black connectors procedure gave the best results, idle OK 1st minute, idle OK next 2 mins, and OK thereafter when engine warm. No Computer Error Light codes were present throughout these events.
-
I tried to reset the computer on my 93 Legacy 5spd by disconnecting the positive battery terminal and waiting 1hr. Seemed OK that evening, but did not work the next day. Drove back home after stalling twice in idle at 100rpm and does not hover at about 1200rpm between shifts, but noticed that the idle was back at the normal 500rpms when the engine warmed up by the time I got home. Reset the engine computer per the shop manual under dash connections the following evening, no engine error codes recorded from the low idle engine stall. The idle worked OK that evening. Next day ran the car cautiously within the neighborhood and verified that idle was nomal 400-500rpms during the entire start to warm up period. Got to work only 5 mins late. The day before the car had the negative terminal disconnected while removing and replacing the starter, then it could not hold idle at 500 rpms even when engine warm or so and engine would stall in neutral or between shifts.
-
The solenoid has been clicking loud and clear when trying to start the car, plenty of voltage at the solenoid terminal but the engine failed to turn over after several tries. Removed the starter, all work from above, 17MM lower nut, 14MM upper bolt to inspect the solenoid plunger and contacts. The plunger had some pits and some corrosion see photos , these are copper contacts, the two terminals had visible wear, the big one had more wear on one end, decided to sand paper smooth and polish see photos, reassembled, engine started immediately. Did not tighten the contact bolts too tight to allow them to float and align themselves some with every plunge. Will write back if the fix fails to give immediate starts the next 6 months (ending in May 2011).
-
One should be able to check if the connection to the stater solenoid has enough voltage/current to allow the solenoid to close its contacts and power the srarter. Disconnecting the 12V to the starter, (removing rubber boot covering connection, remove nut and lock washer, remove cable from bolt, cover cable with rubber boot remember it connect to the +12V battery), place a volt meter ($12) at the wire to the starter solenoid ( Look at the top of the starter: disconnect paddle connector to solenoid, scrape a bit of insulation from wire to paddle, reconnect connector to solenoid), attach meter to wire and battery negative terminal. The TEST: turn on ignition (car will not start, but you should hear the soleniod click to close its contacts, it is very loud), read the volt meter, should read close to the battery voltage of +13V or so, 9V is considered low and unreliable. Repeat turning the ignition key several times to see that volt reading repeats. Now you know your wiring from ignition to solenoid is good. Reconnect the 12V cable to the starter, tighten nut/washer, replace boot. Start the car. It may be hard to get a good reading in the meter if the car starts, if it does not start then you may see a similar reading as before (close to 13V at the solenoid wire). Remove meter from wire.