


Tmckinl1
-
Posts
17 -
Joined
-
Last visited
Recent Profile Visitors
532 profile views

Tmckinl1's Achievements
Member (2/11)
1
Reputation
-

1985 EA82 Steering Linkage/rack
Tmckinl1 replied to Tmckinl1's topic in Old Gen.: 80's GL/DL/XT/Loyales...
Not sure why I didn't think of the rebuild route. Probably just caught up in my RockAuto spending spree. I figured the $140 I'd spend would make things go quicker compared to the rebuild. I've had the car in to get an alignment (eating the outside of both front tires) and the shop said the rack was too far gone to get it aligned. While under the car I saw that both boots were completely gone but the thing is the steering response doesn't seem that bad. There doesn't seem to be excessive free play at the steering wheel and the car doesn't really wander down he road. Anyone have a source for rebuild kits for manual steering rack with splined shaft input? -
1985 EA82 Steering Linkage/rack
Tmckinl1 replied to Tmckinl1's topic in Old Gen.: 80's GL/DL/XT/Loyales...
Thanks for the input. Just to be clear, I'm not swapping out a power unit. It's a manual rack, but has the splined input shaft. May have to install a power rack, just not sure if I could run that like the old manual or would I have to go ahead and source a PS pump, brackets etc and convert to power steering. I would really rather stick with the manual, less things to break or go wrong -
1985 EA82 Steering Linkage/rack
Tmckinl1 replied to Tmckinl1's topic in Old Gen.: 80's GL/DL/XT/Loyales...
Just saw that, I bet he's correct. I'll have to do some more research -
I keep finding that this little DL seems to be a bit of an anomaly. I've had issues with parts before, so no big surprise here. I ordered a manual steering rack and was going to install last night. Upon inspection I see that the new rack has a flanged connection to the steering linkage. Unfortunately my old manual rack has a splined shaft and yoke set up like a power steering unit. I'm guessing that I will need to find a different linkage to make this work. Am I missing something here?
-
All done....took me a while to get to it, but with all the great tips and tricks listed here, turned out to be a stress free evolution. Flushed radiator and dropped oil and tranny lube while I was under there. Next step: new manual steering rack. Thanks again for the tips, greatly appreciated!
-
Email sent
-
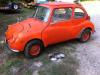
Not mine, just saw this on CL last night https://dallas.craigslist.org/ftw/cto/d/1970-subaru-360-deluxe-2-door/6253076890.html
-
Those powder coated wheels sure pop! Here's a link I found in this forum for the windshield gasket https://www.prp.com/product/detail/106445
-
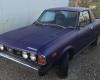
Well, I promised my wife I wouldn't go all OCD with these old subies, but I just couldn't resist. I'm *just* about finished with all the major work on the DL sedan I picked up 2 months ago so I figured she might just forgive me (you know what they say about permission and forgiveness). This is going to be a major restoration/rebuild. I intend to touch every nut and bolt on the car, take her down to a bare metal shell and build it all up again. Might be a while before the actual work starts since I have a few other projects that I've committed to that must be taken care of first (62 Continental, 63 C-10 and an Indianapolis 500 pace car vette). So while it may be a bit, I wanted to share a pic of this little gem and start the documentation process here. I'm sure I'll be scouring this forum (along with any other resources I can find) to source parts in the near future. Mechanically a mess, but very good bones and almost no rust. I suppose the purple would be ok, living in Louisiana and all, but she will end up with with a dark green and white paint scheme with brown/tan leather interior.....EVENTUALLY
- 3 replies
-
- 1
-

-
- Project
- gen 1 brat
- (and 1 more)
-
Ea82 engine not gettinh fuel to the cylinders
Tmckinl1 replied to Ashton70354's topic in Old Gen.: 80's GL/DL/XT/Loyales...
I'm with ferp420 on this one. If fuel in the spark plug hole fires her off (even at a stumble) but fuel/starting fluid through the carb and manifold does not, sounds like intake valves are stuck shut. Even with a huge vacuum/air leak like loose carb mount you should still get a stumbling rough attempt to start.... Of course following that logic would mean *all* intake valves are stuck, leading back to the oil pressure scenario. -
Outstanding folks. Thank you SO much for the tips and encouragement. I purchased a set of belts and pulleys (Gates brand, I've had pretty good luck with them on other projects) and will start with the PB Blaster a few days before commencing the "rippin' & gougin'". I've done so much to this car to make it road worthy, I'm not going to cut corners now. I'll pull and flush the radiator at the same time. My a/c was the dealer installed version so the compressor sets up high in the engine bay, and the car has manual steering, so no pump in the way there...
-
The next project I intend to tackle on the DL is installing new timing belts. I've watched a few videos of the process, but they all seem to have the motor out of the car. Any tips, hints or tricks of the trade you'd care to share would be greatly appreciated.
-
I'm guessing a road trip to Louisiana might be a bit much..... Sure wish it were closer, I'd take it for sure.
-
*Another* EA82 Cooling Sensor question....
Tmckinl1 replied to Tmckinl1's topic in Old Gen.: 80's GL/DL/XT/Loyales...
Update: new *correct* sensor arrived yesterday....plug and play, so all is well with the temp gauge. Now I'm going to tackle the erroneous fuel indicator! I have a new tank to install, this weekend, along with rack and pinion and new cam belt set. Currently fuel gauge indicates 3/4 when full and 1/8 when it's really half full. When I swap the tank I'll work over the sending unit as well... Thanks for the help/suggestions. -
*Another* EA82 Cooling Sensor question....
Tmckinl1 replied to Tmckinl1's topic in Old Gen.: 80's GL/DL/XT/Loyales...
Thanks. This particular coolant temp sensor is a two spade that drives the temp gauge, which seems to be different than a lot of information I've read. Unless the PO went to the trouble of replacing the single plug and sensor with the two spade plug and sensor (highly doubtful given the general condition of the car when I bought it) or maybe they ran the two spade plug on a single spade sensor??? Either way, I am a bit confused. Wiring and original sensor were both two spade, but everything I've read and heard says the gauge is driven by single spade sensor. Got me to doubting myself so badly, but I finally applied a little common sense and just unplugged the darn thing. Sure enough, I loose temp indication with it unplugged. I'm with you on the aux fan, used that little fact to help me feel better about the false indication of an overheating condition. No fan running while gauge pegged high, ran her for a while and verified fan working. I certainly will look into unplugging the ecu, maybe just reinstall original sensor and do that.....

