

FerGloyale
-
Posts
720 -
Joined
-
Last visited
-
Days Won
53
Content Type
Profiles
Forums
Gallery
Store
Everything posted by FerGloyale
-

03 outback rear suspension on EA81 - T-bone 2.0
FerGloyale replied to FerGloyale's topic in Off Road
More in progress. Full seats on both arms IMG_0355 by Dans Subaru, on Flickr IMG_0354 by Dans Subaru, on Flickr -
03 outback rear suspension on EA81 - T-bone 2.0
FerGloyale replied to FerGloyale's topic in Off Road
Nah, it's really not that bad. I am still running the EMPI. If I have time before WCSS, I will change it out, otherwise I'm gonna run it and bring the FEQ as spare. I am working on a Hi-lift jack and front receiver mount too. Add 150 lbs of jack and winch to front bumper, along with stiffening the rump roast so it doesn't lurch backwards under throttle, and the CV might run at happier angles the whole way to Shelton, WA, eh? -
03 outback rear suspension on EA81 - T-bone 2.0
FerGloyale replied to FerGloyale's topic in Off Road
Mirrored the left arm and made a right. IMG_0277 by Dans Subaru, on Flickr IMG_0278 by Dans Subaru, on Flickr I know the pivot bolt alignment looks weird on the screen. Hell it looks weird and off in person, but the alignment is actually spot on, angles are an illusion. You can see in this pic the second arm, tacked but not hammered/heated/welded ye, it looks way wonky, but by the final product both arms are straight and mirror to each other. IMG_0279 by Dans Subaru, on Flickr *FUN FACT, the tube in the new lateral arms here is from factory 1st Gen Brat "A" bar. It's from the same A-bar still on the front of ol' T-bone here! It's from a piece that was the original lower horizontal cross, I cut it out 10 years ago to change up the custom skidplate. If you ever wondered about those A-bar thickness, here you can see........pretty damn stout. I also made an upper perch for left side, and this one will be further outboard to hopefully correct the angle of the spring. If I have time, I will cut out and redo drivers side, but WCSS is coming up quick, . Also while the driversarm wasout, i took the time to make perch plates, and now both arms have full perches on the new lateral arms.....Pics to come. -
03 outback rear suspension on EA81 - T-bone 2.0
FerGloyale replied to FerGloyale's topic in Off Road
There really isn't any more room to cut. The tire rubs against the flat area that is basically the back side of the wheel arch. Any more cutting than I've done would essentially be removing the wheel arch......shortening the rocker ends......losing the rear seatbelt mounts.....Like a full "tubbed" rear end that's done on fat tire hotrod dragsters, lol. Even if I want to go that way (which I do, eventually) I can't finish that before Friday afternoon departure for WCSS21......and I sure as hell don't want to be scraping tires all the way up I-5 and through the mud pit.......that would be hella lame. So this is what I'm doing. Might have to move the upper perch out some huh? IMG_0275 by Dans Subaru, on Flickr -
03 outback rear suspension on EA81 - T-bone 2.0
FerGloyale replied to FerGloyale's topic in Off Road
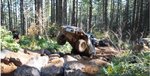
So, the rear springs have settled, alot. Here is the problem I am running into. Tires stuffing against the door/wheel well. And no more room to cut IMG_0249 by Dans Subaru, on Flickr Stiffer springs mght work, as well as mandatory bump stops.........But I'm trying to get this ready for WCSS21, and I don't want it on;y riding on bumpstops. Those are in the works this week. While working on that project, and trying to solve the weight/spring issue, and also making some tubular rear lateral links to replace the flexy stamped steel ones.........I had an AH HA!!! moment. While making the new lateral arm, I could put a landing for a second coil spring on it! Like many Mercedes, Ford, and GM multilink rear SUV suspensions. Side view both springs installed at full droop. IMG_0261 by Dans Subaru, on Flickr And a view of the rear arm, and spring setup. Upper landing may need moved outboard 1~2" or so.......I don't want it to interfere with the skid plate/subframe mount bolts. But for now it seems pretty solid. Test drive soon. IMG_0263 by Dans Subaru, on Flickr -
EA82 "Hail Mary" pass repair
FerGloyale replied to rickyhils's topic in Old Gen.: 80's GL/DL/XT/Loyales...
yup that's me. Somehow could not log on to my old screen name when site changed a year or 2 back. -
EA82 "Hail Mary" pass repair
FerGloyale replied to rickyhils's topic in Old Gen.: 80's GL/DL/XT/Loyales...
+1 Re-ring and go. EA82 bottom ends are TOUGH........unless it's been starves for oil the crank and block will be fine. -
Yes. If you swap the entire bracket, roller with eccentric hub, and long style tensioner cylinder it works.
-
Sleeve is from an aftermarket kit not factory. Take it off and examine the trans quill surface underneath the sleeve. if that area is relatively smooth, simply install the new throwout directly there. That is how they came factory. If that sleeve was put on because the quill is badly damaged (from spun TO bearing) then the repair sleeve is still needed, and you need the larger TO bearing that ifts over it. GD may have a part # for it IIRC.
-
If there are no vac leaks, and everything else is good, then in this case it may be warranted to adjust the idle stop screw. The Throttle body (TB) was designed for a 2.2 Now you are running 2.5 liters of displacement if I'm understanding. it's a small 6mm locknut, with a tiny 3mm? allen on the screw to adjust the stop. Some have an 8mm locknut and a screw.......depends on what exact intake you have. It's on TB with a little orange or yellow paint on it. It is generally NOT a good idea to mess with that screw, but in the case of this frankenmotor it's probably your best bet for drivability. 1/4 turn or less should do it. TPS idle switch contact may need reset/adjusted after changing idle stop screw.
-
Hoses for EJ into EA81 and radiator
FerGloyale replied to Steptoe's topic in Old Gen.: 80's GL/DL/XT/Loyales...
I found hoses off the shelf that had the 2 differing ends, and also the 6" rise I needed for my lift. I had pics of the part #s on my old Photobucket account.....unfortunately I'm not sure I can acess it anymore. I need to dig them up somehow, those hoses are 11years old.......Time to change soon. For other EJ swaps, with no lift, I simply used flex 16" and 18" hoses with 1-1/4" on one end and 1-1/2" on the other. I carry a 24" spare for use in the wheeler. for now. -
Looks good man. I like the bumper skirt treatment. I also like the black panels, it's beginning to look like geometric camouflage
-
keyless entry flasher system doesn't have any control on the transmission w/ manual trans espescially. something else is wrong.
-
EJ tailshaft cut length ? In EA81 ??
FerGloyale replied to Steptoe's topic in Old Gen.: 80's GL/DL/XT/Loyales...
So I'm gonna dig a little deeper in examining wheelbase as it relates to drivelines. (Props) There are only two lengths of wheelbase in relation to the length of the prop, body datum point lengths, suspension mount points, etc. the actual listed length varies by 15~20 mm when you get into different weight/trim/fwd/4wd option, because the rear trailing arm torsion setup makes the wheel travel fore/aft in it swing, so depending on height, the length between front/rear wheel centerlines changes. Hatch is anywhere from 2370~2380, and wagon/sedan/hardtop/Brat/Brumby are all 2445/2460 With the lower riding models being the latter in each set. So when evaluating prop lengths, just think Short vs. long body wheelbase. FSM lists length of the 2 props at 1057mm and 1136mm respectively. Measured as "distance between joints" -
Clutch pedal very hard to start pushing in...
FerGloyale replied to idosubaru's topic in Old Gen.: 80's GL/DL/XT/Loyales...
Sounds like the pressure plate itself is getting stiff. You can check the cable easy by disconnecting it at the trans and seeing if it slides free in the housing. But, again, I'll bet it's the PP. A new clutch set will solve it. -
'91 Subaru Loyale Transmission Capability
FerGloyale replied to 5MileDrive's topic in Old Gen.: 80's GL/DL/XT/Loyales...
It's because on pavement ALL of that EJ22 torque will be hooked up solid, and if you mash the go pedal from every stoplight, and every time you grab the next gear, you WILL eventually break 2nd gear, 3rd gear, or the front pinion. In FWD it all goes through the front diff....it's pretty hard on it. Hard on clutches too. with stock tires size it probably wouldn't be a problem. but if you go up to 27" or bigger, all that torque forced against heavy, taller tires and try to drive like it's stolen, you will break gears. I drive my wheeler slow and steady with as little throttle as possible around town. If you wanna haul rump roast, go to an EJ AWD trans......better clutch options, and the AWD spreads the torque around better for on road antics. Still be awesome for snow, but won't be nearly as good of a wheeler then though. -
3500 RPMs is just getting to the powerband. And it's fine to cruise at those RPMS If you need more power up the hills, use lower gears and let the engine rev out at a light throttle, rather than using a higher gear and having to struggle even with throttle wide open. It can take 4500 all day.
-
'91 Subaru Loyale Transmission Capability
FerGloyale replied to 5MileDrive's topic in Old Gen.: 80's GL/DL/XT/Loyales...
Doesn't work that way. Trans is FWD with optional 4WD. If the above is the setup you want, get a truck D/R 5-spd manual from an 85-89 is the trans to get if you want to offroad it. It will hold up as well as any other non-turbo 5MT. They are basically all the same inside. All the bearings, shaft diameters, etc are are the same. I would advise don't hammer on the throttle driving around town in FWD. -
03 outback rear suspension on EA81 - T-bone 2.0
FerGloyale replied to FerGloyale's topic in Off Road
EMPI axle is giving some pretty nasty vibrations. I'm gonna run it a bit more, but perhaps it's not the best option I had hoped. Probably will put the modded FEQ axle back in before the trip to WCSS -
Need a little help finishing lift on 1993 Legacy Wagon
FerGloyale replied to Blaster's topic in Off Road
Should have swapped the Legacy Tophats onto the Forester struts. The way you have it now has the strut top tipped out further than it should be. This will cause positive camber, which is not a good thing. FWIW, 99 Outback rear struts will give you more height and tire clearance. Personally I would swap the tophats now, and not hack up the body mount any further.n Maybe get some outback rears and use those with proper fitting Legacy tophats. -
03 outback rear suspension on EA81 - T-bone 2.0
FerGloyale replied to FerGloyale's topic in Off Road
The Passenger side front wheel bearing failed after about 200 miles. The other one was shot on the donor legacy the knuckle came from, so I'm not surprised this one was shot too. I had purchased a new EMPI axle to compare to the FEQ's I had to modify, so I took the opportunity to try it out since it was all apart. The EMPI has large diameter joints and a larger shaft. Feels like a six ball/cage design although I didn't pop the boot to check. Installed it on the car and all seems to be fine. So unless it fails suddenly, I am going to assume that the EMPI axles will be the way to go moving forward. The modified FEQ's will stay as spares. Front springs have settled in and are now about perfect. The rears have settled a lot. I am going to need kings or 4-runner springs in the rear. -
1991 Loyale. No heater or a/c
FerGloyale replied to rickyhils's topic in Old Gen.: 80's GL/DL/XT/Loyales...
yes, relay is under dash to left of steering column, in a bracket that holds 4 relays. It will be the one with a big fat Green/white wire in it. Not sure but I think it's a Blue connector. The pushbutton cassette only has 2 sets of contacts. 1 that closes at any position other than "off" that activates the power to the fan. the other set is for the A/C "on" All the other switching of blend doors and such is done with vacuum, not electronics. The dropping resistor that controls fan speed is in the air duct above passenger feet. That resistor controls the GROUND side of the fan wires.- 1 reply
-
- 2
-

-

-
you said in the first post it revs up to 6000 rpms? which is it. And you said the axle was popped out of the diff......well, that would cause everything you described. No, the spider gears in the diff still spin. that's normal. You can't test if the ring and drive pinion are spinning with both wheels in the air. put one wheel on ground, one in air, trans in park. Can you rotate the wheel in the air? If no that means the pawl is intact. If yes, then the pawl is not stopping the ring and pinion from moving.
-
+1 Strut is a straight line, and KYB is the OE manufacturer for Subaru struts. Moog, on the other hand, is an off brand maker of everything and the kitchen sink. Personally I would have changed the bushing int hte stock arm rather than swap a whole suspension part. My money is on the Moog arm being junk. Off by 1/4" would cause the issues your having. The one other though I had was if the upper spring plate rotation isn't correct relation to the bottom perch, it can cause funny ride height and rubbing of spring in turns. shouldn't affect toe though.
-
Broken Front CV axle