


SaltyMike
-
Posts
71 -
Joined
-
Last visited
-
Days Won
1
Content Type
Profiles
Forums
Gallery
Store
Posts posted by SaltyMike
-
-
On 10/23/2023 at 5:38 AM, el_freddo said:
I find in summer here that my fuel tank can pressurise quite a lot on a hot day. I don’t open my fuel tank unless I’m on empty so there’s no fuel to be sprayed at the filler cap for me.
I don’t have an EJ under the bonnet (yet!).
The other thing to check out is to see if the purge control solenoid is operating properly on the EJ - it’s under the intake manifold on the RHS from memory. If this isn’t working properly it should throw a CEL I believe.
If this pressurisation occurs in the cooler months I’d investigate to work out what’s going on, otherwise I’d just put it down to it being warmer and the EJ circulating the fuel more which to me would result in more pressure in the tank.
Cheers
Bennie
I appreciate it Bennie, it’s cooled down a bit over here in New England and I’ve noticed it happening less. I will keep an eye on it though and check the solenoid. Thank you!
-
Hey everyone,
Recently I've been having issues of what appears to be an excess amount of pressure building up within the fuel tank. I know that there is always supposed to be some pressure that releases whenever you remove the gas cap, however this seems to be an excess amount to me. It's to a point where it may take two hands to take off the fuel cap and will result in major fuel spray if not removed super slowly. Coincientally, I just started noticing this after having done my EJ22 swap, but nonetheless I suspected there was a blockage in one of the fuel/vent lines. None of the lines are crossed, and I was able to hearing bubbling in the fuel tank when blowing air into the return line, so it must not be the return line that's blocked.
Through doing some fuel system research, I learned that there is a ventilation box for the fuel system that is located in the passenger side fender, so I checked that out to see if anything was gummed up in it. I found that the box has three lines connecting to it. Two of the three lines are have roughly the same small diameter. However, the other line is a lot larger in diameter (at least at the point where it connects to the vent box, it seems to taper down to a small diameter similar to the other two as the line continues). I blew compressed air into all three connecting points on the vent box itself and nothing indicated that there was a blockage on the inside (I'm unable to take apart the box itself to inspect it.) Next step was to blow air into the three lines that connect to the box. When traced, one of the two small diameter lines connects to the passenger side of the fuel tank. The larger line also connects to the passenger side of the fuel tank. The other small line is the vent line that pops out through the fire wall, and by blowing compressed air into it I confirmed that it was not blocked. The small line that connects to the fuel tank blows air out of the fuel fill port itself when the compressed air is introduced. However, nothing is heard when blowing compressed air into the largest line.
Would anybody have an idea on what the largest line connectiing to the ventilation box does? Is what I am describing indicative of a blockage somewhere?
-
On 7/27/2023 at 7:00 AM, el_freddo said:
No need to run a new line.
Just ensure that what you swap up the front is also what you swap at the back of the cab under the tray area or for sedans/wagons etc, under the back seat.
It could be worth removing the fuel tank filler cap and blowing some compressed air through the small return line to ensure there’s no crud blocking it or reducing the flow.
Worst case scenario is to run a line from the old vent (swapped to return) line up to the breather line at the filler pipe, tap into that line as the return line. And ensure you seal up the factory return point on the front of the fuel tank!
Keep us updated!
Cheers
Bennie
Just last night I swapped the evap and return lines coming through the firewall, as well as back at the tank. Unfortunately, it doesn't seem to have made a difference. Upon inspection though, it seems as though the evap and return lines are approximately the same diameter. I measured both of these lines at roughly 4mm. Seems strange to me, because when I read a write up about converting the fuel system for an EJ22 swap from Phizinza, it says that the return line is 3.2mm and the vent line is 6.3mm.
My Brat is an '82 DL. From my understanding, this was a bit of a strange year for the Brat (only 2nd gen body with a hardtop option, single range 4 speed, Carter-Weber carburetor instead of a Hitachi carburetor). Maybe this uniqueness has something to do with why these lines are the same diameter? Not sure, I may be missing something here. If not, it sounds like I'll have to run a new line to resolve this.
-
16 hours ago, el_freddo said:
You’ve got three lines from the tank correct?
If so the general practice is to swap the vent line and the fuel return line with EJ conversions. You also need to swap it all at the back end before the tank too, otherwise you’re still down to small diametre return line.
Cheers
Bennie
On the front of the tank, there are two lines directly next to one another. I know that the larger of the two is the feed, and I assumed that the one directly next to it was the return. (This post shows what I am talking about:
There's another line that wraps around the tank (evap I'm assuming) which leads to a canister located in the right rear fender. There's two other lines that come out of the tank right above where the fuel fill port is. These two lines also lead into that canister located in the right rear fender.
I tried to switch how I hooked up the return and evap firewall lines, guessing that maybe I had swithced them accidentally and that this was causing the high fuel pressure. This just lead to increased pressure in the fuel tank and purging of fuel through the return line. Is there a write up on the forums here on how people have swapped the lines so the return line will have a larger diameter or do I need to run an entirely new return line?
-
On 7/10/2023 at 12:05 PM, 1 Lucky Texan said:
see if the vacuum line from the fuel pressure regulator is wet with fuel. maybe the FPR's diaphragm is leaking.
Vacuum line seems to be completely dry, I can probably eliminate that as a possibility unless there is another way to diagnose a bad FPR.
-
 1
1
-
-
On 7/9/2023 at 7:21 AM, el_freddo said:
@SaltyMike- is this surging also associated with difficulty starting the EJ22?
Asking as another thread about a hunting idle issue reminded me of a hard starting a fluctuating idle issue I had with my EJ22 many years ago.
I had several codes show up, CTS, TPS, knock and I think an O2 sensor issue.
It was an absolute dog to start, idle was poor at best and it ran like a dying dog under load. I’ll give it this though, I was still able to reliably drive places once it started, just it was missing a few ponies in this situation.
I changed all the sensors at once rather than chasing down what the real culprit was. At the time I was living in our alpine area and working outside in the snow at the remote staff carpark wasn’t a time I was going to individually swap and test which sensor change made the engine operation return to normal. Once they were all swapped, the TPS “gapped” and an ECU reset all was well once again!
Cheers
Bennie
Update: Got a fuel pressure gauge on the Brat recently, and discovered the source of the rough idle: high fuel pressure. I believe that the 2.2 is supposed to run around 30ish psi. My fuel pressure gauge gave me a rating of 65 psi 😬
Now I'm trying to figure out why I'm getting such a high fuel pressure rating. I disconnected what I am 99% sure is the fuel return line coming from the firewall (next to throttle cable coming through firewall) and I got a way more normal fuel pressure of around 30ish psi. I blew into a piece of fuel hose connected to the return line to see if there was any resistance that would indicate a clog. I could easily hear bubbling in the tank when I did so. Just in case the power of my lungs wasn't enough, I blew some compressed air through the line with the same result. I hooked the line back up and got the same pressure reading of 65 psi.
I am using the stock return line that came with the Brat. May be common sense, but could the change in diameter between the fuel return port on the EJ and the fuel return line on the Brat cause such a drastic increase in fuel pressure? Out of all of the write ups I researched while doing my swap I don't remember seeing anything saying that I need to run a completely new return line of larger diameter, just that I would need to upgrade all of the rubber fuel lines to be EFI grade.
-
5 hours ago, el_freddo said:
@SaltyMike- is this surging also associated with difficulty starting the EJ22?
Asking as another thread about a hunting idle issue reminded me of a hard starting a fluctuating idle issue I had with my EJ22 many years ago.
I had several codes show up, CTS, TPS, knock and I think an O2 sensor issue.
It was an absolute dog to start, idle was poor at best and it ran like a dying dog under load. I’ll give it this though, I was still able to reliably drive places once it started, just it was missing a few ponies in this situation.
I changed all the sensors at once rather than chasing down what the real culprit was. At the time I was living in our alpine area and working outside in the snow at the remote staff carpark wasn’t a time I was going to individually swap and test which sensor change made the engine operation return to normal. Once they were all swapped, the TPS “gapped” and an ECU reset all was well once again!
Cheers
Bennie
Apologies for the late reply! Got busy with work and couldn't check the forums.
Anyways, the scanner wasn't throwing any codes specifically related to a bad idle. However, there were multiple EVAP codes thrown as well as two other codes: P0172 (Bank 1 Too Rich) & P0301 (Cylinder 1 Misfire). Besides the surging idle, the engine feels as though it is running pretty well. The surging idle makes itself known once it has had a few minutes to warm up. While driving, it runs pretty smooth but there's probably a 20%-25% chance that when I coast to a stop in neutral, the car will die on me. That being said, I'm assuming that the cylinder misfire is a result of the rich environment it's in (fouled plug maybe, but I haven't gotten the chance to check it).
From a cold start, the EJ22 does take a few seconds to start, and it actually sounds like it's struggling a bit. Once it's warmed up and then shut off, it doesn't have a problem starting up again. That may be a contributing factor, I will look into this, thank you!
-
Hey everyone,
I have an EJ22 from a '98 Legacy now in an '82 Brat. I've found that once at operating temperature, the idle begins surging. It is running rich at idle and at 2k rpm. After hooking it up to a diagnostic scanner, it was discovered that the ECM is fluctuating between a closed loop and an open loop when the idle surges. When in a closed loop, the engine wants to stall.
I hope I put this post in the right place rather than the Retrofitting forum. I figured that since this question pertains more to the operation of the engine rather than how to put this engine in an older Subaru, then its best place is here. Thank you!
-
Hey everyone,
I recently had an issue where the brake pedal in its resting state was not pushing in the switch that controls the brake lights. I got this issue fixed, but my dumb self first tried adjusting it from the bracket that sits on the threaded part of the booster push rod. I learned that by doing this, I unintentionally moved my brakes out of adjustment. Now I’m worried about my brakes dragging but its not quite roadworthy yet to find that out (finishing up engine swap). Is there certain adjustment specs for the brake booster push rod?
Thank you!
-
On 4/8/2023 at 9:11 PM, Rupart said:
ok, i just looked at my shifter set, the upright flanges that are in your 2nd pic are the pivot flanges for the ea82 hi-lo shift lever mount,, you can remove that,, it is no longer used. the other tab sticking out the back, is one side of the rubber sandwich bracket,, the missing rubber and longer side are gone,, the longer tab is what would go to the tunnel stud. by taking off the orig 5spd hi lo mount tabs allows the main rod to go up a good bit. i tried to buy a new rubber bracket from subaru, "discontinued", also not able to find one in aftermarket parts, so no advise there. the rubber part is about 1 inch thick, and the lower tab is longer and 2 bends, and a hole in the end to reach the tunnel stud. Looks just like #19 on the parts page pic.
Thank you so much,
I'll reach out to the guy that I bought the transmission from, maybe he has a piece laying around. Maybe I can use the metal tab that extends rearward in my picture and mount it that way? The rubber would definitely be nice to have to reduce vibration and noise though.
-
On 4/10/2023 at 2:37 AM, el_freddo said:
The wiring going down to the headlights will be the thermo fan switch trigger when the AC is on. Just disconnect the two plugs, remove the AC wiring and reconnect the two plugs left in the main loom, they’ll clip together.
The brake master cylinder wiring should stay with the main loom. That’s your low brake fluid warning light.
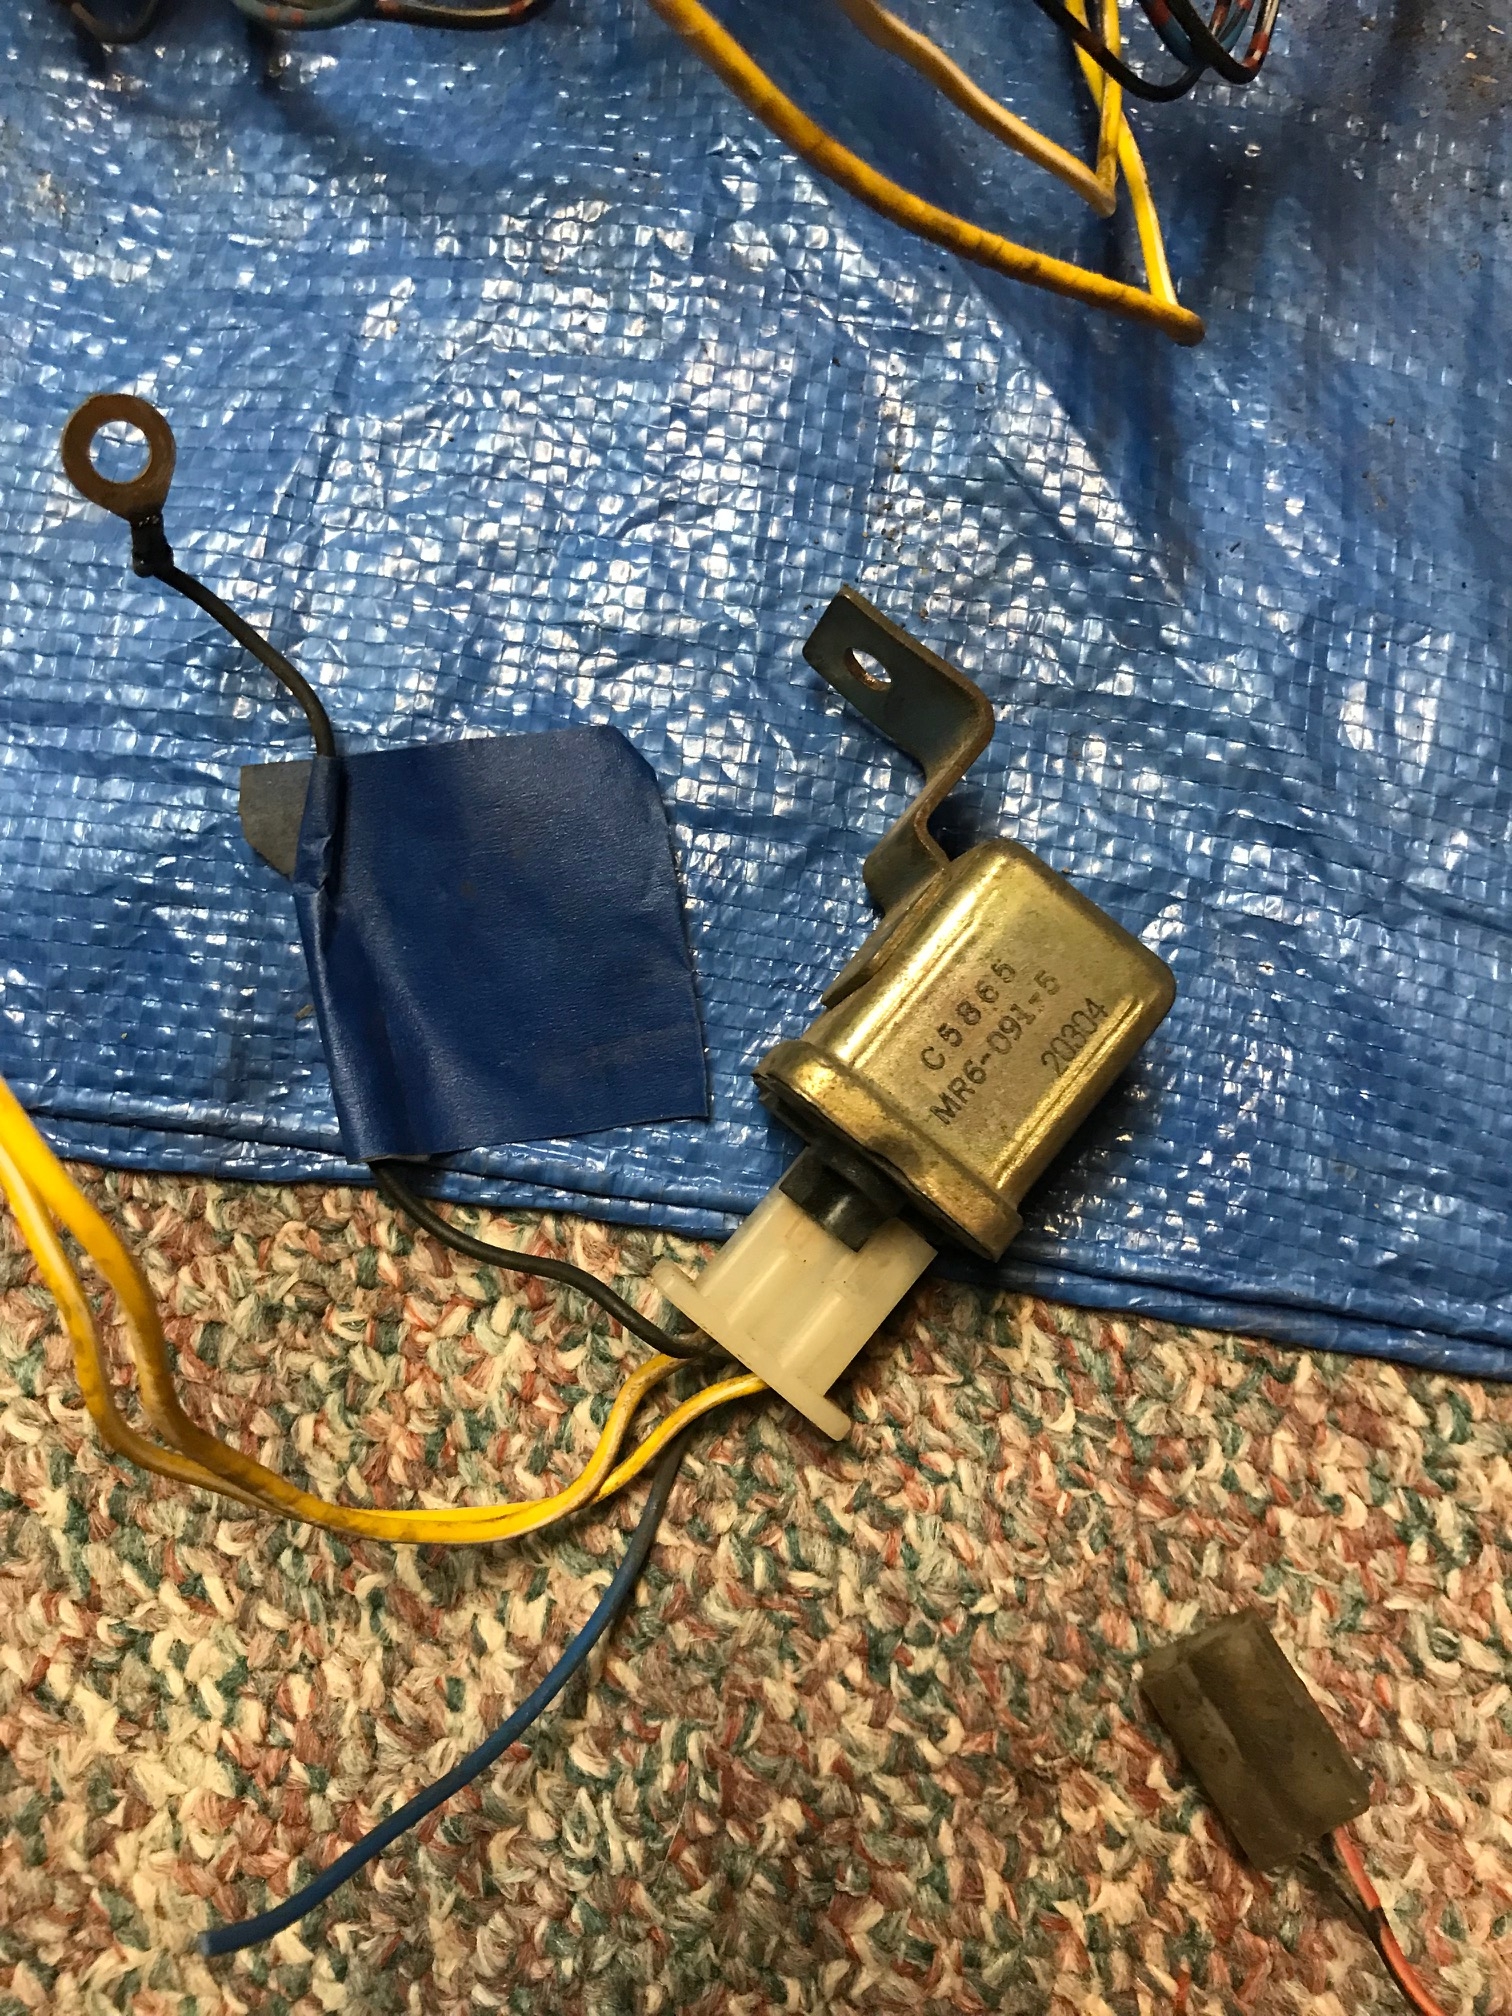
That bank of relays will be all AC related - one for AC clutch, one for the second thermo fan no doubt, and if it references the headlights it’ll be to only run one thermo fan (designed to assume you’re driving at night when it’s generally cooler and also to conserve power usage on a small alternator), the third possibly to power the whole system. That canister on the end is for the idle up diaphragm located beside the carby.
I’m 99% sure that info is correct.
Cheers
Bennie
Great, thank you so much for your help. I'm trying to learn this wiring thing one step at a time haha.
-
On 4/8/2023 at 4:20 PM, Steptoe's photos said:
when i did EA82 5 speed DR into my EA81 Brumby, I needed to space the Brumby EA81 starter by making up a spacer using 4mm aluminium sheet. It looked like a single pipe exhaust gasket once completed.The difference is likely found in the gearbox bellhousing dimensions - as I retained EA81 200mm flywheel . When I finally ditched EA81 for EA82, the spacer came out
When you say you went to the EA82, you're referring to the flywheel, correct?
-
16 hours ago, el_freddo said:
It seems that most of what you’ve shown above is the AC system. It will be separate to the main wiring looms and should be easy to remove.
The brown fuse box near the battery needs to be kept.
There’s really not any wiring that needs to be removed for an EJ conversion, you should be able to easy convert back to EA81 after having an EJ in there.
All you really need for the EJ conversion is:
- permanent power (wire in the back up power to this too)
- ignition power
- start reference (tap into starter circuit)
- oil pressure light/gauge wire (use EA wiring to the sensor)
- engine temp gauge wire (use EA wiring again, EJ sender will change the behaviour of the EA gauge, this is well documented)
- alternator wiring upgraded for EJ output and the plug wiring sorted to work with the EJ alternator. An ignition wire might need to be added to excite the coils to effectively turn the alternator on (stops the battery from draining out when not using the car)
- tape up (isolate) and tuck the EA coil wiring away, or roll up and tape to the main loom if it can’t be tucked away")
From memory this is what’s needed to integrate the EJ loom into the EA loom to make it all work. It’s a good idea to put a fuse between each wire between the looms. That said I’ve never had one blow, but it’s safer to have one there than not to.
Cheers
Bennie
Thank you Bennie,
I completely understand that it’s not necessary to remove the Brat’s wiring harness when doing this swap considering it’s mostly going to be powered by the EJ harness, but I just figured I’d clean up the engine bay a little bit and get rid of the rat’s nest of wires I pulled from it. Just want to be safe before cutting anything though.
Just to confirm, that picture with the three relays and cylindrical connection point mounted on the metal bracket is all for the A/C? That’s the bulk of the wiring in the engine bay currently, and it just seems odd that there is so much wiring for just the A/C. Plus some of those relays have wires going to some important stuff, such as the headlights and the brake master cylinder.
Through a quick parts lookup, I’m pretty sure the cylindrical connection all the way to the left with the hose exiting out the back is the refrigerant pressure switch, so I can rest assured that it’s for the A/C system. -
Another relay and what appears to be some kind of fuse box located, again, on passenger side.
-
Connections next to passenger side relays, fairly confident that none of them were connected to anything.
.thumb.jpg.048329ff5c54f1c588583c08eb983f2f.jpg)
-
Another relay, can't find in all my pictures where it was located.

-
Hi everyone,
Finally in the wiring stage of my EJ swap and I'm working on cleaning up the EA81's wiring harness (at least what was in the engine bay). Besides obvious things such as headlights, wiper motor, etc, what wires need to be kept? I have my EJ22 harness thinned out by SJR and ready to go in. I've removed my A/C wires as I will not be keeping it.
There's a large cluster of wires and relays that were located on the passenger side by the strut tower, and when I've seen pictures of EJ22 swapped 80s Subarus, I don't see any of those wires there. Before I cut them though I just want to be sure. I'll have to post the pictures in separate posts because they can't all fit in this one post. I've also read in Numbchux's swap guide that the EA starter relay needs to be kept but I can't find any wiring harness that show it.
Relays bolted to passenger side strut tower:

-
On 4/6/2023 at 8:34 PM, el_freddo said:
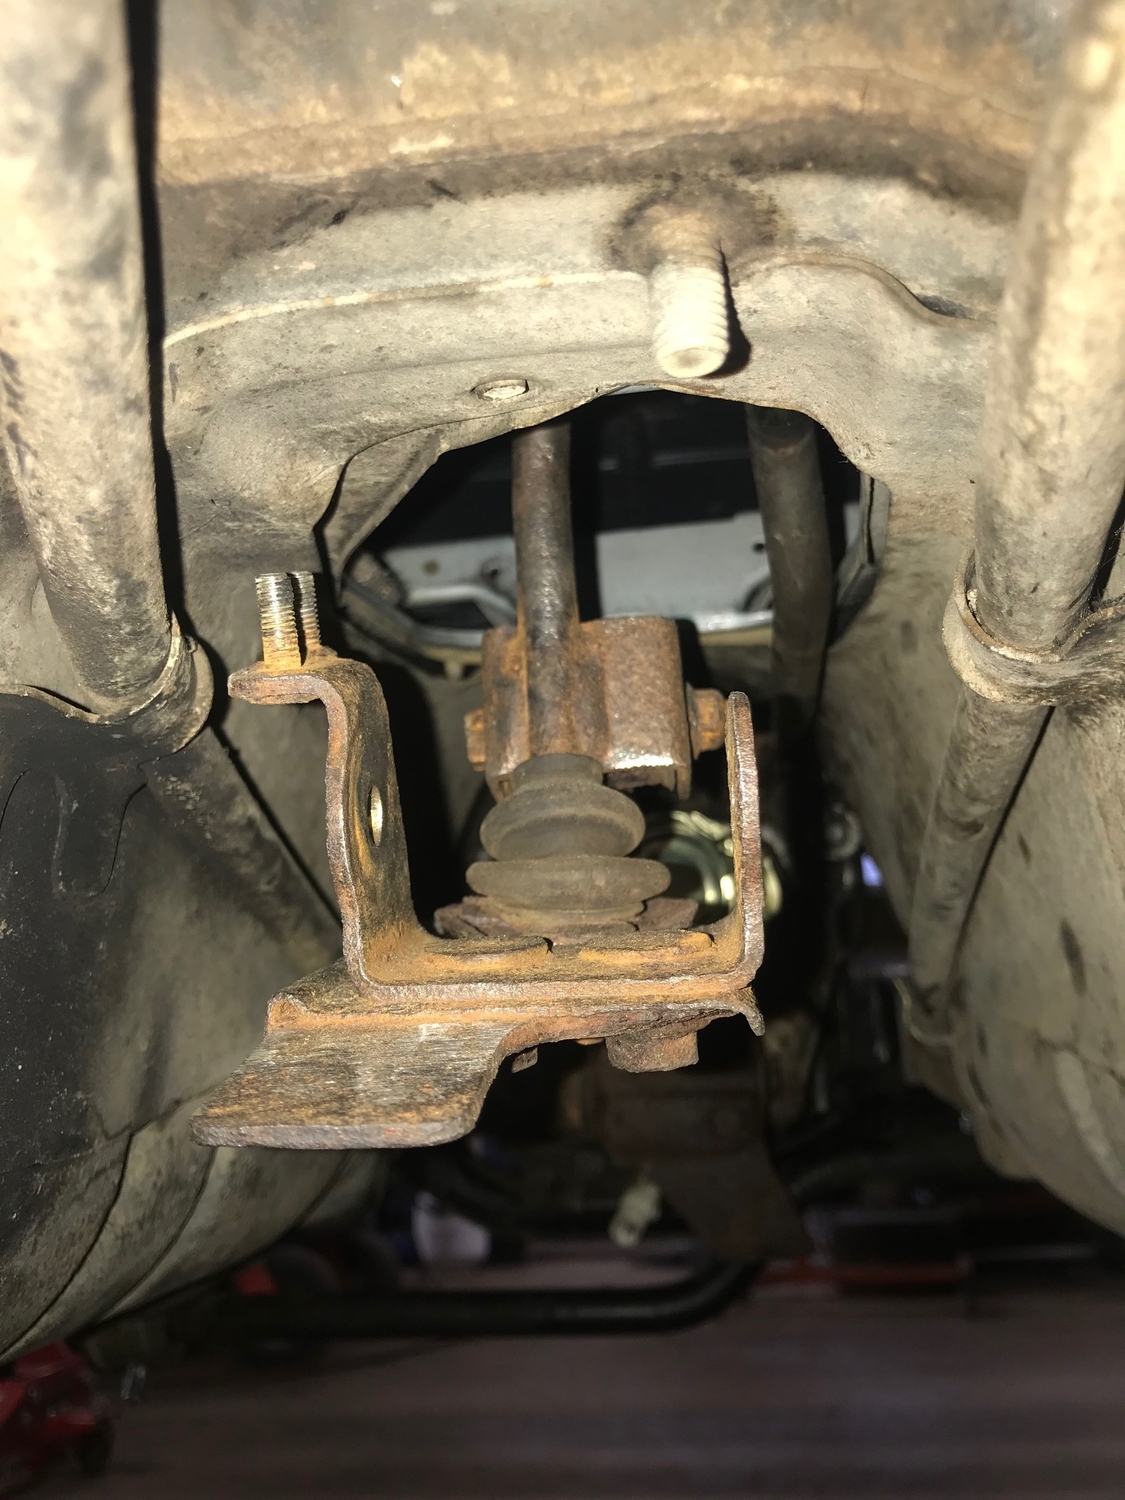
The gear lever arrangement needs to sit up a lot higher, just saying in case you haven’t realised already.
Just out of shot at the top of the pic is usually a single stud that’s unused. This is where you’d make a plate to mount to this stud and the two studs on the bottom of the gear lever as seen in the pic.
The L series used a bracket that had a rubber bush built into it to reduce drivetrain noise transfer to the body too
This is one conversion I’ve not done yet but believe it to be a very worthwhile swap. You’ll lose the Massey Ferguson highway tractor vibe and feel like you’re actually driving a modernised vehicle.
Cheers
Bennie
This new picture I just posted shows that unused stud that I believe you are referring to. I've been told about his rubber bushing, but I don't think my transmission came with one when I mounted it. There was one that went between the two bolts holes you can see in the lower bracket, but it was a part of the 4WD selector, and since Jerry's kit allows me to use the Brat's stock selector, I just unbolted it. Additionally, the lower bracket leaves no room for the driveshaft.
-
On 4/6/2023 at 11:08 PM, Rupart said:
hi,. i just looked again and realized you are not showing the lower mount bracket,, what is in your pic is the actual rod that goes to the shift rod in your trans. there is another lower bracket( mounts on trans) at that shiney alum spot on your trans, then another rod that connects to it and goes back to the shift pivot cup, mounts with the 2 studs on the cup. then the rubber cushion piece also boltsto the rear of that bracket rod piece. Check the pic i posted, i think its clear enough to make out the parts, click on it to expand.
Sorry , i may be wrong about your pic being 2wd parts,, i was looking at the other rod bracket, but,, both shift rod brackets and the bracket that goes on the trans are different for 2wd or 4wd, so basically you gotta have all 3 parts for a 4wd to work right, all from an ea82 setup.
Hi Rupart,
I think that this picture shows the lower mount bracket you're referring to. The parts diagram you posted labels it as 20. The bolt hole you see to the left towards the rear of the bracket is one of the two holes that mounts the 4WD high/low shifter. The two studs on top on the bracket are for the electronic mechanism that will display on your dash what mode you are in, but I don't place on wiring it.
I figured that I would have to keep this bracket as it allows for the 5 speed shifter to be mounted, but keeping it there will not leave any room for the driveshaft, even when I move it as far up and out of the way as possible, therefore I removed it and it's why you can see that really shiny area of aluminum on the transmission.
Do you have a picture of that rubber piece that bolts to the bracket and then to a stud on the tunnel you're referring to?
-
On 4/6/2023 at 8:27 PM, el_freddo said:
I believe they don’t. Different hole size to snug them into the gearbox mount from what I recall. Easy to work it out if you have the two available to play with.
Cheers
Bennie
When I get the chance I will check the size of the holes. The spacing between both mounting holes are the same though.
-
@Steptoe's photosI have the starter from the 98' Legacy (5MT EJ22) and the starter from my '82 Brat (4MT EA81). Both starters have a total of 9 teeth and the spacing between the two bolts holes are the same. I'll have to look back and see if the actual holes themselves are the same size, I didn't notice any significant differences at the time I inspected them. The cog on the EJ's starter stick's out more than the EA's, but both mount in flush with the transmission housing.
I've heard of people having to space out the starter motors when they do the 5-Speed swap, but since I can't see whats going on between the fly wheel's teeth and the starter's teeth, and both starters are sitting flush in the transmission housing, I'm not sure what the best course of action to take is. I may have to wait until first start up.
-
Does anyone know if a starter from a '98 Legacy 2.2 5-speed would work on an EJ22 swap with a EA82 flywheel and 5-Speed D/R?
-
2 hours ago, idosubaru said:
Don’t recall year/model. I remember being surprised XT6s ran fine without an instrument cluster when I had a ton of them so I did it with later EJ (or possibly EZ) and they drove fine to work. It’s odd driving not knowing if check engine light tripped, speed and engine temp.
some folks on vanagon forum mentioned sometimes it takes awhile for issues to show up with a lack of VSS so maybe I got away with it for a lone commute to work?
Which I say because the Subaru vanagon conversion folks have to deal with this often maybe you could see what they say if you strike out here?
Let us know what you find.
I was first made aware of this through a friend that has done this swap on their bus. Definitely seems to be a more prevalent problem over there. When I get to this point in my swap soon I will post here what I found.
-
On 10/18/2019 at 10:38 PM, FerGloyale said:
88 Gl should indeed have had a neutral switch. It was originally FI, correct?
Was this problem ever solved? Would really be interested in hearing the solution if so. I'm anticipating having a similar problem with my swap.
.jpg.df52b633ee42fb6e9fff5389abe5a1c1.jpg)


DL to GL Dash Swap
in Old Gen.: 80's GL/DL/XT/Loyales...
Posted
Hey everyone,
I just recently began doing a dash swap on my '82 Brat. Besides my original dash being worn beyond repair by the sun, I've been meaning to do this as it will be the next major step in my EJ22 swap project. I was able to get a very clean uncracked tan dash for a great price as well as a complete '82 GL wiring harness, which will make the wiring job as easy as it possibly can get. However, I just have some questions while I am doing this:
It's tough to tell for sure, but are the air ducts behind the dash the same in both DL as well as the GL? It seems as though the center area by the climate control may be slightly different, but it is difficult to know for sure.
Also, while removing all of the wiring to swap the GL harness over, I noticed that there are quite a few wiring connections that are seemingly unused and do not go to anything, in particular where the harness in the engine bay connects to the harness that weaves behind the dash. If they are completely useless, is there any harm in removing them to sort the wiring a little more?