Search the Community
Showing results for tags 'Legacy Outback'.
Found 9 results
-
 On our 2005 Outback, our backup lights have been collecting water during rainstorms. Usually it appears as heavy condensation or fog, but after a big rain when I open the tailgate hatch and remove the backup light bulb, water runs out of the assembly. So far it has not shorted out the electrical outlet. I searched the forums but had a hard time finding exactly this problem on this car, so I just want to provide some info and couple helpful links for someone down the road. This is not a difficult repair with basic tools, but do allow at least a couple hours, more like 3 or 4 if you take your time. It took me a long time because once I got the tailgate bezel off (the part where the backup lights are), there was a lot of clean up to do - and of course you want to take your time on a careful reassembly. Body panel clip removal tools are very handy, but not essential. Harbor Freight has a cheap set. I was careful, but still managed to break one of the clip anchors and two bolts. This necessitated getting creative with a different screw and anchor, which took a while to figure out. Both of the breaks were caused by the nut/bolt being rusty, and not loosing. You will need some silicone sealant for the lights themselves, and 3M Strip-Calk, which is about $17. The Strip-Calk is specifically made for assembling body parts and light housings, etc. This was originally described to me as, "Dumdum comes in 12 inch long string sections (like the very thin red licorice)". I also used a lot of 409 and paper towels getting everything nice and clean. I have noticed in the past that most leaks are associated with a build up of dirt and grim in hidden or hard to reach areas. This first video covers removing the interior panels. You do not need to remove the long horizontal panel above the window. Also, on the rubbery weather striping, the small white clips popped right out, which is better than separating them from the strip as Tony does. I taped the strip back in place so it would not be damaged if the tailgate closed. You need to unclip one electrical connector, which on my car was kind of a pain. In this second video, Bruce removes all those interior panels, but also the tailgate outer bezel with the reverse light assemblies. If you only have time for one video, watch this one. I think Bruce misses a set of nuts on each side of the tailgate bezel, far left and right. They are covered by skinny black panels, which I only partially removed (I could not budge the visible clip, but the hidden ones came right off). If you have removed all the 8mm nuts inside the tailgate and the bezel does not budge, look for those other four nuts. Besides using the Strip-Calk on each side of the light foam and around all the bolt hole locations, I put a strip along the rubber edge below the window, wear the bezel makes contact. That is the first place for water to enter under the bezel recesses. I used the silicon to seal all around the light assembly, where the clear part meets the black assembly. That should about do it. Time for a beer.
 -
 Hi Folks. Previously my partner had the same year & model & though we're in Vermont where cars rust to bits, we got lucky enough to find another which came here from CA. & got well treated before rust could set in. We're very happy with it but for several things: 1 - The dome light doesn't come on at all; 2 - It throws an evap code every so often; 3 - It has the central locking system & the alarm stickers - but came with no remote(s). I'm guessing it uses the same ones as the other '98 did as it has no button near the OBD plug - and we have good remotes left over from when the other car went for parts. They are the Alps 88036ae060 & look like the pic here: image ?? But, when trying to get the car into programming mode it is 100% unresponsive - leading me to think that system was disconnected or is otherwise messed up. I tried the programming steps from the couple of different alarm types I found & none of it made any difference. Since the alarm must also use door switches I'm guessing these may be related somehow... In my searching I've read a bunch of stuff about fuses & different systems & I remain uncertain of how to proceed. I will appreciate any guidance in these matters very much !!
 -
 I thought this dead horse could use a little more beating. I would like to lift my 96 Legacy Outback. With the intention of putting on larger tires, as you do. Currently my 205 70 15 tires are about a 1/4" from the rear strut spring perch. (i think that's what it's called). Which year struts should I use for the front and rear? Would a small wheel spacer help? I figure if those can get me a couple more inches i may get some 235 70 15 under it. Thanks!
 -
 Hello all, I am absolutely certain I am not the first, nor will I be the last to come on and ask about this particular issue pertaining to these transmissions. However I cannot find a clear answer from browsing other posts and forums, so here goes. My '02 Outback wagon has a 5-speed out of an early GD chassis Impreza WRX (Bugeye) installed. I recently had it rebuilt, as I didn't really know what the condition of it was and how many miles it had on it, and I also had the clutch replaced while the transmission was out of the car. For the past little while I've noticed that when slowing down with the car still in gear from about 3K RPM to about 2K RPM it makes this very distinct rattling/grinding noise. I have narrowed it down to a transmission fault as the noise is nowhere to be heard with the clutch disengaged, however what that fault is is somewhat unclear. The most prevalent response has been cheap transmission fluid (which would not surprise me in the least), to other more serious problems. So, I am seeking out help from you all to get a more concrete answer to this question. Some additional information if this may help with proceedings, the transmission can grind when shifting into first when at a stop (however this is often remedied with shifting into second before shifting into first), it occasionally grinds on the 3rd to 4th up shift (especially if you are or have been travelling at higher speeds, eg travelling on freeways although it does do it occasionally with low speed, in town driving), and very rarely on the 4th to 5th up shift during passing maneuvers. Recently, when the transmission is cold it will make a very loud rattling noise when moving off from a stop in first, and when idling at a stop in neutral. Once the transmission has warmed up a bit after a small amount of driving this more recent noise is no where to be heard. Any help on this matter would be greatly appreciated!
 -
 Hi everyone, I'm sure there are plenty of threads out there discussing suspension lifts on the BG body Legacies. I don't want to add to a stale, broad topic, but simply to document my process in the hopes of helping anyone in the future do what I did and help anyone that has questions. Feel free to ask. I just finished this project tonight, 3/4/2016 at roughly 243,7xx miles. With the spacers and struts, it resulted in roughly a 2" additional ride height over the saggy stockers. Will update with any finds or problems. -I lifted my 1998 Legacy Outback Wagon with 2003 Forester struts and 1" spacers. Here is my story.- BEFORE YOU BEGIN- Make sure you know what you have. This may seem arbitrary, but these instructions only apply to the Outback model Legacy wagon. I cannot guarantee the same process or any advice for the SUS. IMPORTANT: again, Outback only. The Outback comes from the factory with a inch/inch and a half lift over the standard Legacy. Thus, it has spacers between the front and rear subframes, trans mount, and differential mount. These are important and change suspension geometry, most importantly the angle at which the lower control arms will flex and stress the ball joints. The more angle, the more stress. IMPORTANT: know your rig. Lifts will stress ball joints, bushings, and axle shafts more than they were designed to accommodate. Mod away, but mod at your own risk. IMPORTANT: This applies to vehicles keeping the stock tire size. This will work with the original 205/70R15 tires, or 215/65/16 (such as Forester steelies.) Increasing tire size is possible, but more on that later. [here is the "I am not responsible for any issues caused by what you did to your vehicle or their side-effects, improperly aligned headlights, injuries, failed inspections, missing sway bars, unrelated concerns, oil leaks, or other 'ever since...' concerns. This is a modification, not a repair. Nothing is guaranteed. Things may not go as planned and I am in no way responsible for that" disclaimer thing. Happy modding!] WAHT 'SPECIAL EQUIPMENT' YOU WILL NEED ACCESS TO -Spring compressor (rear strut dissassembly) -Alignment equipment -Air tools or high powered battery/electric tools (such as Milwaukee M18 tools) recommended TOOLS -1/2" ratchet or impact -3/8" ratchet or impact -19mm or 3/4" Socket -19mm or 3/4" wrench -12mm socket -14mm socket -14mm wrench -multiple prybars -hammer -flat-head screwdriver and/or punch and/or chisel -cut-off wheel -tricking someone to help you before they realize what you're doing is recommended WHAT I USED: Forester struts -Forester struts from 1999 to 2008 will bolt up no problem. However, 99-02 struts are actually shorter than Outback struts, so using them to gain ride height would be counter-intuitive. I know for a fact 03-04 struts will work, that's what I used. 1" strut spacers -available from many distributors online, such as Gorilla Offroad Company, Subtle Solutions, or nameless eBay sellers. I got mine from Gorilla Offroad. They sent me the wrong rear spacers which I noticed well before installation, but they were very good about correcting my order. No matter who you order from, make sure they fit before you get your rig all apart. Another bonus of getting Forester struts, you can test fit them out of the vehicle. BEFORE INSTALLATION You will need to replace the mounting studs on the struts. You should have gotten hardware with your spacers, which include 12 (at least 2" long) bolts and lock nuts, or longer studs. If you are using the struts currently in your car instead of forester struts, you can skip ahead and come back to this once dissassembly is complete. The front struts are easy, since the mounts spin. You can simply pound these studs out with a hammer, or use a press. The mount can spin to allow you to remove the old stud and install the new stud or bolt. My spacers from Gorilla Offroad came with hardware, as in 12 bolts and lock nuts. The spacers had provisions in them for the nuts to sit in once the spacers were in place. I re-used the top mount nuts. The rear struts are where it gets tricky, since the top mount doesn't spin conveniently out of the way. Therefor, you need to separate the strut mount from the strut assembly, and the rubber insulator from the metal mount. Use a spring compressor for dissassembly. Spring compressors are very dangerous, as they use thousands of pounds to compress the spring. If the spring is not secured properly, it could come loose and cause serious/fatal injury, not to mention property damage. If you do not feel comfortable using a spring compressor, it's better to find a friend who is or bring it to a shop for disassembly/reassembly. If you are comfortable using a spring compressor, compress the spring until you can grab the bottom of the shock absorber and shake it gently so it moves free of the spring. Remove the 17mm nut at the top of the strut, in the middle. If the nut does not break free of the shock absorber, use a pass through socket and a hex socket in the provision in the middle of the stud, or gently grip the shock absorber shaft with pliers to prevent it from spinning (NOT recommended, as it could damage the shock. Only for desperate or brave individuals.) The shock will fall out, so remove the top mount from the spring, pull back on the rubber insulator (it grips around the center, spray with silicone lubricant to break free) and replace the studs. Re-assemble strut. Repeat for other side. THE DIRTY WORK -hoist vehicle off wheels -remove front wheels -remove the 12mm bolt holding on the ABS wheel speed sensor wire. Be careful not to let the mount twist and break the wire. (ask me how I know) -use a flat head screwdriver and a hammer to remove clip holding on the break hose to the bracket. -you may find that the brake hose passes through the bracket, which cannot be removed, and must be opened to be removed. I recommend against this as it could lead to more problems, such as bleeding the brakes, bleeder screws breaking hose fittings being too damaged/corroded to reuse, etc. In that case, I used a cutoff wheel to notch the bracket, being careful not to damage the brake hose, until I could use a screwdriver/chisel/punch to break the mount and bend it out of the way. -Remove the 19mm (3/4") nuts and bolts holding the strut to the knuckle. The top bolt is the camber adjustment bolt, so it is cammed. Be careful not to spin it with an impact to avoid damaging it. -remove the three 12mm nuts holding the top of the strut to the vehicle. The strut will fall out the bottom, so be ready to catch. -install the new lift strut, reversing the removal procedure. NOTE: resecure the brake hose to the bracket. Zip-ties will most likely fail a safety inspection, just as a side note. -getting the knuckle bolts in is where a helper comes in handy. You will need to pry and push and jiggle the strut and knuckle around until you can line up one of the holes and put the bolt in. One one is in, it goes easier. Remember, the TOP bolt is the cammed, camber adjustment bolt. Since camber goes positive during suspension decompression on a macpherson strut system, install this so the camber is most negative, as in the top of the knuckle moves away from you as much as it can be adjusted. -tighten all of your mounting bolts and double check your work. Move to the rear. -remove rear wheels and repeat removal process. You should not have an ABS speed sensor to worry about in the strut this time, though. -disconnect the rear sway bar by removing the 14mm nut and bolt. Remove the mounts, and the sway bar if you wish. You will not be able to reconnect it after the lift using the original end links. It's not that much more body roll, I promise. -to gain access to the rear mount studs from the interior, fold the backseats forward and locate the access trim panel over the strut tower. Remove the Christmas tree style fastener closer to the seat, on the side, then pull up to remove the trim. Remove the insulation set on top of the mount. -to remove the strut, you will need to wrestle the lower part away from you, down between the trailing arm and front-most control arm, so the strut can be moved down enough to pull the top out first. -once the strut is removed, it is a good idea too inspect your shock towers for rust. Here in the salt belt, every Subaru I see in they junkyard that doesn't have a hole in the block has a rear strut tower blown through from rusting out, unusually the left side. Look carefully both on the inside and outside of the vehicle. Pull back the carpeting and insulation in the cargo area a bit to check for rust. A coating of rustproofing while you're there isn't a terrible idea. -before installing the new strut, clean, buff, and slightly spread the lower mount bracket for ease of installation. Use a cut off wheel or a sawzall to remove the brake hose bracket. If left in place and used, it will pull the hose too far down and stress the upper section of the hose. If left on and not used, it will rub against the hose and cause risk of hose failure. The lift will cause the hose to be pulled down more, so there is less slack and actually ensures the hose won't go anywhere it shouldn't. -reverse removal procedure to install. -there is no easy way to get the rear knuckle into the strut. There just isn't. I used a 54" prybar against the trailing arm and the center of the rear subframe, and jostled the knuckle around until the holes lined up. This is the hardest part. Again, where a helper comes in handy. -complete the reassembly, double check everything, and put the wheels on. -alignment time! ALIGNMENT -I actually found the alignment is not affected as much as I thought it would be for a lift. When I put my car on the machine, the rear camber was out of spec, positive by only one tenth of a degree on the left, and less than a tenth on the right. Rear toe was still in spec. Front camber was also surprisingly in spec for a blind adjustment. -due to differences in setups and vehicle condition, your alignment may be different. If it is out of spec, have it fixed. Camber causes excessive wear on the inner (negative) and outer (positive) shoulders of the tire. Rear toe could cause dog-tracking or diagonal wipe (which destroys tires something fierce). I hope this helps anyone considering the project and wondering how involved it is. Having the studs installed in the struts beforehand, it took me between 3 and 4 hours with shop air and a vehicle lift. Any questions, I will answer to the best of my ability. Happy modding!
-
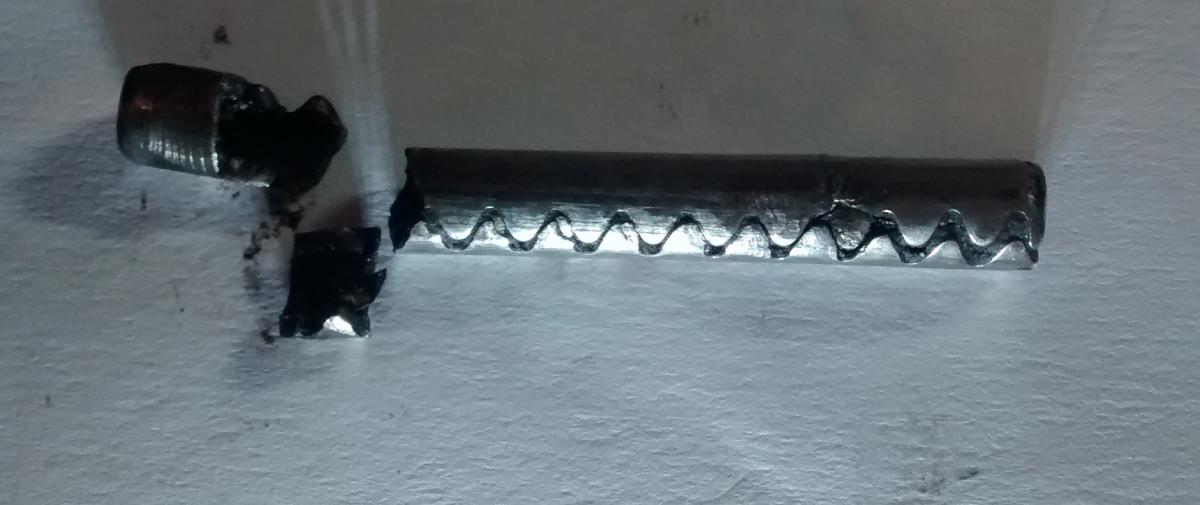
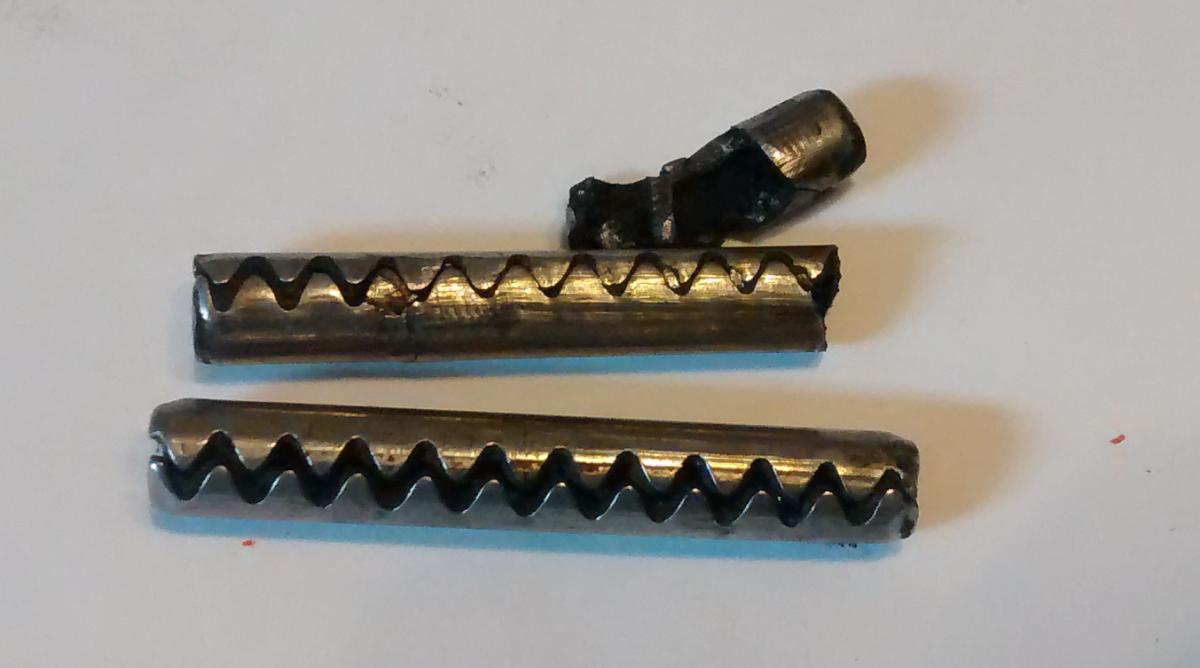
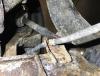
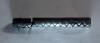
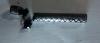
 I punched out a roll pin on my 97 legacy outback and it seemed like it took more effort than it should have and when it finally came out it had been broken. I went to put a new pin in and it was being a real bugger to work with so I took a look at the roll pin that had come out. It was permanently compressed. Is it possible that the shaft from the transmission has a hole that is too small for standard subaru roll pins? Here's a few pictures of the pin: Here's the roll pin from the 97 legacy compared to a pin I pulled from a 99 forester last week.
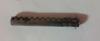

-
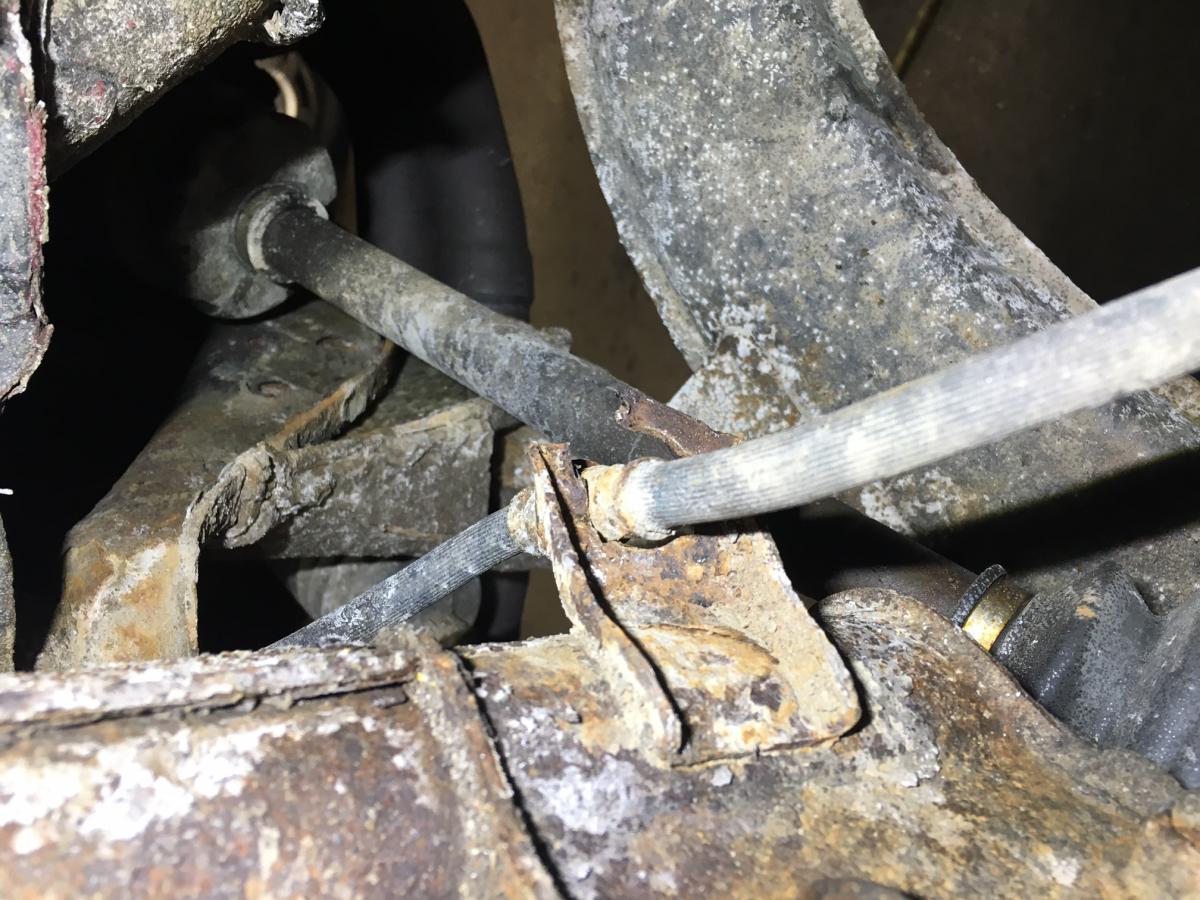
 I can't afford to get ripped off by a "dealership" or mechanic so I came to see if I can be a little more informed on whats going on to my 1996 legacy outback. (I love these cars, they are reliable and durable) Thanks so much in advance, and please correct me if I am wrong. So I have been on a road trip for a month or more and I am assuming due to regular mountain and heavy load usage (northern California sharp turning roads) I am now hearing clunking noises every time I steer left coming from the driver side front left tire area usually happens when going 45-65 mph, sometimes when going slower. I've also noticed its happening when I am decelerating or hitting the brakes. When it first hit me I was on the highway going 65 mph and my steering wheel started jerking like never before. I pulled over next town and did some internet research. I came up with a list of possible things it could be: Bad tire alignment steering rack axle ball joints cv shaft cv axle cv joints inner/outer tie rods wheel bearing lower ball joints I then went under the car and took some pictures, I am not too car savy but enough to do the work myself if it isn't re-building a motor. I need help figuring out what's causing the noise so I don't get ripped off if I have to go to the mechanic. From other forums and posts I have read it seems to be something I definitely need to take care of as soon as possible. The torn boot is in the front left driver side. I have noticed atf fluid leaks and sits in a puddle sometimes (can't be good?) Another angle Torn Steering rack & pinion boot or inner tie rod boot I believe? Another angle of the torn boot This is again the same torn boot, except this time in the photo the steering wheel is turned to the left as far as it can go (this is the way when it makes the clunking noise) It seems to be the Rack and pinion teeth that is being exposed? (This is where I get confused, is this the steering rack and pinion boot or is it the inner or outer tie rod boot? please help) How bad does it look? Again, another angle with the steering wheel turned to the left as far as it can go. CV Axle boot (closest to the wheel) I believe, with the steering wheel turned to the left. Does it look bad? Again, another angle of the CV Axle boot (closest to the wheel) same position. So, what I am thinking it has got to be either a bad CV axle or CV joint? Or a bad inner/outer tie rod and boot. Or a torn Steering Rack & Pinion boot with a bad overall steering rack (Although I hear its rare). I am low on funds and really need to just get down to the nitty gritty of the problem and fix it. What must be done? I need your advice, tips and help. Thank you!
- 7 replies
-
- 1
-

-
- 1996
- legacy outback
- (and 8 more)
-
 I bought a 2.2 L manual 1996 subaru legacy outback last year. It consumed a lot of oil and puffed a little blue smoke coming down steep roads or hills. I flushed the rdiator when I got it, oil and filter change, brake change, valve cover and seal change, air filter. drove it for about 2 months when it started to hard idle. Noticed if i was coming to a stop in any gear other than first it would die, and I could keep it from dying by pushing in the clutch almost from deceleration, even if going 30mph. The hard idle became a bucking when slowing down and at times when speeding up. changed the 02 sensors. nothing opened up the cat to find it had melted into a block and was clogging the muffler. a relative broke most of it out in the cat but didnt clean out the muffler further back. hooked up to to read the codes and got: p0500 vehicle speed sensor (speedometer doesn't work) p0201 injector circuit cylinder 1 p595 iac system p0301 cylinder misfire un hooked the iac and it instantly breathed better it is still not connected still uses a lot of oil now puffs out blue smoke at high rpms other than 5th gear and occasionally at start up. car is choking on itself really bad I have looked up so much stuff online and am at a lost. Any help would be very much appreciated
 -
 My old man's car blew its head gasket according to the dealer. So in an attempt to save a few mortgage payments getting this car's gaskets replaced in a dealer, I figured I could do it myself. Now, I'm no slouch in the mechanic department; I'm wondering if any other members here have done the head gasket themselves on an H6 EZ30 motor. The repair industry calls for 14 hours for each head gasket and I know that there's not very much clearance at all in the engine compartment. Provided the heads are not damaged (the rad did boil over) I could potentially save a lot of money. The labor is not something I'm fearing. TLDR: Head gasket blew on an H6 3.0 (EZ30) engine. I want to replace the gaskets myself. I have an AllData printout of what i need to do but: Do I need to take the engine out? Do I need any special tools? Any tips from the pros? what to look out for, what not to do etc. Thanks a lot in advance, wish me luck!