83subaruGLchick Posted March 26, 2019 Share Posted March 26, 2019 Love your build! Post some more project pictures when you can/have time! I want a shell that looks like this! Quote Link to comment Share on other sites More sharing options...
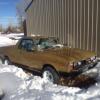
LouKoff Posted March 31, 2019 Author Share Posted March 31, 2019 Wasn't able to get the brat going for the road trip because I found that I broke a spring washer on the rocker arm. But i did get the new rotor on and I got my rear drums turned, and the brakes feel better than ever. Took it out for some joy riding on some icy roads but immediately found out my alignment went wonky in the back because it was fishtailing and fighting itself bad in 4wd going straight over 25mph on the ice. Took it back to the garage and did a 2x4 toe plate adjustment and then used a drywall laser to double check everything. Now it's driving great, but I still have to replace the rocker arm assembly before I start dailying it again. Heres a random photo dump Header wrap by Luke Hoffman, on Flickr New Carpet Project by Luke Hoffman, on Flickr Winter Drive by Luke Hoffman, on Flickr Settled Suspension by Luke Hoffman, on Flickr Probably going to be taking it out of storage, washing, doing some more wetsanding and buffing to get the paint really looking nice this season, and then start dailying it again soon. Quote Link to comment Share on other sites More sharing options...
LouKoff Posted April 13, 2020 Author Share Posted April 13, 2020 (edited) Not long after my last post I ended up tearing meniscus pretty badly while rock climbing which lead to me having to get surgery and spend about 7 months in bed, having to do lots of rehab to walk correctly and gain mobility back in my knee. Unfortunately this also meant that I was unable to bend my knee enough to safely drive the brat as I'm 6'4" and barely fit in the thing to begin with. After about a year I finally got it back on the road, but not after some trouble with the fuel tank. So anyway on to the update of the car, I replaced the rocker arm which had broken a spring washer and started driving it a bit but had trouble with the car stalling out often and sometimes not starting at all. Turns out that after sitting the fuel tank had rusted again pretty badly and the sediment from the tank was clogging the in tank fuel lines. The fuel lines turned out to be badly rusted inside as well so I tried to take a industrial pipe cleaner to the inside which was a bad idea as the brush on the end of the metal line ended up breaking off in the line making the problem even worse. Unable to get the brush out of the line I was forced to make a new line in the tank. I did this using some 3/8" brake line I bent to reach near the lowest point of the tank, drilling a new hole in the tank on the drivers side of the tank, then feeding the brake line through an opening in the baffle. After a deep clean of the tank using vinegar and then degreaser with many flushes of water to make sure any gasoline fumes and varnish had been removed I brazed the new line to the tank. To hopefully stop future problems with the tank I sealed the tank using por-15 fuel tank sealer following their recommended procedure of prepping the tank with a degreaser and then their metal prep which is an acid based solvent to etch the metal and get rid of any of the remaining rust. new line by Luke Hoffman, on Flickr new line out of tank by Luke Hoffman, on Flickr new line in tank by Luke Hoffman, on Flickr On to other news while unable to drive the brat I was forced to get another vehicle big enough for me to fit in so I picked up this 1988 Toyota right before my surgery. I also started cutting up the donor brat I took the ea81 from to make a trailer out of it. Brat with CC2 by Luke Hoffman, on Flickr Brat with CC by Luke Hoffman, on Flickr Brat trailer project by Luke Hoffman, on Flickr After getting the brat back on the road I decided it would only be right that now that it was no longer lowered I would flex it out to check the suspension travel. Here are the results right as it started to three wheel. Flex2 by Luke Hoffman, on Flickr Flex1 by Luke Hoffman, on Flickr Front Flex by Luke Hoffman, on Flickr Rear Flex by Luke Hoffman, on Flickr Now that it's back on the road I've found some new motivation for it and will probably be doing little projects on it here and there. Some things I'd like to do next are a rear bumper and some mods to try to squeeze some more lift and travel out of the suspension. I also decided to ditch the idea of fixing the topper as I'm not a huge fan of how it looks and it was just pretty messed up with a rotten core and missing windows, so I cut it up and am hoping to make a fiberglass tonneau cover using some of the pieces from the topper. As far as the second gen brat trailer goes I'm trying to make it a capable off road trailer I can pull behind the Toyota or maybe behind the brat for camping and doing utility work, so I'm going to be building a steel frame for it with new suspension, haven't decided if I'll go independent suspension like timbren or leaf springs and a straight axle yet. I've also got a build thread going on for my Toyota which I'm turning into a off road camper on expedition portal if anyone cares to check it out https://www.expeditionportal.com/forum/threads/1988-toyota-custom-cab-build.207189/ Edited April 13, 2020 by LouKoff 1 Quote Link to comment Share on other sites More sharing options...
LouKoff Posted July 8, 2020 Author Share Posted July 8, 2020 (edited) I've been driving the brat as a daily the past two weeks because my other car broke and I've been waiting on parts to fix it. So in the mean time I've made some upgrades to the rear of the brat this week....suspension and a bumper. I used EMPI 9571 coilovers meant for vw baja beetles with torsion bar front suspension as a helper spring for the torsion bars. The stroke is 5" and the extended and compressed lengths are almost exactly the same as stock. Bolted right in other than having to press out the sleeve the coilover bushings came with and very minimal cutting. I cut a little off the bump stop tab on the control arm and ground a little off the bump stop to get the spring to clear on full droop. I also made a rear bumper with a hitch and swingout spare tire carrier so i can keep my spare out of the way and use a hitch mount bike rack or other things. Empi 9571 by Luke Hoffman, on Flickr Bushing sleeve brat coilover by Luke Hoffman, on Flickr Coil by Luke Hoffman, on Flickr Coil clearance on gound by Luke Hoffman, on Flickr lil rear lift by Luke Hoffman, on Flickr Bumper finsihed by Luke Hoffman, on Flickr hinge by Luke Hoffman, on Flickr Swung by Luke Hoffman, on Flickr I've also done some camping and doing some shakedown testing to get a feel for what else it needs in the suspension and steering to drive a little nicer off road, Im thinking trying to get a little stiffer front spring or finding another solution to getting better front suspension and steering. Brat PR4 by Luke Hoffman, on Flickr Brat PR3 by Luke Hoffman, on Flickr old grade back by Luke Hoffman, on Flickr old grade front by Luke Hoffman, on Flickr uphill brat old grade by Luke Hoffman, on Flickr downhill old grade by Luke Hoffman, on Flickr lakeside swing brat by Luke Hoffman, on Flickr lakeside bumper brat by Luke Hoffman, on Flickr Edited July 8, 2020 by LouKoff 1 Quote Link to comment Share on other sites More sharing options...
Probz Posted July 8, 2020 Share Posted July 8, 2020 Nice of you to drive the car around like its meant to be driven, usually when i get nice paint on a car, i wanna keep it safe like a baby and barely drive it around. Quote Link to comment Share on other sites More sharing options...
LouKoff Posted July 14, 2020 Author Share Posted July 14, 2020 On 7/8/2020 at 3:01 PM, Probz said: Nice of you to drive the car around like its meant to be driven, usually when i get nice paint on a car, i wanna keep it safe like a baby and barely drive it around. Thanks, I tried to baby it for a while and then came to a realization that after all the work and money I put into it to make it drive well it should be driven as much as possible. With that being said I notice every new scratch and dent and it kills me everytime, got caught out camping in a severe thunderstorm and hail with it the other day and picked up a few new dents on the hood which really hit deep. Quote Link to comment Share on other sites More sharing options...
NuclearDeLorean Posted August 19, 2020 Share Posted August 19, 2020 I just finished this journey you went on. Awesome work!!!! 1 Quote Link to comment Share on other sites More sharing options...

Recommended Posts
Join the conversation
You can post now and register later. If you have an account, sign in now to post with your account.