


Pierobon
-
Posts
27 -
Joined
-
Last visited
Content Type
Profiles
Forums
Gallery
Store
Posts posted by Pierobon
-
-
So, straight down to issue:
I have a 2008 Outback with original Keyless system installed and Push-To-Start button. This also means that my car does not have a key slot in the steering wheel column. (click for pictures)
When I bought it used, the previous owner only had one key.
So, I bought a new original Subaru one, but the dealers here in Brasil are charging more than a thousand of my brazilian bucks (read U$350) just to program the new key into the ECU. (New single key is about U$1000). That's just too insane for me.So I bought the OBD-USB cable and tried to do the programming myself, but all I could do so far was reading the sensors of the car with FreeSSM.
Because my car doesn't have the key slot to start the engine, I am not able to follow the key programming procedures found on youtube, because all of them involve turning the key on-off to activate the programming mode on the car.
I also tried the original Service Manual way, but I just couldn't find the step 2 registration connectors (1 pole white).
The Service Manual, Body section, page SL-47 describes:
D: REPLACEMENT
1. REGISTRATION OF KEYLESS TRANS-
MITTERNOTE:
• A maximum of four keyless transmitter can beregistered for each individual vehicle.
• When replacing or adding the keyless transmit-
ter, new registration of keyless transmitter is neces-
• When replacing the keyless transmitter,registra-
sary.tion to immobilizer system is also necessary.
1) Remove the keyless transmitter from the ignition
switch.
2) Remove the lower trim cover at driver’s side,
then connect the registration connectors. (1 pole
white connector)
3) Press the door lock switch (1) located under thepower window main switch to UNLOCK. (Make
sure the room light blinks and buzzer sounds, and
then system is in registration mode.)4) While pressing the button of keyless transmitter
to be registered twice with door lock switch pressed
to UNLOCK. (Button for LOCK, UNLOCK and
TRUNK are acceptable)5) When the registration is completed normally, the
door lock actuator will lock → unlock. If the lock →
unlock operation is not carried out, repeat the pro-
cedure 4).NOTE:
• When pressing the keyless transmitter button,
slowly press for first and second (press longer for
second) to check operation of door lock actuator.
• Do not press the button of keyless transmitter
more than twice.• Do not batter the button of keyless transmitter.
6) Repeat the steps 4) if there is an additional key-
less transmitter to be registered.
7) Pull out the registration connector, and install the
lower trim cover at driver’s side.NOTE:
• The transmitter can be registered only when the
door lock switch is remain pushed to UNLOCK.
• Continuing to press the door lock switch to UN-
LOCK again allows to be registered although the
door lock switch is released for once.• When adding the keyless transmitter, re-registra-
tion of keyless transmitter which was already regis-
tered is necessary.2. CLEAR OF KEYLESS TRANSMITTER
1) Remove the keyless transmitter from ignition
switch.
2) Remove the lower trim cover at driver’s side,
then connect the registration connectors. (1 pole
white connector)3) Press the door lock switch located under the
power window main switch to LOCK. (Make sure
the room light blinks and buzzer sounds, and sys-
tem becomes in clear mode.)4) While pressing door lock switch to LOCK, insert
and remove the key on ignition switch 10 times
within 10 seconds.
5) When the clearing is completed normally, the
door lock actuator will lock → unlock. If the lock →
unlock operation is not carried out, repeat the pro-
cedure 4).6) Pull out the registration connector, and install the
lower trim cover at driver’s side.NOTE:
• The transmitter can be cleared only when the
door lock switch is remain pushed to LOCK.
• ContinuingtopressthedoorlockswitchtoLOCK
again allows to be cleared although the door lock
switch is released for once.• If changing from registration mode to clear mode,
you cannot go to clear mode unless completing the
registration mode. The reverse case is same as
this.Solutions to my problem:
1 - There could be a different procedure to program my new key, pushing buttons and connecting cables, that doesn't involve OBD interfacing.
2 - There could be a computer software with the same function as those OBD Key Programmers devices, that I can use with a basic OBD-USB cable.
Please please please help!
Thanks a LOT!
-
Like I said, I'm knocking door to door on every garage I can find, looking for a job. Of course that's fun, you get to know all the tiny villages!travelling around Europe? for fun I hope!

ciao
I can carry the whole transmission barehanded (with some effort, of course).My only concern now is whether the cherry picker I got would be capable of dealing with the engine+transmission :/ I got the 1 ton from Harbor Freight... any estimate of how much the engine+transmission can weight?
Half a ton weight limit should be enough capacity, but maybe not enough height clearance.
With a ton crane you can lift the entire front of the car to put it on top of service blocks. Just watch out where you are fixing the chain - engine mount or suspension wishbone is ok, make sure you stay clear of the drive shaft.
Ah, and never use a metal hook if you are doig that, use a huge nylon strap.
-
I don't think it was a good idea to let the baby crawl under the back of the car............doesn't look safe for the kid. He needs to be a lot older, before he starts wrenching on a Subie.
Oh my, what can I say?
I'm sorry, I should have called you before wrenching on my own... LoL
If you were old enough, you would strive to learn how to do it even beter!
Sorry about the bad news for you, pal.
-
I'm totally amazed that you are doing this work in flip flops and everything is so clean.
If anyone like my pictures, and wants to give me a job, I am currently wandering around Europe knocking on every auto shop I can find.
Just send me a PM, I will probably answer in less than 3 days max.
Appreciate your help!
-
One might add a "salter" to the car, same way train locomotives "sand" the rails to avoid slippage.
This way the salt would melt the ice and let the tires hit the tarmac to break and stop.
(this was a joke of course)
-
Decisions, decisions,,,, order a $2.00 o-ring and have to wait another week or try and get this thing dropped in and back together??
LOL, I have to say I live in Brasil, and the government here is so stupid with importations that you actually have to wait sometimes about 90 days to have something cleared of customs.
Most stuff subaru has in-stok, but if you are lucky enough to need that single part that's not stocked in Subaru of Brasil depot - oh my you are F*%#&!
So hey, what's waiting another week?
-
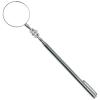
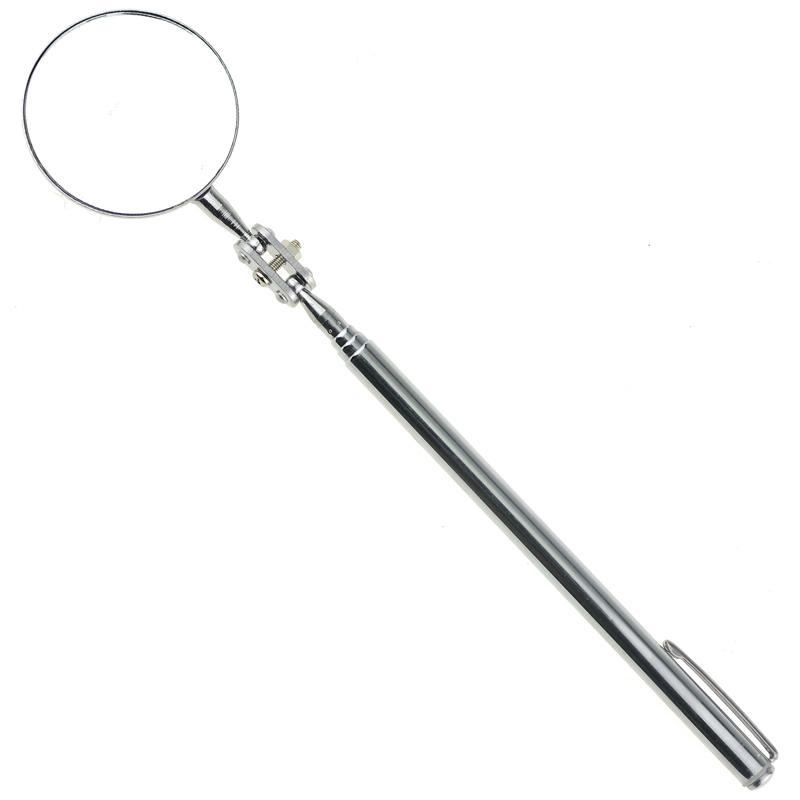
Used one of these to find the dripping blue stuff, couldn't see much, under and behind the pump there is a "hole" as big as your thumb, had to squeeze it between the oil-pan and gas exhaust - HOT!!!
Anyways, I couldn't see much but it looks like the original leak was from the pump bearings and the spinning was throwing the glycol all the way to the side of the pump, then somehow gravity guided it sideways until it touched the engine block and finally dripped vertically down. So it only looked that it was coming from the gasket itself.
Anyways, now I glued both engine block and thermostat gaskets with RTV and it's working - YAYS!


-
Mine is EJ20, I'm gonna remove all covers, fire up the engine and look for the leak point with some camera or mirror or loupe or idk. I know it will be easy to find cause i'm using a very blue glycol in the system instead of just water.
I'll post here when I have news.
Thanks for everything anyways!
-
power steering pumps have a shaft seal and rear gasket as well. there's a rebuild kit for them from Subaru. failure is very rare, rebuilds or used pumps are the alternative to the high cost of a new Subaru one.
you got that oring from Subaru? i didn't even know they sold it here in the states!?
my problem has nothing to do with the power steering shaft or gasket. what's leaking is the o-ring in the bottom of the oil reservoir.
-
the steering pump leak is likely the o-ring between the reservoir and the pump.
it takes about 30 minutes to replace.
Problem is that I already replaced it, again original subaru part.
-
I guess it's a no-go.
Tested and retested, engine idling leaks about 3 table spoons of glycol for every hour running.
I'm tired and depressed about this situation.
And now I discovered the steering oil pump js leaking too...
My grand dad is probably gonna sell the car after this. =(
-
Hope that too, love the show too!!!
-
can you estimate an approximate "highest" point of the lift when the engine/trans combo is pulled as a lump?
8 feet?
i've done this before, but the space i've got this time is less since i know it gets really vertical pulling both.
with garage door closed i don't have enough room to slide the lift away from the car
with garage door open, it closes off the open space above and i don't have the room to lift as high
i can alternately:
1. lift as high as garage door allows, then lift the rear of the trans separately so it's more horizontal and slides over the radiator cross member
or
2. roll the entire contraption out of the garage when i'm ready to pull it, i'd rather avoid that though.
Here is a tip for you, you don't have to remove the wheels like superu pictures, when you lift the engine/transmission combo by 2 or 3 inches you have enough space to move it sideways and disconnect the driveshafts, this way the vehicle is lower considering it is not placed on those fixed supports... This way you also don't have to remove the suspension links to disconnect the driveshafts from the transmission.
But if this is still not enough, I guess you can remove the front wheels, then lower the vehicle and support the wheel axels directly on the ground with some wood blocks, leaving the disk breaks a single inch or less far from the ground...
but if you do it with the wheels on, you can do all the preparations, push the car outside and crane the engine/trans combo, then push the car back into the garage (you can't imagine how the car becomes so light to push without half a ton of metal inside)...
About the tiles in my garage, eh...
Car is form grandpa, house is from grandpa... haha.
Sao Paulo is hot, air is hotter than 80F for 80% of the year, reaching 100F now and then, so if you can do ceramic you will have a cooler house. Also, it's way easier to clean... so pretty much every house here has ceramic kitchens and bathrooms, it's really impossible to find people who build with wood and wallpaper, it's always bricks and cement, way cheaper too!
nice to know people appreciate my third world place =)
-
Top Gear UK extinct? That can't be right...
Well, I'm sorry if i'm wrong about that, there was a lot of speculation about this a few months ago, and I still don't know if they are recording more seasons, there is nothing on their website...
-
What kind of additive is this Subaru special one?
What about us people who don't live in the US, how do we acquire it?
Anyone knows the chemistry behind it, maybe I can buy some similar here in the third world, Subaru dealers here have no idea what this is about, i think it only exists in the US
-
In the snow (no stopping power) Cheap tires,
...
For the money spend on a new one you could get a 2010 used Mercedes C class all wheel drive. Thats what I'm doing.
I don't know about the Mercedes, never driven them and the reviews on the net, specially the ones from the now extinct UK TV show Top Gear, don't make me want to drive.
I can talk about BMWs, I love them and they have that sporty feel I love.
My grandfather have a 08' Outback, and I have to tell you the ABS feels so different on both cars!
Subarus are more tuned to the safe side of the equation, and BMWs a little more to the sporty side of the equation.
For this reason I can say the ABS cuts in a little earlier on the Subarus then they do on BMW, and I can confirm they really feel that way. I bet it's the same sporty feel on a mercedes. This might make no difference at all in a dry tarmac, but in a very ice-slippery surface the difference is such that on a BMW you have more wheel lock, meaning more snow piling up on front of the tires, meaning more stopping power... while on the subaru you have less wheel lock, meaning more wheels spinning, meaning more control of the car, meaning in the end that you can steer the car and avoid a collision while still breaking easier on a Subaru then on a BMW or probably a Mercedes.
I live in Sao Paulo-Brasil, no snow here, I can say that in a dry surface the cars behave like that, I can only imagine what a huge difference this would do on the snow.
And come one, Michelin on a japanese car? Try Yokohama, they are a bit more expensive but it's the original stuff Subaru uses in japan! I'm sure that will make a bigger difference than the ABS thing.
-
Applying the RTV sealant and screwing the pump on the block took me 9 minutes, way below the 20 minutes limit of "dry to the touch" time that says on the packing. Mission Completed.
Used no gasket this time, hope there is really no problem at all.
Still concerned about this:
http://www.mototuneusa.com/power_news_--_how_to_blow_up_an_engine.htm
Let's see what happens!
Will wait 24h to dry, only then I'll put the glycol back on the engine to test.
Time for a pint!
-
I'm totally amazed that you are doing this work in flip flops and everything is so clean. I will probably pull the radiator also, to protect and give me more room.
You know, since you already have to drain and disconnect the radiator hoses from the engine, what's wrong with removing 2 additional screws and sliding it up and out? Air conditioning radiator is still inside the vehicle, but this one is smaller... just take care not to touch the engine there because it's really easy to bend the grills - engine is heavy and the slightest touch is always strong enough to damage the radiator.
And about the cleanliness, you know, engines are designed with tolerances on the scale of thousandths of an inch, and the smallest dirt is always enough to get stuck on those tiny spots and ruin the tolerances by 500% or 98236573% very fast.
This is one reading I liked very much, its best suited for the obsessed ones, but I guess everybody can have learn a lot from it. Enjoy the last picture from the page. =)
http://www.mototuneusa.com/power_news_--_how_to_clean_up_at_whatever_you_do.htm
You can always say "but who cares about racing, I use my Subaru for traveling and sightseeing... Now I tell you, hey, what about those extra fuel mileage? 10% more power could mean 10% less fuel used - yays!
And the flip-flops are because air temp was about 35ºC on that day, guess that's 95ºF. I like more working with pants too...
-
I am sure there is no wear, no bending and no materials from the old gasket.
Clean, shiny and tidy. Just very little scratched cause I used sandpaper to glue the RTV thingy twice.
I just didn't try to RTV without the OEM gasket, cause I didn't want to change the gap distance, but since someone here already does that I guess there won't be any problem.
Just a strange observation I have to add, looks like RTV has poor adhesion to the gasket itself, it's probably made to adhere to aluminium or steel directly and the gasket is painted (rubber-coated someone said here).
I will just be obsessively extra sure that I won't overglue the flange, cause the hole where the coolant goes into the engine block is so tiny, omg! I would risk a guess: Subaru designed all the flanges but the engine head to use RTV, but here manual tells people to use the gasket, so there's no risk of gluing the hole itself
 LoL
LoL 
-
Yes everybody, I only use original subaru stuff from subaru dealer. Steel painted black in this particular case.
I guess tomorrow morning I'll try trashing the OEM gasket and going for the glue... thanks for the tip john
I'll post my results when I'm done.
-
https://www.icloud.com/photostream/#A1JtdOXmYYdG9;C1754850-7DB7-4092-8009-D4F64C98A1A2
I think it's even easier to do this way, since you don't have to separate engine and transmission inside the car (and later unite them also). Also, if you look this other picture, the same bar you normally use to hold the hood open, you just have to position it in a different place so the hood will stay open almost in the vertical.
https://www.icloud.com/photostream/#A1JtdOXmYYdG9;05722CD9-39A8-432B-B1F1-BD2C4F4B4884
-
 1
1
-
-
Tiny little tip to avoid this shitty experience of separating and uniting engine and transmission:
https://www.icloud.com/photostream/#A1JtdOXmYYdG9;C1754850-7DB7-4092-8009-D4F64C98A1A2
Remove them altogether!
 Yay
YayThat's me in the picture btw...
-
I have this precise problem too, 1996 Legacy, H4 2.0L engine.
I took the entire engine apart to clean and assembled it with 100% new gaskets.
Subaru service manual says I need to tight the screws to 10Nm+4-0, first attempt I went to 12Nm, second attempt I tried 14Nm, third attempt I was pissed off and tried to glue both sides of the gasket with Loctite 5699 Gasket sealant, In the 4th attempt I tried using a sandpaper in the flanges and gasket to improve gluing, used the same glue and original gasket, tightened to 16Nm (that's 20% more torque than the limit on the service manual, 60% more than the recommended value).
I don't know what else to try, the water pump and the engine block were both measured and there are no bends at all in either flange.
Please someone help, If nobody has an answer to me I will try to glue the pump to the engine block without the gasket (like the engine block and oil pan and oil pump), but I really didn't want to decrease the gap - please help!

Thanks!
-
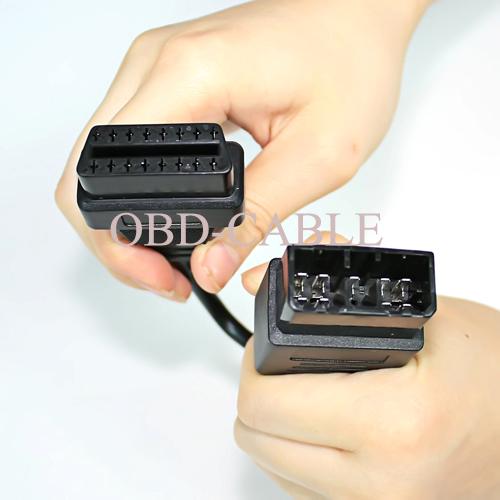
I am thinking about using this double cable combo:
http://img.auctiva.com/imgdata/1/5/4/0/1/3/0/webimg/575028468_o.jpg
http://cdn102.iofferphoto.com/img/item/148/724/937/faYrVTfdAsSeXRq.jpg
Will it convert correctly and work in my computer?
Programming a new Keyless Key.
in 1990 to Present Legacy, Impreza, Outback, Forester, Baja, WRX&WrxSTI, SVX
Posted
Have you read my post? Seen my pictures (clickable links)?
My key is not on the list from your link.
Thanks anyways. =)