Leaderboard


Popular Content
Showing content with the highest reputation since 03/04/25 in all areas
-
Update - I let the car cool down for a couple of hours and burped it again. Just when I was about to lose hope... the fans kicked in. Just to be safe, I hung around until they kicked in a second time. All seems good now. Thank you everyone for your advice. I really appreciate it.3 points
-
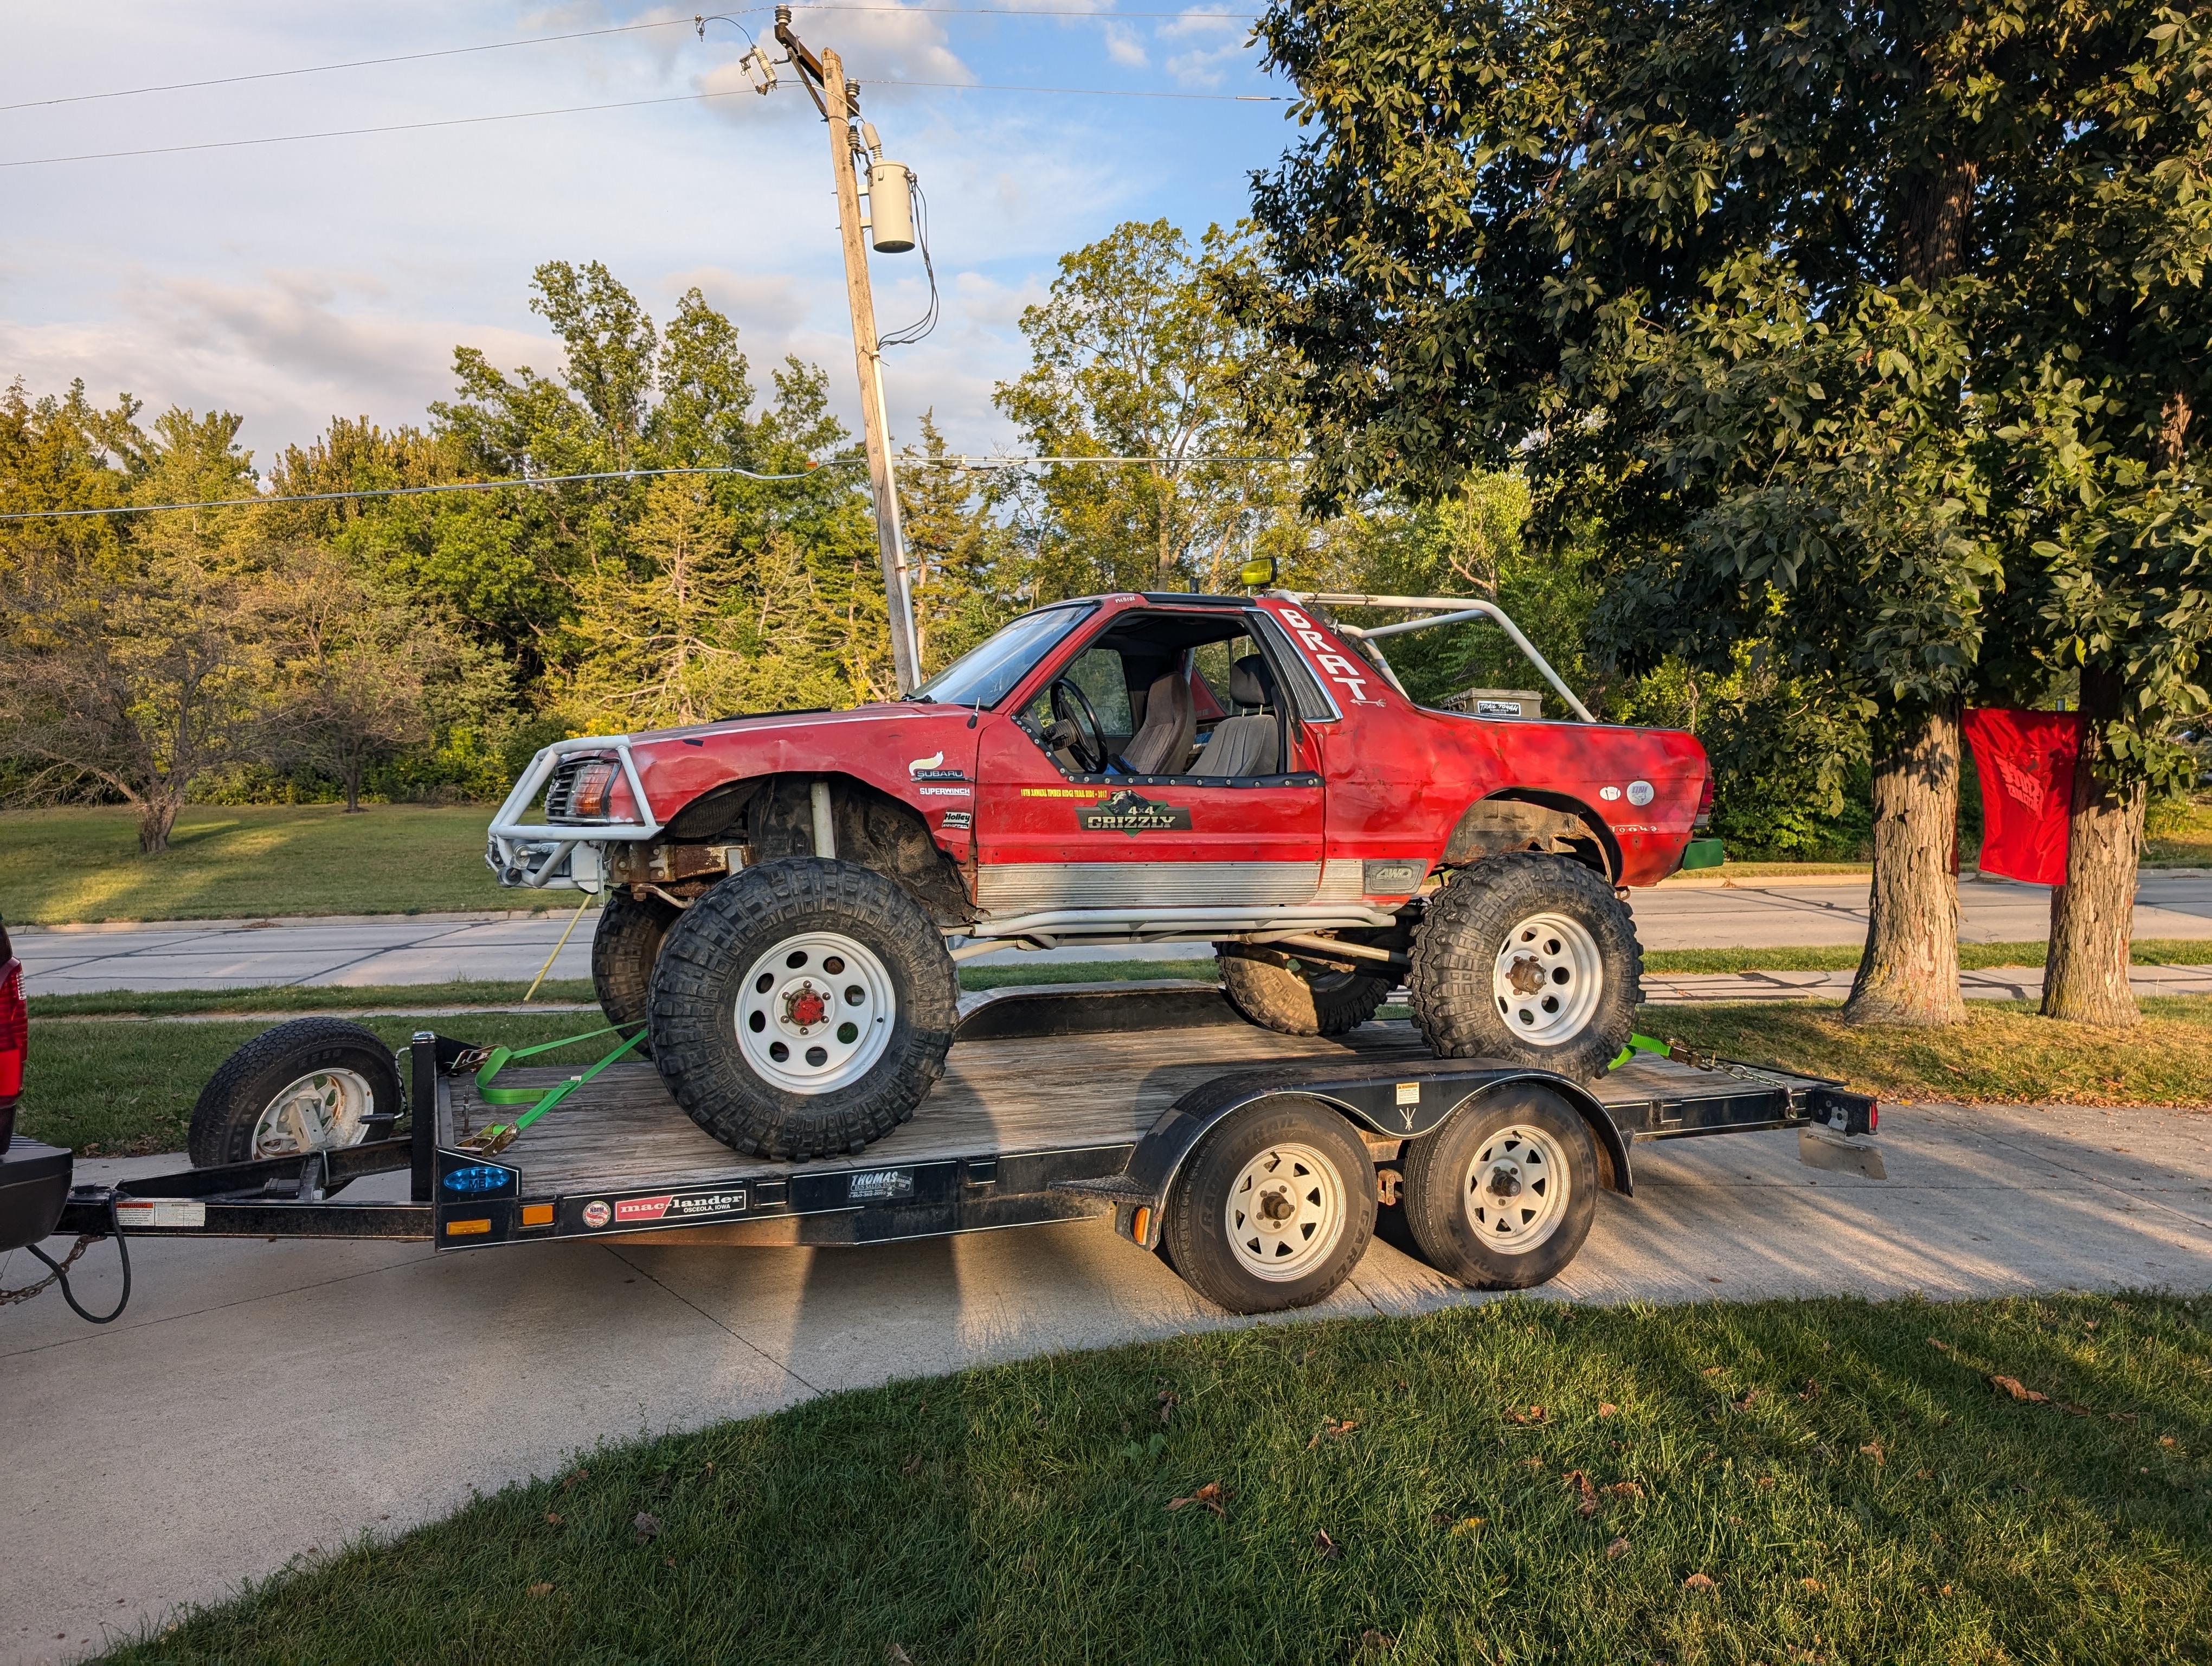
Brat is still alive and kicking.....

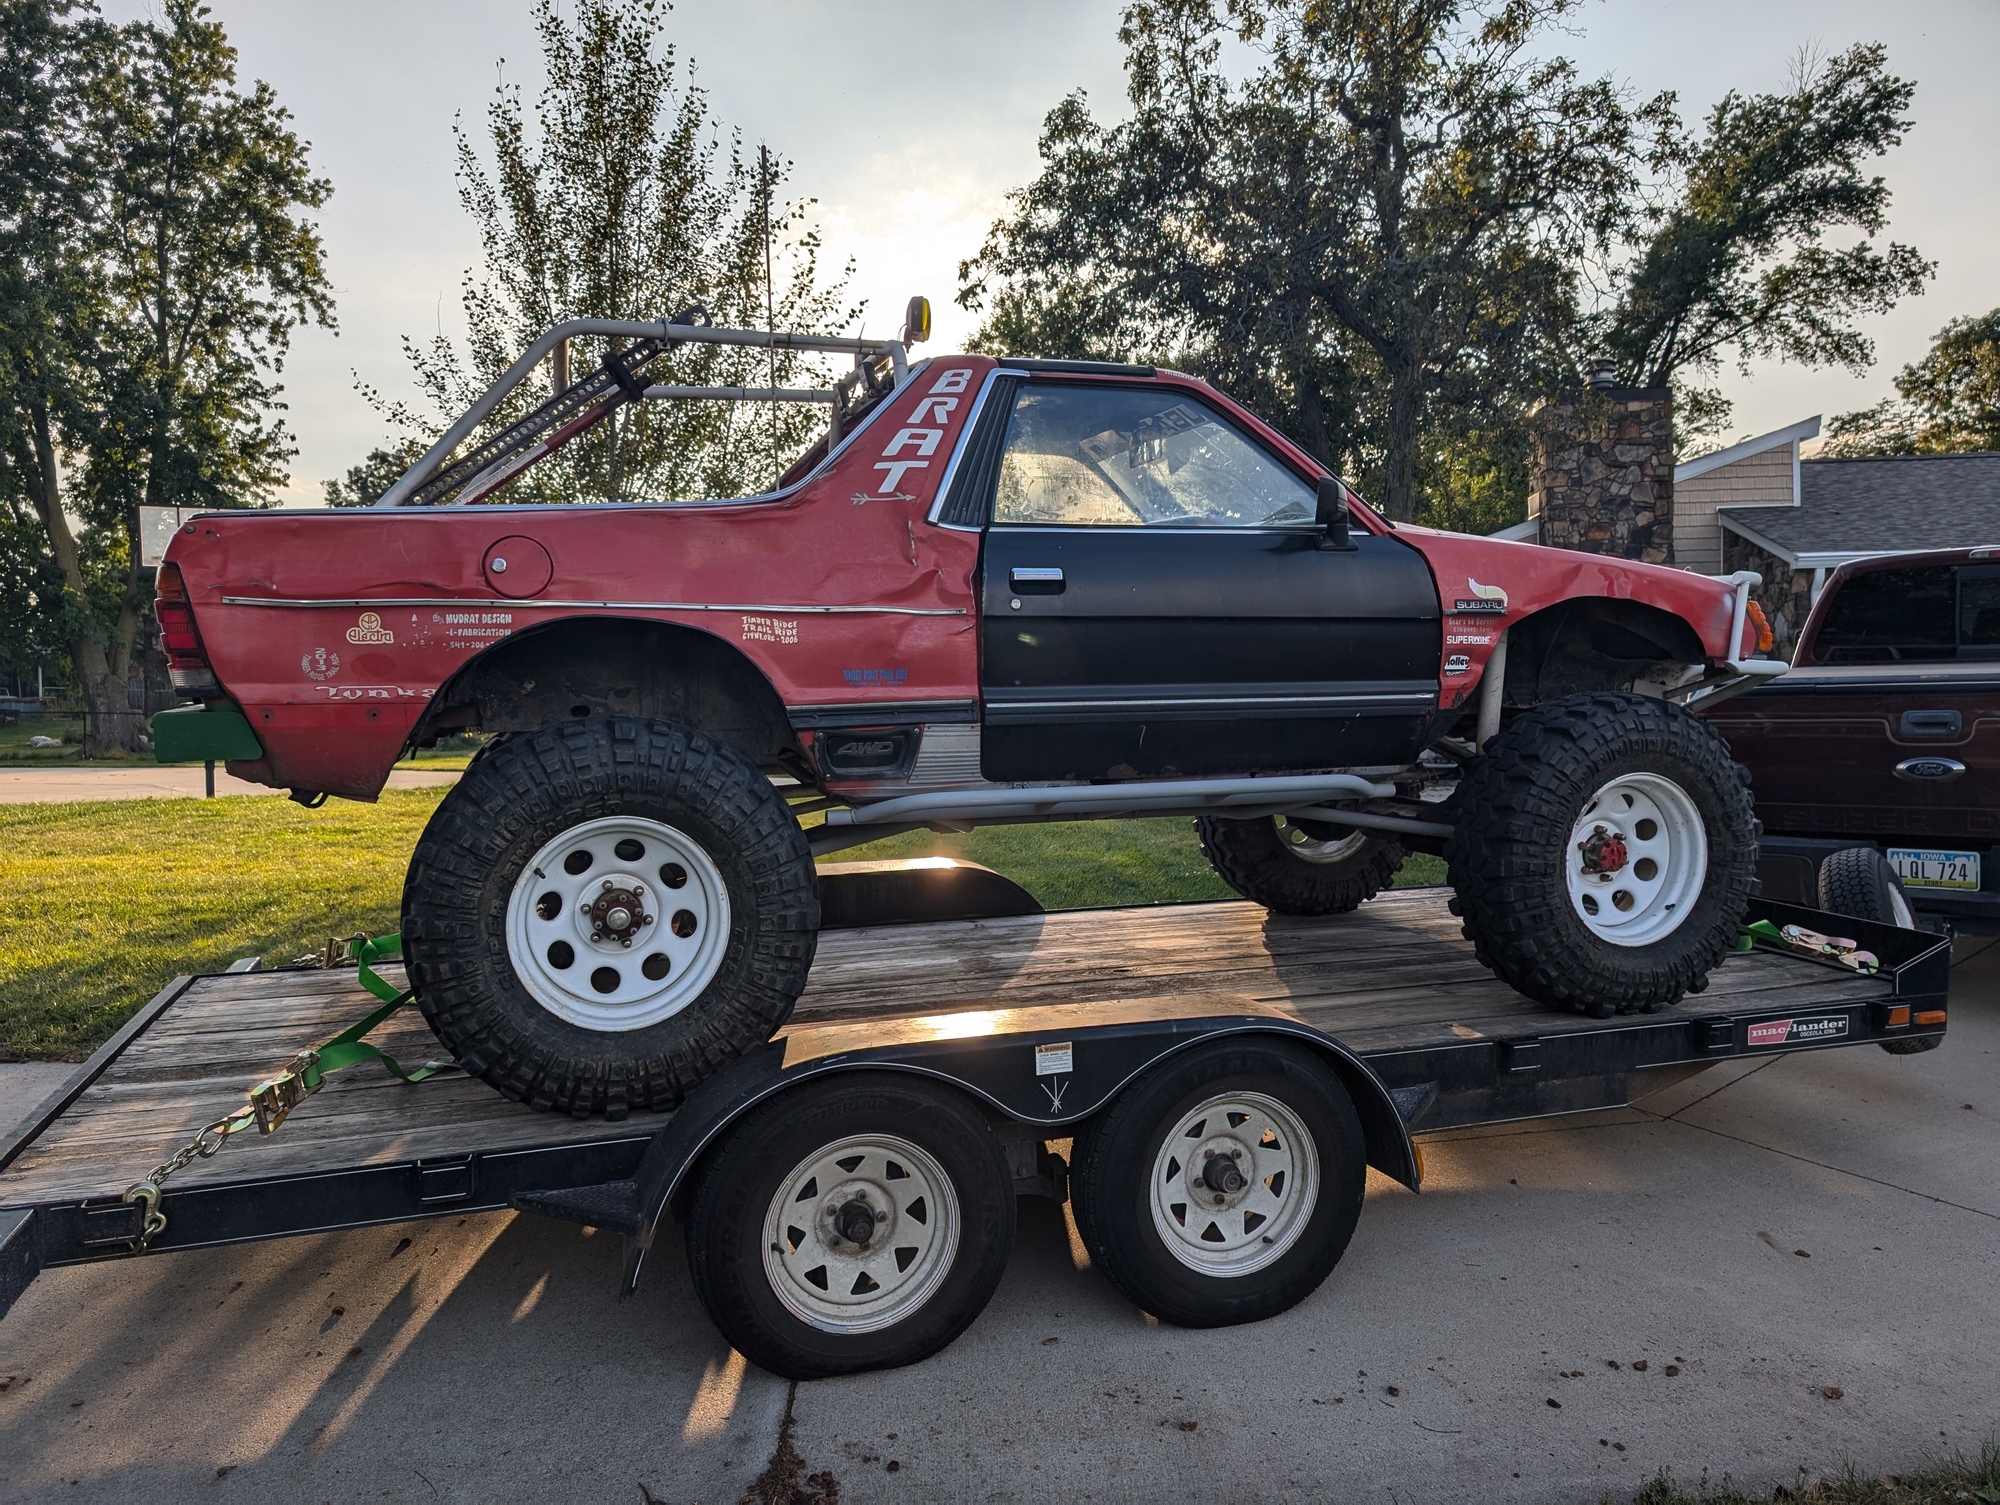 3 points
 -
2.2 swap. Runs for ever.2 points
-
After some Al-Cu brazing practice, the old brass pipes are now attached to the new aluminum heater core. Had to redo the brass pipes to the copper elbows because the melting temperature of the AL-Cu brazing sticks is higher than the plumbing solder used for the brass pipes to the other end of the copper elbows. The brass pipes are made of thin brass, so that necessitated using brazed elbows rather than the shark-bite type. Next step is to slightly modify the plastic bosses that anchor the pipes to the heater box.

 2 points
 -
My sincere thanks to all of you. I followed all your suggestions and it ended up being the relay. What a nightmare to get access to! Ended up getting it out eventually and replaced it, and success, the blower fan is now working again! Thank you again everyone.2 points
-
I agree 100%. Still haven’t started it. My daughter’s car, so I’m not in a big hurry.2 points
-
OK, Mr. McBRAT, you owe us an update on the life this beast has been living2 points
-
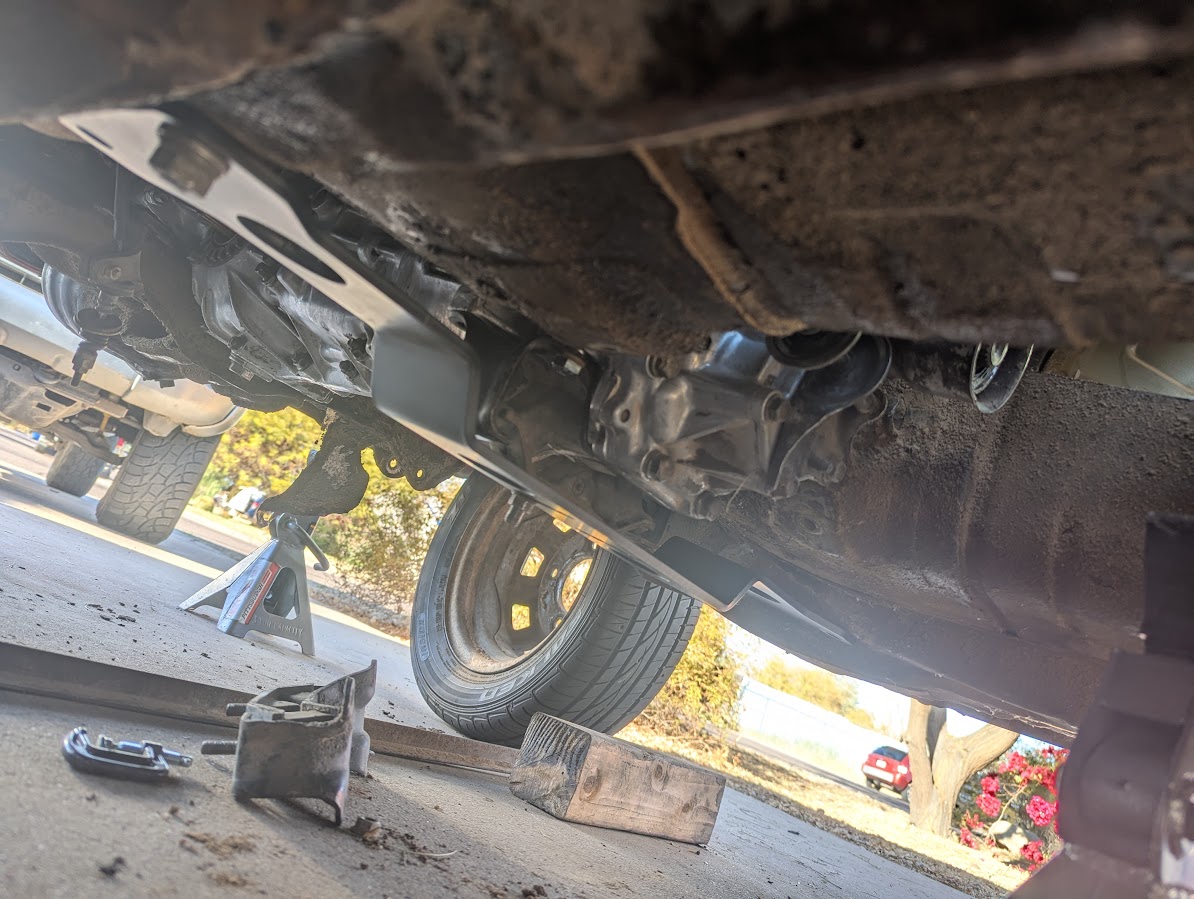
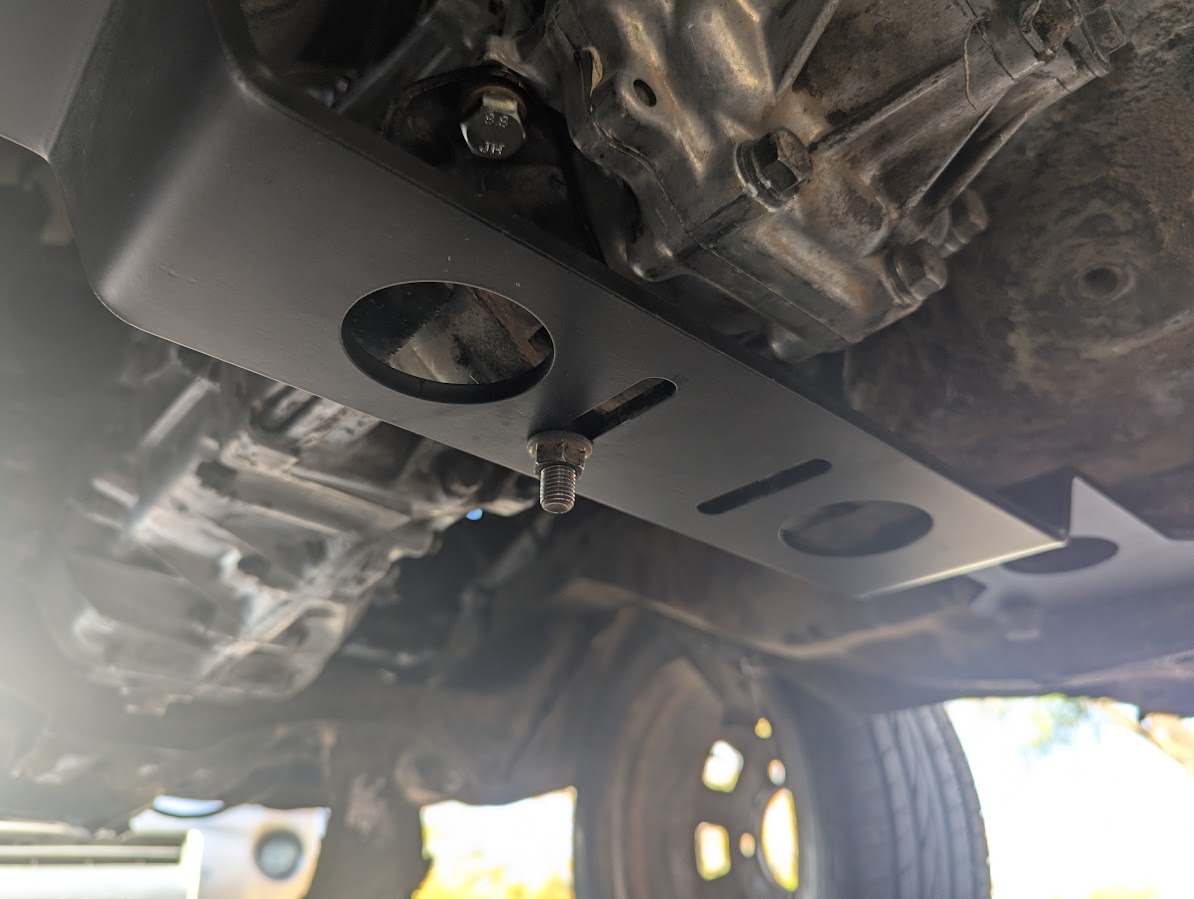
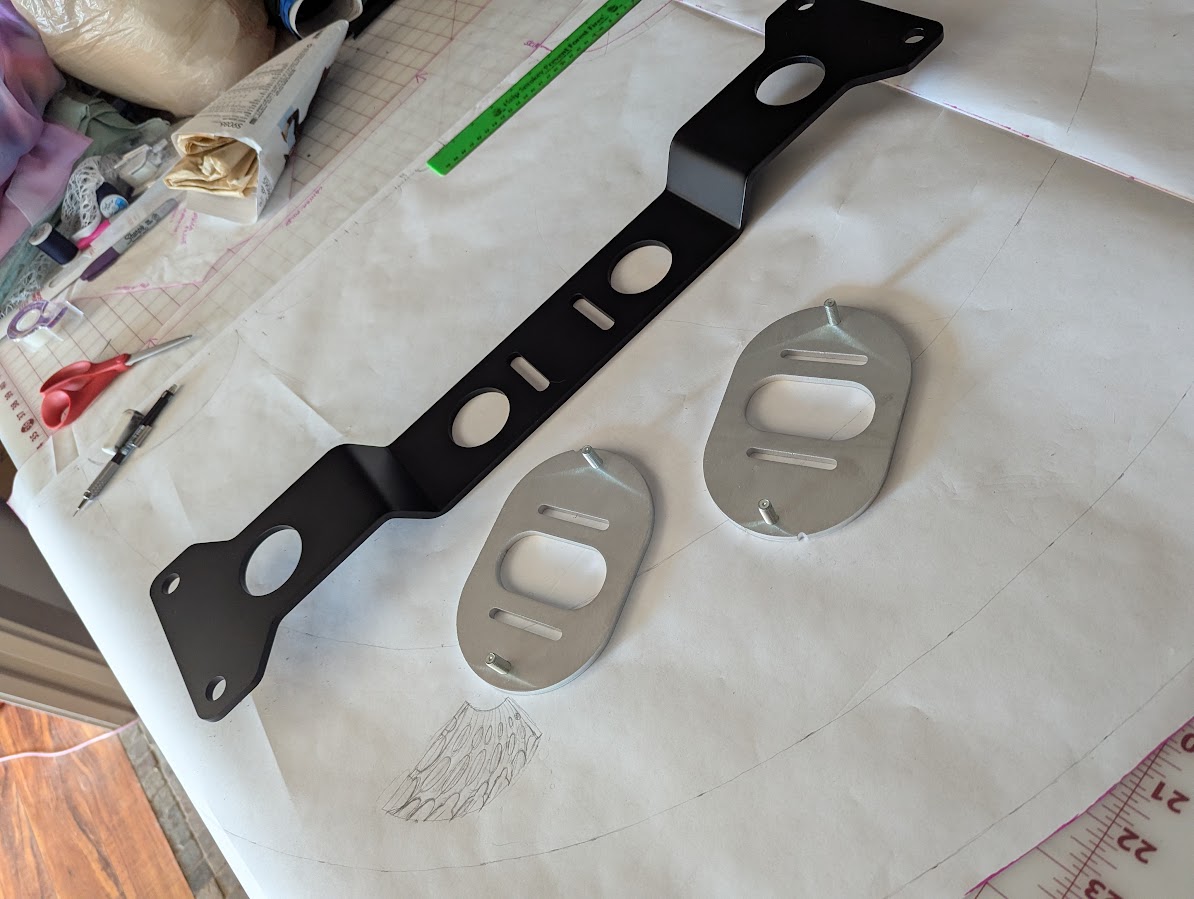
Well, I got the crossmember bolted in late yesterday afternoon/early evening. Looks like my measurements for the holes and slots were close enough to make it work - I did have to knock the passenger-side/right-side stud out of the stock rubber transmission mount to get things to bolt on properly. This is temporary, again due to the offset of the stud pattern on the mount. I'll most likely install a replacement stud in parallel with the existing one for this build, and if/when it comes time to put in a new mount i'll adjust the crossmember to suit. (The CAD file has already been updated to match so other future builds should be just bolt-on.) I'd be very interested to get in touch with one or two more individuals doing Gen 1 builds like this so that I can further beta-test this crossmember design. If you're looking to do similar, get at me! Once I've got the *new* new camber plates on hand it's going to be a hard charge forward to put the impreza suspension in and the front wheels back on the ground so I can start cutting out the impreza transmission tunnel, rear suspension, and anything else I might need so I can reclaim its current parking spot. Truckin' right along! Thanks for following!
 2 points
 -
Looking for a windshield 79 wagon 4wd windshield1 point
-
Nah I wouldn’t touch that as it’s got the EJ25D. Smooth engine when it’s operating properly, nasty head gasket which started the whole EJ25 reputation of having forever headgasket issues. Nice looking vehicle, I’d recommend having a game plan for when that EJ25D gives you issues. STi conversion been done many times before, great candidate for it Cheers Bennie1 point
-
UPDATE. All seems good enough for now. My oversight and approach was somewhat lacking. There was extra weight in the back of the wagon all this time. Nothing broken or out of place at either L or R coil spring/shock mounts. Both shocks are still good. Left spring does sag but only just a bit. I got the car on a level driveway and took photos. And I was I was able to temporarily get my fuel pump working again when the car wouldn't start this morning. Voltage was getting there, but motor was at a "dead spot" on the 34 year old orig fuel pump. So I reversed the polarity and spun it backwards for a few seconds. Then it was working as normal. Yes, I do have a Ford F150 electric fuel pump, but never got around to installing it. Need to check it for fuel line fitting adapters. Thanks
 1 point
 -
Thanks Bennie. Will be jacking up the car tomorrow morning and see whats up and compare measurements on L & R side. Will take a few photos. And YES I WILL BE USING JACK STANDS!1 point
-
Visited a friend in Arizona and we swapped the 5MT in his 2002 WRX. Quarter million mile unit we pulled vs less than 100k mile unit from a 2004. Installed the proper stubs and seals so he could reuse his axles. The clutch he got did not fit the flywheel he got from the same company even after calling to make sure they would fit together. 2004 trans came with a clutch so we had three total. All of the pressure plates had the same bolt pattern, all too small for the new flywheel they sent him. No big deal, we can just use the new disc and pressure plate on his old flywheel. Fortunately my brother checked or we would have found out the hard way but this new disc (and the one from the 2004 junkyard trans) stuck out farther into the flywheel than his old disc and would have rubbed on the flywheel bolts. If not immediately, eventually as the disc wore. Luckily there was a speed shop close by open on a Saturday and they an ACT stage 1 disc hanging on a peg that worked perfectly. He is surprised that the pedal is significantly lower effort than before. One of the reasons we swapped the trans is that it had started to make (gear?) noise while engine braking especially once it had warmed up. This new one does too which makes me wonder if it's some kind of engine/pulley noise. On the plus side he can now downshift into first while moving for the first time ever. Fixed some minor oil leaks while we were at it. Discovered that really old RTV will not cure even if left for hours, again glad we figured that out the easy way. Also a good reminder that turbo Subarus are significantly more difficult to work on. Front subframe from the black Outback. One side had been extensively welded from the underside but not the other. Did some little things on the cars preparing for a trip out west. Replaced a tie rod, changed oil, greased struts, etc in green Impreza. Noticed one of the engine mount to crossmember nuts was gone and the other one was a turn or two loose. So that explains the occasional drivetrain clunk I've been getting. B got the LO indicator on the Forester's instrument cluster to light up when he shifts into low range. We modified the tow bar to make it a bit lighter, more compact, and more rigid. Tack welded washers in place for the width to fit our cars so it can't pivot around. Hopefully we'll never use it again.1 point
-
Video from our trip to Arkansas last fall with slammo and travelvw.1 point
-
Lots of power. 25-27 MPG. TEMP GAUGE inoperative. Used old exhaust Manifold, Intake air manifold. Old engine belt pully lower drivers side failed at 186000 miles. engine locked up. Installed new front axles, brake drums, disks, struts, catalytic converter.1 point
-
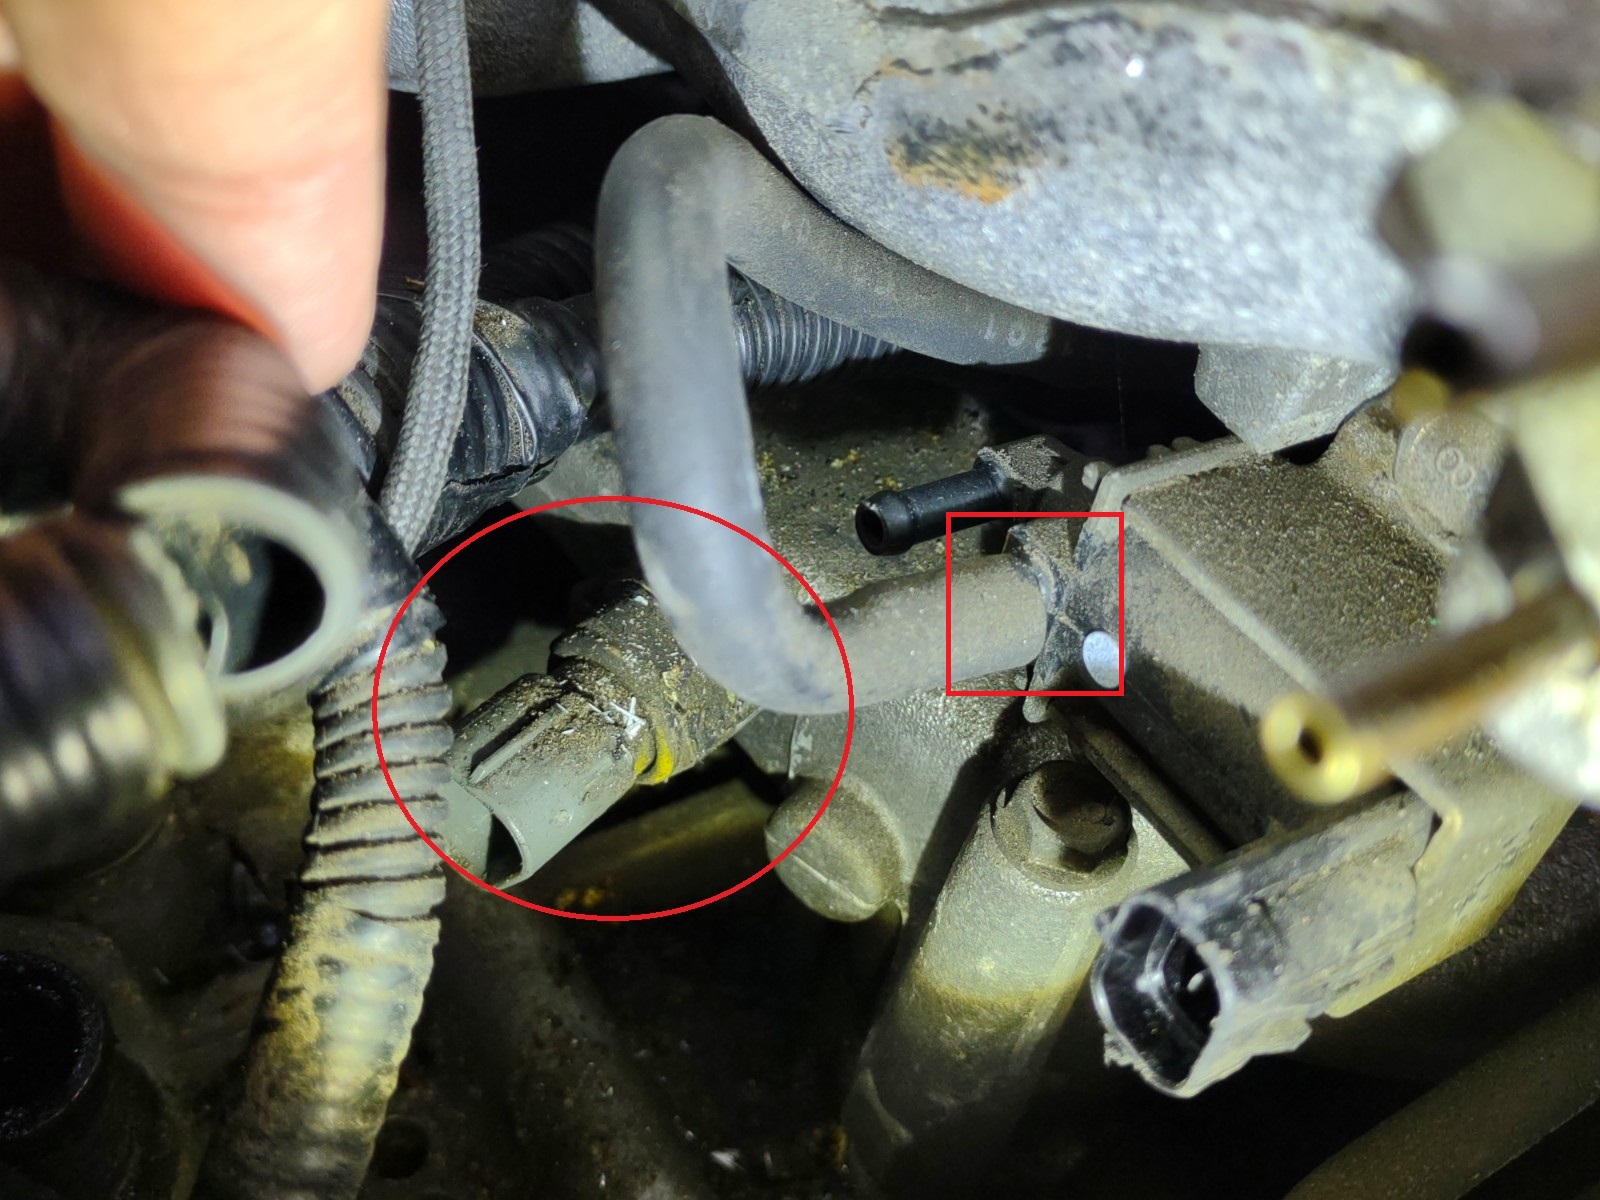
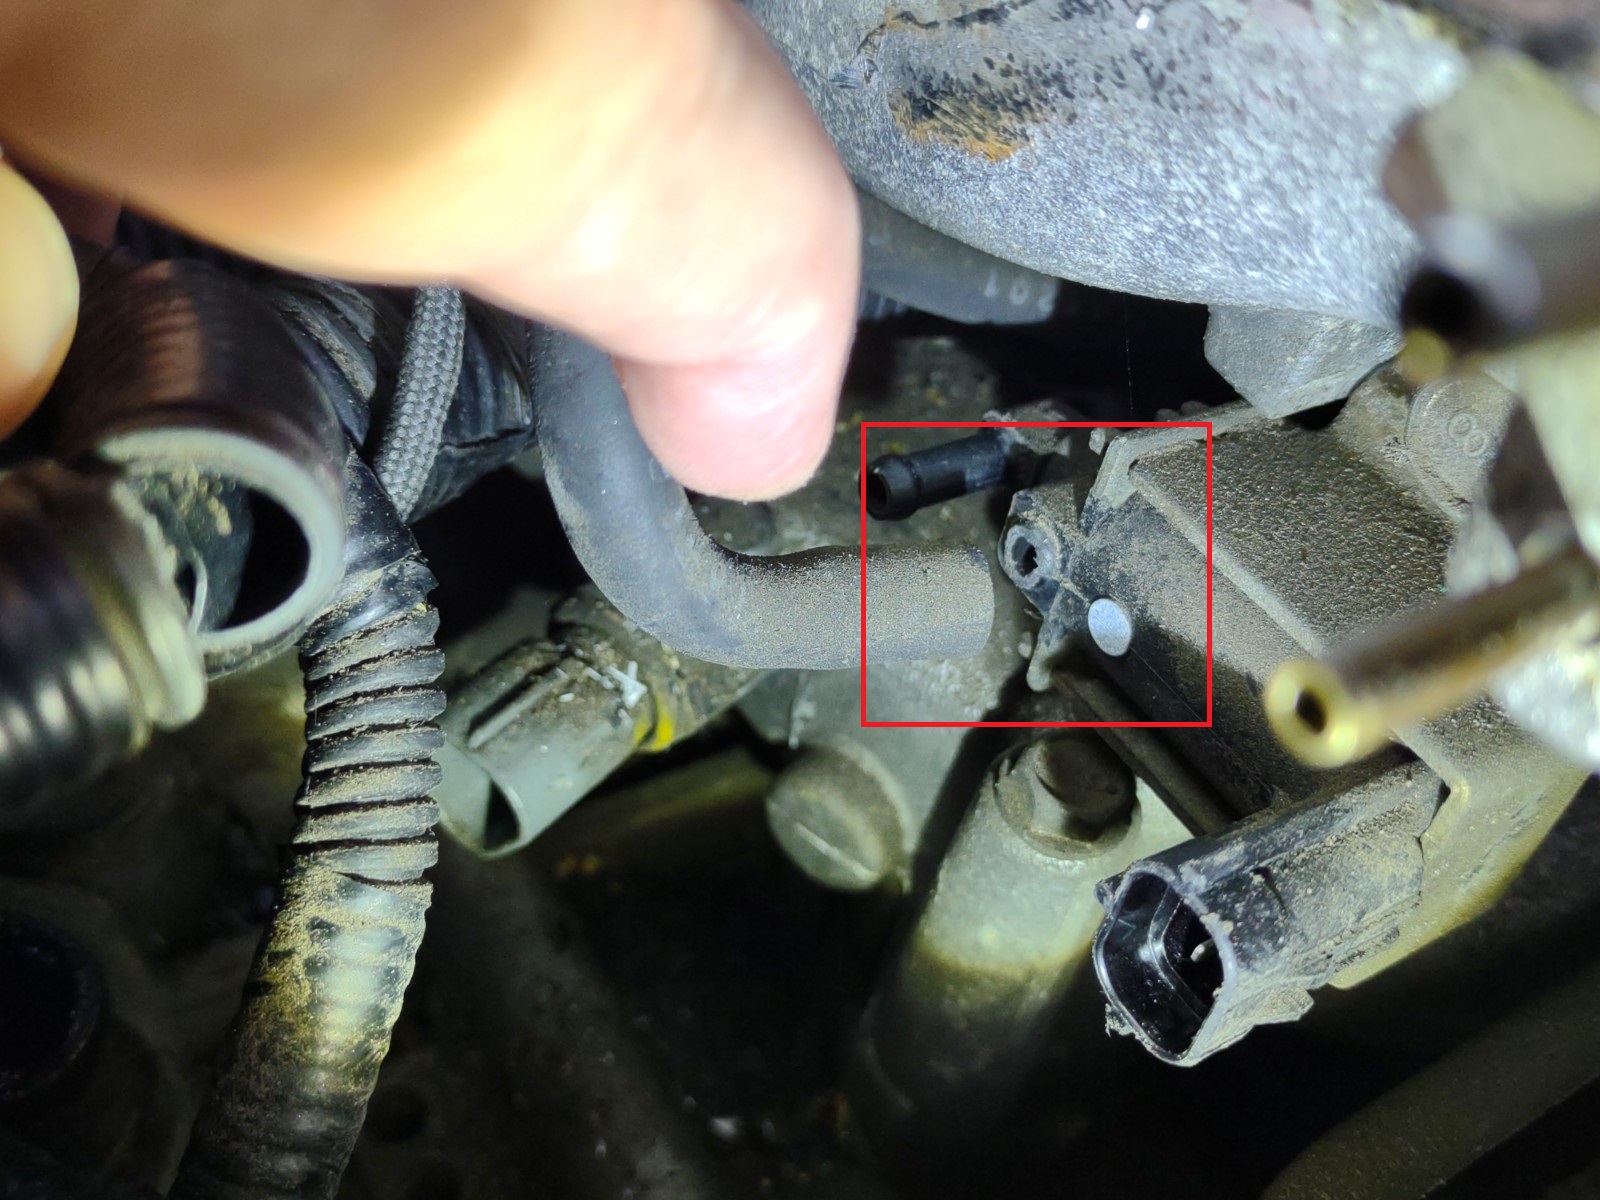
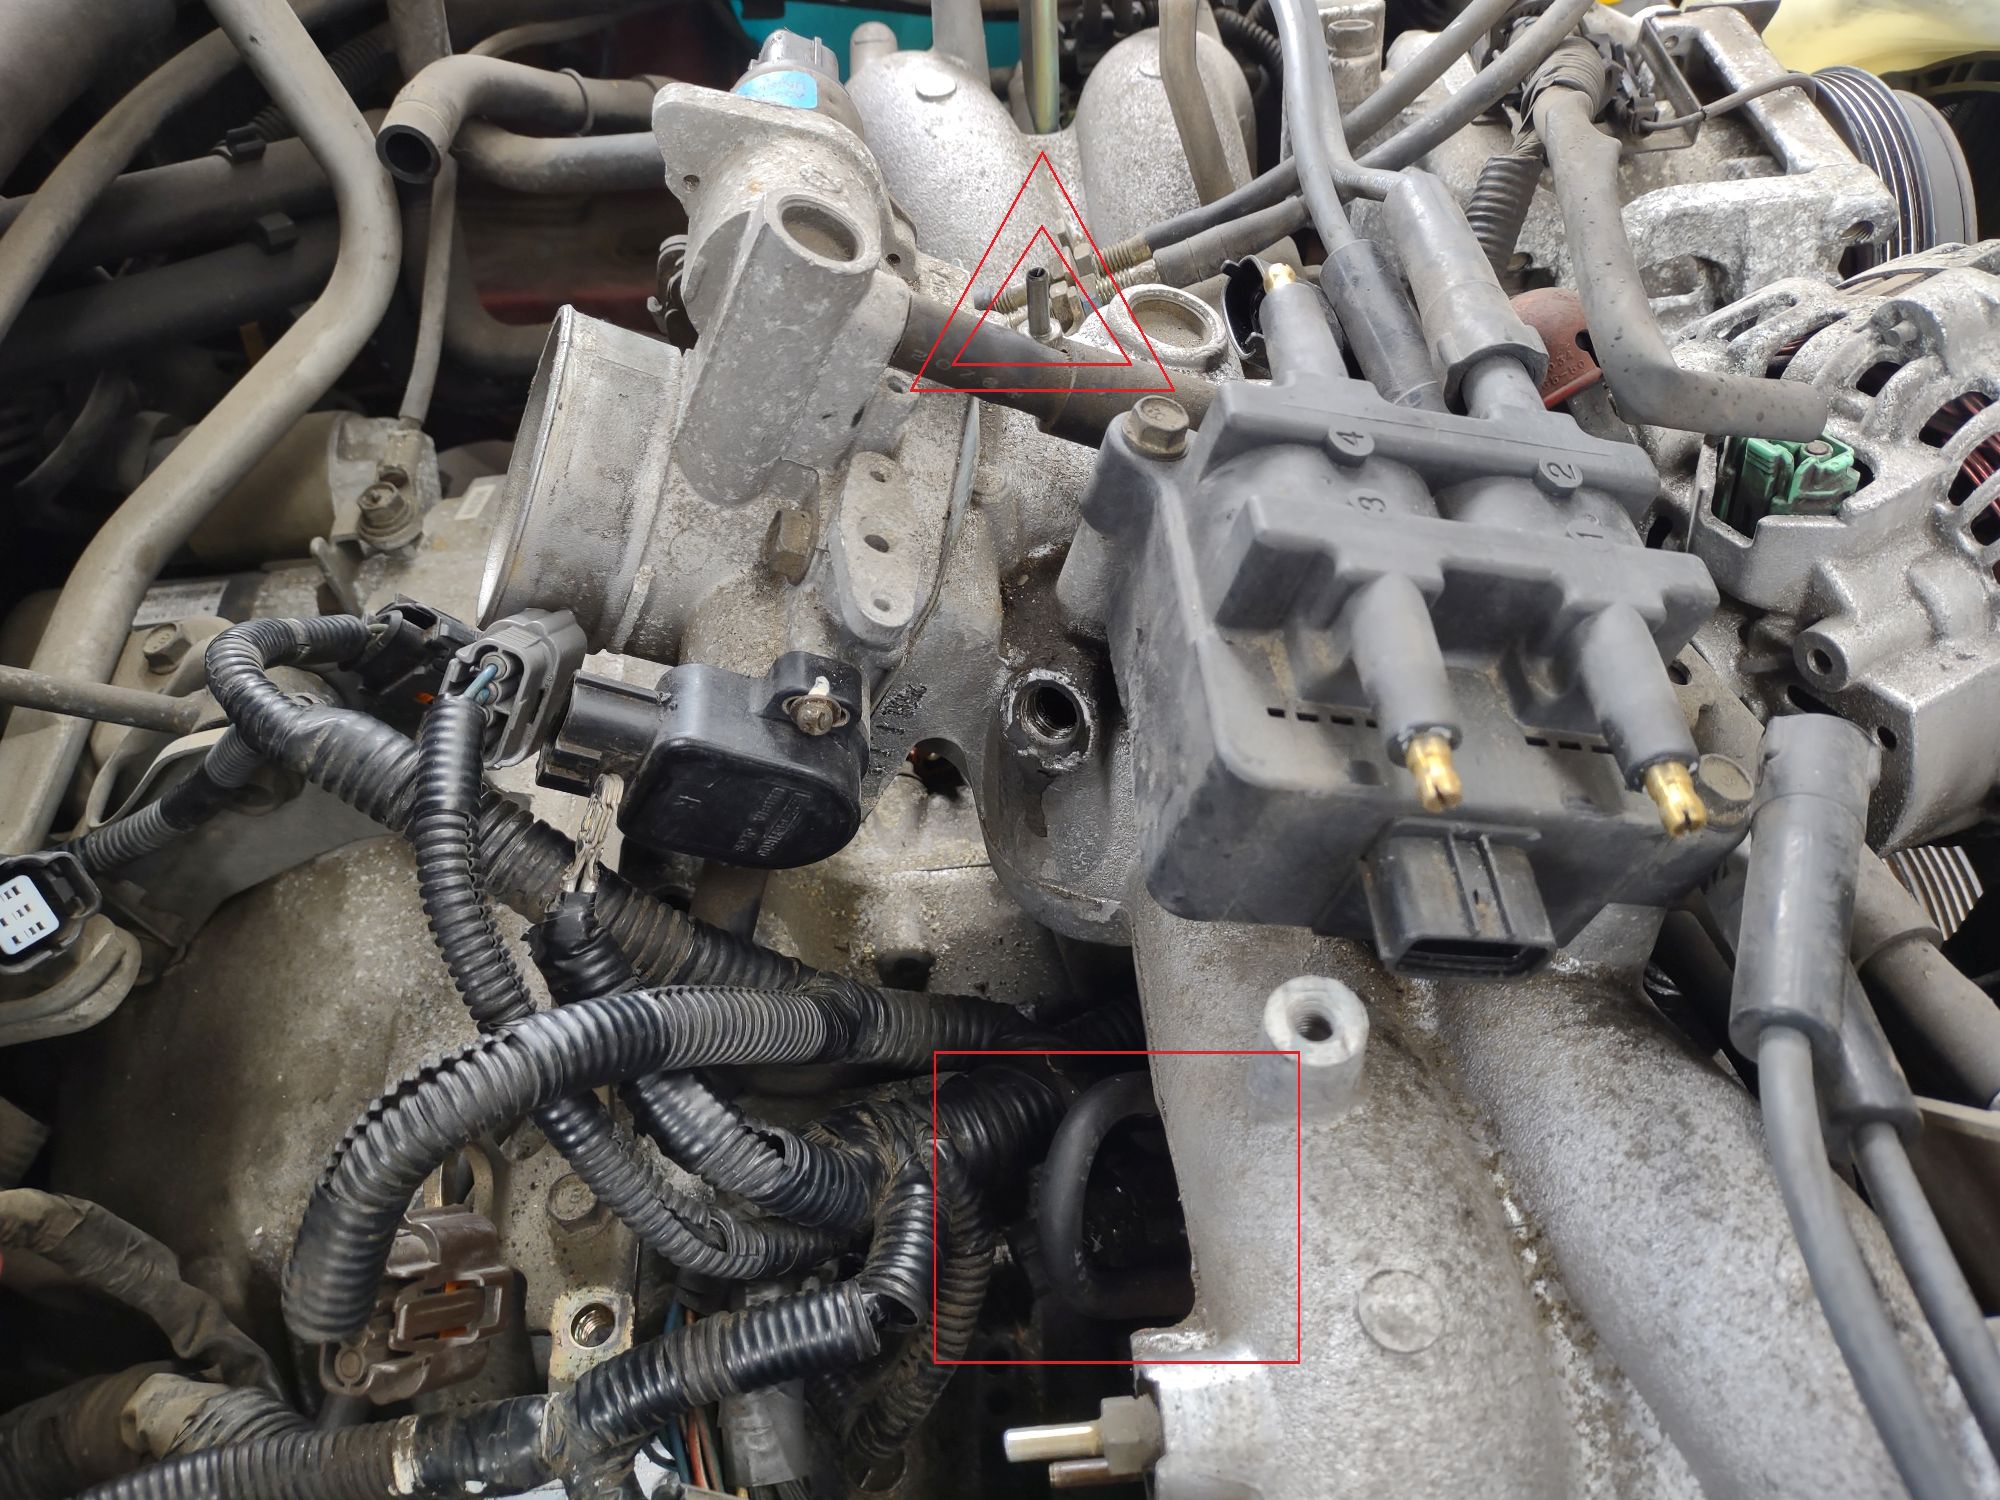
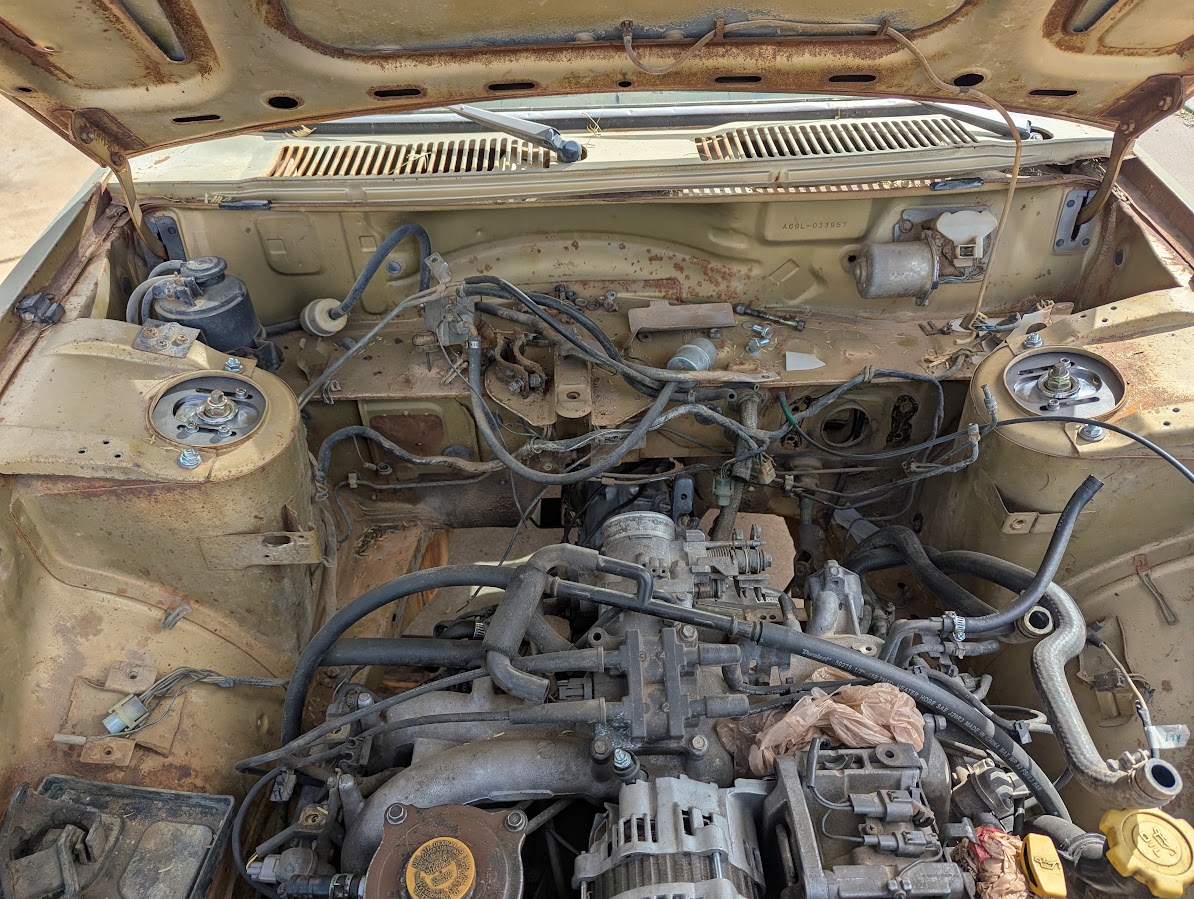
Finally got some time to get back to this. Cabin heater is working, so not the pump. I also tested the fuses and relays for the radiator fans. They tested fine. I did a bit of research and found out about the green connectors under the steering column used for diagnostics. When I plugged that in and turned the key I heard lots of noises and clicking. The radiator fans were working. I dug into the engine to find the temp switch, per Imdew's suggestion on 3-14-2025, which I believe is also called a coolant temperature sensor. It's kinda buried underneath alot of wiring. I unplugged quite a few electrical connections to give myself enough slack to get to the coolant temperature sensor. I was able to access it and unplug its electrical connection. There was a small hose I wanted to remove to get better access for the wrench, and when I put my hands on it I realized it was broken. See attached photos (#1 and #2). I put a circle around the sensor and a rectangle around the hose. Unfortunately, the plastic nipple is broken. I think I'll need to replace the part the nipple is connected to. Hopefully not, but my gut says that's the way it's gonna go down. Anyone know what this part is? The hose that connects to it goes under the intake manifold and then travels off toward the driver's side of the vehicle. For reference, there is another black nipple to the left of the broken one (see photos #1 and #2). It's intact. The hose that connects to it travels up past the coil. The attached photo (#3) shows a wide view of the hose/nipple that's broken (bordered with a rectangle) and the connection past the coil with a triangle.
 1 point
 -
If the socket is still functional, I'd just RTV it to the housing. The plastic is old and just breaks down over time. If it doesn't work, you have a few options. 1: Find a side marker assembly online and use the socket outta that, but again with the plastic being so old, it's a shot in the dark if it's lugs are broken or not. 2: Buy a universal #194 lightbulb socket (Amazon, eBay) and RTV that to the housing. You may get lucky with some searching (I found some Loyale sockets with a Google search along the lines of "Subaru GL 194 lightbulb socket".) Good luck on your search!1 point
-
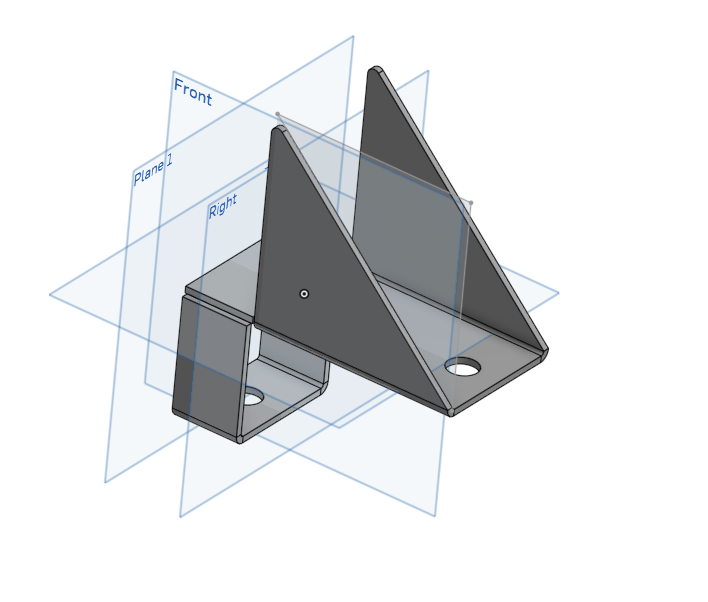
Well, I'm so close to getting the jackstands out from under the front of this thing I can almost taste it. Did a little measuring under the car today, no convenient bolt holes but I did manage to rough measure and sketch up an idea of what my new control arm mount will look. Started on cardboard then transferred it to CAD this evening. I need to remove one of the control arms to do a more detailed measurement so I can get the bolt holes lined up where they need to be but I think withe some decent 4130 chromoly sheet this should be plenty stiff welded in where it needs to go once I get those measurements. this part will again be available to folks looking to do a similar build. First photo is of the render, second is looking in through the drivers (Front left) side wheel well towards the rear of the car. Red lines represent the assembly, blue the bolts, and green the places I intend to weld the bracket to the car. Next fitment and fabrication project is the steering rack, which I pulled from the Impreza today as well. I'd really like to get away with an install that doesn't end with me resorting to cutting up the transmission bell but that's honestly looking like more and more of a chore.If the fabrication to get the impreza rack in ends up looking like it will be just as much of a hack job I might just capitulate and try to clearance the existing manual rack as cleanly as I can. But I'm getting ahead of myself, - one problem at a time. More updates to follow once I have the control arm mounts ready to go in or once I have the impreza stripped enough to warrant a celebratory "it's out of my shop!" post.
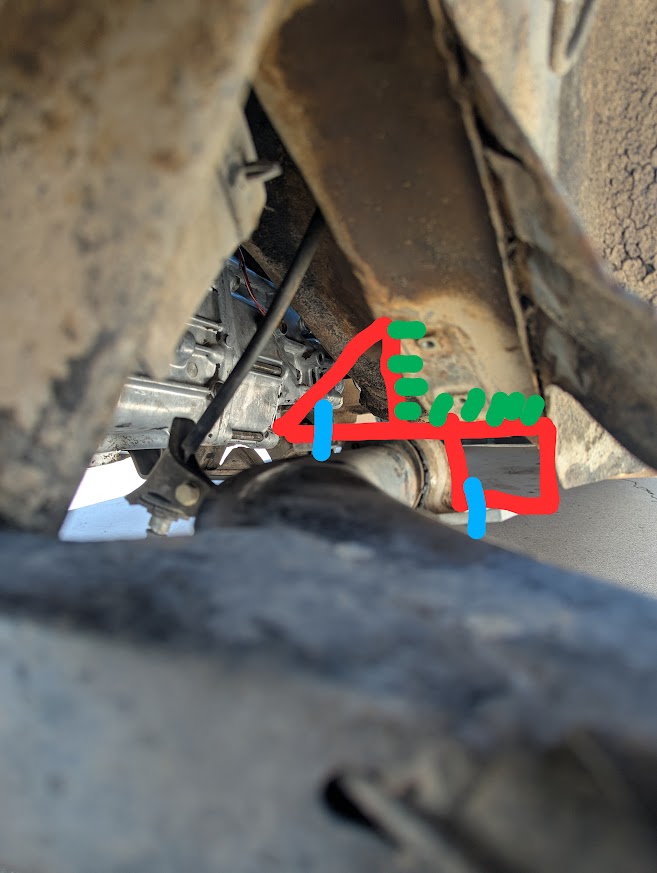 1 point
 -
If it's an '85 and still has it's cat converter, be careful. Too much zinc could ruin the converter over time. That said, in '85, the zinc content of oil had to have been higher than it is now? I'm not an expert in Subaru engines, but I know FLAT TAPPET (usually v8) engines benefit the most from zinc. In this case, if you have a flat tappet aftermarket cam, it's worth using it up to a point, especially with high valve spring pressures. I think the number people shoot for anymore is 1300ppm or so for cars with NO converter. The old Dino Havoline 10W40 runs almost 1000, and I wouldn't see that being too low. I ran Castrol for decades in an old Datsun, never added zinc, and never had a problem. Rotella used to be great, but they changed it over time, and the Zinc is sadly not what it once was. Valvoline VR1 is an awesome oil for classic cars that you can now buy at Walmart- I THINK it's around 1300 ppm Zinc. However, it states... "It is not recommended for vehicles with catalytic converters" https://www.valvolineglobal.com/en/vr1-racing-motor-oil-sae-10w-30/1 point
-
Run diesel grade oil, it has the higher ZDDP levels. Example: Shell Rotella.1 point
-
Where’s @GeneralDisorder these days? I miss his blunt input on things like this. Buy an ‘80’s Chevy he’d say! I hope he’s ok. Cheers Bennie1 point
-
Some folks have baked their ECUs just enough to get the solder to loosen up and reset. Also check every ground for good metal contact. And if the general field that a ground lands on is a rusty area that’s not considered a good ground. Folks add ground wires. Usually see the braided type, nice and thick. That would be a starting point. Good luck. Post back.1 point
-
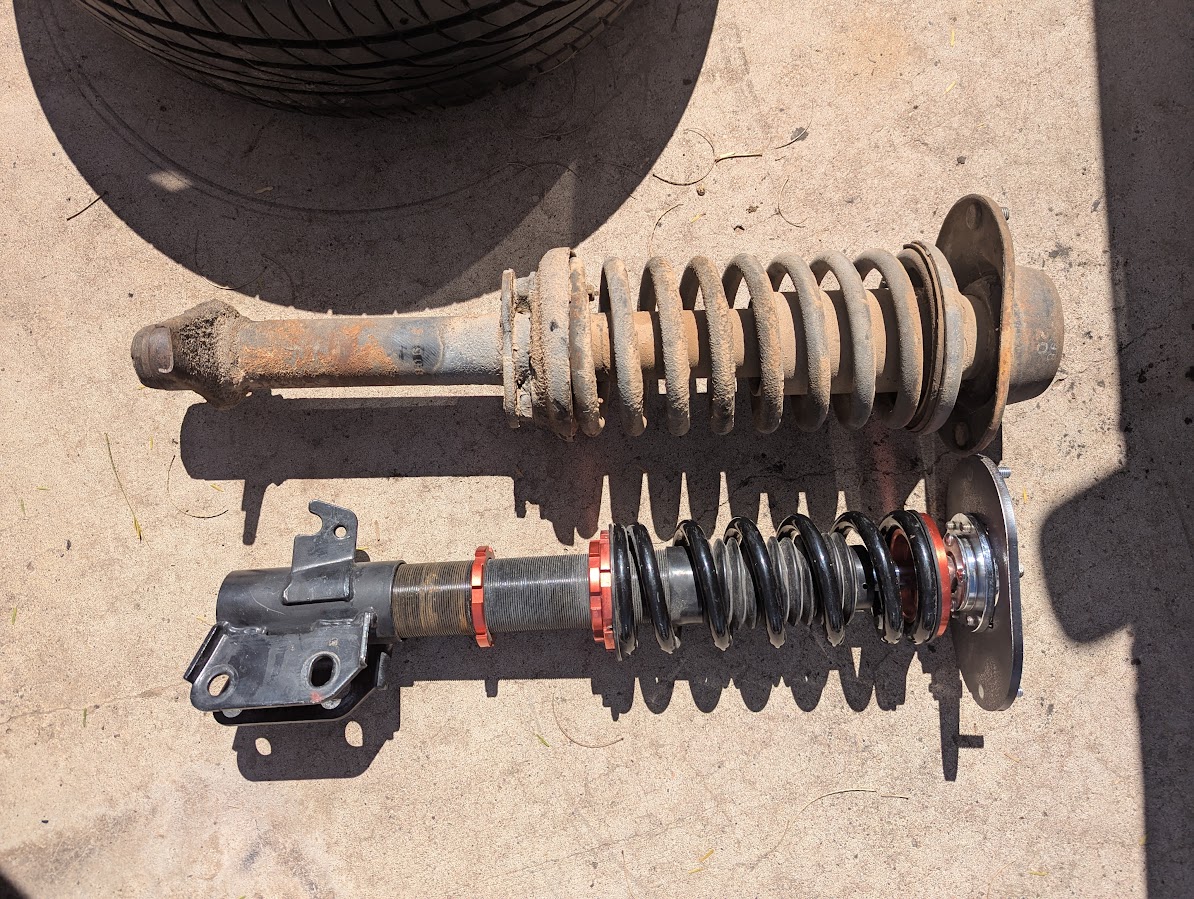
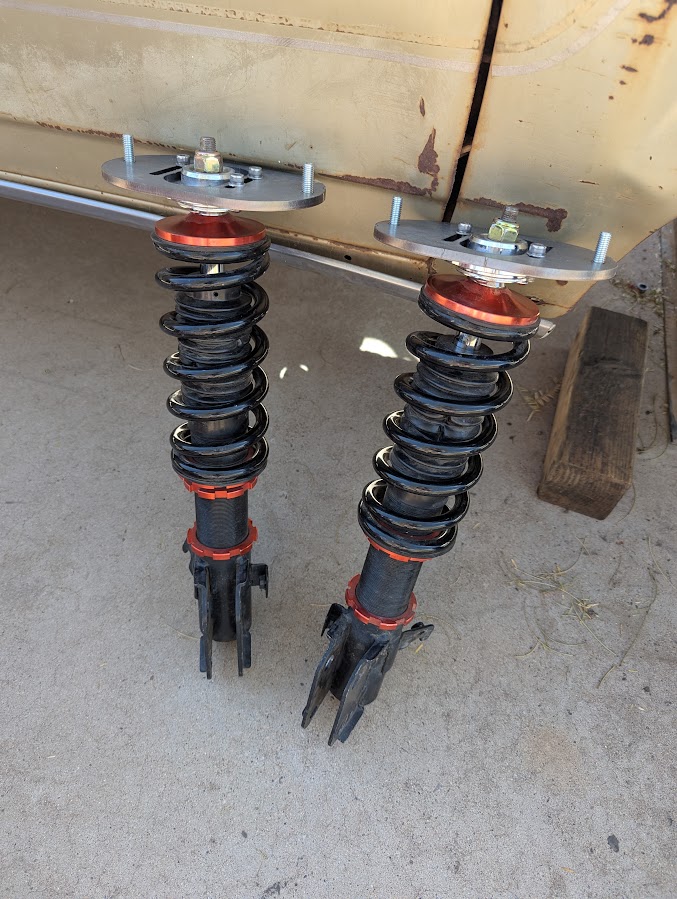
Small tangential update... Firstly, got the slots on my camber plates adjusted to where i can install all the mounting hardware. Hooray! Secondly, and more importantly - I took a little side quest to investigate using similar coilovers as replacements on a more OEM setup using these camber plates. Seems to me one more part combined with a slight modification to the lower bracketry/threaded tube on the coilover would be all that's needed to fit these into the original knuckles. The lengths are nearly perfect, the coils would still have a decent amount of adjustment in them after, and I think this will allow for a very no-nonsense approach that gets a lot of older cars a much-needed suspension refresh up front. I'm going to get a draft done, once I have that and some initial parts turned out I can test fit them off the car myself, but I will need a brave volunteer to try the kit on an unmodified EA setup. Reach out if that sounds like you!
 1 point
 -
It’s a dream to pile into my ‘81 B.R.A.T. and trek slowly at 55mph all the way to this. That would be SO cool. Or I get rich and get a flatbed trailer and tow it there with my wilderness.1 point
-
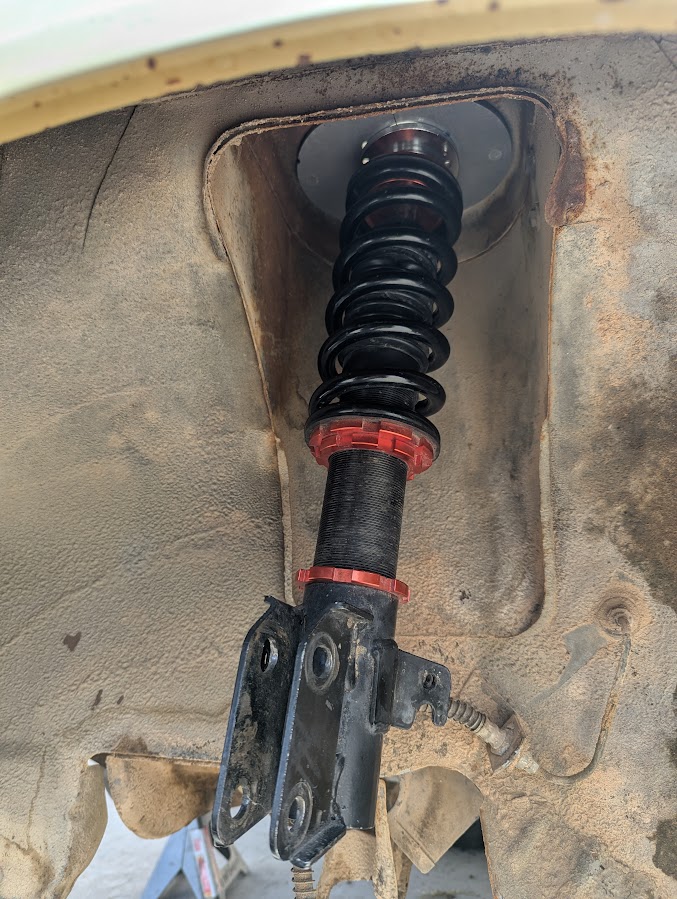
It's been a busy couple weeks, and today was another rough Monday so again I stopped what I was doing to work on the Brat a little. Got the second attempt at the camber plates in for the front suspension late last week. They need one more revision (slight widening of the distance between the bolt slots, i overcorrected just barely from the first version. I'd make them again if I were putting together a kit for sale or if this were not my personal car but again, for my purposes, a little filing and these will do the job. Once I get the filing and all the bolts in their respective places I'll be putting in the front knuckles and figuring out the second mounting point for the lower control arms. As far as length and diameter goes, these coilovers look like they were made to fit this application now. Very excited.
 1 point
 -
Got it all back together, driving it for a few weeks and runs maybe even better than before - sounds much better without the worn out water pump rattling - , no leaks! BUT didn't pass CA smog (engine light is off when motor is running) and was 2 degrees to advanced so reset it and ran a bottle of " CRC Emissions System Cleaner" .. double your money back... in a half tank of gas so going to try to pass test again. Thanks everybody for the support1 point
-
B and I pulled the dash out of the Impreza and worked on some wiring. The neutral and clutch switches (for canceling the cruise control) haven't been registering on the Haltech in a while. I had them wired 12VDC to one side, signal wire to Haltech on the other side. B suggested trying to ground them and that made them turn on and off at the Haltech. Still don't understand that, had them wired to power and they worked for a while. I think they stopped working when I replaced the expansion module or updated the firmware. Regardless, they work now. B installed the cabin air filter kit. Slammo turned me on to this. Very simple install/upgrade. B also cleaned out the HVAC box and blower motor. B wired in a retained accessory power module from timers.shop. Set that up to keep the power to the family band radio and two cigarette lighter outlets after the ignition is turned off. Will set that to 99 minutes I think. Been meaning to do that for years. He also made a little panel and added a switch so we can turn on one fuel pump or the other once the extra fuel tank is done. He replaced the backlight bulb in the gauge cluster so the clock shows up now. I wired all four EGR solenoid grounds to one of the outputs of the Haltech so we can see if that does anything. Wanted to get it working before we tune the car on a dyno. I got the horn working. Since the cruise inputs for the Haltech need a 5VDC power supply I had to separate that out (they're normally powered by the 12VDC horn circuit) and run the horn power through one of the airbag wires. The main reason for pulling the dash was to try to get the speedo working. After some trial and error and back and forth with Dakota Digital, I seem to have it working now. Will update the EZ36 swap thread with details. On that topic, I plan on just putting a swap guide and base map on my website soon too. Not sure how to share files on here.1 point
-
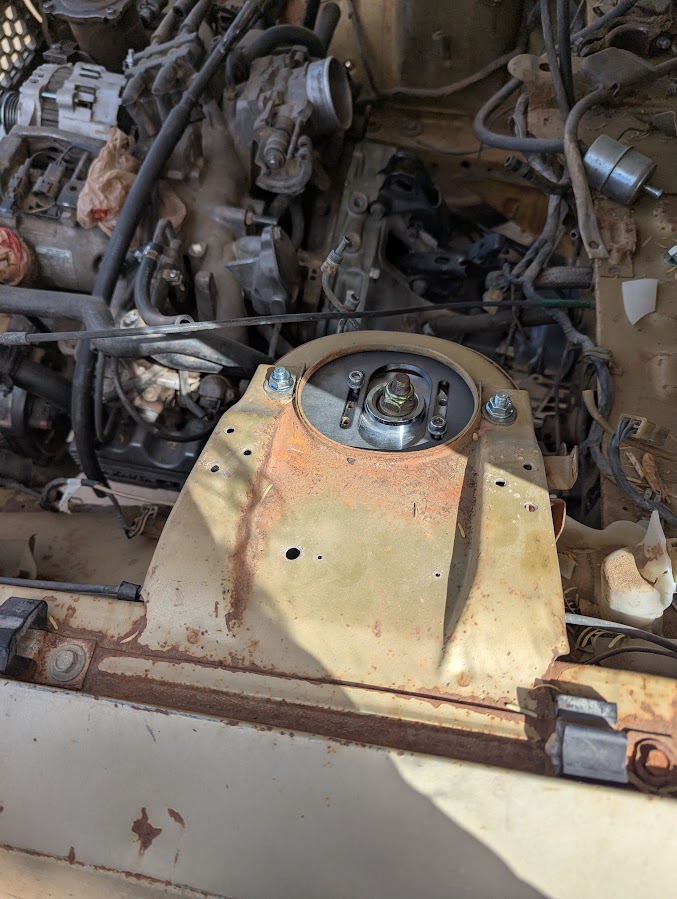
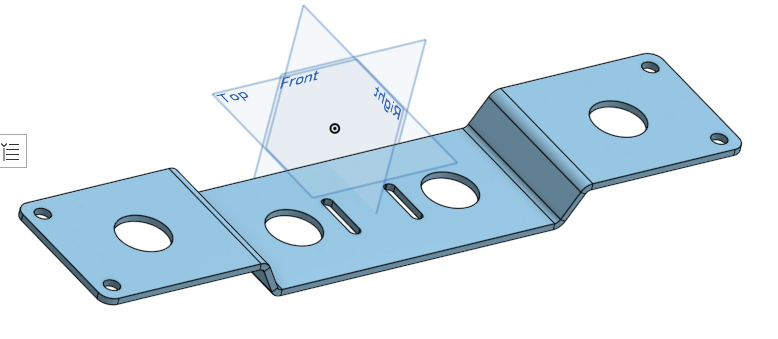
Well, parts arrived, and i have some iterating to do, but progress is progress. I made a slight mistake on my CAD draft of the camber plates 😕 The stud locations are dead nuts on, as is the center slot, but the slots for the plate-to-strut attachment screws don't line up. I'll have to get a second set made, oh well. I might hack up the original ones that came with the struts to get me by until they arrive but the turnaround time on these was so fast I just might not bother. Similar story for the trans crossmember but it's less serious there. I didn't design the slots in the middle quite far enough forward to accommodate the offset of the stud pattern on the transmission mount. From where I was measuring under the car on my back things seemed to be much more in line than they actually are. I'll be making the slot a little longer on my current build out, but the likelihood is high that I'll want to remake this part too later down the line as well. If anyone needs or wants one of these transmission crossmembers from me in the future I will have it fixed by that point. Photos in the car to come as soon as I'm able to spend some real time under there, maybe this evening, maybe tomorrow.
 1 point
 -
That’s the era where they (SOA) really tighten up with dealer stock. Dealers are told to destroy parts or at least damage them as they throw them out. So finding 80’s and later NOS is more tricky than 70’s. But Carl Porter is the big man these days for NOS since I’ve been getting out of this habit slowly. He’s here once in a while. Find him in FB if you haven’t already.1 point
-
Been on a bit of a stall since the last little update for some event travel, but over the last few days I got out the tape measure and CAD and have modeled up a new crossmember. Finally bit the bullet and had it sent out for CNC cutting, and bending this afternoon. Also have the camber plates for the new suspension included in this parts order - so hopefully I'll have a good bit of progress after those parts get in, probably a little over a week. This'll be done in 1/4 plate and the final piece has had a bit width removed for weight savings so I'm hoping I can get away with building this without too much additional fabricating. I suspect if anything I'll want to add in some gussets to the bend areas as a belt-and-suspenders approach. On the flipside I'm also hoping I don't get this thing in and say to myself "man I really overbuilt this thing" - aiming for the Goldilocks zone here, so to speak. If other folks have other Gen 1 cars of similar body style, I'd be interested to see if the crossmembers and bolt locations are the same across 79-81 and across the brat and wagon platforms. If they're the same or not too different I'd be able to put a more commerically-viable version of this together pretty quick with the right datasets and measurements.
 1 point
 -
Moosens. Please take a look at the last image in my last post ".. and before I stuffed the sock in the intake port (to block dirt and debris) I looked down into it and I see a pile of "oxide crystals" https://www.ultimatesubaru.org/forum/topic/186408-ea82-replacing-manifold-gaskets1 point
-
Got em all out without breaking any - I don't think Ive stripped the holes either but haven't cleaned it up yet. For this really tough bolt I decided to use a "paint stripper" heat gun on high for about 15 minutes and it still wouldn't budge so drilled a 2nd hole down closer to the threads, earlier had drilled a hole about in the middle of the column to get the penetrating oil down into the crud in the bottom inch of the column also. After drilling this second hole and then using a lot of penetrating oil, then heat, I had progress had to heat up down by the head for at least 10 minutes with paint stripper heat gun, that's why my aluminum shield has turned golden brown .. I tried a M.A.P. torch but it was to scary and causing way to much smoke for my comfort.. and wiggled back and forth tell I could get about 1/4 turn, came back next day tried it cold no t so much movement so heated it up again and kept working it back and forth - but not going as far in as out.. then add more sauce.. do it again and eventually.. Here's the bolt right after I got it out - I used a lot of B'laster penetration oil, and couldn't get it moving with the 3/8" impact gun - had to really push and pull on this ratchet - really hoping the bolt wouldn't break,, kind of amazed it didn't1 point
-
I was gone for about 2 months and I finally got back to working on this car and ended up drilling a small hole on the outside corner of the manifold where the bolt goes down to try to get penetrating fluid or blaster down in there and then went and got myself a modern 225 foot pound max rigid torque wrench gun and I haven't broke any of the 3 bolts loose yet, so I guess I gotta go get me M.A.P. Torch, thanks for the good suggestions.1 point
-
Just like @idosubaru says; Turn the bolt a little bit, spray the bolt head with PB Blaster or other penetrant fluid. Then torch the area of the head where the bolt is stuck with a map gas torch (handheld) Turn the bolt back and forth just a couple degrees again. Torch the area, spray with PB Blaster or dab on some candle wax while it's still hot. It will make the lubricant soak down to where it's needed. Keep repeating the process until the bolt frees up1 point
-
I would love to see the end result, 242Hp and 220Tq would make for a quick car!1 point
-
Whatever happened to this project?1 point
-
Found what I needed.1 point
-
Yeah, but- Why not be able to shoot in some new grease now and then? I'd rather grease my bearings than replace them. This idea is interesting. I was working on a way to force new grease into the bearings while the axles were out. But this idea is also worth thinking on. One question I have is- What about too much grease? If grease was fully packed into the housing, all around the spacer, ect., would it possibly cause a failer due to higher pressures or something? Some people say 1/3 full of grease. If it is not any problem to be full, then we should be able to pack all the grease we can into the hub (when we got the axles out) and be ok with it. What do you guys think about that?1 point
-
Only for the rear - the tool is to remove the huge ring nut that holds the bearing in. You can use a coal chisel and hammer to pound it around, it just chews up the nut, and is a lot more difficult. The tool has four protrusions, and can be used with an impact. Takes em right out quick. GD1 point
-
No - the rear can be either two bearing/race sets and a spacer, or can be a single sealed unit. Either way in every case I've seen, the rear is sold as a unit - per wheel - while the front is sold individually. You have to buy four bearings for the front, and two for the rear. 4 seals per wheel all the way around. They are a different size than the front, are held in differently, and the seals are different. I don't see the similarity other than they are both bearings. Have you ever done one? I've done enough to own the special tool for it.... GD1 point
-
different parts # but still take 2 bearings and 2 seals per wheel on a 4wd.1 point
-
I had four bearings and four seals when I replaced them on my 84 4WD wagon. Whats this about the grease?!?! Wish I had known that....1 point
-
Hey, you could do it Jaguar style. Drill the spindle, like you were talking about. Also drill a hole through the hub, and put the zerk in the hub. pump grease into the hub, and old grease exits through the spindle. A similar setup exists on M60 tanks, except there are 2 holes in the hub, and none in the spindle. One hole contains the zerk, and the other has a relief valve. It's fun pumping those up with a pneumatic grease gun. You don't know when it's going to pop off, or where the nasty, old grease will fly. I probably have a few of these relief valves sitting around, if you wanna give it a shot.1 point
-
The rears do last a long time. I've never replaced a set because of failure that did not result from some other problem. I had a set go bad because the little washer with the tab you bend down had sheared it's key off, and allowed the nut to spin off. (this was a 2WD rear bearing). On the 4WD this is much less likely to happen because of the design of the spindle. GD1 point
-
Well - the way I figure your at least diluting the contaminates with more clean grease Also - if the bearings are cared for properly, and the car was designed with bearings that could hold it's weight, they should never fail. The metal never actually touches - the bearings ride on a thin coating of grease - the only way a bearing can wear out is it's it's got too much weight on it (thus sqeezing out all the grease), or if it's running dry, or with contaminated grease. So saying that they shouldn't need regreasing till they fail if properly installed doesn't make sense - if they were properly installed, they should never fail. Of course this isn't a perfect world, and they do indeed fail because of either improper installation, or seal failure, which lets in contaminates, and water (even clean water will ruin the grease), and lets the grease leak out. For these reasons I like the idea of a grease fitting - it would allow you to just replace the seals without having to remove the hub and pound the bearings out of it. Just remove the seals from either side, and pump in new grease till it runs clean from either side - new seals, and put it back together. This way you could prevent failure of the bearings for a long time I think. GD1 point
-
Yeah - I have to dissagree junkie - water and other contiminates from the abuse that us off-roaders do to our bearings is going to make them fail prematurely. A good regreasing via a zirk fitting on the hub after every couple runs would help to keep them from running dry and failing prematurely. I don't think that drilling a small hole for a fitting would weaken the hub. If the hole is drilled properly, it shouldn't be a problem. GD1 point
-
I dropped the idle at 210F+ to 800 and it still hasn't stalled and I don't think I've stalled it starting out. Also had someone help me tune the PID on the cruise control, we got that very smooth now. Wound up zeroing out the derivative gain and the integral gain. Actually flipped what the integral gain was doing from the base settings and that may have helped even more. Had a bunch of friends help part out the black Outback. Base of passenger side A pillar was more cracked than I expected especially since the windshield wasn't cracked. This is a good example of why I considered the car totaled. This evaporator has actually been flushed out a few times. That white thing used to be a round washer sealing the bulkhead fitting in the fuel cell for the main pickup hose. We got most of the wiring harness out intact. We cut a few things for the rear taillights and the doors before we realized we could/would remove the entire thing. Mainly I wanted to keep the portion from the ECU to the engine so we could potentially swap that EZ30 into something else. Wiring harness pictured weighed 51#. This is after we put away/threw away a lot of parts. Not much left on the shell aside from the bumpers, some glass, and the headliner. Hopefully will be picked up momentarily.0 points