
All Activity
- Yesterday
-
 A 93 22 intake manifold won’t plug into the EJ25. It could work if you bolt a 1995-1998 EJ22 intake manifold on it and figure out all the minor pvc and vacuum and other bits. 93 EJ22 block bolts to EJ25 trans and exhaust. Bolt 95-98 intake manifold onto 93 engine and it’ll plug into the EJ25. 1995 EJ22 from an automatic is the direct bolt in option. Manual 95 works too but just won’t have EGR which you can easily work around. 1996-1998 EJ22 are all bolt in and plug and play if you also get a single port EJ22 exhaust manifold. It bolts right in place. The EJ25 exhaust is dual port and won’t bolt to the 96+ EJ22. (95 EJ22 has dual port exhaust heads so it bolts right up to the ej25 exhaust
 -
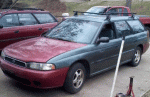
From the picture, that’s a nice truck, especially for Minnesota.
-
Rain has finally stopped in Minnesota, time to get the Brat out.

- 1 reply
-
- 1
-

-
 100% agree. It’s the same over here in Oz too. “Sad times”, but here I am hanging onto my old Subarus - I started that before they needed to hang on to their older cars… Cheers Bennie
 -
 I think that price is fair given mileage and availability. For a future vintage project I just drove several hours mostly due to NYC traffic to pay $800 for a low mileage sedan with the early 2.2. Car had interior stripped so I really paid for the engine, harnesses, and not a lot else. I will also try to extract the 4EAT transmission for our 94 Legacy but if that doesn’t happen I still feel I got a somewhat fair deal. Guys like me have to wake up and realize there are no more $500 beaters. Also, I would never make the effort I did for any other engine. It’s the first edition 2.2 and that’s it. Simple and reliable.
 -
 It's a coil spring on the base of the pedal. You can see it if you're on your back and shine a light up where the pedal pivot is. They never break. Actually while you're under there, check the entire brake/clutch bracket for any cracks from corrosion. It really sounds like something wrong with the hydraulics, to the point where it can't overcome the pedal assist spring.
 -
 Thank you. She says It does run and has a cracked head. I agree that they probably dont know for sure its a cracked head. car: https://www.facebook.com/marketplace/item/3641701636070190/?referralSurface=messenger_lightspeed_banner&referralCode=messenger_banner engine i found https://www.facebook.com/marketplace/item/451568884474460/?ref=search&referral_code=null&referral_story_type=post&tracking=browse_serp%3Ab67ead0b-ab41-40e5-a383-715ad38ce71f i have pulled both a 2.2 and a 2.5 before and did the head gaskets and timing belts . I think the car is nice . Seems high for it without a good engine. IDK the price of a good 2.2 . What should it be?
 -
Sure: look for rust, drop in a 2.2 with new timing bits and you’re golden. $1,500 seems high for a non running 90s Subaru with a blown engine but I’m guessing you’re in the PNW? long explanation: You know this I’m sure: Those 90s 2.5s blow headgaskets all the time. It’s probably not a cracked head, there’s no way someone put the effort into distinguishing between headgaskets and blown head. Although it probably doesn’t matter these things usually overheat in such a way that people often limp them and overheat them multiple times. Good chance you’ll see evidence of a new cooling system part (or 5) as people chased it, they often diagnosed those engines incorrectly. they’re prone to multiple overheats before someone figures out it’s the headgaskets. Also at this age the chance of this being a second (or third!) head gasket is high as well (and maybe prompted the cracked head guess). Anyway - all of those reasons make this a really risky repair and an engine I’d rather not keep. They’re prone to losing the lower end bearings due to all the prior overheats That’s why Larry and I would just drop a 2.2 in it. Much better engine. if you love risky engines and want it, look for signs of distorted/warped melted timing belt covers or knock sensor indicating extreme external temperatures. I’ve seen them with new headgaskets blow an engine within a month had signs of overheating like that. They were engines I told someone not to keep and the person didn’t listen. If you do repair it resurface the heads. Don’t bother checking for flatness, it’s a waste of time. They always have high and low spots 100% of the time and you want proper surface roughness on an engine that loses headgaskets this easily. Use Subaru gaskets and clean and lubricate the head bolt threads to make sure they torque properly. If they’re not rusty reuse them.
- Last week
-
(Dirt cheap and then drop a 95 2.2 into it. ) Is it plug and play? I found a 93 2.2 with 80k miles on it?
-
It has 88k miles, she wants 1500 for the car
-
 This sounds like the most likely explanation. So is this spring in the passenger compartment? The temperature with air conditioning doesn't get that hot. So I'm assuming it is located at the clutch itself or in the engine compartment. You have to drive the car around for a few miles so that the engine and engine compartment get thoroughly hot. I'm not actually too interested in making a repair since We don't have too many really hot days here. The rest of the year it works normally. I did notice something interesting this morning when I got in the car and tested the clutch. The very first time I pushed it to the floor it did stay down even though the engine is cold. But after I pulled it up it worked normally again.
 -
The pedal is has a bistable helper spring mechanism. The first half of travel the spring wants to push it back up, when you pass halfway, the spring wants to pull the pedal down. Think of an old school light switch. Could you try pressing the clutch all the way down, then keeping it held down with a 2x4 or something. Check if the slave cyl is holding the fork down after an hour.
-
85 F. is about 30 C. I'm using DOT 3 brake fluid and I sucked out the fluid in the reservoir and put in new a year ago. I didn't flush the whole system. I suspect the problem is more mechanical. When I pull the clutch up it goes through some resistance, just like you do when you push the clutch pedal down. Halfway up it then pops the clutch all the way up. Its as though a spring or something gives resistance. The car has some bad rust around the right rear fender and rear door frame. So I'm not too interested in the car's longevity.
-
No maintenance at all. No hose replacement. A year ago I did suck out the brake fluid in the Clutch reservoir and put in new brake fluid. The clutch works normally when its not hot. It feels more like a mechanical problem like a spring or something. When you pull the clutch pedal up it goes through some resistance halfway up and then pops up all the way nicely.
-
long travel Outbacks or making Subarus faster and more reliable offroad
el_freddo replied to pontoontodd's topic in Off Road
I’d agree with this statement. Try doing the old EA style front struts - very painful especially when lifted with springs!! Cheers Bennie -
I can’t be bothered working out what 80°f is in Celsius, anyway, what type of brake fluid are you using in the clutch system and when was the last time it was flushed? Also a good time to put a new flexible hose to the slave cylinder. Cheers Bennie
-
 Clutch hose replaced? System air free?
 -
It's been a year since I first posted this about the clutch problems in hot weather. I didn't do anything to maintenance the clutch since then and it has performed well in the last year and the car has 7000 more miles on it (330,000 miles now). So today we have hot weather again and I was out driving and it repeated the same problem as last year when we had temperatures up in the mid 80s here in Fairbanks, Alaska. To refresh the topic, the clutch pedal gets stuck in the down position in hot weather if you drive the car around much and the engine and clutch get hot. You have to pull it up with your foot. And it gets difficult to shift gears. So this only happens in hot weather in the mid 80s or hotter. After the engine cools down, the clutch will be normal again, based on previous experience. Just like last year I don't plan on doing anything to remedy the problem. This is a problem that happens maybe once a year. I just avoid driving it when hot. It definitely would not be a good car in the lower 48, but up here with our cold winters it seems happy.
-
Dirt cheap and then drop a 95 2.2 into it.
-
 Swapping the struts in the field wasn't too bad. Definitely way less time consuming than taking them apart and swapping shims, bleeding them, reassembling, etc. Will try lubing the high lifts but they seem fairly clean and new. If anything the one I keep in the Impreza was too new, didn't have the paint worn off it when we started and I know that can be an issue.
 -
(2).thumb.jpg.bec89cdb417321b805950fa2084ffc78.jpg)
long travel Outbacks or making Subarus faster and more reliable offroad
travelvw replied to pontoontodd's topic in Off Road
Strut swapping for fun/research, you guys are nuts! Yeah, I'm used to no A/C in my old Toyota with a little heater core foot burn in the summer time. I'm not sure what all is going on with your high lifts, but I always spray a little lube on mine and work it up and down before I head out. They like to stick and not function properly after they sit for a bit. K -
 Edithentem joined the community
 -
Most folks avoid that four cam engine. It’s such a short run and Subaru then offered a more reliable 2.5 To me it had better be dirt cheap because you’re rolling the dice. my opinion
-
Drove up to the UP Friday night and checked a few of the camping areas we'd found on the last trip. First one had a few people in it including some guys setting off fireworks so I went to the next one which was unoccupied. Camped near an outhouse along the river/reservoir and set up the tent. B showed up a few hours later. Saturday we headed to the first suspension test area. First thing in the morning the tach in the Impreza didn't work but then it started working after some driving and a few restarts and has been working fine since. Stopped at a cool waterfall/rapids at an old bridge/dam with some people fishing just downstream. Saw a Forester out in a field with the back sheet metal cut off. Took a few trails/roads we hadn't been on before that went through but I tried one too many. We'd gone north most of the way on this road before and then went east the long way so this time I tried going all the way north. It was fine until it wasn't. Got stuck in a mud hole in the Impreza. Took us a couple hours to get it out with the high lift and recovery ramps and snatch strap. Then it took us a few more hours to get both the cars turned around. Once we were out on foot digging and jacking it became clear the road was covered with 3-4” diameter logs. These were both a help and a hindrance. We did learn a few things though. One, we need to practice using our high lifts more or perhaps watch some videos. B's seems to just lock up occasionally. Mine wasn't lowering consistently. At one point I kept “lifting” even though it was mostly the jack sinking rather than the car lifting which then took a while to jack the jack out of the mud. I really need to fab a rear bumper for the Impreza with good recovery points. The 1.25” square adapter I bolted on my high lift was mostly useful but with all this heavy use started to rotate, so that could use an upgrade. Definitely need a bigger lifting foot too. I made one for the high lift I keep in the white Outback but it fits so tight I never bother to take it on and off so it makes the high lift even more of a hassle to store. Solving those issues probably would have cut our recovery time in half or less. Gotreads folding recovery ramps were alright. At least once they worked their magic, tire would suck them under and then grab. We slightly bent them but they still fold back in the carrying bag. Definitely more practical to carry than the solid recovery boards we have. We really need to pack the winch so it's more accessible too. Currently I have it buried in the spare tire well. There weren't many large trees around but we probably could have cut our time significantly by winching. While we were getting unstuck we found some scraps of styrofoam, part of a tow strap with hook that we used during our recovery, a floor mat probably from a UTV, a leather work glove, and a few beer cans. So we probably weren't the first people to get stuck there. At any rate, we got out and finally made it to the first suspension testing area. B could go significantly faster in the Forester than I was going in the Impreza without “bottoming”. The Impreza had the front end banging noise we've had in the Foresters that shows up sometimes even when we don't seem to be hitting very large obstactles. Got some baseline max speeds with slight bottoming on a relatively high speed road with some big but fairly smooth dips in it. We started with our tires at 35-40psi and then tried it again at 25psi, didn't notice much difference in ride quality. B did say the Forester seemed less squirrelly at the lower tire pressures, I felt the Impreza understeered less at the lower tire pressures. Just beyond that suspension test stretch is a log section where we were going about 10mph. Headed on to an area where we'd driven through a lot of whoops before. Unfortunately when we got there we found they'd graded most of them smooth. We did find one winding trail that was still whooped out though, very fun to rip through that at 35-40mph. Again the Impreza was limited by the banging noises. We headed on to the next section of whoops that's fairly close to a campground we've stayed at a few times. As we were approaching them it was dark and there was quite a bit of standing water in the trail so we decided to just camp for the night. Sunday morning we headed back up to the fast whoops. You can run most of these at 50-60mph but there are some near the end that are really big so 40-45 is more prudent. 60 will get you very airborne. Again the Impreza was limited by the banging and the Forester could go significantly faster. It was mainly the left front so we tried swapping front tires side to side (two different brands but both mud tires in the same size at the same pressures), that made no difference. We'd brought a set of front struts with different valving in them for the Forester and rear struts with different valving in the Impreza. Since the Impreza was limited by the front end banging and the front struts are easier to swap, we put the struts with new valving in the Forester and the ones off the Forester on the Impreza to see if it would fix the banging. B said the new strut valving felt generally more damped and didn't get as airborne off the same big whoops at the same speed. The struts off the Forester didn't seem better in the Impreza. We headed back to the winding whoops trail to test our changes. Similar results to the faster whoops. We were trying to figure out what might cause the banging noise and noticed the aluminum front control arm bushing on the corner that was making noise flexed a lot more than usual so we swapped that out with a less used spare. The banging noise almost went away, now I was able to drive the Impreza as fast as the Forester with minimal banging noises. This made sense as B has this problem most often, including the last trip, but we'd just replaced those bushings on his car before this trip. Then we headed back to the original test road. Again I was able to drive about as fast as the Forester with much less banging than before. There's a dip at the end that makes a decent jump in the one direction, the cars jump and land fine but at 50+ you're going a little fast for the dips right after the landing section so the cars bounce a bit. Also was able to drive the Impreza as fast as the Forester now through the logs with the fresher bushing. We swapped the front struts on the Impreza back to what we started with. Was maybe slightly better, we both felt that set we started on the front of the Forester was bouncier than the other setups which makes sense looking at the valving. We took the short (distance) way to the campsite which took a few hours. The longer distance way we took the next day takes about a half hour. Bounced the RR tire of the Impreza off a rock on the way there. Put a hole in the sidewall. Tried plugging it but even with three plugs it was still audibly leaking so we just swapped on the spare. Camped at a site we'd found on the last trip overlooking a stream/river. In the morning we headed up to town to meet my brother and take him for a ride and shoot some video since he's the real shock tuning expert. North of town there are tons of trails and we spent a little time wandering and found a wide powerline grade with two trails side by side, one whooped out, that we'd been on before and seemed good for shooting some video. Again the Impreza's coolant temp would start to climb on fairly low speed 2-3000RPM second gear light throttle type terrain especially with a lot of soft sand. As soon as we either stopped and idled or moved at a higher speed the temps came right back down. Still thinking that's the lean tune at low loads and RPM, need to set up another tune at stoich to test between the two. Met up with my brother and took him on a ride through the fun winding whoop trail and the side by side powerline whoops to get some video and took some notes on his thoughts. One thing B and I discussed since neither of the cars we took has functional AC at the moment is how much the 200F heater core under the dash increases cabin temps. Assuming once these cars are 20+ years old a fair amount of air leaks past the control flaps too. Will probably try some shutoff valves and some extra hose to bypass the heater core for summertime use and see if that helps. Even with the AC working, if it reduced cabin temps by 10F that would just improve AC performance further. Definitely seemed cooler driving the Impreza with the windows down to turn the fan off or switch to defrost/floor since the air coming out of the vents felt well above ambient. Overall it was a good weekend. Annoying being stuck that long in the heat and humidity but gave us/reinforced some ideas about improved vehicle recovery. Didn't execute the full original shock testing plan but we think we finally figured out the mysterious banging noise and it's a fairly easy fix and the valving changes we did make seemed to be an improvement. Also both cars seemed to go through the whoops pretty well.
-
 If it has a cracked head, the coolant likely leaks, and it may have a history of overheating. Beware!
 -
Thanks all! 100% ended up being grease from the cv boot. I couldnt notice any cracks but did a deeper dive and thats for sure the culprit. Gonna dive into it later this week. Thanks for the quick follow up and help again everyone. The subaru car community is the best.


