Subaru_GL
Members
-
Joined
-
Last visited
-
Quick update, the lights work! The original battery cables were junk, and had tiny terminals on them that won't fit a modern battery. I parted out a '90 Loyale last fall, so I grabbed the cables from that car. They fit excellent, and are a big upgrade from the stock setup. The lights all just worked, I didn't have to do any wiring diagnostics at all. More soon.
-
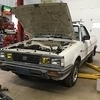
At this point, I'd finished with all my engine bay paint work and repairs, and I was sick of tripping over the engine and transmission on the floor. Time to get it installed! It's starting to look like a real car again! I immediately ran in to my first oversight. A seasoned FF-1 enthusiast will note that this intake manifold is missing an important hose barb for the heater core. I used a 1400 intake I had lying around because it was one piece and fit right on, but it turns out I can't use it. I started running coolant lines and found this right away. Thankfully the parts car had the intake I wanted, a single piece but FF-1 specific unit, 1300g only. I quickly stripped it down and cleaned it up. My first coolant hose mock up, you can see where I really needed that last hose connection. Of course, I now needed to swap the carb throttle body back to the smaller base FF-1 style, so I took apart 3 carbs to piece together one nicely moving and functioning throttle body. I'm working on the throttle cable linkage now, it's been a challenge because the 1100 and 1300 are completely different and share almost no parts. I didn't take many pictures, but I spent many hours drilling out all the broken front end fasteners on the car, more than 12 by my count. This allowed me to bolt up everything on the front for the first time in possibly 45 years! Look, a real car! I'm stoked, it's really coming together! A recap of what you're looking at here: none of this car's original front sheet metal is present at this point. The hood, fenders, grill, and headlights are from the parts car, the turn signals are straight from Japan (used but extremely nice), and the green valance was from the Seattle trip. The bumper will be a project on its own, but the hood opens and closes with the latch as it should, a huge achievement! The holidays will surely slow my progress, but I'm pleased with how well it's come together at this point. Stay tuned for more!
-
Next, I needed to turn the car around to start playing with the engine, so I needed to sort the steering rack. I'm still not done, I'll have more pictures when I get back to it. The FF-1 rack is easily disassembled, so I took a whack at "rebuilding" it. It was full of nasty 50 year old grease, so I cleaned everything, painted the rack housing, and re-assembled it with new grease. The nylon bushings were fine, it just needed a deep cleaning. I also took the opportunity to rope in the replacement rear window. I had to cut the seal on the parts car, but the old seal from the broken window was still nice and flexible, so with my friend helping it went right in. With the rack temporarily installed, I put the wheels back on and shuffled the car around in the shop until it was facing the other way. The hood will need work, hence the board. The original hood was very bent and poorly repaired in the past, so the parts car hood will be what I run. It seems that the hood latch failed and the hood flew open, or perhaps the junkyard the car was in took some liberties in getting it open. This is what the support looked like, you can see the hood prop was ripped clean off the cowl. The original hood has a good support, so I'll be drilling some spot welds and extracting it later. The cleaned up and repaired passenger side really made the battery tray look bad, so it was next to tackle. It also has some dents and accident damage, but not nearly as much as the other side, and the parts car was very rusty around the battery tray, so I did my best to straighten it up. I worked it over with a hammer and dolly to get it closer to straight, it helped quite a bit. Again, I have no idea what I'm doing, but it turned out alright so I'm not worried. I wire wheeled the whole area, and used some sheet metal screws to fasten the battery tray down better. Most of the spot welds were broken from past body work. The seam sealer came back out to cover up the sheet metal screws around the battery tray, and then I brushed some "canvas white" rust-oleum enamel paint on the whole area. It blends fine, and looks 100% better.
-
It's been a busy month, I've made tons of progress on this project finally. The subframe finally came out, no broken bolts but lots of penetrating oil required. The subframes met briefly before being swapped. The top one is the original, you can kind of see how bent it is by looking at the bumper mounts. With the subframe out of the way, it was finally time to get out the grinder... The point of no return! I bolted the "new" subframe in to begin lining up the replacement inner fender. I also bolted up the fender, grill, and core support from the parts car to help line everything up. The first test fit showed where I needed to trim the inner fender just a bit to get it to butt up correctly. The inner fender pre-trim, the gap is close but not perfect yet. The car had been rust proofed, but the parts car never was, as you can see by the color difference on the inner fender. More test fitting, this is with the original fender to the car which is VERY bent up. The bumper is also twisted, but I wanted to see how it would mount up. The final fit, with just a small gap to fill with weld present. I left everything bolted up to hold the part in place for the first few welds. First few test welds looked great, so I went at it. Quick note, I'm not a trained welder, I know these welds aren't perfect, I'm sure I messed up a bunch of body work because I'm a hobbyist. Feel free to judge away, just know that I'm not performing any metal work for hire or on anyone else's cars, so I'm the only one who will be effected by the quality of this work. I went up and down the seam with single tack welds spaced apart to keep it cool, grinding between welding sessions. I spent 3 or 4 days welding this up, doing it in my free time and letting it cool every time. Hey, that looks something like a real repair! I quickly primed and brushed some seam sealer on the repair, to hide my shame and add a factory style finish. Everything is lining up nicely, the core support measures out on both sides, and it's starting to look like a real car! More in the next post, I really have been cruising on this.
-
I do, it's not in very good shape though. Look at the pictures of the parts car, that's the spare one.
-
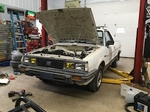
Now that winter is here, I can really get plugging away on this. It finally made it in to the actual shop, so it's warm and ready to get fixed! I need to pull the subframe to get some parts swapped on to the new subframe, but before I do that, I need to do a little body work... This old damage will need to be corrected, the headlight is all floppy as most of the spot welds are broken along the front. I'm no body man, but I do know that these kinds of folds don't just pull back out. Thankfully, the parts car donated it's front quarters, so I have some nice straight metal to fabricate in. I'm discussing options with my friend who knows body work, I think I can handle this small section job. It's non-structural, and with the fender and core support bolted up, I should be able to get it nice and straight.
-
This is the last update to this post, I'll try and be more regular on here now that I'm getting more time to work on the car. I did manage to score some more NOS parts over the summer as well, important ones at that! This muffler popped up on ebay out of nowhere, so I jumped on it. It's OEM and correct for wagons, I'm stoked! I also scored these front seat belts, the rusty ones were what I was working with on my car. The shiny ones came all the way from England; they had been removed from an FF-1 in the early 80's when GB changed their seatbelt laws and required shoulder belts. The PO tucked them away in a closet for 38 years! He posted about them on Facebook, where I contacted him and made a deal. They will really bring the interior together, and are in PERFECT condition! That's all for now, I'll try and take lots of pictures of the subframe work, it'll be a bunch of work but totally worth it. Happy November!
-
I was able to buy an old dealer's stock of factory tools, dating all the way back to FF-1s (the dealer opened in 1970!). Not every tool was present, but I got quite a few goodies, including the transmission stand you can see in the above pictures. I also got this awesome set of engine stands, I wish I had these while I was working on the engine! Quick note on the engine, it is now fully assembled and ready to re-install! Before it can go back in, it'll get bolted to the transmission, and then I need to sort out my subframe issue. I have the subframe from the parts car stripped down and ready to re-assemble, I just need to pull the subframe from the good car and get them next to each other.
-
I also re-did the clutch throw out bearing and arm while I was playing with the trans. This is what it looked like when I took it apart initially. Nothing to crazy, just a rusty throw out. After removing the release arm and bearing holder, I could get a good look at the pivot. I've had a few late model (like 2000 and newer) Subarus that had issues with this pivot. If it gets too dry, it'll wear right through the release arm and leave you stranded with no way to disengage the clutch. This one has fossilized grease on it, but is in otherwise very good shape. Good thing, that's another part that I would never be able to purchase! All cleaned up with new grease on the pivots, the sleeve, and a new Beck/Arnley throw out bearing. The splines were a little rusty, so I cleaned them and the pilot bearing snout with some steel wool. Everything moves smoothly! Ebay came through for me with this clutch disc and pressure plate. Both OEM Japanese parts, only the best!
-
Summer distracted me big time, now that it's cold out I have time to update this thread. After organizing all the parts car parts, I started on the front brakes. This is the original transmission to the car, the shoes swelled up with rust and nothing was turning. Thankfully I had a giant 3 jaw puller that worked perfectly. The brakes are barely worn out, just rusty and nasty from sitting. The puller only broke the round hold downs for the retaining springs, everything else was in good shape after cleaning. A good friend hooked me up with some NOS brake shoes, they are identical to the ones that were on the car. You can see that they were barely worn, either the car got new brakes from the dealer right before it was parked, or it was still running it's original pads and has really low miles. The other side was also very rough, to be expected. I didn't get any good pictures, but I took everything apart and soaked all the rusty steel parts in Evaporust for about 12 hours, wire wheeled them, then painted most of it black to keep the rust away. The backing plates are in fantastic condition, so I just cleaned them up and re-used them as-is. I thought the "license from Bendix" was a neat stamp, a lot of these adjuster components look very familiar to other cars I've worked on. I had the local FLAPS turn the drums, the one on the left is from the parts car but looks just like what I started with on the right. I'm glad the local guys could turn these for me, it would have been impossible to find any replacements that don't look like the one on the left... I was able to buy these NOS wheel cylinders at a local import auto parts store that's been around forever, they were on the shelf! Lazorlite brand parts are always a good score, if you look closely it is a factory OEM part with the Fuji emblem ground off. First step was bolting the backing plate back on, all cleaned up and ready to go. The leading shoe has the parking brake lever on it as pictured, though a secret spring is hiding that I forgot the first time.... Impossible to see from the front, but very necessary for a good parking brake! This is cleaned up and put back together, you can see I had to fake the hold down spring retainers with some slightly larger than stock ones. It should work just fine.
-
It's been a minute, here's a quick update: I'm losing my outside storage, so the parts car has to go, and soon. So, I took a day, and stripped it down. I still need to get a few trim pieces, marker lights, the roped in windows, and the gas tank and anything else underneath, but it's 99% stripped. Everything was labeled and stored away. A few notes: this thing came apart super easy. I think I broke maybe 3 or 4 bolts total, very impressive for a '71. The doors are paper thin, they can't weigh more than 30-40 pounds a piece. I could carry two at a time, an odd feeling. I didn't take many pictures, it went pretty quickly and I didn't want to lose momentum. The good car will be getting moved to my actual shop soon, then some serious work will commence. I did go back and pull the rear axle after this photo was taken, also super easy and might make a cool trailer axle in the future.
-
Big update, the heads are on! The factory repair manual says to "coat each side of the head gasket with liquid sealer", which I interpreted as copper gasket spray. I've used this stuff on EJ motors, it seems to work just fine. I also used it on the copper sealing rings at the bases of the cylinders... Another thing the manual mentions is a spacer tool to help torque the bolts that hold the rocker shafts on. I just took apart some EA71 rocker assemblies and borrowed the towers to use as spacers. I was able to borrow the head alignment tool used when bolting these heads on, you can see it bolts to the coolant crossover flange and holds two of the intake bolt holes in place. It's starting to look like a real engine! I torqued both heads in steps, the repair manual is pretty vague on what I should actually do. This is the OEM manual, too. It says to tighten in stages before the final torque, so I did 5 pound increments. It went very smoothly! Next is rocker shafts, and I have some NOS parts on their way to continue my assembly.
-
After a ride in the ultrasonic cleaner, the parts looked much better. I found an old stock carb kit on ebay, which worked excellent. It didn't take long to run into a problem, of course. The original throttle plate assembly is messed up, the secondary is completely seized. I have a second EA61 carb for parts, but it is even rustier. So, I started digging around in my parts. I have this 1300g intake that I wanted to use, where I made my first discovery: the EA61 carb has a smaller bolt pattern than the EA62/63/71 carb. On the left, EA61, on the right, EA62. This is the late style gasket over the early manifold, definitely not compatible. On the left, EA61, on the right, EA71. I have a EA71 here for spares, and for fun, I pulled the carb to see if the throttle plates were any good. They move exactly as they should, thankfully. Even better, the carb base is the same size on both carbs, so I was able to simply bolt the EA71 base onto the EA61 body. The biggest difference is in the throttle plate size, though it's the secondary that is drastically larger. I won't know until I bolt it all up, but I think this will work. This is the completed franken carb. I did have to swap the linkage parts over onto the new baseplate, but it is all the same size and it was super easy. One more piece to the puzzle!
-
Small update, been busy with other stuff, but I still pick away at this project. I pulled the carb off the manifold and got it torn down, it actually looks very good inside. I was pouring ATF through it to try and un-seize the engine, and it seems to have had a positive effect on the insides of the carb as well. Everything is in the ultrasonic cleaner now, enjoy some pictures of a VERY old Subaru carb. Until next time!
-
Had a chance to play with the parts car today, I haven't had much of chance to look it over since I got back. The weather hasn't been cooperative either. The hood latch was stuck (the release cable is broken, I think). I was able to remove the front valance and reach up behind the grill to unlatch the hood. The hood prop is in the center of the hood on these cars, and it looks like this prop was jammed and someone really wanted to get inside. That support running across the hood is bent to hell, and the prop is ripped in half. The valance will do for now. The engine doesn't look great, but it's nearly all there. This car is a 1300g, so this engine is an EA62. First things first, I wanted to see how seized it was. I put a 22 on the crank, and to my surprise, it turns! In fact, it seems to have compression! I had a quick peak at the engine in Seattle, but the hood got closed and I figured it was safer stuck closed for the 2000 mile trip anyway. I'm thrilled, this is an excellent alternative if my EA61 ends up having issues. Don't worry, I've come too far on the EA61 to give up on it, I just feel good knowing I have options.