bendecker Posted February 28, 2013 Share Posted February 28, 2013 (edited) My kids love riding in the back of my '81 Brat, especially when we go on adventures in the desert. Unfortunately, kids grow and their heads now poke up over the roof if they sit up straight. On our last trip, this was a problem -- they got pretty uncomfortable at speeds over about 40mph because of the wind. So... I started thinking... and a project was born... The DIY Back Seat Wind Dam! It's still in process, but has pretty much settled out as far as design goes (although, I might round the corners so it looks more like commercial ones...) On the to-do list is to fiberglass the plywood so it's completely waterproof, sand it smooth, and paint it either white or black (opinions?). It will look far less redneck when done, I promise. Edited February 28, 2013 by bendecker 2 Quote Link to comment Share on other sites More sharing options...
bendecker Posted February 28, 2013 Author Share Posted February 28, 2013 Details #1: The deflector is made from a 2-foot by 4-foot piece of 1/4-inch birch plywood from Lowe's (really nice stuff to work with). It's clamped in the back using pvc conduit clamps to a Yakima 1A roof rack that, in turn clamps to the gutters. There are only two pictured, but I've drilled holes for 4 and will use all of them once it's fiberglassed and painted: The spacers are 1/8-inch Baltic birch plywood left over from a cabinet project. They allow the dam to lie flat on the bar with room for the tops of the towers: Quote Link to comment Share on other sites More sharing options...
bendecker Posted February 28, 2013 Author Share Posted February 28, 2013 (edited) Details #2: The front is held down by two fabricated gutter clamps and some 3/4" polypropelyne webbing with a plastic tension piece and stainless steel hardware: I got the plywood to curve by cranking it down and lightly spraying it with water from a spray bottle for a couple of days in a warm garage. It holds its shape really well and will permanently stay that way once it's been glassed. I also did an angle cut from the front to back. The goal was to make it as wide as possible, but have it transition into the roof with a cleaner look: I'm also toying with painting large letters across the front that say "SUBARU" or "BRAT". Comments...? Ideas to improve it? Does anyone else have people ride in the back of their Brats? Thanks for tuning in... Edited February 28, 2013 by bendecker Quote Link to comment Share on other sites More sharing options...
Zefy Posted February 28, 2013 Share Posted February 28, 2013 (edited) Pretty hard to find one of these air dams, but finding a high rise canopy is not. There are people that have cut the backs off to reproduce the look. Pretty much exactly the same i think. If you're going to strap a piece of plywood to your roof you should at least paint it...i guess it serves a purpose though... Edited February 28, 2013 by Zefy Quote Link to comment Share on other sites More sharing options...
Nils Posted February 28, 2013 Share Posted February 28, 2013 Hello Bendecker, nice car! Maybe possible to use a caravan wind deflector from the 70`s/80`s mounted on a roof bar? Its easy on/of installing and road legal, you dont have to be afraid of parts falling of when cruising in your classic Subaru I can find some photos if you need, or else keep up the good work. Always nice to see creative people working, keep us updatet with photos? Quote Link to comment Share on other sites More sharing options...
maestro Posted February 28, 2013 Share Posted February 28, 2013 Bendecker, there are wind deflectors out there you can purchase. The one Nils is talking about I think is made by a company called Aeroplus. You may be able to go to an RV store and find something like it. However you seem like most of us and on a budget. That and making it yourself is a reward of satisfaction on its own. That said I think instead of fiberglassing the board you can try plasti dip in an aerosol can. Go back to Lowes and to the paint section. They have it in the spray paint section or just ask a paint person where it is. In my Lowes they only have the black and the white. Otherwise you can order those or any other colors you want online. They even sell a glossifier you can spray over the matte color to give it more shine. I have used it on my wife's Jeep Grand Cherokee to make a car bra as the paint was chipping on the front of the hood. Did not want to pay to have it painted. It looks great. It will also be waterproof and no sanding. Just spray on and let it dry and you are done. Check out there product on dipyourcar.com. Quote Link to comment Share on other sites More sharing options...
O.C.D. Posted February 28, 2013 Share Posted February 28, 2013 (edited) You can also paint over plastidip as many have done. Then you can do any color you choose. I might add that you could benefit from side moldings as well. I am no fluid dynamics or aerospace engineer but I would think that air coming in on the sides would create vortexes underneath the dam that could cause lift? You have no trailer or closely following structure behind the dam to help the flow continue. Just a thought. Then again this is a gen 1 Brat, lol. You aren't exactly going to be hitting 85 on the highway, lol. Edited February 28, 2013 by O.C.D. Quote Link to comment Share on other sites More sharing options...
bendecker Posted February 28, 2013 Author Share Posted February 28, 2013 (edited) You can also paint over plastidip as many have done. Then you can do any color you choose. I might add that you could benefit from side moldings as well. I am no fluid dynamics or aerospace engineer but I would think that air coming in on the sides would create vortexes underneath the dam that could cause lift? You have no trailer or closely following structure behind the dam to help the flow continue. Just a thought. Then again this is a gen 1 Brat, lol. You aren't exactly going to be hitting 85 on the highway, lol. I like the plastidip idea. Thanks. I've also thought about side molding for the same reasons that you mentioned. Also, the more I look at it, the more I think thinner with side molding might have a more streamlined look. Edited February 28, 2013 by bendecker Quote Link to comment Share on other sites More sharing options...
bendecker Posted February 28, 2013 Author Share Posted February 28, 2013 (edited) Bendecker, there are wind deflectors out there you can purchase. ....That said I think instead of fiberglassing the board you can try plasti dip in an aerosol can. I wanted a very snug fit in the front and the wind deflectors out there are pretty expensive. Also, this thing is not going anywhere. It's locked down tight. Again, I do like the plasti-dip idea. If I go with side pieces (not for lack of lift, which should be a non-issue, but for increased air deflection), fiberglass will still be a structurally sound way to attach them and it can still be painted or plasti-dipped. Edited March 1, 2013 by bendecker Quote Link to comment Share on other sites More sharing options...
maestro Posted March 2, 2013 Share Posted March 2, 2013 Well for a snug fit on the front how about just getting some c-channel ruber gasket and glue it to the board where it meets the hood after you coat the board with the plasti dip? The camper top and the air dam seats to the roof and sides this way. Another really cool idea would be to find someone with a camper top that would go to a local fiberglass shop and have them make a mold of the front part to make the air dam out of. Just like the one in the subaru attic picture. I have an extra camper top but I'm in Virginia. Quote Link to comment Share on other sites More sharing options...
bendecker Posted March 14, 2013 Author Share Posted March 14, 2013 (edited) Progress! Rounded corners, smooth edges, fiberglass, bondo, spot putty and primer. Nice smooth transitions to the mounting spacers: Next: white paint and some type of "SUBARU" or "BRAT" with a logo in black. I'll either make a stencil or get vinyl banner sticker made. Edited March 14, 2013 by bendecker Quote Link to comment Share on other sites More sharing options...
bendecker Posted March 14, 2013 Author Share Posted March 14, 2013 (edited) BTW, I had my kids ride in the back at 60mph before I started glassing it. They were really happy with the difference. There is still some ambient wind, but the head-numbing hurricane was completely gone. Edited March 14, 2013 by bendecker Quote Link to comment Share on other sites More sharing options...
O.C.D. Posted March 15, 2013 Share Posted March 15, 2013 Quote Link to comment Share on other sites More sharing options...
doughildreth Posted April 10, 2013 Share Posted April 10, 2013 Made my airdam today! It turned out pretty good! 3 Quote Link to comment Share on other sites More sharing options...
bendecker Posted April 10, 2013 Author Share Posted April 10, 2013 Saw your pic in another thread, Doug. REALLY nice! BTW, mine turned out great. Unfortunately, my Brat is currently in the garage with stuff from a ton of 1/2 finished projects piled high in the back. As soon as that changes, I'm going to pull it out for a picture of the dam -- glassed, painted and installed. Then.... I'm ordering some semblance of a decal to go across the front. Quote Link to comment Share on other sites More sharing options...
O.C.D. Posted April 10, 2013 Share Posted April 10, 2013 I can't even locate a topper and you just hacked one up. Le sigh..... But!!! Does look really good. Think it will turn out well for the Attic Build. Quote Link to comment Share on other sites More sharing options...
doughildreth Posted April 10, 2013 Share Posted April 10, 2013 I can't even locate a topper and you just hacked one up. Le sigh..... But!!! Does look really good. Think it will turn out well for the Attic Build. My plan is to make an easy connection from summer airdam to winter topper, it should work well. I was very careful cutting it, and between the window frames and a slot on the roof it should connect nicely. 1 Quote Link to comment Share on other sites More sharing options...
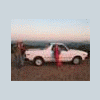
bendecker Posted March 15, 2014 Author Share Posted March 15, 2014 (edited) So, I finally got around to taking some pictures of the final product. (Hey, it's only been a year!) It turned out exactly how I wanted it to and I get a lot of positive comments on it. People think it's some rare accessory that I purchased somewhere. And (best of all) people riding in the back love it. The front left rim is off because I'm putting on custom center caps for my newly powdercoated pug steelies Nice and smooth, now that it's all fiberglassed and painted: Edited March 15, 2014 by bendecker 1 Quote Link to comment Share on other sites More sharing options...
jonas Posted March 16, 2014 Share Posted March 16, 2014 Nice '81. Along with the '82, probably the rarest of Brats. Got more pics? 1 Quote Link to comment Share on other sites More sharing options...
bendecker Posted March 16, 2014 Author Share Posted March 16, 2014 Sure! What would you like pics of? Quote Link to comment Share on other sites More sharing options...
jonas Posted March 16, 2014 Share Posted March 16, 2014 Interior? I used to have an '81 myself. Wish I still had it, but it was a pile of rust and had some electrical issues. Quote Link to comment Share on other sites More sharing options...
bendecker Posted March 17, 2014 Author Share Posted March 17, 2014 (edited) Interior? I used to have an '81 myself. Wish I still had it, but it was a pile of rust and had some electrical issues. Will do (although, it might take a while). In the meantime, here are some pics and write-ups of things I've done: https://plus.google.com/photos/104996736048797020042/albums/5420708382421326497 I'm the second owner and bought her from a friend back in the '80's with only 26k miles on the odometer for the whopping sum of $3,200. She's up to 183K now and is no longer a daily driver. Overall, there are very few issues -- the air doesn't work, a couple of minor oil leaks, and a good paint job would be great. But, I do what I can when time permits. Edited March 17, 2014 by bendecker Quote Link to comment Share on other sites More sharing options...

Recommended Posts
Join the conversation
You can post now and register later. If you have an account, sign in now to post with your account.