Dans92brumby
-
Posts
7 -
Joined
-
Last visited
Recent Profile Visitors
417 profile views

Dans92brumby's Achievements
Newbie (1/11)
0
Reputation
-
conversion Brumby converion
Dans92brumby replied to Dans92brumby's topic in Old Gen.: 80's GL/DL/XT/Loyales...
Will the crossmember of a 83 glf with ps bolt into a 92 brumby? -
conversion Brumby converion
Dans92brumby replied to Dans92brumby's topic in Old Gen.: 80's GL/DL/XT/Loyales...
ive gotten in contact with two engineer companies to discuss the need for getting the an ej20 tranplant certified. and the other to see if they can supply me with the adapter plate and fly wheel. i will keep posting information here while doing my research and also a summary of what i may need and then what a actually needed once the swap is completed. -
conversion Brumby converion
Dans92brumby replied to Dans92brumby's topic in Old Gen.: 80's GL/DL/XT/Loyales...
i found this on a Subaru group he doesn't have sources for credit but this is his exact post. Found somewhere... All copyright to the originator. -------------------------- I hope with this write-up to compile all the available information on the EJ-swap into an EA-series car, specifically a Phase I, OBD I, N/A EJ22 into an EA81 or EA82. The lightweight EA-series chassis is the perfect candidate for the efficient, powerful, 16-valve, MPFI EJ22. With the information included here, you should be able to do this swap with just a Chilton’s manual. But a Haynes would help, and a Factory Service Manual would help. The First thing to remember when doing something like this is that every situation is different. And you’ll have to figure some stuff out on your own to make it all work. Not everything will be covered exactly in this write-up. But it should get you off to a huge start. If you’re having problems, don’t hesitate to post a question on the Ultimate Subaru Forums at www.ultimatesubaru.org Links M. Rose: Great source for the Adapter plates .................................. http://www.mroseusa.com Checklist/Table of Contents: 1. Transmission 2. Flywheel 3. Clutch/Pressure Plate 4. Motor Mounts 5. Fuel delivery 6. Radiator 7. Radiator Fan(s) 8. Oil Pressure Gauge 9. Temp Gauge 10. Exhaust 11. Misc. Engine Bay adaptations 12. Wiring 1a. The input shaft on the EA-series transmissions are about a 1/2" longer than those on the EJ-series ones. And the upper 2 bolts in the bellhousings are also in slightly different places. An adapter plate will correct both of these issues. These adapter plates are available through M.Rose, or can be made yourself Homemade adapter plates may not center the bellhousings relative to each other (via the 4 pins on the sides), paying for a precision laser/CNC cut plate may be worth it. If the bellhousings are not centered perfectly, it will pressurize the transmission input shaft in the direction of the misalignment, risking failure of the transmission input shaft front bearing. 4 Here’s a picture of the adapter plate that 91Loyale made: The offset Studs were made using a jig to hold them while we welded. You thread them into the engine, slap the plate on and it locks them in position, then slide the transmission on a put the 4 nuts on. 5 Also, a pitch stopper bracket and stopper from an XT will bolt onto the transmission and up to the firewall without modification on an EA82. EA81s have the mount on the firewall off center. So you’ll have to be a little creative. 1b. If you're swapping in the EJ transmission, a custom driveshaft will need to be used, and you'll need to make sure you have front axles that match the inner spline count (all EJ cars use 25 spline except FWD Imprezas which use 23 spline. turbo EA82s use 25 spline, all other EA cars use 23). Or, you can do a 5-lug swap using EJ front knuckles, and use EJ axles. And you'll also need to shorten the linkage. An EJ transmission will bolt right up if you use the front and rear X-member peaces from an XT6 and the center piece from a WRX. The drive shaft has to be shortened 55MM. the rear axels you have to buy adapters to mount the EJ inners to the EA axles, cost $6 each from rockford CV. 2. The bolt pattern for the flywheel on the EA cars is a bit smaller than the EJ, and is also asymmetrical so that the timing marks are aligned correctly. The EJ series cam timing marks are on the crank pulley, and since the ignition timing is computer controlled, there's no need for the ignition timing marks. so the bolt pattern is symmetrical. The ideal way to do this is have a local machine shop weld the holes shut, and then redrill them (should cost about $30). 1 But another way to do it (I did it this way, with great results), is to use the flexplate or flywheel from the EJ as a pattern, and grind the holes out on the EA flywheel with a Dremel. The pilot bearing hole fits perfectly on the crank, so you can't get it off center. And you're modifying almost the exact same amount on all sides of the flywheel, and very close to the center, so balancing it isn't much of a problem (although a shop could balance it for about $30). The XT6 flywheel is a bit lighter than the 4-cyl version, so for performance sake, the XT6 one is preferable, however either one can be used. If using an EA81 transmission, the important part is the pressure plate. Get one for an XT6. You'll also need to get a throw out bearing for an '85 Nissan 720 pickup to run that PP with an EA81 4spd. The stock EA81 clutch plate is more than adequate when paired with an XT6 pressure plate. 1 3. An XT6 Pressure Plate should be used to hold the extra torque/hp. (only if keeping the EA transmission) For money sake (specifically, I was virtually broke, and happen to have a normal EA82 clutch kit already), I used the 4-cyl disc and pressure plate, and so far it's held. Knock on wood! 4. Use the EJ motor mounts, and widen the mounting holes in the crossmember slightly, somewhere between 1/4" to 1/2" on either side. A Dremel or similar rotary tool with a grinding stone works great for this. EA82 crossmember accepts the motor mount holes without widening (round EJ mounts) EJ mounts may have a centering nipple that needs to be ground off as there is no receiving hole in the EA crossmember as there is in the EJ crossmember. 3 5. You'll need a fuel pump from a Fuel Injected EA car (if yours isn't already), to put out the necessary fuel pressure needed. The pressure regulator is built into the fuel rails on the EJ motor, so the inline ones can be removed (little things on the lines right near the Throttle Body). Some say that if you've got a carbureted car, you'll need to upgrade your fuel lines to fuel injection grade. If upgrading from an EA81, a surge tank may be necessary to prevent fuel starve when cornering with under 1/4 tank of fuel 6. The EA radiator is plenty to cool a non-turbo EJ motor. The challenge lies in hooking up the hoses. The EJ Radiator hoses are a 1 1/2" ID (inner diameter), whereas the EA ones are 1 1/4". Solution 1(the one I used): use bushings to change the ID of the hose. Napa sells these. They're little pieces of hose with a 1 1/2" OD (outer diameter), and a 1 1/4" ID, with a lip on one end. These can be slipped into the larger hose (lip keeps if from sliding in too far), and the clamped onto the smaller end. I used the legacy hoses, I simply trimmed about 1/2" off the ends of the upper hose, and the bottom one worked pretty well since I'm using a loyale radiator (since the lower port comes out almost straight out, instead of at a steep upward angle). Solution 2: have a radiator shop braze larger inlets onto your radiator Solution 3: use a muffler pipe reducer and 2 pieces of hose (this is a pretty small muffler pipe....so it may be hard to come by. it was for me) Solution 4: Use the smaller size hose, and force it around the larger inlet on the engine (WD40 and/or soapy water will help it slip on). Solution 5: Use Napa flex radiator hose with 1 1/2" ID on one end, and 1 1/4" on the other. Flex hose is really stiff and not recommended for use in a lifted rig as the bends are very sharp - this could compromise the inlets on the radiator over time 3 You may need to be creative with the routing The single row radiator ea82 seems to be a better fit than the twin row. Of course cooling is sacrificed. The ea81 radiator is alot easier for the radiator shop to modify to work with ej hoses. My guy here modified the lower ea81 radiator pipe with a bigger outlet that pointed in a way that the lift kit would appreciate (90 degree elbow) but for the ea82 radiator hes taking the inlet and outlet pipes and swapping them. This way the top one will have a 90 degree bend and point right into the ej water pipe and the lower one will be a straight out outlet. Ill still have to use flex radiator hoses from Napa that have different inlet and outlet diameters but thats doable. 2 For my lower radiator hose (my radiator has the outlets modified to match the size of the EJ22, with the lower outlet given a right angle bend down) I will use Napa #9521. A right angle bend is not optimal as it reduces the clearance between the outlet and the radiator support corner brace; 45deg. would have been better, or building the outlet to come an extra 1/2" - 1" from the radiator before bending down would have been better. 3 I'm also going to mention here that you'll need to replace the lines that run to the firewall and then into the Heater Core. They’re the same ID, but longer. Pre-formed hose is not necessary, simply take a piece of your old line (5/8" ID if I'm not mistaken), in to Napa and tell them you need about 3 feet of it, and 4 hose clamps to match (don't try to reuse those crappy factory clamps!). Then cut 2 pieces the right length, and clamp them in place You may want to put a 90° coupler to angle them down around the starter if you’re running with a lift, like this: The part number for the heater hoses I used is Napa #10868 (x2). Each is a long hose with a right angle bend at each end. I trimmed a few inches out of the middle of each, making 4 shorter hoses with right angle bends. Then I put right angle heater hose elbow from the "HELP!" aisle at the auto parts store to push them up over the starter, wiring, etc.3 7. Typically, after this conversion, there isn't enough room between the radiator and the engine for the Radiator Fans. You'll need to replace them with 1 or 2 aftermarket ones and put them on the grill side of the radiator. if you're keeping the A/C, you'll have to get a little creative since the A/C condenser will limit that space (hint: ditch the A/C) I went to Advanced Auto, and they have a 12" aftermarket radiator fan made by Imperial that can be mounted on either side of the radiator, and has little clips that pull through the radiator itself. No need for any fancy mounting hardware. The same company makes an automatic fan relay, with a remote heat sensor that attaches to the radiator in the same way. this simplifies the wiring, and makes the operation of the fan automatic (if this is in an offroad rig, and there's any chance that the fan will become submerged, wire it to a switch inside, so you can manually turn it off when going through water. if it's on while underwater, the blades will probably bend and take out your radiator!) EA81 skinny fan fits fine in front of A/C condenser - with the radiator support and hood latch removed. Replace the center radiator support with two "1/3" supports (?) and use hood pins. May not flow enough air though, haven't driven it yet. Tube bumper instead of stock will help with airflow. 3 8. The EJ cars only have an idiot Oil pressure light, not a gauge. There are a few ways to approach this Solution 1: wire a light into the harness, and mount it on the dash. And ignore the gauge. Solution 2: plumb in your EA82 sender, this is doable with about $50 worth of adapters and lines available from Paragon Performance in CA. contact M. Rose (88hatchmonster on USMB) for more details on this approach Solution 3: Buy an aftermarket gauge kit. Many of the companies that make these offer a metric sender kit that *theoretically* should be a direct replacement for the stock sender (under the alt) 9. The resistance on the temperature sending units is calibrated differently. So if you wire it straight into the EA dash, the gauge will read about half. As usual....there are a couple solutions: Solution 1: Live with it....it's not that bad, but if the gauge reads 'normal' (or what would be with the stock motor), you're motor is overheating. Mine barely moves past the 'C' mark for operating temp. Solution 2: Weld a bung for an EA82 temp sensor into a sleeve, and put it inline with your upper radiator hose. Solution 3: Aftermarket gauge/sender. Same deal as the oil pressure gauge. 10. Exhaust. If you want a complete exhaust system, you'll have to have most of it custom made. As the stock EA system won't be compatible with the motor, nor with any other part of the EJ exhaust. And the EJ exhaust is routed differently, so it won't fit right on an EA car. “AND FOR GODS SAKE!!!!!! USE THE EJ STYLE EXHAUST!!!!!! IF NOT YOUR TOP END WILL SUCK BECAUSE THAT SMALL DIA. PIPE WILL CHOKE YOUR CAR TO NO END.............JUST LIKE MINE” 6 Or, you can do what I did, and use the stock legacy y-pipe and mid-pipe, with no axle-back/muffler. In my case, the legacy donor car had 240k miles on it, so there wasn't really anything left of the cats. This setup makes for a pretty throaty sound, and it's the right price, but will be replaced with a full-custom setup soon. When doing the swap into an EA81 car, the cat will need to be shifted a bit to keep from hitting the crossmember. 88HatchMonster, "I made a small cut in the right side pipe so I could shift the cat away from the crossmember and then had to shorten the left pipe in two places." There is a tab on the heat shielding right behind the flanges on either side of the Y-pipe, that I had to pound flat to keep from rubbing on the crossmember. EJ22 Y-pipe may rub on the crossmembers - shim it down by stacking an extra flange onto the y-pipe's flanges? (1cm drop) 3 There are variations here, just make sure you test-fit everything before committing to it. And in the long run, and full-custom made system may be preferable. 11. The wiring on the EA81 goes thru the grommet behind the strut tower without any problem. The EA82 you have to pull the LF fender and run the wiring thru that grommet and its a lot harder to get all the wires thru the 2nd hole that the old intake manifold wiring went thru but it does fit. 2 The 2.2 fits in the EA82 body frame rails better but the clearance between the radiator and the front pullies is tighter on the ea82. 2 The EA81 was a lot easier to put the air filter into but both can be done this way: Take the legacy air box, cut the bottom of it off so the bottom of the filter is exposed and then take the legacy airbox mount on the frame rail and make new holes to bolt it in. 2 I simply zip tied the stock legacy airbox into the stock location. It’s worked great. Or, the EJ MAF can be adapted to the EA82 turbo airbox: I drilled new holes in the airbox to accept the MAF and then cut the plenum at a certain angle. I'll admit I went through three of them before finding the proper angle at which to cut.. because each stretched differently in the section with the accordion joint - fortunately they charge $3 each per plenum where I get my parts! my plenum is a legacy plenum; I redrilled the holes in the airbox and I planed 2-3mm off of the edges of the MAF where it would bump the airbox.. This is a run of the mill hardware store clamp of some sort used to mate the intake plenum to the MAF. It has a rubber liner inside of the steel clamp. I cut the rubber liner lengthwise and narrowed the diameter by a few cm and glued it back to itself with black RTV silicone, to great effect. I then glued it onto the intake boot with more RTV and slightly beveled the lip inside the sleeve.. one end of the tube is a little narrower than the other IIRC. I could get more of these from wherever-I-got-them if anybody would like. 3 Both sets of power steering lines have the same fittings on either end. So either set can be used. However, the Legacy ones are shaped for the location of the legacy power steering pump, so they will fit better. I used the ones from the Loyale, the routing was a little odd…. but it works fine. The fittings between the hard lines leading to the Power steering rack (EA82) match the EJ ones, you will have to bend the lines a bit, but they will thread into the flex lines leading up to the pump. This connection is down on the crossmember right by the passenger side axle. 5 12. And last, but certainly not least, Wiring. Now, keep in mind that the EJ22 is completely computer controlled. Not like an old carbureted V8 that’s all mechanically driven. Even the EA cars had a distributor. An EJ22 has many sensors that tell a computer (ECU, or Engine Control Unit) what’s happening with the engine, and it, in turn, tells the ignition coil and injectors what to do to keep the engine running smoothly. All of the wiring needed to do this will need to be transplanted into your EA car. This is, by far, the most complicated part of the swap. Mechanically speaking, it’s a very simple swap, but the electrical system is a huge job. A Chilton’s manua will have pretty good wiring diagrams of both the EA car, and the EJ. The Haynes manuals are also handy. But the factory service manuals are best, but I’ll include many of those pages. So, for starters, you’ll need to remove all of the necessary wiring from the donor car (the following is all based directly off a ’90-’94 legacy, although newer models will be somewhat similar, even though they’re OBDII). It’s a VERY good idea to figure out and label what/where things go to as you remove them, because most of the wires under the dash will be removed and discarded. So here are a few pictures of a Legacy with the dash removed (you’ll need to strip it all the way down to the firewall to get everything out, but this gives you a good idea of where everything goes). When it comes time to thin out the harness, remember, an unplugged wire is the same as a cut wire, except one makes for a much lighter/simpler harness. So, if you know where the connector goes, and therefore know if you’ll need/use it, you’ll know if you can cut out that wire or not. So pay close attention as you pull things out of the donor car, it’ll make things simpler in the long run! First off, the relays: You’ll only need 2. The Main/Ignition Relay (Brown) and the Fuel pump relay (Green Connector). You will use the EA starter relay, as it’s already wired in where it’s needed. These 2 relays are located in the far upper left hand corner of the dash, all the way back near the firewall: Circled here in red is the SMJ (or Super Multiple Junction, more on this later), and in blue are the 2 green ‘Test mode’ connectors. The black read mode connectors and the yellow select monitor will be near this. You’ll want to save these, for future troubleshooting. There’s the Main relay again from below. In the foreground, you can see one of the headlight relays, with the white connector. You’ll use the EA headlight relays, so these can be removed. Also of note, you won’t need to use any of the stock legacy fuse panels. The engine control system only needs a little power. You can string one wire Next, cruise control. If your car was equipped with it, you’ll have the control box and relay. If not, the wiring and connectors will still be there. This is a good place to start thinning out the harness when it comes time to do so. So make a note where these wires are, and label them, so when the time comes, you’ll know what it is. The cruise control unit is the large grey box here, and the smaller black thing above it is the relay that controls it. Also, you can see the large blue and white connectors that disappear underneath the carpet. These go back to the brake lights, turn signals, trunk light, rear door locks, etc. etc. You will not need any of this. The fuel pump wire is in there, but you can splice that in from closer to the relay. And, another legacy interior minus dash shot: This car is receiving an aftermarket ECU, so the stock ECU connectors will be cut off, and new ones spliced on. This is why all the wires coming from those connectors are marked. But this wouldn’t be a bad idea in an EJ swap either, as it will help you identify wires later. In the background, you can see the 2 connectors circled in Red. These go up into the dash for the gauges. You’ll only need a handful of wires from there (oil pressure light, temp gauge, tach, and Vehicle Speed Sensor). Do not start cutting these wires out until you’ve identified the ones you’ll need to save. You’ll also need to safely rescue the group of wires that passes through the firewall behind the ductwork in the middle. This is a big job, but there are dozens of wires in the cluster that you’ll need. You can also disconnect the SMJ (see pic above) to simplify removal of the harness. It’s very easy to identify later, and will drastically simplify the removal process. Factory Service manual pages: There’s a pretty good overview of the interior side of things. And the engine side is pretty simple, since it’s more obvious where the wires go. Label as many of the wires as you can before removing the harness. Here’s a pinout of the SMJ (referred to in the Chilton’s manuals, but not explained.) Here are the pages from the 1992 factory service manual about the legacy under hood wiring: Ok, now that you’ve got stuff figured out and labeled, start taking it out. Unplug everything, and start removing the harness. You’ll need to remove the driver’s side fender, and disassemble the fuse/relay box under the hood to get it out. You’ll also need to strip the dash out all the way down to the firewall, which means disconnecting the heater core lines completely, as well as the A/C lines. Try not to cut anything until it’s all out, just to be safe. Now, once it’s all out of the car, you can start reducing it to just the necessary engine control harness. Start by cutting/stripping all the electrical tape and plastic loom from the harness. Then, find a connector somewhere that you know you won’t be using (Cruise is a good place to start…), and start cutting out wires. Go one wire at a time, and trace it as far back into the harness as possible, and cut it off. If it splits, cut it before the split. Then proceed to identify the wires from there, cutting them off if you know they’re unnecessary (the cruise needs some signals from the ECU and such, things needed for other parts of the engine management, so don’t just cut everything out). As you’re going through, take note of all the necessary power and ground wires. Grounds are usually black (obviously) and powers are yellow, or occasionally red. There’ll only be a few power wires, but you’ll be tying them together into 2 different ones (one switched, and one straight from the battery). Just keep working through the harness, eliminating stuff you won’t need. Don’t cut anything out unless you know it won’t be used. This can most easily be done from the interior side out, since there are far more connectors that won’t be used. Under the dash, you’ll only need the 4 ECU plugs (all yellow), power and ground for that, the 2 relays, and wiring for those, and wiring for the dash (Check Engine Light, Oil light, Tachometer, Vehicle Speed Sensor, and Temp gauge). As I mentioned earlier, if the connector isn’t going to be plugged in, there’s no use leaving the whole wire in the harness...and if you run out of things that you know won’t be used in the interior, just move to something from the engine bay that you know you won’t be using (turn signals, headlights, A/C, Cruise, wipers, etc. etc.). Once you’ve reduced it just down to the crucial Engine control harness. You can begin preparing it for install. Reduce the power wires to one. Use a thicker gauge wire to hook up right to the battery, with an inline fuse holder. Then split it off, one wire that goes straight to the ECU for the memory wire, and another that goes to the main relay. Then get the grounds together, and tie them all together, with many different places were it can bolt to the car (insufficient grounding is a common problem in this swap). Then make sure you have all the gauge wires marked and ready to tap into the EA cars harness. Now is also a good time to find those same wires in that EA harness. Now, before taping anything together, or installing the harness completely, plug it into the engine and ECU. Then solder up your powers and grounds, and the fuel pump wire. And see if it starts (if you’d like, contact me and I’ll send you a video of my wagon when it first started. You can see the ECU and wiring harness draped over the driver’s door). I would highly recommend making sure it runs before fully installing the harness. Once you know it runs, you can wrap it with electrical tape and put it in corrugated plastic wiring loom. Then string it through the holes in the inner fender and into the engine bay. The actual ECU mounting bracket is different on the EJ22 than an EA cars’, so you’ll have to be pretty creative. I just used lots of zip ties to keep everything from moving around, and stuffed the ECU and harness up under the steering column. You’ll need to tap in a wire from the ignition switch to the ECU so it can essentially choke the engine while cranking (ECU wire needs 12v + when cranking, see attached ECU pinout). The EA82 system as this same circuit, but the switch grounds the wire to the ECU to engage it on the EA82, so you’ll need to string your own wire. You’ll also need to hook up the rest of the wires under the dash. Once again, make sure the car starts and runs before putting the dash panel and fender back on. If it does, reassemble the car, double check all fluids etc., and enjoy you’re new motor!! Information thanks to USMB members: 1 88HatchMonster 2 ShawnW 3 Baccaruda 4 Bratsrus 5 91Loyale 6 Ballitch 7 Suberdave -
conversion Brumby converion
Dans92brumby replied to Dans92brumby's topic in Old Gen.: 80's GL/DL/XT/Loyales...
So I would be able to put an ej20 in with an adapter plate and keep the current transmission. That would mean I dont have to worry about the axles and tailshaft and mounts ect just the ecu swap over, radiator and cruise control. Am I right? And some how find a suitable powersteering rack? Would the ps pump on an ej20 work with the L seiries ps rack? -
conversion Brumby converion
Dans92brumby replied to Dans92brumby's topic in Old Gen.: 80's GL/DL/XT/Loyales...
Just want 5spd as I prefer it over 4 spd not for performance -
conversion Brumby converion
Dans92brumby replied to Dans92brumby's topic in Old Gen.: 80's GL/DL/XT/Loyales...
5 spd transplant... Was hoping to use this to help me swap over my trans but pics wont load. -
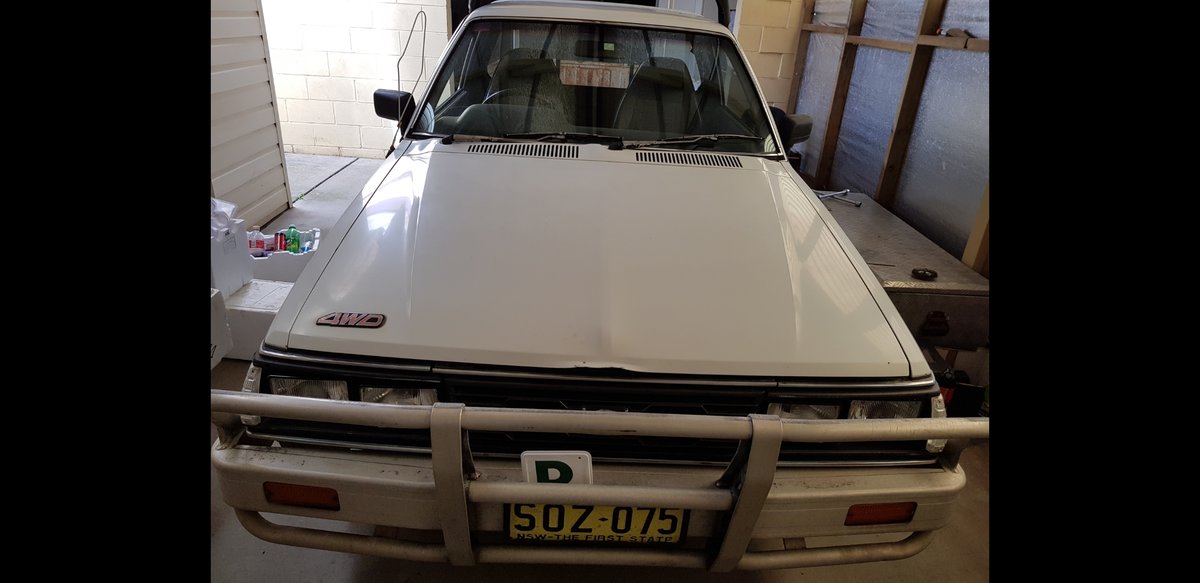
Got my hands on a 92 brumby. And looking at converting the engine transmission drive train. Adding abs cruise control and power steering from a newer subaru (impreza liberty) I'm hoping I can just transfer it all over from the donor car straight into the brumby. A few questions brumbys are fed unless 4wd is engaged... right? If so how would I make it always awd during the transfer. Are there any modifications/adapters I'm gonna need ? Any information and knowledge is appreciated. And I will keep this updated with my progress. I know its doable.