hohieu
Members
-
Joined
-
Last visited
Everything posted by hohieu
-
hohieu replied to mellow65's topic in 1990 to Present Legacy, Impreza, Outback, Forester, Baja, WRX&WrxSTI, SVX99 Forester, 2.5 SOHC, 5 MT, 132 k miles 17,168 miles/672.28 g = 25.54 mpg Always regular octane, which is almost always 87. Almost all highway miles over the past few years -- I keep track just to make sure that the engine is working properly. That said, there are far too many variables (e.g., temperature, wind, elevation, driving habits, tires, and load) to say anything definitive about mileage.
-
hohieu replied to nipper's topic in 1990 to Present Legacy, Impreza, Outback, Forester, Baja, WRX&WrxSTI, SVXAgreed, but it's hard to charge much more than a couple of hours for, say, a half shaft replacement, regardless of much time you're spending dismantling seized components. I was looking at a Toyota on the rack when I brought in my car to have new tires mounted and for the annual state inspection. The longer CV half shaft was seized at the center bearing (no such thing on a Subie), and my mechanic did just as you said, he called the owner to let him know what it would take. Most customers, however, aren't going to be so understanding, especially when they start to compare charges against with what other shops are charging for a typical job. Hence, it's also important to preserve your reputation. My mechanic is a decent guy so this is important to him. But now this thread has now really gone off topic...oops.
-
hohieu replied to stevensocial's topic in 1990 to Present Legacy, Impreza, Outback, Forester, Baja, WRX&WrxSTI, SVXOne quart of oil should bring the oil level from the lower to the upper mark. Where is the oil now when you check it?
-
hohieu replied to nipper's topic in 1990 to Present Legacy, Impreza, Outback, Forester, Baja, WRX&WrxSTI, SVXright ... and if they have to spend a couple hours trying to remove a seized component in order to do the job, they really can't charge a customer much more than book value on labor.
-
hohieu replied to nipper's topic in 1990 to Present Legacy, Impreza, Outback, Forester, Baja, WRX&WrxSTI, SVXBecause early Foresters had unusually high failure rates due in large part to the original caged ball bearings, which were subsequently updated with tapered roller bearings, a revised low force installation procedure with OEM Kent Moore tools (similar to the Hub Tamer) was also recommended in order to decrease the potential for deforming the new bearing. At the aforementioned labor rates, you would effectively pay for your investment with one bearing replacement. It makes sense to purchase the Hub Tamer, especially if you don't already have the other tools you'll need for the job (e.g., slide hammer, hub puller, bearing separator) As for the long pinch bolt, mine was corrosion welded into the bushing collars, and man, I hit it with everything I had over the course of several days: PB Blaster, impact gun, punch and 3-lb hammer, torch, impact hammer..... In the end, I had to cut off the head of the bolt with a grinder fitted with a cutting wheel. Then I separated the bushing from the rear lateral link with a two-jaw puller, cut that end of the bolt off, separated the bushing from the front lateral link with the puller, and finally tapped what was left of the bolt out of the knuckle. It was a real bear, and by far, the most time consuming part of the job. Before ordering parts for the job, it's a good idea to check and see if you can remove that pinch bolt. If you find that you'll need to cut the bolt off as I did, you'll need to add some parts to your list. I had to buy the parts from the local dealer: bolt - $27.25 bushings - 2 x 27.77
-
hohieu replied to nipper's topic in 1990 to Present Legacy, Impreza, Outback, Forester, Baja, WRX&WrxSTI, SVXIt's acutally quite a simple job with the right tools. You're right, the Hub Tamer removes a lot of the guess work. Installing them to the right dept is quite simple. the bearing will bottom out into the housing, and there's an internal c-clip that retains the bearing. But you're absoutely right, removing the long pinch bolt can be the most difficult part of the job. They have a tendency to seize inside the lateral link bushing collars.
-
hohieu replied to stevensocial's topic in 1990 to Present Legacy, Impreza, Outback, Forester, Baja, WRX&WrxSTI, SVXA water drip out of the tail pipe is normal. H20 is a byproduct of combustion, which along with condensation in the exhaust system will drip out when your car is first started in colder weather. White smoke out of the exhaust after the car is fully warmed up would indicate and internal head gasket leak. The rattling you hear may be the exahust shields, which sometimes goes away after they heat up and expand. As for checking you oil, in order to get an accurate reading this should be done when the engine is cold and on level ground. It takes approximately one quart to bring the oil from the lower mark to the upper mark. If you've overfilled your oil by a quart or more, you should drain some out or change your oil. An overfilled engine can blow seals due to excessive oil pressure and get sloshed around by the crankshaft. Hard to make a guess at this point without more info. (edited some typos)
-
hohieu replied to stevensocial's topic in 1990 to Present Legacy, Impreza, Outback, Forester, Baja, WRX&WrxSTI, SVX1999 Forester has the 2.5 SOHC engine, which tend to leak externally.
-
hohieu replied to stevensocial's topic in 1990 to Present Legacy, Impreza, Outback, Forester, Baja, WRX&WrxSTI, SVXsorry for any redundance in my previous post...I was typing away as others responded with their very good advice...
-
hohieu replied to stevensocial's topic in 1990 to Present Legacy, Impreza, Outback, Forester, Baja, WRX&WrxSTI, SVXInternal head gasket leaks are not uncommon for your car, but what's unusual is that your car is leaking coolant externally. Check your receipt to see what else was replaced during the timing belt service. An OEM thermostat is highly recommended as others on this board have reported problems with aftermarket ones. A collapsed radiator hose can also be caused by stuck or clogged radiator cap, where an OEM one is again highly recommended, that doesn't allow the system to draw in coolant from the reservoir as the engine cools. Then check all the other likely sources for a coolant leak: radiator hoses bypass hose heater hoses The revised head gaskets are holding up better according to many on this board who have experience with the same 2.5L DOHC engine, who will also sugggest that you go with Subaru OEM gaskets. It sounds like you averted cooking the engine and risking a cracked block so this repair should do the trick. Does your car have an auto or manual tranny? If the latter, now might be a good time to do the clutch and rear separator plate because they'll most likely pull the engine to do the head gaskets. Most likely not the culprit here. You have a leaky gasket or seal that's causing the oil lost or maybe a split CV boot, though the mechanic would most likely have spotted the latter. That "hot" smell could be oil or grease leaking onto and buring away on your exhaust pipes. Other things you should have them replace that should not add any more labor costs to the headgasket job (Some of these items may have been already been replaced while they were in there for the timing belt): head gaskets (2) intake manifold gasket set exhaust manifold gasket set crank seal cam seals (4) valve cover gaskets (2) spark plug well gaskets (4) exhaust spring bolt set & gasket
-
hohieu replied to J A Blazer's topic in 1990 to Present Legacy, Impreza, Outback, Forester, Baja, WRX&WrxSTI, SVXYep, that's the way I did it, but I did not find it necessary to remove the two 19mm bolts on the bracket holding the rear of the control arm in place. There's enough play after removing the pinch bolt ("through bolt" in the link povided by johnceggleston). Supporting the control arm with a floor jack eases removal and installation of that bolt.
-
hohieu replied to J A Blazer's topic in 1990 to Present Legacy, Impreza, Outback, Forester, Baja, WRX&WrxSTI, SVXI found it was easiest to remove the sway bar link bolt and the front control arm bolt. You'll have enough wiggle to clear the inboard differential stub and then you're home free. You just need to torque them back to spec. with all wheels on the ground.
-
hohieu replied to msmithmmx's topic in 1990 to Present Legacy, Impreza, Outback, Forester, Baja, WRX&WrxSTI, SVXMobil 1 grease works too and is readily available. That Neo stuff looks good, but I suspect that it's not the breakdown but rather contamination or absence of grease that causes bearing failure. In othe words, when worn seals allow contaminants in and grease to leak out, this spells doom for the bearing.
-
hohieu replied to msmithmmx's topic in 1990 to Present Legacy, Impreza, Outback, Forester, Baja, WRX&WrxSTI, SVXNot a Subaru example, but when I did the brakes on my mother-in-law's Grand Cherokee, the e-brake shoes were shot - lining was completely absent. I was very surprised, but if you leave the parking brake engaged for long stretches of time, they could seize & wear down. The more amazing thing is that they took off the rear rotors to check. If they didn't do this, just try adjusting the shoes and then the e-brake cables under the console as already suggested.
-
hohieu replied to killashandra's topic in 1990 to Present Legacy, Impreza, Outback, Forester, Baja, WRX&WrxSTI, SVXYep, sounds like the wear indicatators are rubbing against the rotor. When were the brakes last serviced? If this is in fact the case, it'll make noise until the tab breaks off. Then thinkgs will appear fine and you'll have several thousand miles until the friction material is completely gone. If the rotors are still good, it's a good idea to have the pads replaced before you have metal on metal grinding.
-
hohieu replied to mcbrat's topic in 1990 to Present Legacy, Impreza, Outback, Forester, Baja, WRX&WrxSTI, SVXThe belts do stretch during initial break-in period so my question is whether they've ever been tightened after they were first installed. You don't want to overdo do it as this will put undue stress on your accessory bearings. I'll have to see if I can convince my wife to start it while I watch/listen... It will be very difficult to pinpoint the noise by listening. If it's not the belt tension, which would be my bet, you'd have to remove the belts and check for smoothness of your accessory bearings.
-
hohieu replied to nipper's topic in 1990 to Present Legacy, Impreza, Outback, Forester, Baja, WRX&WrxSTI, SVXThat's right. I, like others on this board, had to cut the lateral link bolt off. Aside from that, it's a very simple job, especially with the hub tamer.
-
hohieu replied to hohieu's topic in 1990 to Present Legacy, Impreza, Outback, Forester, Baja, WRX&WrxSTI, SVXThanks for the info., Skip. Bummer that these things fail so easily and often.
-
I have a drawtite wiring harness for my 99 Forester that I've used twice in three years? The last time I went to rent a trailer from Uhaul, I discovered that right turn signal terminal for the trailer was dead. All other lights work just fine. The problem lies somewhere in the little box where the wires from the car go through to the jack that plugs into the tralier wiring. Questions: Can I just cut the right turn signal wires and splice them together withough them running through the box? Also, just curious as to what this box does and what's acually failing inside this box?
-
hohieu replied to four-fleet-feet's topic in 1990 to Present Legacy, Impreza, Outback, Forester, Baja, WRX&WrxSTI, SVXMakes sense -- I wonder if the disaster found by Gloyale was caused by RTV used on valve covers or somewhere else? It's a good idea nonetheless to use a judicious amount -- 1/8" bead. Regarding the oil pump reseal -- as mentioned in many other threads, it's recommened to check the screws on the back plate and tighten any loose ones with loctite blue. I would also recommend installing the crank seal after the oil pump is mounted back on the front of the short block. I installed the seal while the oil pump was out, and the lip of the seal would repeatedly turn inside out as I pushed it back over the crank shaft snout. The car is probably on its second water pump, right? Otherwise, you'll want to replace it. I would also regrease the T-belt idlers, including the tensioner idler while you have things apart. As for the head and valve cover gaskets, I would leave them alone until they start leaking or, for the latter, until you need to adjust the valve clearance. Finally, if there's no play on the affected rear wheel, you probably have some time with the wheel bearing; however, if neglected for too long, damage may be done to the housing. The toughest part of the job will be removing the lateral link bolt.
-
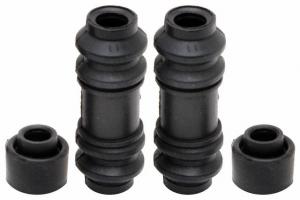
hohieu replied to floater's topic in 1990 to Present Legacy, Impreza, Outback, Forester, Baja, WRX&WrxSTI, SVXI usually check only for my car for which they do offer complete axle sets including everything in the upper photo. After checking for floater's 96 Outback, I see that they do not offer complete kits, perhaps because there seems to be more variation among the different brake systems among the earlier new generation models (i.e., sedan vs. station wagon), but don't quote me on this. Nonetheless, they do offer the "caliper pin boot kits"/ "caliper bushing kits" separately. Funny thing is that they offer the same items under these two different headings. From what I've ordered for my Forester and other vehicles, the rubber parts offered by Wagner seem to of higher quality than, say, Raybestos, Carlson, or any of these other suppliers. The parts I received were even made in the USA, but who knows how quickly supply chains change? Floater, would this one work for you? RAYBESTOS Part # H16031 { AXLE KIT} Front; Inner and Outer; Axle Bushing Kit; Station Wagon; Antilock Brakes Rear; Inner and Outer; Axle Bushing Kit; Station Wagon; Antilock Brakes
-
hohieu replied to floater's topic in 1990 to Present Legacy, Impreza, Outback, Forester, Baja, WRX&WrxSTI, SVXRockAuto has complete caliper repair kits by Beck/Arnley that come with pin boots and little rubber bushing that slides onto one of the pins. They also sell the pin boot kits, also listed under caliper bushing kits on these sites, separately.
-
hohieu replied to hohieu's topic in 1990 to Present Legacy, Impreza, Outback, Forester, Baja, WRX&WrxSTI, SVXWhat year is your car? Do you drive much on unpaved roads? Any brake front brake issues prior to wheel bearing failure? 110K miles seems a bit premature. It's true that the bearings themselves aren't all that expensive, especially if you get the Koyos, which IMHO are very good. So it's not the cost but curiosity that concerns me. Like fixing an oil or coolant leak, except with the distinct difference that it's much more labor intensive to check and replace wheel bearing grease and seals, I'm curious to see how long the the original bearings will last with an overhaul. So you've read the Pirsig classic?
-
hohieu replied to four-fleet-feet's topic in 1990 to Present Legacy, Impreza, Outback, Forester, Baja, WRX&WrxSTI, SVXAfter removing the the fans, you'll have plenty of clearance. You can use PVC plumbling couplers of 1" and 1-1/4" to drive in the crank shaft and cam shaft seals, respectively. if you have an appropriately sized adapter (e.g. from a hub tamer or ball joint press), you could also try pressing the new seals in using the the crank and cam shaft bolts. This would be the best way in my opinion. Otherwise, you can tap the seals in with a soft faced hammer. -- Remember to note how far the old seals are pressed into the well for the puruposes of installation. To remove the cam shaft seals, you can use a screwdriver if you trust your dexterity to not scratch the cam shafts. Otherwise, you can drill two small holes into opposite sides of the seal, attach two srews, and use a hammer to pry against the screw heads. In both cases, its helpful to use a hammer handle or something similar as a fulcrum as you pry up on the seal. The crank shaft seal will come off easily with a screwdriver after as it is mounted onto the oil pump housing, which will have to come off in order to perform the reseal. Do a search on timing belt jobs, and there'll be plenty of good threads. There's also an article on www.endwrench.com for doing the timing belt job on the 2.2L SOHC.
-
hohieu replied to four-fleet-feet's topic in 1990 to Present Legacy, Impreza, Outback, Forester, Baja, WRX&WrxSTI, SVXI know that this has been your inside joke with Skip, but WOW, what a spread?! A picture, as they say, is worth....