


Corvid
-
Posts
89 -
Joined
-
Last visited
Content Type
Profiles
Forums
Gallery
Store
Posts posted by Corvid
-
-
Yeah, that seems to be the case. The main concern I've noticed is finding the rubber and pistons for rebuilding, like I listed in that link up top.
For that reason, I feel that the sets with 34mm pistons are the most desirable.
-
I was helping a buddy take down some rear calipers he got off a GL-10 tonight, when we realized that the pistons were stuck in place with corrosion and/or filth. Bummer. After some cursing and troubleshooting, we ended up pulling out as much of the top seal as we could, hosing down the piston with break-free, loading the caliper into a 14-inch C-clamp, and then compressing the piston to the bottom to break it free and deliver solvent to the cylinder.
Ok, so now what? We have crunchy, loosened pistons that still won't come out, and we don't have an air compressor. Well, we do have all my stuff for working on road bicycles...
We put the rubber brake lines back on the calipers, and removed the left over 10mm fitting from where the body-mounted hard brake line got severed. After cleaning up the cut end with a dremel, we got the small piece of flared metal tubing out of the 10mm fitting, and dropped the fitting in a small vice. In about 10 seconds, we drilled the hole through the fitting out to almost 1/4", so that it would barely fit a Presta valve from a road bike inner tube. We cut the Presta valve out, so that there was just a tiny rubber donut at the bottom, which sealed against the flared opening on the brake line leading into the caliper. We snugged everything down, threw the two-handed floor pump on that bicycle inner tube valve, and cranked it up to 130psi. A little prodding, and both stuck pistons shot out like cannonballs.
Now we just need to hone the cylinders, order new pistons, reseal the little demons, and its rear caliper conversion time.

On another interesting note, these calipers have the less common 30mm pistons, even though they came off a 4wd GL10.
I'm not sure there is any rhyme or reason that I understand behind the difference.
-
Holy Belt Eater, Batman!
 Nice catch!
I do hope your friend is not driving that car at the moment! that could let go at anytime.
Nope, I recommended for him to leave it in my driveway until its fixed.
He does big commutes almost daily, too.
It was the first time I've ever clicked "Next Day Air" on a parts website!

But for real, Heartless, you and Fairtax and a couple other folks have been really helpful on a lot of these EJ series threads, so credit goes in part to you. Thanks!
-
Which idler pulley has been failing?
I found the Gates kit off of ebay to be the most reasonably priced and it came with good quality idler pulleys, water pump, and tensioner.
That's whats coming in the mail, but we got a better price from rockauto.com.
Looks like fluid contamination to me.
Something dripping onto the belt between the cover seams.
Is the Power Steering pump wet? How about the upper radiator hose where it attaches to the block, any evidence of coolant leaking there?
So far, everything looks dry and tight. I'll have more answers when we dig in Thursday night.
-
So, I've been reading up on here a lot about the EJ series engines, in preparation for the 2.2 I'm about to overhaul. Then a few nights ago, I was eating dinner with a friend of mine who bought a really nice Legacy GT Limited 6 months ago. Just out of curiosity, I asked him how many miles were on the car and if the previous owner had done the timing belt and water pump. He said the car had 150k, but now that I mentioned it, the PO hadn't said anything about the timing belt and there weren't any receipts for it. No problem, I said, bring it over on Monday and we'll change the oil, check the belts, check for leaks at the head seams, etc.
We looked it over yesterday, and the engine is clean, dry, and pretty. Car runs great. We opened up the timing cover to take a peek at the belt...

I explained what an interference engine is, and we had the parts kit bought online 30 minutes later.
Thanks to this forum and everyone on it, for being an invaluable resource, empowering people with knowledge, and saving folks from economic and mechanical hardship.
-
 2
2
-
-
I now have a working modified Maxima alt all ready to drop in, just trying to bump this to see if I can get some info on this previous question before I wire it up.
Hey GD,
I was reading on other threads here, and I think it was you that posted links to madelectrical.com's writeup on 3-wire alt. setups.
That writeup was great, but I came away from it with the impression that direct wiring between the alt and the battery is likely to fast-charge and damage a low battery.
I came away from this thread with the impression that after upgrading the alternator, the charge wire running from the main junction box to the battery should be upgraded, and that an additional fused wire should be added between the alternator main output post and the battery.
To explore this or clear it up in plain english, have I misunderstood either your advice, or the advice of the madelectrical.com writeup?
If I understand both sets of advice, could you speak about the difference of opinions?
Why would a person not simply upgrade the charge wire from the main junction to the battery, and add an appropriate fuse?
Thanks for all your time on this project and your advice.
-
Alright, so I placed my order late last night, the revised list end up like this, for anyone else looking to do the same...
From 1stsubaruparts.com:
11831 AA210 Baffle Plate
8004 06140 x5 Battle Plate Bolts
8004 06150 Special Baffle Plate Bolt
8069 31070 Service O-ring 31x2
8069 46030 x2 Cam O-rings 46.5x2
8067 32150 x2 Cam Seals 32x45x8
8069 23060 Fill Neck O-ring 23.7x3.5
8069 17080 Pickup O-ring 17.8x2.4
8069 10170 x2 Dipstick O-rings 10x2
8069 19050 Oil Pump O-ring 19.2x2.4
8067 33030 Front Seal 33x49x8
21200 AA072 Thermostat
21236 AA010 Thermo Gasket
8092 18270 V-Belt 18x6x877
44011 AC030 x2 Exhaust GasketsTotal with shipping and sales tax was about $130
From rockauto.com, using a discount code from retailmenot.com:
Radiator Upper Hose Goodyear #62445
Radiator Lower Hose Gates #21852
Air Filter Denso #1432057
PCV Valve Beck/Arnley #0450031
Spark Plug Wires NGK #FX31
Valve Cover Gasket Set Felpro Permadry #VS50395R
Intake Manifold Gasket Set Felpro #MS94987Total with shipping was about $100
From Ebay:
Timing belt kit with Aisin water pump from mizumoauto - $136
Exedy Clutch kit #15010 - $140
Total so far is a touch over $500 in overhaul parts, but by getting non-picky items from rockauto and ebay, I did save almost $70.
I still need fluids, oil and fuel filters, spark plugs, vacuum hose, and small coolant hoses.
I also realize now that I forgot to order 2 of the 8069 33010 Coolant Crossover Pipe O-ring 33.7x3.5, so I'll have to stop by the dealership counter and buy them in person.
Thanks for the input so far, I'll be posting questions and progress in here in the weeks to come.
-
I've resealed several oil pans on my cars and I felt it was well worth it. However, you will need Ultra grey or similar (threebond) sealer for the oil pan. The sealing surface is not flat enough to use anaerobic.
Fuel injectors are an either/Or deal. Either will work just fine and the only difference I can tell between any of them is the color of the tops. I'm sure the flow rates differ slightly or the nozzles have some minor difference but the ECU can adjust to make either type work. There were differences in the very early style injectors but those shouldn't be on a 94 engine IIRC.
http://item.mobileweb.ebay.com/viewitem?itemId=260925109309
This timing belt kit will save you a few $$ over the gates kit and comes with the Aisin water pump, factoy style rubber coated metal water pump gasket, and brown front crank and cam seals.
Ok, I'll look into the oil pan sealing more before I make a final call. That's kind of what I was curious about with the injectors. This is the first FI car I've really dug into, so its good to hear that the computer is smart enough to take up the slack in that case. Thanks for that link, at first it didn't seem worth the effort of ordering from a 3rd online location, but it does save just over $20 from the bill.
no mention of intake gasket.
i use good quality intake / exhaust gaskets from rock auto.
no need for subaru, but avoid el cheapo.
no mention of coolant cross over pipe o-rings, 2 each.
i have never replaced the oil pick up o-ring.
or pulled an oil pan just to reseal it.
the oil pan seal usually lasts the life of the car.
but no biggie either way.
If the injectors, coil, etc. were compatible, I was hoping to not take the intake apart or remove it. Will I have to anyway?
8069 33010 x2 Coolant Crossover Pipe O-rings 33.7x3.5. Good call, I don't like having rubber parts of different ages in the cooling system.
I want to pull the oil pan in part to divine the future by examining whats inside.
I am running the NGK wires on my 90 Legacy with no problems - not sure how well they work on the newer stuff (96+), but they work fine on the 1st gen 2.2
on the tensioner - first, check it for being worn out - if you can push in the piston (as in pushing it against a fixed object with a bit of body weight behind it) if it moves it needs to be replaced.
if it does not move, use a vise and compress it s-l-o-w-l-y! do NOT rush this part! you will damage it if you do. small turn of the vise handle - just a little tension (between 1/8 & 1/4 turn of the handle), let it sit for 3-5 mins, small turn of vise handle, let sit - repeat until you can insert a pin thru the holes (get the holes more or less in line before compressing - one hole on either side of the body & one thru the piston shaft) to keep it compressed until after installation - a small allen wrench is commonly used for this.
Only other thing I can suggest is new vacuum lines throughout - even tho they may "look" ok, they are old and most likely dry & brittle - even a little bump can cause cracks that may go visually unnoticed but can cause all sorts of strange running issues later.Good to hear multiple people echoing that the NGK spark plugs are fine. Solid advice on the tensioner piston, I appreciate that and will investigate that today or tomorrow. I totally didn't say anything about vac lines, and I also keep new vac line spooled up by the yard in my garage. I went over and replaced every single hose in a stock EA82 setup 4 months ago. Good vac lines are important, so I'm glad you said it out loud.
-
I usually spend my time in the Older Gen section, but I'm getting ready for a new project. I'm about to reseal a junkyard EJ22 from a '94 Legacy auto with 105K on the clock, and drop it in a '94 Legacy manual, so I've been reading and cross-referencing all the advice and reseal threads on here in preparation.
Here's my factory shopping list, via my '90 Legact Factory Parts Manual and part number updates from 1stsubaruparts.com:
11831 AA210 Oil Separator Plate
8004 06140 x5 New Model Plate Bolts
8004 06150 Special New Model Plate Bolt
8069 31070 Wrist Pin Service Hole O-ring 31x2
8069 46030 x2 Cam O-rings 46.5x2
8067 32150 x2 Cam Seals 32x45x8
13271 AA051 x6 Valve Cover Bolt Washers
13294 AA012 x2 Valve Cover Gaskets
8069 23060 Oil Filler Neck O-ring 23.7x3.5
8069 17080 Oil Pickup O-ring 17.8x2.4
8069 10170 x2 Dipstick O-rings 10x2
8069 19050 Oil Pump O-ring 19.2x2.4
8067 33030 Front Crank Seal 33x49x8
21200 AA072 Thermostat
21236 AA010 Thermostat Gasket
8092 18270 V-Belt 18x6x877
44011 AC030 x2 Exhaust GasketsHere's my aftermarket shopping list, via Rockauto.com:
Water Pump Aisin #WPF002
Radiator Upper Hose Goodyear #62445
Radiator Lower Hose Gates #21852
Timing Kit Gates #TCK254
Clutch Kit Exedy #15010
Air Filter Denso #1432057
PCV Valve Beck/Arnley #0450031
Spark Plug Wires NGK #FX31
NGK spark plugs and a bypass hose, I'll pickup locally.
If the flywheel isn't beautiful, I'll have it resurfaced.
I've read that NGK spark plug wires are good enough to use without problems, unlike most aftermarket wires. Arguments?
I've read that the hydraulic tensioner piston cylinder device should just be compressed and reused. Arguments?
I see different part numbers for fuel injectors and ignition coils for manual and automatic cars, but I can't find any threads on here where they have caused problems for people. How are they different? Are there any problems interchanging them?
No need to suggest Ultra Grey RTV, I prefer anaerobic.
Is there anything else I'm not seeing? Anything that's missing from my list?
-
Hey GD,
I was reading on other threads here, and I think it was you that posted links to madelectrical.com's writeup on 3-wire alt. setups.
That writeup was great, but I came away from it with the impression that direct wiring between the alt and the battery is likely to fast-charge and damage a low battery.
I came away from this thread with the impression that after upgrading the alternator, the charge wire running from the main junction box to the battery should be upgraded, and that an additional fused wire should be added between the alternator main output post and the battery.
To explore this or clear it up in plain english, have I misunderstood either your advice, or the advice of the madelectrical.com writeup?
If I understand both sets of advice, could you speak about the difference of opinions?
Why would a person not simply upgrade the charge wire from the main junction to the battery, and add an appropriate fuse?
Thanks for all your time on this project and your advice.
-
1
-
-
Thanks for the help guys. I'll give a report back when I get this done. Current project is to finish stripping the crashed 86 D/R and get the hull towed out of the driveway. That will allow me to get running cars all the way up into the garage again, so i can stop working outside in nasty weather.
Then I've only got half a dozen other projects...

-
Get the right size tap and re-thread the holes.
I haven't done much tap and die stuff, That would involve going up a size and finding new hardware, right?
-
The least favorite of my D/R '85 wagons just got new rear struts, but I can't get the upper attachment bolts to tighten, they just keep spinning.
Luckily, they're captured, blind, and I cant access them.

Got any ideas?
-
Sorry about the old thread, but just going through my posts, I realized I never gave a report back on this. I ended up following Miles advice, and I worked out fine. It's a lot of time on your back, and powersteering lines make it even more annoying, but you can follow the advice in this thread and replace your oil pan gasket with the engine in the car.
-
Thanks for the info. Those parts numbers were good, one part was the orange rubber o-ring, the other is the metal clip reinforcement that hold the rubber in the correct shape. Each part was less than $5. Hopefully this thread helps someone else.
-
Hey guys, I'm at the midway point on a full split-block, bearings-up rebuild.
I've got all my big parts back from the machine shop, but the backup o-ring, also referred to as the coolant passage o-ring, from inside the block is gone.
I've read that they come in a Fel-pro full gasket set, but I already have all my other gaskets, so any idea where I can find one on its own?
-
Ugh. Hidden in plain view.
I never even wasted a moments thought on the exhaust needing to be disconnected, and no one actually typed that specific word until now, that I saw. Makes total sense, of course the y-pipe isn't flexible.
Now I just have to see whats up with taking that off. The PO "altered" the header flanges to mate up with the other two threaded holes, 90 degrees off from the original two that stripped out. Off to work, I'll report back on Sunday.
-
Negative, sorry I forgot to mention, I did take the pitching stopper off first.
-
Ok, finally got done with all the other chaos in our lives, and got down to do this job this morning.
Things that came up:
1. It looked like there was an option to try to unbolt the engine mount from the engine, leaving it attached to the crossmember. The easier option looked like unbolting the motor mount from the crossmember and leaving it attached to the engine. I did the later, is that what is recommended?
2. After undoing the nuts on the attachment points for the motor mounts and the tranny mounts, we jacked it up by the tranny, but weren't able to get a lot of vertical play out of it. The motor mount studs never lifted out of the crossmember holes, they just moved forward and a little up.
3. Calculating where the rest of the rear oil pan bolts are, the space I imagine needs to open up, between the crossmember and the back of the oil pan, seems to have power steering (?) lines running through it. Has anyone else had to work around those?
That's it for now, until I screw something else up.
-
Thanks you guys.
Tomorrow's project is to redo the oil pan gasket and troubleshoot the electrical on my roommate's '85 GL wagon, so that we can be mobile again. Then I'm out of town for a week. When I get back, this project in whatever form it takes will begin in earnest. Feel free to keep the advice or ideas coming. I appreciate it.
-
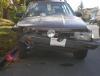
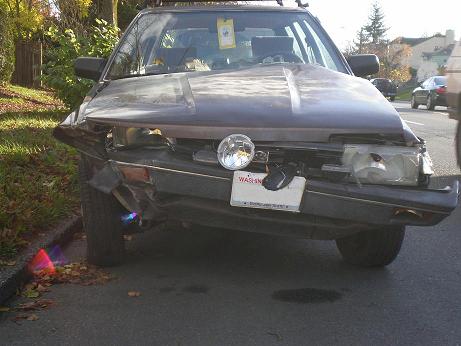
Haha, I forgot to check the speedo as I hit. I would say probably 35ish at impact? Yeah, the release cable is immobile, I'm going to be trying to take out the bolts. I can get at least flat wrenches in on both sides, I think. What a week.
-
I avoided a worse accident on the freeway yesterday, but in doing so put my 86' GL wagon into a concrete barricade at decent speed. Caught a little air in the front from the impact, and it turned the engine off. Engine won't turn over, sounds bound up. My neck and back are sore, but I'm mostly alright, health-wise.
Not much forward of the firewall looks salvageable, but we'll see after I figure out how to get the hood off. I haven't parted out a car myself before, can anyone give me advice on how to figure out if the engine is still functional or not? Any other advice is great too. I know GD has saved a couple car with wrecked subframes, but this one seems a little far gone to me.
I've got some feelers out right now, and have shot a couple emails on craigslist. I guess if my engine is alright, I'd be trying to find something that needs one and swap it in. At some point I'll be parting out whats left of it.
Bummer.
-
So I continued trolling the depths of this website, and several online references and parts stores. I finally have a firmer grasp on what the deal is with these caliper pistons, mostly thanks to old posts by ruparts and GeneralDisorder. I'm sure this is old news to some people, but I found it difficult to find info on, so I figured I'd at least tie the info on at the end of this thread.
It seems that all EA82 rear calipers are INTERCHANGEABLE, but they are not all the same. Depending on which body style and year(?), the calipers have multiple piston diameters. ruparts says he knows of at least 3, I've only run into 2 in my digging around, so I'm only addressing the 2 I've had contact with.
From what I've gathered...
30mm piston rear calipers came on XT6's, and maybe FWD turbos(?). They are less common.
Raybestos overhaul kit: #WK2019.
Raybestos piston: #DPS85211.
Subaru factory overhaul kit should be #725191120. Parts Counter dude says not available at all, so try digging online.
34mm piston rear calipers came on 4x4 GL-10's and RX's, supposedly. They are more common.
Subaru Factory overhaul kit: #25191GA550.
Raybestos overhaul kit: #WK1945.
Raybestos piston: #DPS85143.
Now I'm just waiting for my 30mm kits in the mail.
'Bout time.
-
PROJECT UPDATE / NON-UPDATE:
The calipers I have came from SubaruJawn, I think off a late 80s EA82T XT. I went to 1stsubaruparts.com and found Rear Caliper Seal Kit #25191GA550. The website had them listed for Loyales with Rear Discs, but was pretty sure I have read on here that all our rear calipers are the same, so I bought them.
Waited 10 days. Got them, in the Fuji Heavy Industries box, and they are the exact same size and shape as the cheap raybestos kits I already have, which don't fit. I mic my rear caliper piston at 1 and 3/16" on the dot, and the seals are for a piston which would mic at around 1 and 3/8". Wtf.
So, now I'm looking for advice.
Were there multiple different rear calipers on EA82 cars?
Does anyone know which are which?
Does anyone have any ideas on how to get my hands on a reseal kit for this stupid 1 and 3/16" Tokico caliper that is ruining my life?
Overheating '97 EJ25 needs help in Austin TX
in 1990 to Present Legacy, Impreza, Outback, Forester, Baja, WRX&WrxSTI, SVX
Posted
I know this is a long shot, but I thought I'd try.
I've got friends on a roadtrip from Washington, who are in Austin right now with a 1997 EJ25, that does fine on the highway and then tries to overheat in normal traffic. They have no tools or mechanical knowledge to speak of, and my impression is that they do not have a lot of money. They have described a visible coolant leak, but haven't sourced it.
If anyone is around that feels like helping, they could really use an actual diagnosis from someone who won't be trying to scam them into a headgasket job if they have a bad hose.