


hilux_1990
-
Posts
67 -
Joined
-
Last visited
hilux_1990's Achievements
Advanced Member (3/11)
10
Reputation
-

Internal/Recycled Air Button on EA-82/L-Series
hilux_1990 replied to hilux_1990's topic in Old Gen.: 80's GL/DL/XT/Loyales...
So anyway... My ea82 has a combined knob that controls the fan speed with a button in the center that turns A/C on&off. On the instrument cluster side of that fan/AC knob is a vacuum button, which is broken. Normally you push it in and it lights up, and you push it again to release it. See attached photo of this "internal air" button (right-hand drive vehicle) The passenger & drivers air vents near the doors have their own levers to control internal/external air. I think this button just controls the central vent flaps that feed into the A/C system. I'm not exactly sure.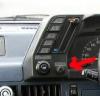
-
Hey guys, The button on my dash (next to the fan speed control) which selects internal recycled air is not working properly. It connects to two vacuum hoses and when you push it, it normally stays pushed-in and lights up. Has anyone had problems with their switch? it appears the button is permanently attached to the switch, so I'd have to swap out the whole dash piece? 1991 Subaru L-Series GL Wagon 4WD EA-82 carby, manual trans 160,000kms/99,420miles
-
Hey guys, I'm wondering if anyone would have the specs on the aircon blower fan used in EA82 soobies? I've got a couple laying around here and if I can find out (or calculate) how much air they can move I might find a use for them cheers, David.
-
Replacing the 4WD light switch
hilux_1990 replied to hilux_1990's topic in Old Gen.: 80's GL/DL/XT/Loyales...
On the L-series the transmission is located further forward than the hole for the gear sticks. I removed the two-piece tailshaft in order to gain access to remove the 4wd-high-range switch. I made a special socket to fit the switch by taking an appropriate 'cheapo' socket and cutting a slot in the side with an angle grinder. This allows for the wires coming out of the switch. I picked up a working switch from the wreckers but I was able to fix the existing switch by squirting lots of brake cleaner inside the switch until all the dirty oil had been flushed out. A test with a multimeter showed the switch was now working. You can probably get away without draining the tranny fluid by jacking up the rear of the vehicle. I replaced the transmission output seal as well. -
ea82 timing belt tensioner springs
hilux_1990 replied to mickytrus's topic in Old Gen.: 80's GL/DL/XT/Loyales...
...a mechanic who works under the shade of a tree or, in other words, a home mechanic who likes to tinker with their own cars, often at their own pace and using much igenuity to get the job done. -
Hi guys, I've got a 1991 dual range 4wd wagon. The 'LO' range light works okay, but the 4WD light with the 4 wheels doesn't work. I tested the wiring and switch and found the switch is buggered. The switch is located on the end of the transfer case, right above where the tailshaft comes out of the tranny. I don't think I can get a tool in there to remove it (no body lift ) so what do people recommend I pull off without just yanking the whole transmission? I was thinking of removing the crossbrace below the tailshaft, the tailshaft, draining the fluid and replacing the switch and perhaps the rear seal. Anything else I should do while I am there? and would anyone recommend a new switch over one from a junkyard? interesting fact: when I was looking to buy an L-series I discovered that ~every~ vehicle I looked at either had a faulty 4WD light or a faulty LO-range light. Every vehicle.
-
Oil filter housing spring and ball bearing?!?
hilux_1990 replied to newsance's topic in Old Gen.: 80's GL/DL/XT/Loyales...
When you remove the oil filter, there should be an oil passage in the center of the flange (with the screw thread), an oil passage on one side, and a small ball bearing that seals the end of another oil passage. I have never seen behind this ball bearing (you can push it in to squirt cleaner down the passage) but I imagine there is a spring behind it and if this particular valve has failed, or falls apart, you will most likely need a new oil pump assembly (it is apparently a non-repairable valve because it's built into the assembly). I would find another oil pump assembly to use. Clean it up real good and check there's no scoring of the various oil passages. Also remove and check the oil relief valve (yes, another valve) that is located behind a bolt on the opposite side to the oil filter. I would suggest buying a new spring to make sure it's working properly. -
ea82 timing belt tensioner springs
hilux_1990 replied to mickytrus's topic in Old Gen.: 80's GL/DL/XT/Loyales...
Mmmmmm, genuine belts... That's a funky filter wrench, never seen that sort of design before. Maybe the USRM needs a section about extra special home-made service tools. -
EA-82 dropped in - won't start
hilux_1990 replied to hilux_1990's topic in Old Gen.: 80's GL/DL/XT/Loyales...
Well, finally some good news... she fired right up! I removed all the accessories and checked the timing belts. One up, one down, all good. As mentioned in an earlier post, I wasn't happy with the procedure I had followed for finding TDC on the #1 cylinder. I thought "what the heck" and took note of where the rotor was pointing, pulled the dizzy and re-orientated it so that the rotor was pointing 180degrees to where it was before. I turned the key to ignition and wired up a hot-switch to the starter motor to make things a bit easier. Now the engine sounded more like things were combusting at the right time and the exhaust was coming out where it was supposed too, the bottom. I aligned the flywheel to zero and taking the Doctor's advice I re-orientated the dizzy anti-clockwise (about 2 teeth) so that the rotor was pointing about 40degrees left from straight at the firewall. Once again it sounded like it was barely firing. I then re-orientated the dizzy ~back~ clockwise 1 tooth. Barely a click of the starter and she roars into life like the best sounding lawn mower on the street! Just to double-check, I aligned the flywheel to zero again and the dizzy rotor is pointing about 10degrees left from being straight towards the firewall. The reason I was being so specific of this '86 model, Hitachi dizzy was that the cap on the old 1991 engine clipped onto the dizzy body at a much different orientation, meaning the body/rotor would have to be orientated at a different angle to make it fire at the correct time. I haven't adjusted the timing correctly yet but given that it starts I'm almost there. Big thanks to everyone for their help, particularly the good Doctor RX. Best advice of this thread I think would have to be testing the engine before you put the drive belts back on. While my timing belts were fine, it's the best general advice I've heard. -
ea82 timing belt tensioner springs
hilux_1990 replied to mickytrus's topic in Old Gen.: 80's GL/DL/XT/Loyales...
Sounds like you make a good shadetree mechanic mickytrus... I just shopped for my soob bits locally actually, I didn't really have the time to shop around online and then wait for things to arrive via the sea. I remember someone else on this forum say they had someone else install their timing belts and later break (twice). Apparently some mechanics like to wrench the timing belts as tight as the v-belts. -
You don't need to touch anything on the clutch to pull the engine. Have a good look around the engine and see if anything else is physically stopping you pulling the engine away from the tranny ie. the engine mounts. Otherwise, carefully use a prybar with some rags/wood to seperate them.
-
EA-82 dropped in - won't start
hilux_1990 replied to hilux_1990's topic in Old Gen.: 80's GL/DL/XT/Loyales...
I marked where the #1 plug wire is on the outside of the dizzy body, then aligned the rotor to that. For this '86 engine with a Hitachi dizzy, #1 on the dizzy cap is pretty much straight towards the firewall. -
EA-82 dropped in - won't start
hilux_1990 replied to hilux_1990's topic in Old Gen.: 80's GL/DL/XT/Loyales...
Is there anyway to check the cam timing without removing the alternator, compressor, drive belts, front covers....? I might clean the plugs. #1 was already looking nice and sooty. Can I use a timing gun while trying to crank the engine? I found TDC for #1 (I think I got it right) then aligned the rotor so I thought I could get the timing exactly right later on. As mentioned, this engine supposedly hasn't been used in 3 years... looking down the throat of the carb it looks ok, but do things get gummed up? -
Yeah, is it manual or auto trans? With mine (manual), I removed the bolts/nuts that join the engine to the bellhousing but still had to carefully use a prybar to seperate them both. I jacked up the transmission a little to put it on an angle but I found it was the engine mounts that stopped me pulling the engine further away from the tranny. I couldn't lift the engine/trans assembly high enough so the mount-to-crossmember bolt would clear the hole in the crossmember. I had to unbolt the engine mounts from the engine and then it came away easily. When dropping the engine back in, sit the mounts on the crossmember and loosely install the nut. Then lower the engine back in and align up the mounts as you go.
-
EA-82 dropped in - won't start
hilux_1990 replied to hilux_1990's topic in Old Gen.: 80's GL/DL/XT/Loyales...
PoorMan is correct, my vehicle's right hand drive. I didn't actually remove the dizzy but I had the cam carrier removed and had been happily spinning the camshaft... forgot about that I hooked up a compression gauge to #1 cylinder and kept rotating the engine by hand until the needle moved. The pointer was about 2 inches past the ignition timing marks now and I then rotated the crankshaft once more until the pointer was aligned at zero. I then replaced the dizzy so the rotor was pointing to my mark for the #1 wire. My wires are hooked up okay... #1 is pointing towards the firewall, and it's then 1-3-2-4 going around anti-clockwise. Once again I tried jump starting it just in case I didn't have enough battery juice. I tried it with the choke flap open, and also most of the way closed. When I try to start it there's just the usual cranking noise... ugh, ugh, ugh, ugh... with no luck. Depending on how much throttle I give it, the carby sounds like a steam train! pfft, pfft, pfft! shooting puffs of smoke straight up, and the odd puff out at an angle. While I didn't actually pour any fuel directly down the throat, I tried using the throttle to squirt in lots of fuel (ie. up to 20 squirts) and that resulted in my little steam train firing a few small bursts of flame out the throat I managed to make myself laugh at this little steamer but any further suggestions on how to get her to fire up would be appreciated. Thanks.
