


WoodsWagon
-
Posts
4068 -
Joined
-
Last visited
-
Days Won
5
Content Type
Profiles
Forums
Gallery
Store
Posts posted by WoodsWagon
-
-
I'd highly recommend using the cupro-nickle line to replace it. It's a bit more expensive but much easier to fit into place, harder to kink, and will never rust out again.
When you go to remove any of the line nuts on the failed line, just cut the line off close to the nut and use a 6 point socket on the nut. If you try to undo them with a wrench they will round over. Once it's off, you can drill through the stub of line left in the nut to clear it out and re-use the nut on the new line.
A reasonable double flaring tool can be bought for $40, a roll of 3/16 cunifer line for $25, and you re-use the nuts. A pair of brake line bending pliars can be handy for the tight U bends where the rear lines attach to the hoses.
-
Well you probably put a bit of wear on the rear transfer clutch pack in the transmission, but that can be replaced without pulling the transmission out of the car. Drive it, and if you don't get binding on tight circle turns you didn't get it hot enough to warp the frictions and steels. If you wore it down enough you just won't get much power transfer to the rear wheels, so it'll be a mostly FWD car.
Basically tow dollying an A/T won't kill it unless it's a VTD model one. It may well wear out the AWD ability though but that doesn't stop you from driving the car.
-
Slightly off topic but the 00-04 legacy cabin filters are pointless because they leave a 2"x4" bypass hole past the filters because of where the blower motor resistor is. So the filters may catch some stuff, but plenty can get past the bypass. I was disappointed with the first and only pair I bought and installed.
-
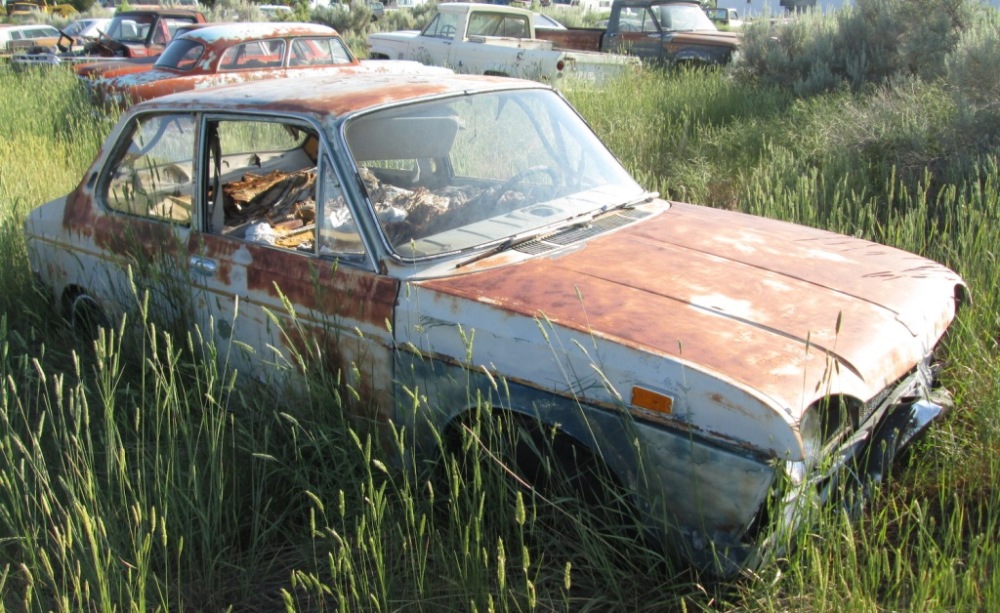
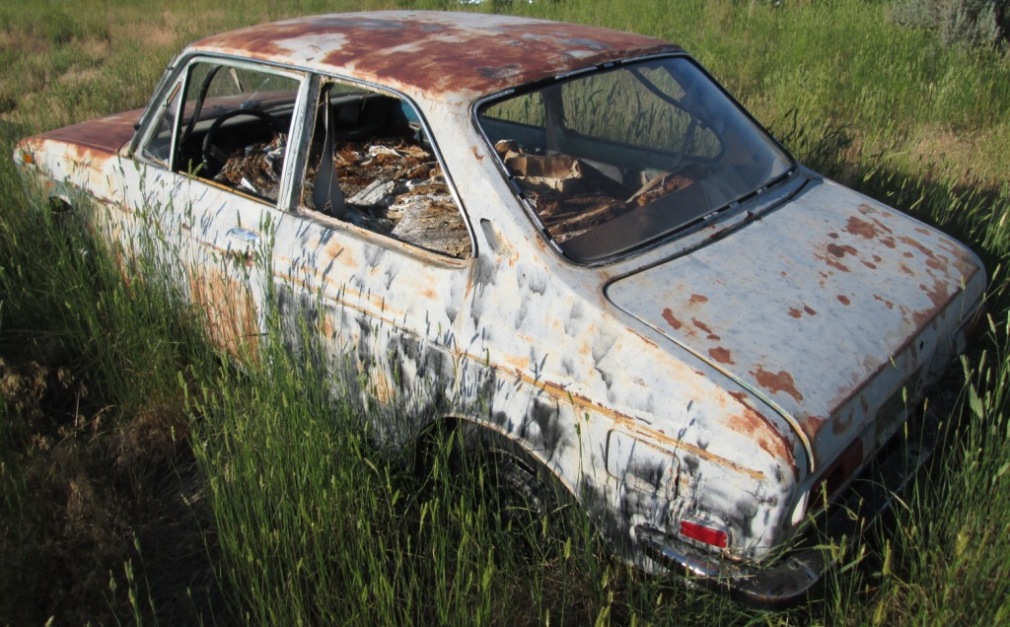
Outside of Riverton WY, but I think the guy prefers to sell whole cars not parts. Being a WY car it's probably not rusty underneath, but I worry what moisture the phonebooks might have held. I also took the pics as a curiosity not trying to organize a rescue project.
-
I shoulda taken a better look at it but I was running short on time and there were a lot of other cool cars to photograph. It was full to the brim with phonebooks.
-
 2
2
-
-
I never had an issue with control arms but I sure banana'd a few radius rods and I caved and tore the firewall/floorpan junction where the radius rod bracket mounts.My lift blocks weren't linked to each other so the additional leverage caused the body to fail. The radius rods and their mounts to the body are where upgrade efforts should be directed.
I'd much rather the stock control arm twist when a radius rod bends rather than a rigid boxed arm shearing at the bushing end if a rod bends.
-
Why would I do this, whats the advantage of having a transfer case insead of a button?
It directly replaces what you have and it has reduction gear that gives you a lower gear below first for going slow. So no custom mods and no rebuilding transmissions, just bolt in the factory parts and go. It's the trans the GL nearer you probably has.
Capitol Imports in Sacramento has a loyale 4x4 trans for $250.
Look under "Subaru Other" for all the 80's models.
Chatfields in Sac has a dualrange 4x4 no listed price
-
That would go fine here.
Are you looking to upgrade the stock ones or add more in different places?
What year is your brat?
-
No. Engine bolt pattern is different. A 5spd from any 86-94 non-turbo with the same body style as yours will fit. Try and get a dual range 4x4, pull the shifter and boot with it and it's a bolt in upgrade to the pushbutton 4x4.
-
Saab 900's used an intercooler mounted right behind the drivers headlight. Compact, cheap, and relatively easy to find in junkyards.

-
There's essentially a universal joint in the shift linkage where it attaches to the shift rod going into the transmission. It has plastic bushings inside it, and any wear in them makes for a lot of slop at the shift knob.
Here's a good thread showing the same problem on a legacy, which uses essentially the same linkage: http://www.ultimatesubaru.org/forum/topic/109623-shifter-linkage-replacement/
I made solid bushings out of aluminum pipe I had laying around for one of my cars. Greased it up and it worked fine. You should still be able to get the plastic ones from subaru.
-
Here's another thread about it: http://www.ultimatesubaru.org/forum/topic/86471-long-time-no-post-need-some-advice-on-the-brat/?do=findComment&comment=728173
And this on pirate4x4 http://www.pirate4x4.com/forum/general-chit-chat/1048765-any-subaru-gearheads-around-here.html
-
Your fun hasn't started yet if you haven't split the bellhousing. The dowel pins like to rust and lock the two halves together. Spray penetrating oil on them now and hope it soaks in.
-
1
-
-
Way too much work swapping in a 2.2 motor to another brand of car. The wiring harness, computer, and tranny won't match up. It would be a nightmare.
Yes, it has been done successfully with Volkswagen vans with all the changes needed learned, and passed on to others. However, the first guy who did that had to have a tremendous engineering feat to complete.
No worse of an engineering feat than what we do retrofitting EJ's into older subaru's.
-
Put a good trans cooler in and learn how to brake torque launch it. Smaller outside diameter tires will help too. Your weight reduction plans will be a bunch of work for a tiny % of the cars overall weight and you won't be able to feel the difference in performance.
-
A/t doesnt mind not having the rear driveline hooked up but you will cook the center diff in a 5spd if you try that.
-
On a hydraulic clutch is there anyway to "move" the clutch fork to make sure it's not the throw out bearing partially engaged? It doesn't sound like it is but I'll test it if there's a way to do it. I see other threads with "noise goes away when clutch pressed" - where folks say replacing throwout bearing fixed it.
Yes, grab the top of the release fork and push it firmly toward the slave cyl. The cyl will slowly compress.
-
A melting connector is either a connection issue or an overload issue. Low spring tension of the female side spade connector or corrosion on their surfaces raises the resistance of the connection. If it was a perfect connection there would be no heat generated. It should take some effort to push the spades together or pull them apart, if not squishing the female side with pliers a bit while it's apart can tighten up the pin fit.
The other option is the fan motor drawing more amps than the circuit was designed to handle. The oil in the bearings of a 20 year old motor probably isn't the greatest so it may be working harder than intended. The radiator fans in my dads 300k+ mile legacy were drawing 36amps and 24 amps each vs 12amps each for the same fans in our 200k mile parts car. The excessive load had cracked a fuse so they would only run intermittently.
-
Racks rarely fail. The coupler between the column and the rack has U-joints that commonly rust up and bind. Spraying penetrating oil (not WD40) on the two joints will quickly tell you if they're the culprit if that frees the steering up.
-
1
-
-
to avoid having to open the brake lines, you will need to cut a small section out of the bracket that holds the line (do this in the flat area - not on the angled part) - a pair of bolt cutters work nicely, then simply file the sharp edges/corners smooth. I have done this multiple times with no problems.
Remove the clip that holds the brake line to bracket, move the line so that you have a little extra space to work with - cut out about a half inch or so of the bracket - just enough that you can fit the line thru it and file off any sharpness ... do the same thing on the ones going into the car for ease of installation. Once you set the brake line back in place and install the retaining clip you cant hardly tell they have been cut.
I've found it easier to do one cut then bend the flap out of the way, and then bend it back flat before putting the clip on. That way you still have a whole hole.
-
I never messed with struts b4
1--If I shop for used parts--96-99 OB or 98-2003 forester.....I wont know how good a condition they are in--risky?--they would look like the attached pic right?
2--john---if I but the Kyb's....will they come with springs? If not, then I probably can't use my legacy springs right?..then where am I
3--sway bars and trailing brackets were mentioned above....what needs to be done to do the job right--I don't know what a trailing arm is
swap sway bars too? and the brackets that hold them?
If you buy new KYB's for a 98 outback, you can re-use your Legacy springs. That's what the red one in my picture has, and you can obviously see it's not sitting lower than the outback next to it.
If you carefully cut and bend the brackets where the brake hoses go through the struts you can swap the struts without having to bleed the brakes. Unless you have a Brighton with rear drums, then you have a hard line instead of a flex hose and you have to pull it then bleed the brakes after.
Stock sway bars work fine. The rear can be hard to get the hub pushed down far enough to bolt the strut in, and taking the sway bar off makes that easier. Hook it back up once it's together and sitting on the ground again.
Trailing arm brackets from an Outback or Forester are optional. They're the pivot point for the front of the rear suspension's trailing arms where they mount under the floor beneath the back seat. Swapping them out helps center the rear wheels in the wheel wells, so running bigger tires won't rub on the tail end of the rocker panel by the back door. 205/75r15's fit fine without swapping brackets, but it doesn't hurt, and if you go to bigger tires than that it reduces rubbing.
-
1
-
-
You didn't answer my question about the gas.
Old bad gas in the tank from a car sitting will wreak havoc on an engine. It turns to glue on the valve stems and sticks them in place. Once a valve sticks, you loose compression on that cylinder and it will also start sucking oil past the rings. Within a few times of starting the engine up, running it, and letting it cool off, you go from a engine that ran fine, to one that's missfireing, burning a ton of oil. and running like garbage.
I've seen engine's replaced due to it, only to have the new engine meet the same fate within a day of being put in because the bad gas was still in the tank. I've seen pushrods get bent on OHV v8's when the valves stick shut, pushrods drop out of inline 6's when the valves get stuck open, rockers drop out of EA82's when the valves stick open. It's a massive problem, and it's all due to junk gas. When I revive any older car now I run it off a boat tank with a separate pump until I can get it to the shop and clean out the fuel system. Dealing with the aftermath of trying to run it on what's left in the tank or pouring fresh gas into the tank and dissolving the varnish coating the inside of the fuel system and letting it get fed into the engine just isn't worth it.
Carb cleaner sprayed around the stems inside the intake ports, heat from a hot air gun, and tapping the rocker with a soft hammer can often free the valves up again, but sometimes you have to pull the heads, take the valves out, and clean the valve stems and guides off manually.
-
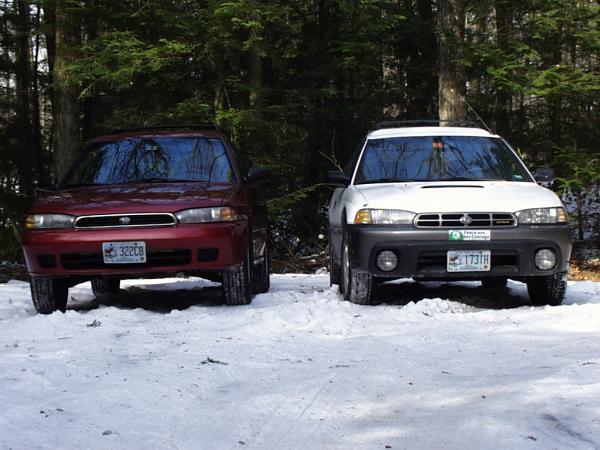
The red one is a 95 legacy with 98 Outback struts and wheel/tires on it. 205/70r15's.
-
How old is the gas that's in it? Did you pump all the old gas out before putting fresh in?
93 Loyale EA82 head gasket first timer
in 1990 to Present Legacy, Impreza, Outback, Forester, Baja, WRX&WrxSTI, SVX
Posted · Edited by WoodsWagon
Make sure it's the headgasket before you dive into the job. The intake manifold gaskets are a common failure and they will let coolant leak into the intake from the coolant crossover passage. It leads to coolant loss and steam out the exhaust, but not overheating until you run the coolant low. One caution on the intake manifold bolts is that they like to corrode and snap off when you go to remove them. So turn them gently and try and work them back and forth to walk them out instead of forcing them.
Oh, and for future posts, your car is considered an "Old Gen" subaru so use that subforum for questions rather than the New Gen one.