


89Ru
-
Posts
500 -
Joined
-
Last visited
-
Days Won
7
Content Type
Profiles
Forums
Gallery
Store
Posts posted by 89Ru
-
-
Got heads back from new machinist. He used a diamond cutter.


Pressure test setup

-
Frozen caliper is easy to diagnose. One rotor will be hot, sometimes smoking. Use an infrared thermometer to check rotor temp.
I have this problem also, off and on for a while, on a 2002 H6 3.0 outback sedan, 320k miles. At 60 mph, the steering wheel shakes, enough that I don't want my wife driving the car. Drives fine other than the shaking. Mine is a bit different than what you describe. It appears when letting off the gas, worse on hilly roads just at the transition from flat to downhill. Over time, I have tried changing CV axles, front struts and bearings, inner and outer tie rod ends, ball joints, new power steering pump, new tires all around. These all have helped make the problem less or go away but it comes back, not as severe but I don't think I have addressed the central issue yet. As it seems to be related to the position of the car on the road and whether power is applied or not, I have suspected a suspension/mounting related problem.
I would lean toward the lower control arm as heartless describes.
-
Found a new shop that claims to machine to mirror finish with carbide cutters on a PCM mill machine. Will drop off heads tomorrow morning. I asked about measuring surface roughness and didn't get a clear answer. I'll ask to check if the surface is square with a height gauge. Two other shops in the area gave this guy a recommendation so going with the majority. Crossing my fingers that these can be reworked. New gaskets arrive tomorrow.
1 hour ago, GeneralDisorder said:And both my machinist and my cylinder head shop use a CBN cutter to accomplish this.
Need to check them not just for flatness and Ra but also for the surface being square to the head. Have to check it with a height gauge on a granite surface plate.
GD
-
Can't figure out how to get pics over 2mb to show up yet. Do these look too rough for MLS gaskets to seal? I'm going to take the heads to different machine shop on my next day off and see what they can do.
http://i444.photobucket.com/albums/qq166/89ru/IMG_20181020_204143202_zpsjrpy4hnq.jpg
http://i444.photobucket.com/albums/qq166/89ru/IMG_20181020_204052240_zpsywe7ojti.jpg
http://i444.photobucket.com/albums/qq166/89ru/IMG_20181020_204010939_zps7rscg61f.jpg
http://i444.photobucket.com/albums/qq166/89ru/IMG_20181020_203945342_zpsdu8ry94o.jpg
http://i444.photobucket.com/albums/qq166/89ru/IMG_20181020_203934441_zpstrjeafnh.jpg
http://i444.photobucket.com/albums/qq166/89ru/IMG_20181020_203915589_zpsnonsqao7.jpg
http://i444.photobucket.com/albums/qq166/89ru/IMG_20181020_203858052_zpsltupd2ln.jpg
-
Thanks for the specific details. I definitely had some head bolt creaking with engine oil. I've got some Sta-lube from O'Reilly's.
I wish my machinist was willing to invest in some new tools. He wouldn't buy a helicoil kit last time I needed stripped threads fixed.
12 hours ago, GeneralDisorder said:You must use something like the Amsoil lube. Regular engine oil won't handle the load and will creak. Once you achieve ZERO creaking you are doing it right.
-
16 minutes ago, forester2002s said:
Not sure what you've skipped.
I've always followed the complete torqueing sequence when installing new head-gaskets.
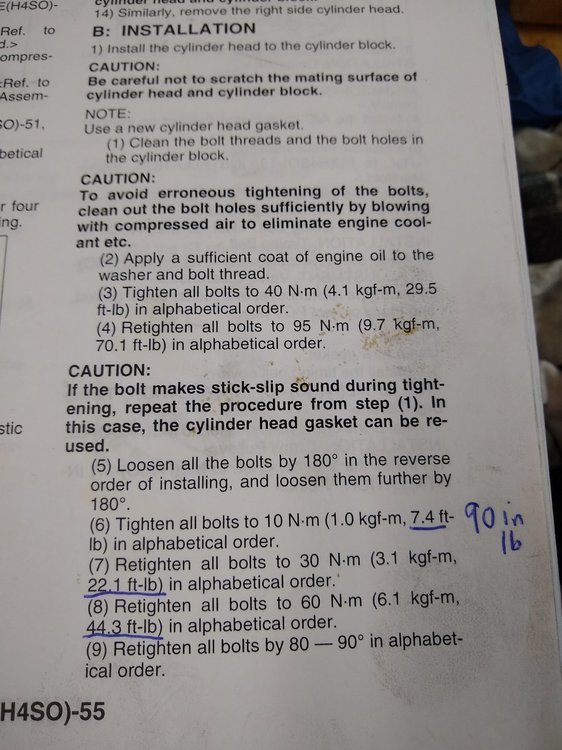
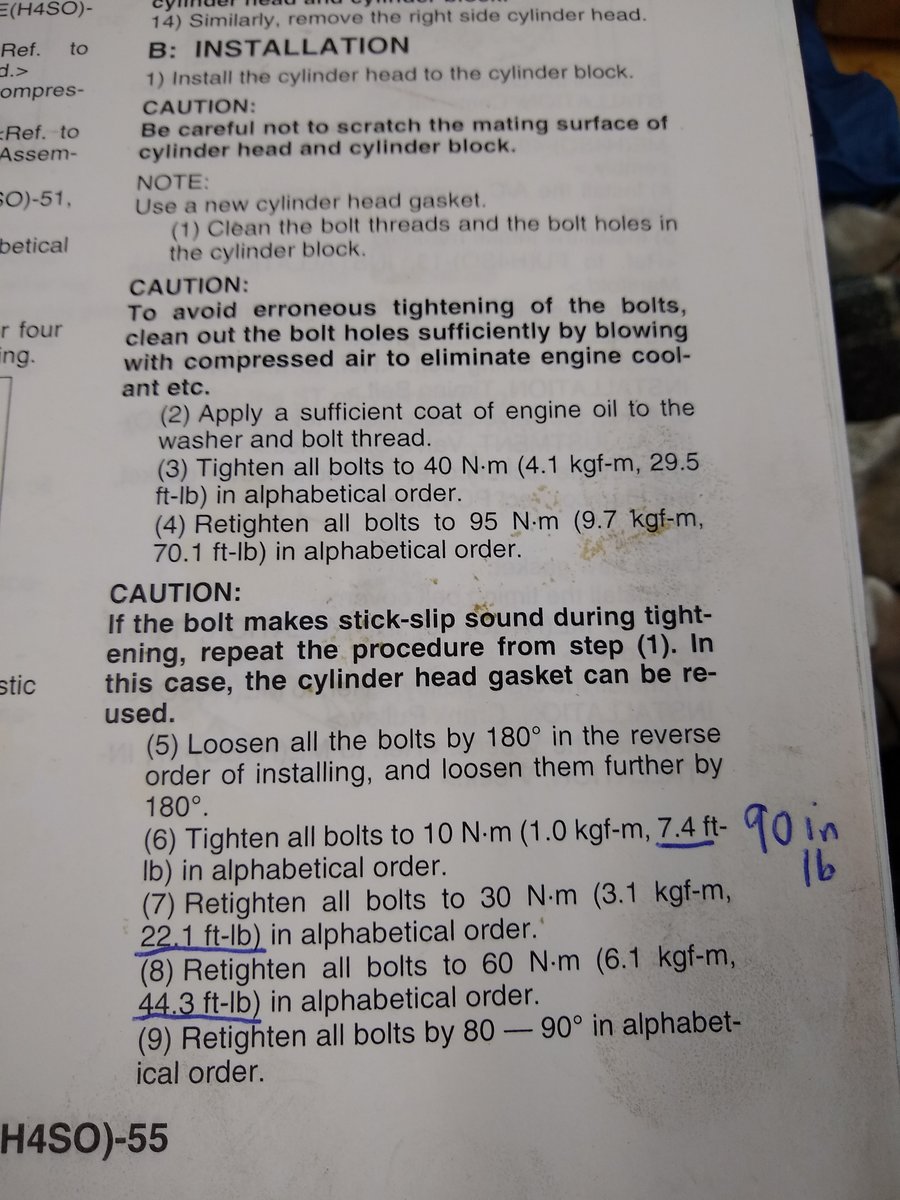
Perhaps this is one of several errors. I skipped steps 3,4 and 5 below. Was following some advice that stated these steps were for new bolts only. I started on step 6 with existing bolts.
One other question. How many passes do you make? I found that the early steps take 2-3 repeat passes in alphabetical order to get all bolts to the specified final torque for each step.
-
 1
1
-
-
Ido: I did the pressure test to avoid having to install in vehicle and pull out again if it leaked. Have no idea if putting fire in the hole would get it to seal up. My guess is someone else worked on this since I don't think it has OEM gaskets. I'm assuming that MLS with copper sealant spray isn't OEM for the EJ253.
GD: The tool for surface roughness is a bit pricey for me lol. Everything is apart. Felpro gaskets aren't deformed or scratched that I can tell. I'm using new torque wrenches from precision instruments. Marked the bolts so I wouldn't overtorque when doing the angles. A bit of stick slip when torquing down. I rinsed the bolt holes with engine oil and cleaned the bolts with brake cleaner and dipped the threads and washers in engine oil before installing.
Will get 770 gasket and bolt back together dry. I don't have an old head bolt to make into a thread chaser but I can buy a new bolt and make one. Just use a grinder to machine 3-4 slots parallel to long axis of bolt, fill with grease? This is my first time doing head gaskets so any tips are greatly appreciated.
-
2007 Outback 2.5i EJ253 with AVLS. 100k miles. Basic problem: Can't get heads to seal with 15 psi into cooling system. Dropped 1/2-1 psi shop air in one hour. Filled with coolant. Dripping coolant on driver side in multiple places. Next step is to use some kind of sealant on the gasket. What I'm asking is which sealant. Details below.
History: Bubbles in overflow tank and gurgling noises in cabin. Never overheated under my watch but I just bought this car, have only 1500 miles on it. Did radiator exhaust gas test twice, once before sale and once after for two minutes, both clear. Drives great btw. Hot heat in cabin. Radiator level drops and would not draw coolant from overflow tank on cooldown. Coolant temp fluctuates as expected with significant air in system, between 180 and 210. Blue exhaust gas tester solution stayed blue until exposed to tailpipe fumes, then turned yellow. Tried new radiator, new water pump and hoses, bled air I don't know how many times. Finally got fed up and pulled engine out, pulled heads off, valve rockers, and cam cover and sent to local machinist. Existing gaskets: unknown vendor MLS (multi level steel) with copper spray. Machinist said warp at .002" and .004" and machined them down. New gaskets: I used Fel-Pro solution: PermaTorque MLS with LaserWeld, gasket #26415PT with the blue coating. Reused head bolts. Rinsed bolt holes with oil x2. Skipped the bolt stretching steps and just did the torque to 7.4, 22, and 44 ft-lb. Then 80-90 degrees, 45 degrees, and lastly 45 degrees on center bolts. Cam covers resealed with permatex ultra grey. Reinstalled rockers and let sit for 24h. Left timing belt off and cams loose. Did leak test as mentioned with air into throttle body coolant hoses. Tied heater pipes together with heater hose. Tied water pump intake to coolant crossover pipe with scrap hoses. Won't hold 15 psi shop air with sealed cooling system. Filled with coolant and slow drip off DS head with 15 psi. Unbolted. Rechecked flatness of heads and short block in eight locations with t square and .002 feelers, pretty much unchanged from before installing. Took heads back to machinist and he just laughed saying no one in this state can measure Ra smoothness, he has been doing this for 40 years and does them all the same. I showed him the Felpro handout stating machine to 60 Ra (600 Rz). He suggested a can of copper spray. He did say he has some other type of cutters but they come out "the same."
So where to go from here? Do I need a new machinist? I've seen some use permatex aviation gasket sealer. Subie dealer says use composite gasket p/n 11044AA633. Since this car already had MLS gaskets with copper spray I'm thinking of abandoning Felpro and going with Subaru OEM gasket. In that case, which one? Sealant or not? I have a bunch of pictures to upload when I get a minute.
-
On Ebay, ask the seller of the Mizumo kits bundled with the Aisin water pump to be sure of the Mitsuboshi timing belt. Some kits with the Aisin pump have the ITM ENGINE COMPONENTS timing belt.
-
Was reading the repair mistakes and blunders section of RockAuto news and saw that USMB made the forum of the month.
-
1
-
-
Bearing for the idler pulley is 6203. Parts tech may find it under alternator bearing for some chevy truck (TIMKEN 203FF is one option).
-
Did the transmission handshake and TCU reports no trouble code (2 Hz flashing on the AT oil temp dash indicator)
Forgot to mention I am getting P0851 now. Looks like I need to adjust the position of the inhibitor switch, it has play in the screw slots for that and an alignment hole with a special tool...that could have been the problem in the first place. The PO had the transmission rebuilt and not all the dash gear position indicators light up so maybe it has been needing adjustment all this time. My first auto trans this century and it looks like I'm getting schooled by it.
-
I was hopeful, but I still have to override the shifter lock. It could be two problems occurring simultaneously, or they could be connected somehow.
-
Put a new inhibitor switch in and the backup lights are working again. Its starts too

-
Did some searches on the buzzing...seems like its a transmission duty solenoid and buzzing is normal.
The shift lock solenoid has either gone intermittent or something is disabling it. Sometimes I press on the brake and I hear it release, other times it does not release and I have to go to manual release.
-
2002 H6 3.0 auto won't crank. For the last month when the car gets warm it would not start (just silence). Always started after sitting overnight. Now with the weather getting warm, after sitting for a day and a half its just silence apart from fuel pump and starter relay click, dash lights good. Tried a jump and still nothing. Narrowed it down to the inhibitor switch (in a MT this is called the neutral safety switch). Sits on the passenger side of the transmission and provides a short in P and N gear selections to allow the starter to crank. You can fool it into starting by shorting two pins together with a small paper clip. Connector is on top of the transmission just ahead of the firewall. T3/B12 pins 11-12. Looks like a new inhibitor switch is needed. Rear backup light also does not work and the dash gear shift position indicator lights are wonky.
Problem is now my gear shift is locked I think because of my tinkering. I can unlock it by sticking a paper clip in the little hole to the right of the shifter...but what else is going on? I started the car with T3/B12 disconnected (despite a sudden electrical buzzing sound from underneath the car with the key in run position). Does the TCU get upset with B12 unmated and lock the shifter? How do I clear this? Reset the TCU/ECU or will it clear itself once the inhibitor switch is replaced and the car can start normally...
code 852 is the neutral switch input circuit high
-
Thanks guys, my installer is hesitant about the job so I'm heading towards the EJ22 swap instead. Seems like more folks have done this anyhoo.
Still intrigued about the EJ20 tho, here's a link for someone who swapped an EJ20 into a 2002 impreza and raves about it. https://www.toronto-subaru-club.com/forums/technical-engine-normally-aspirated/172191-simple-affordable-replacement-any-sohc-ej25.html
Fairtax I'm checking out that link to find an EJ22 for this job.
I love it when people say I can just glance at sumptin and know, I'm not there for sure! Need to triplecheck and then sleep on it, phone a friend!
-
Just want to see if this can work. Found a JDM sohc EJ20 with dual port exhaust, comes with intake. Will this swap into a 96 Legacy Outback with an EJ25 and auto? Seems like the EJ22's are only available USDM. I want to keep everything NA. Besides paying attention to EGR and dual vs. single port exhaust, what else is out there to bite me? I live in a state where I can't have a CEL lit to pass inspection. Wiring a direct plug and play or is there splicing involved? Will the ECU be happy with the EJ20?
I'm open to suggestions for better ideas and sources for an engine.
-

Image is '96 impreza wiring diagram. While buzzing out the clock spring if that doesn't pan out also buzz out the front sensors and inflator wiring. The control module is looking for low resistance on the inflators so shorting the pins can make the light go out if that is the trouble.
-
1
-
-
No gary, lucky me. Head gaskets were done on the JDM engine.
Maybe I can conjure up a special tool 86Bratman...maybe I'm already in over my head but I hate the thought of burned valves as much as getting the dealer to do this.
no overheating or headgasket issues?
-
1997 Legacy Outback Wagon, 2.5L DOHC. JDM engine put in by PO at 170k and I have 60k on top of that.
Compression (cold) results: #1 210, #2 220, #3 220, #4 150
That 150 on #4 took its sweet time to get there too. So am I over the edge for burned valves or just creeping up to it? It runs ok but has been stumbling, real misfires at low rpms lately. Sounds a little hollow out the tailpipe. Not idleling rough, seems to be ok on power. Plugs look all the same. Leakdown test on #4 warranted?
Will pop the valve covers off tomorrow and check the clearance on the valves. I'm expecting bucket and shim type vs. the screw adjustable SOHC after '99. Hoping to be able to pop out the shims without pulling the engine and pick up new shims at the dealer. Any tricks to this? Advice on making special tools or just use a wide screwdriver to lever down the bucket? A friend suggested using a zip-tie to help pull the shims out. Consensus seems that the exhaust valves are mainly too tight so they stay open and don't cool. They are best accessed from under the car.
-
i was living south of baltimore, home of some pretty good salvage yards, or 'parts gardens' as they are sometimes called. bought my first soob in maryland and got hooked
-
Who on the board lives here? Already found a pick-a-part on Lebanon Pike near Trevecca but haven't gone in. Found the subie dealer downtown too. Sales tax is a killer here, 10% but no income tax so that's a plus. Super nice people here and lots of subie's, well, not as much as up north lol. Finally got a garage to work in, houses are a good value here.
-
Whatever you do, don't use a high wattage soldering gun! Short of a blowtorch, that's the most inappropriate tool possible for delicate pcb work. A low wattage, fine tipped, preferably temperature controlled iron is the only way to go.
+1 absolutely correct. too much heat and you can cook the part or damage the pcb. low wattage iron, fine solder, and temperature control is needed. a microscope helps for both work and inspection. if the pcb is designed well, just a touch of heat will flow the solder onto the pad/lead and keep the solder from bridging under the part. the smallest amount of solder, just enough to wet the pad is best to avoid bridges. if bridges form, usually just sucking up the excess solder with fine solder wick and just walking the iron over the leads fixes the problem. i'm not a electronics tech but have pretended to be one occasionally when they aren't available. in my opinion the hardest part of surface mount work is removing many-leaded devices, which i always left to the experts who have vacuums, hot plates, and hot air reflow tools.
New head gaskets won't seal
in 1990 to Present Legacy, Impreza, Outback, Forester, Baja, WRX&WrxSTI, SVX
Posted
Ground slots into a head bolt and chased all bolt threads with assembly lube. Lubed bolts well and ran them in and out several times w/o heads on. Oiled cylinder walls. Might have slopped some oil on the fire ring for the driver side. After remachining heads I reinstalled with new dealer 770 gaskets. Used no sealant. Torqued heads following procedure without skipping steps. Zero stick slip on the threads this time. Assembly lube did the trick.
Have 15 psi into dry cooling system, test setup as in previous post picture. Went out with the family for Halloween. Came back and its losing pressure, just over 2 psi in 7 hours which is better than last time around with the sanded heads, about 2 psi in 2 hours I think. I soap bubbled all the joints last time around and nothing leaked except coolant at the gaskets.
Kind of wondering if this will seal up after it gets up to temp. Short of picking a gasket sealant (horrors) I am out of ideas.