Injulen
Members
-
Joined
-
Last visited
Everything posted by Injulen
-
Hey all, working on my 1995 wagon today and it needed some adjustment to the parking brake operation. I looked in the service manual and it says to expand the shoes you turn the star wheel up and then to contract the shoes you turn it down. The side they are working on in the manual is the driver side. Does everything get reversed for the passenger side or do they use opposite threads so that it is still up = expand and down = contract? Thinking about it in my head, if they use the same parts, you are accessing it on the opposite side so down becomes expand and up becomes contract. Am I wrong?
-
Injulen replied to greenleg88's topic in 1990 to Present Legacy, Impreza, Outback, Forester, Baja, WRX&WrxSTI, SVXDo the threads on the drawbridge adjuster change from side to side? If on the driver side hub you turn the wheel up to tighten, wouldn't it be on the passenger side you turn the wheel down to tighten? This would not be the case if the part is side specific and the passenger side adjuster has reverse threads. I ask because I am doing this right now and am confused on this point.
-
Injulen replied to Injulen's topic in 1990 to Present Legacy, Impreza, Outback, Forester, Baja, WRX&WrxSTI, SVXIf you don't find the vent leaking, check the solenoids. From another thread:
-
Injulen replied to Injulen's topic in 1990 to Present Legacy, Impreza, Outback, Forester, Baja, WRX&WrxSTI, SVXIt must be 10 posts because this is my 11th and I can now add attachments.
-
Injulen replied to Injulen's topic in 1990 to Present Legacy, Impreza, Outback, Forester, Baja, WRX&WrxSTI, SVXSure, but doesn't the "Insert Image" button just embed the offsite image that is linked? If there is a way to upload the image directly to the forum I would definitely do that.
-
Injulen replied to Injulen's topic in 1990 to Present Legacy, Impreza, Outback, Forester, Baja, WRX&WrxSTI, SVXThe car that I did the work on is a '97 with a '96 EJ22 in it. The canister IS in the back on that one, large square box behind the passenger side rear wheel. I had to maneuver around the purge and vent lines to do the work. The "Before" pics of the vent pipe are actually from my '95 Subaru which has the canister in the engine compartment. I forgot to take before pictures of the '97 so I substituted the images from my '95.
-
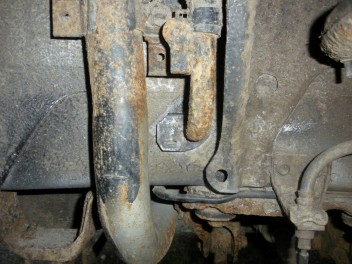
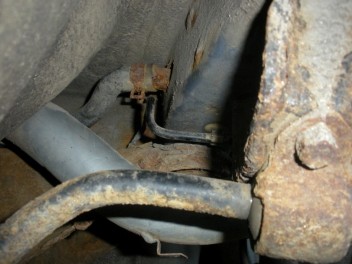
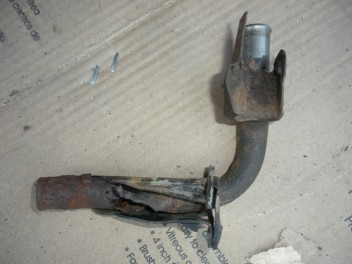
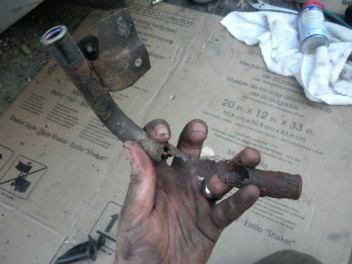
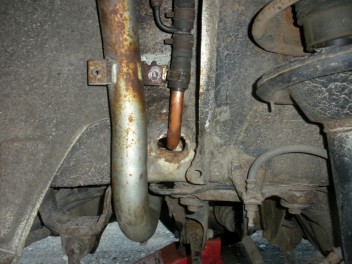
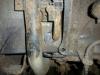
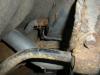
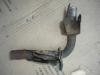
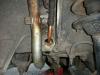
Hey all. Did some service today and figured I would snap some photos and do a quick write up. I had a CEL code P0440, that one has something to do with the EVAP system leaking. After weeks of searching for the cause and scratching my head, today I finally found it. Where the fill vent goes through the frame rail near the passenger side rear tire, the metal pipe simply rusted away. I had already checked my fill pipe a few times since that is one of the most common causes of the P0440 code but this little piece escaped my eye for quite awhile!! One of the worst things was that I couldn't put more than 1/2 a tank of gas in the vehicle without getting a horrendous headache inducing gasoline fume smell. Once I found where the fumes were leaking out, I despaired a little. It was a kind of a pain in the butt spot and I couldn't find that part for sale anywhere without buying the whole filler neck assembly for $100+. Enter my step-dad: he recently repaired his truck's filler neck with some 1 1/4" copper pipe. He showed me his repair work and we decided to give the same concept a go on the Subaru. Scrounged up some 5/8 OD copper tubing, cut & bent a piece, voila!! No more fume smell, no more CEL!!!!!! Oh, and it cost me $0. Free labor and a piece of scrap copper. Imgur Album: http://imgur.com/a/k05np Car is jacked up and ready to go. The smaller diameter pipe on the right is the one that rotted through. These "Before" images are actually from a '95 Legacy, I forgot to take photos before doing the work to my '97 Legacy. Close up of where the vent pipe goes through the frame. The plastic grommet extends through the frame and trapped a lot of dirt and moisture, causing the pipe to rust right through. This is the other side of the frame rail where the vent pipe ends and connects to the rubber vent hose that goes to the gas tank. The hardest part of this service was getting up in there to unhook that clamp. On my '97 Legacy there are three hoses that aren't on this '95 which go to the charcoal canister. (The '95 has the canister under the hood instead of behind the rear passenger wheel) You can see that the pipe is quite corroded and swollen from the rust. I was able to grab on and wiggle it quite a bit. The part of the pipe that is visible on the outside of the frame rail wasn't moving whatsoever so I knew there was a break inside the frame. After pulling out the filler neck and vent assembly, here is the rusted out vent pipe and the grommet it runs through. You can clearly see that the worst of the rust happened right inside the protective grommet. Pic without the grommet. Nasty. Here you can see my tungsten carbide ring is nice and shiny despite the road grime xD 5/8" OD copper tubing. Bent it to shape and size, wrapped some electrical tape to bump up the OD for a snug fit, went together smoothly. I accidentally broke the bolt that holds the vent pipe bracket and filler neck to the chassis but oh well. Zip ties are in my future! Will probably also stuff some cloth or rubber around the copper pipe so it doesn't rub too much against the frame. In this pic you can actually see the three black rubber hoses that come to and from the charcoal canister. They are visible in the bottom left of the photo. One last note, this was made much easier by removing the filler neck tube. It wasn't completely necessary but it opened up a lot of maneuvering space for my hands.
-
Injulen replied to Injulen's topic in 1990 to Present Legacy, Impreza, Outback, Forester, Baja, WRX&WrxSTI, SVXAh yes thanks for pointing that out. I will post it in there and moderators, please feel free to delete this one. Edit: Just went to the USMB repair manual section and couldn't quite figure out where this belongs. Engine? Double Edit: Nevermind, there is a section for submissions.
-
Injulen replied to Red92's topic in 1990 to Present Legacy, Impreza, Outback, Forester, Baja, WRX&WrxSTI, SVXHey all. Did some service today and figured I would snap some photos and do a quick write up. I had a CEL code P0440, that one has something to do with the EVAP system leaking. After weeks of searching for the cause and scratching my head, today I finally found it. Where the fill vent goes through the frame rail near the passenger side rear tire, the metal pipe simply rusted away. I had already checked my fill pipe a few times since that is one of the most common causes of the P0440 code but this little piece escaped my eye for quite awhile!! One of the worst things was that I couldn't put more than 1/2 a tank of gas in the vehicle without getting a horrendous headache inducing gasoline fume smell. Once I found where the fumes were leaking out, I despaired a little. It was a kind of a pain in the butt spot and I couldn't find that part for sale anywhere without buying the whole filler neck assembly for $100+. Enter my step-dad: he recently repaired his truck's filler neck with some 1 1/4" copper pipe. He showed me his repair work and we decided to give the same concept a go on the Subaru. Scrounged up some 5/8 OD copper tubing, cut & bent a piece, voila!! No more fume smell, no more CEL!!!!!! Oh, and it cost me $0. Free labor and a piece of scrap copper. Imgur Album: http://imgur.com/a/k05np Car is jacked up and ready to go. The smaller diameter pipe on the right is the one that rotted through. These "Before" images are actually from a '95 Legacy, I forgot to take photos before doing the work to my '97 Legacy. Close up of where the vent pipe goes through the frame. The plastic grommet extends through the frame and trapped a lot of dirt and moisture, causing the pipe to rust right through. This is the other side of the frame rail where the vent pipe ends and connects to the rubber vent hose that goes to the gas tank. The hardest part of this service was getting up in there to unhook that clamp. On my '97 Legacy there are three hoses that aren't on this '95 which go to the charcoal canister. (The '95 has the canister under the hood instead of behind the rear passenger wheel) You can see that the pipe is quite corroded and swollen from the rust. I was able to grab on and wiggle it quite a bit. The part of the pipe that is visible on the outside of the frame rail wasn't moving whatsoever so I knew there was a break inside the frame. After pulling out the filler neck and vent assembly, here is the rusted out vent pipe and the grommet it runs through. You can clearly see that the worst of the rust happened right inside the protective grommet. Pic without the grommet. Nasty. Here you can see my tungsten carbide ring is nice and shiny despite the road grime xD 5/8" OD copper tubing. Bent it to shape and size, wrapped some electrical tape to bump up the OD for a snug fit, went together smoothly. I accidentally broke the bolt that holds the vent pipe bracket and filler neck to the chassis but oh well. Zip ties are in my future! Will probably also stuff some cloth or rubber around the copper pipe so it doesn't rub too much against the frame. In this pic you can actually see the three black rubber hoses that come to and from the charcoal canister. They are visible in the bottom left of the photo. One last note, this was made much easier by removing the filler neck tube. It wasn't completely necessary but it opened up a lot of maneuvering space for my hands.

 Injulen replied to methusalah's topic in 1990 to Present Legacy, Impreza, Outback, Forester, Baja, WRX&WrxSTI, SVXFrom what I have read, if you do a headgasket job on the 2.5 with the current OEM style gasket, you don't need to worry so much. Something about upgrading the design. I've also read that doing a headgasket job on these engines is fairly straight forward and easier than a lot of other engines. Oh, and there is never a dumb question.Injulen replied to Injulen's topic in 1990 to Present Legacy, Impreza, Outback, Forester, Baja, WRX&WrxSTI, SVXChecked the spare earlier today, all good. Thanks for the reassuringInjulen replied to Injulen's topic in 1990 to Present Legacy, Impreza, Outback, Forester, Baja, WRX&WrxSTI, SVXHmm interesting, I'll try that. I'll be getting a full alignment at the shop when I get four new tires next week so its probably not a big deal til then. I figured I would be okay for a bit since there is no steel showing and I too have unknowingly driven on much worse than this. I've got to do about 200 miles of highway driving this week and I was just mildly concerned about a blowout at 65mph.Hi, I realize this isn't really Subaru specific but I trust the experts here. My '97 Legacy Wagon has one tire that is getting quite worn down on the outer edge. It is just starting to show secondary rubber. The tire was on the front passenger side and I believe there is an alignment issue that caused the abnormal wear. I don't have the money for new tires right this second.. I might next week though. My question is, does anyone think this tire is going to blow out on me within a week? I rotated the front tires to the rear in hopes that without needing to turn it won't ride hard on that outer edge. Here is a pic: Thanks for your help.