
davepak
-
Posts
115 -
Joined
-
Last visited
-
Days Won
6
Content Type
Profiles
Forums
Gallery
Store
Everything posted by davepak
-
You know I've seen a video of a Russian guy servicing a Koyo steering rack, and its not that difficult. The main thing I see is to have the special tool to extract the inner shaft plus the tricky placement of an inner circlip..I'm going to do a test drive and see if the leak has really improved. Because it might have been that temporary fix I made. I used a compressed air coupling (for the thread ) and a clamp on a hose. It sure leaked a lot from there and maybe it dripped down to the boots making it look a lot worse..
-
Oh man about that shop... Im down here in San Jose... Costa Rica! That's why sometimes getting spare parts is not as easy or I have to wait for 2 weeks when I order something from the US (Like the actual fried ECUs I got) They quoted me about 200 usd for the repair of the rack... I wish I can do it myself but there are a couple of special tools to get it apart. I think with the placement of the high pressure pipe the other day, the most significant leak is addressed until next time. But thinking about it, there must be many shops like this over there in the US, and if you mail them the gasket and seal kit also, they should be able to leave it as good as new. Dave
-
Same here. The rack on the car now is a pulled one in "good condition" as per the guy from the junkyard...but I know it leaks from the side seals ( the first one he gave me was seriously worse) there is a shop specialized in rebuilding them..so I guess on my next vacation I'll have it done. The original rack is sitting there so I can use it and have some motivation by then.. to put it back on its horrendously tight nest ! Maybe by then I can get a set of new injectors and a pair of angel eyes headlights. On the remaining vacation days I might work on the sunroof. The handle is broken and nowhere to find one. Planning to have it made out of a steel plate at a shop.. Then paint the roof and change the weather rubber strip.. What about your XT6, do you drive it around?
-
There was a major leak from the high pressure "hose" as I had placed one 2 years ago. I couldn't fit the actual pipe on its thread. Until yesterday after 3h of fiddling and a junkyard piece. I've got the gasket set for the rack but I might wait a bit. The repair is a bit pricey and removing the steering assembly is a nightmare!
-
Thanks Bennie! Yesterday I got one of those pipes. It was the high pressure line from the steering pump into the rack. I couldn't fit it 2 years ago, and I almost couldn't yesterday it took me about 3 hours of fiddling . This will take care of the major leak on the steering system
-
It's official: it's alive and street legal. It passed the periodical inspection with flying colours and minor marks. (oil wetness, corrosion in chassis.. Etc) It behaved well despite old fuel in the tank that I know has still some contamination. It climbed up the hills weakly at first but then it improved. I know now it needs to be used! Thank you all for the support @idosubaru @Rampage @88SubGL @el_freddo @1 Lucky Texan and the rest of the members who gave me ideas and help. My conclusion goes down to that clogged tank, and a chain of misfortunes for such a rare car where no one would understand its proper operation. I will: Burn up all the remaining fuel and clean the fuel filter or replace it again if needed. Place an injector treatment for good measure. Have a hydraulics hose made for the steering rack and address the leaking. (it's not the engine, it's the steering rack) I'd probably work on the body and continue a paint job detailing and polishing. Fix the radio console so I can finally play some old tunes while going about town. VID-20210205-WA0002.mp4
-
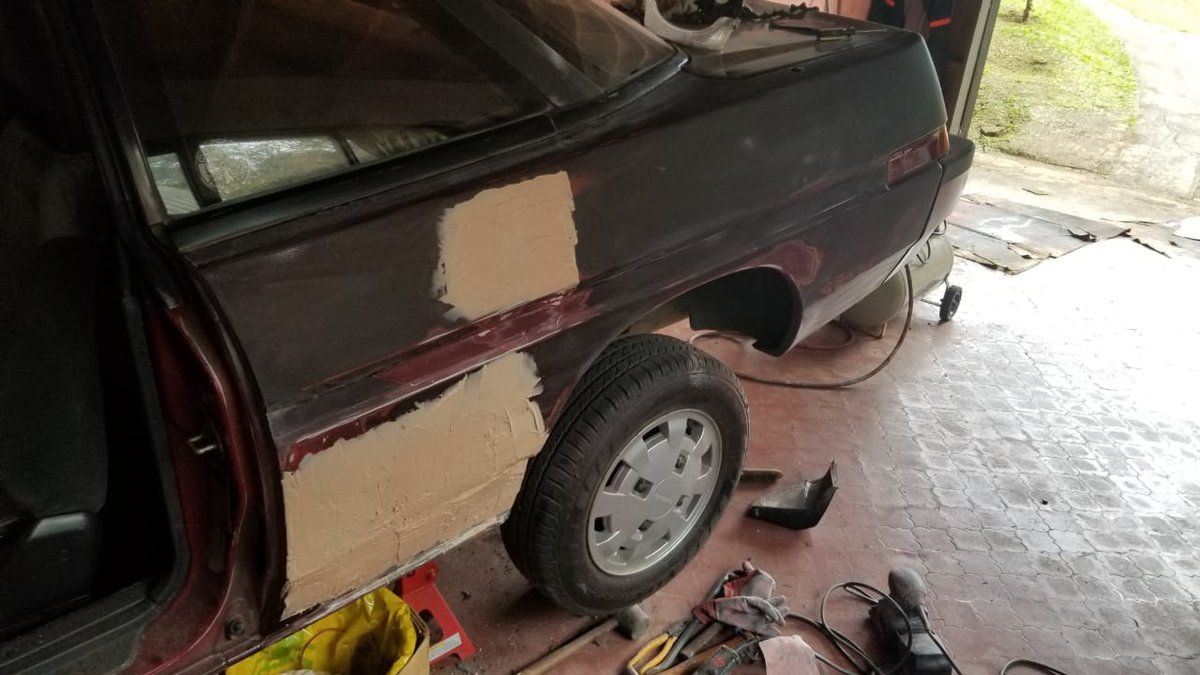
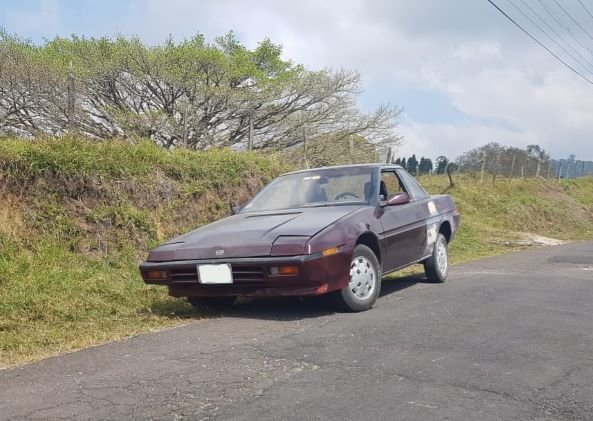
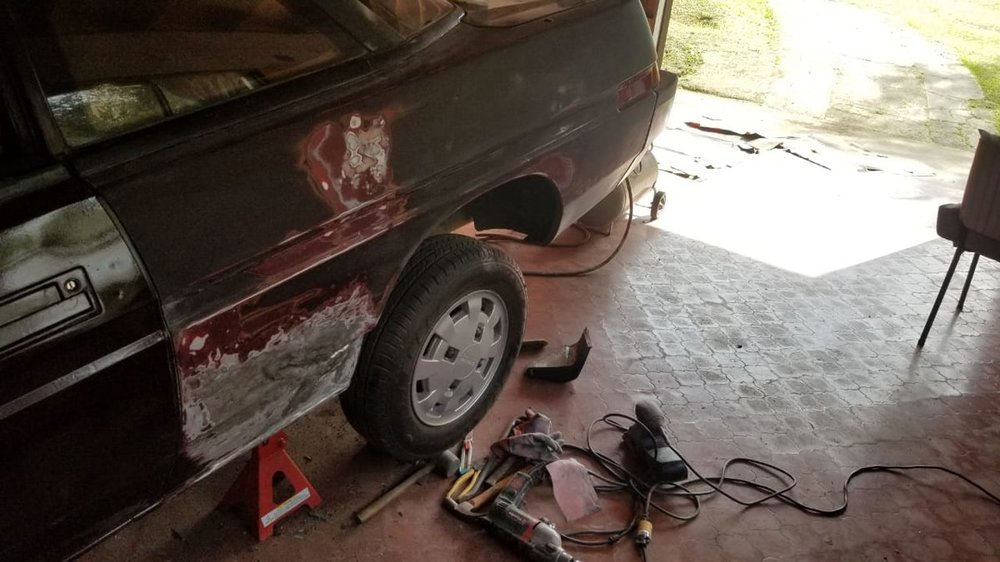
It lives! I took it for a ride and definetely noticed a change in behavior! There is still some old fuel in it so I think the minor sputtering will be there until it burns it all. It fired up right away! No whinig of the pump. All other systems are ok (except the steering rack's leaks) maybe another time.. I took a pic quickly during the test drive. And I also made an appointment for the periodical inspection. I'll work on fine tuning and painting the rear quarter panel. I'll post the updates!
-
Thanks a lot @88SubGL Reviewing some tank cleaning videos.. The presentator addresses dirty tanks. And they looked so clean to me when compared to my car's tank. I can see how the fuel system was overwhelmed with this amount of clogging!
-
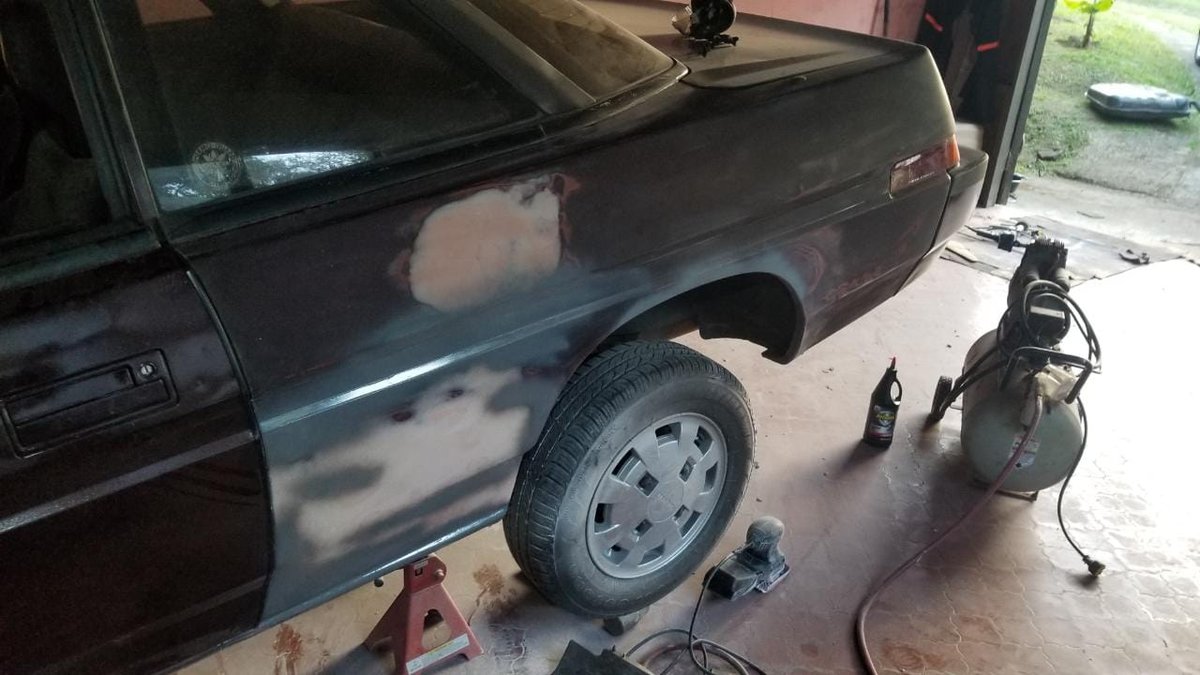
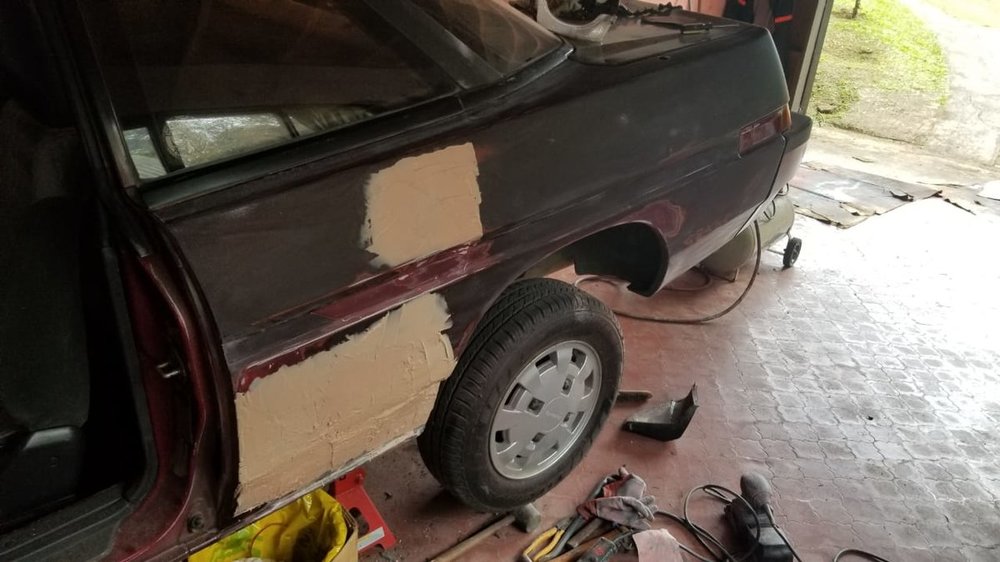
So the tank was welded and sealed back. I finished the repair of the dent and its ready for primer and paint. A busy day but quite rewarding!


-
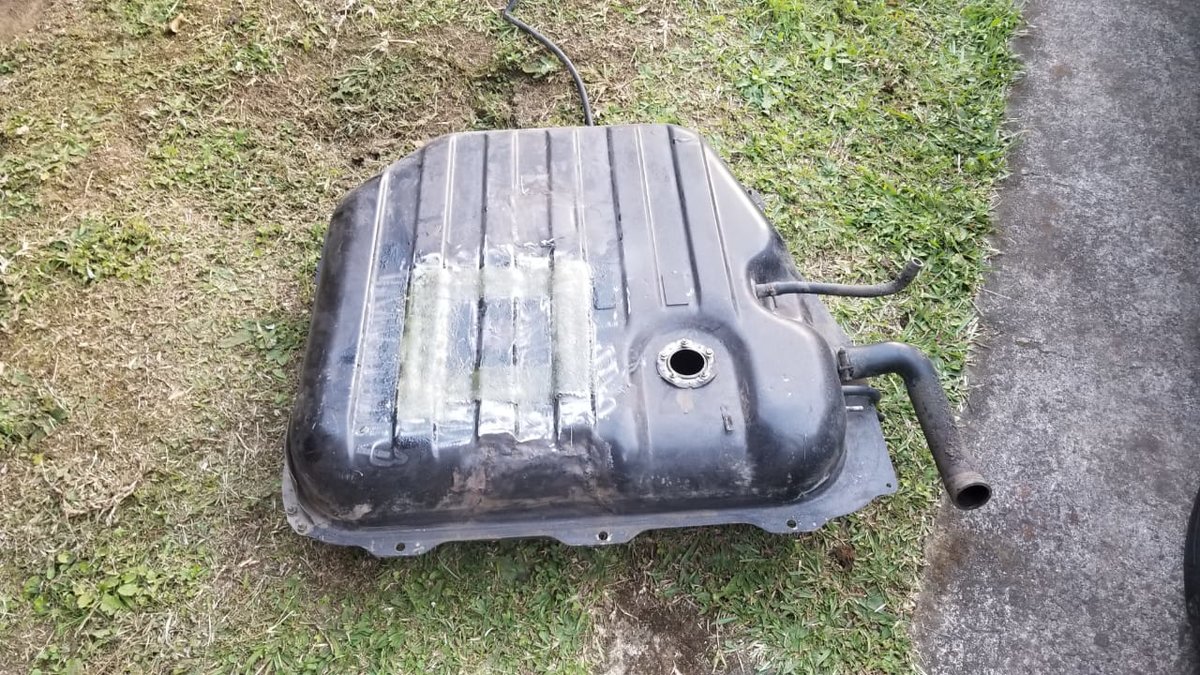
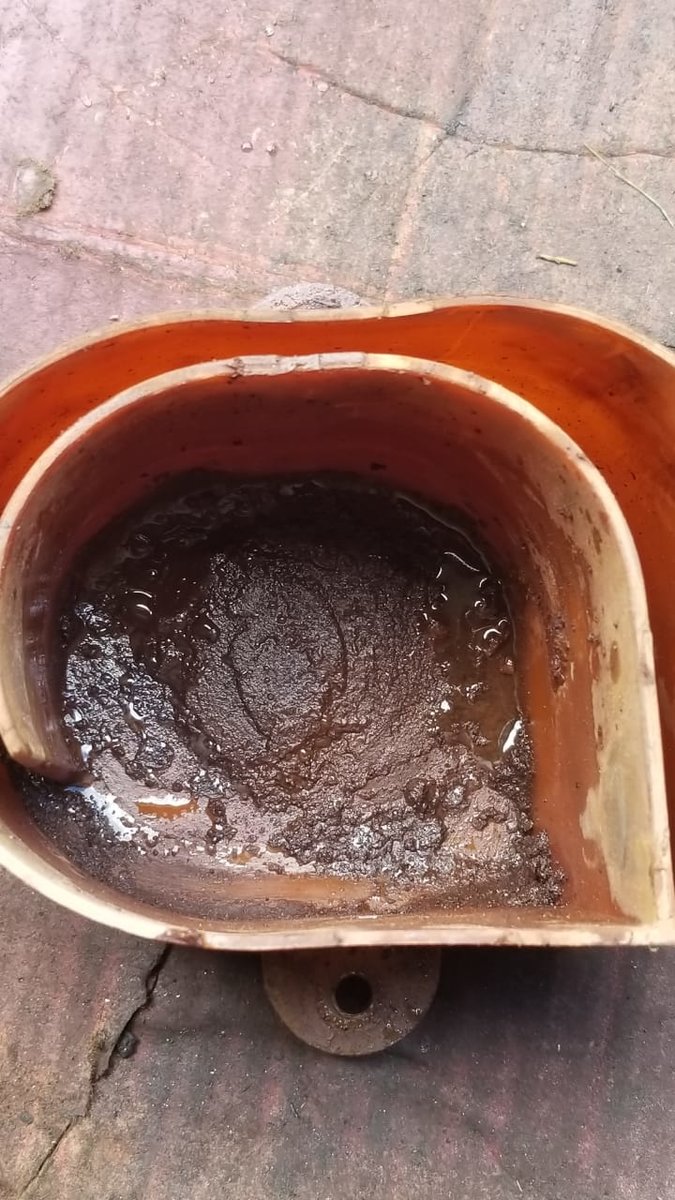
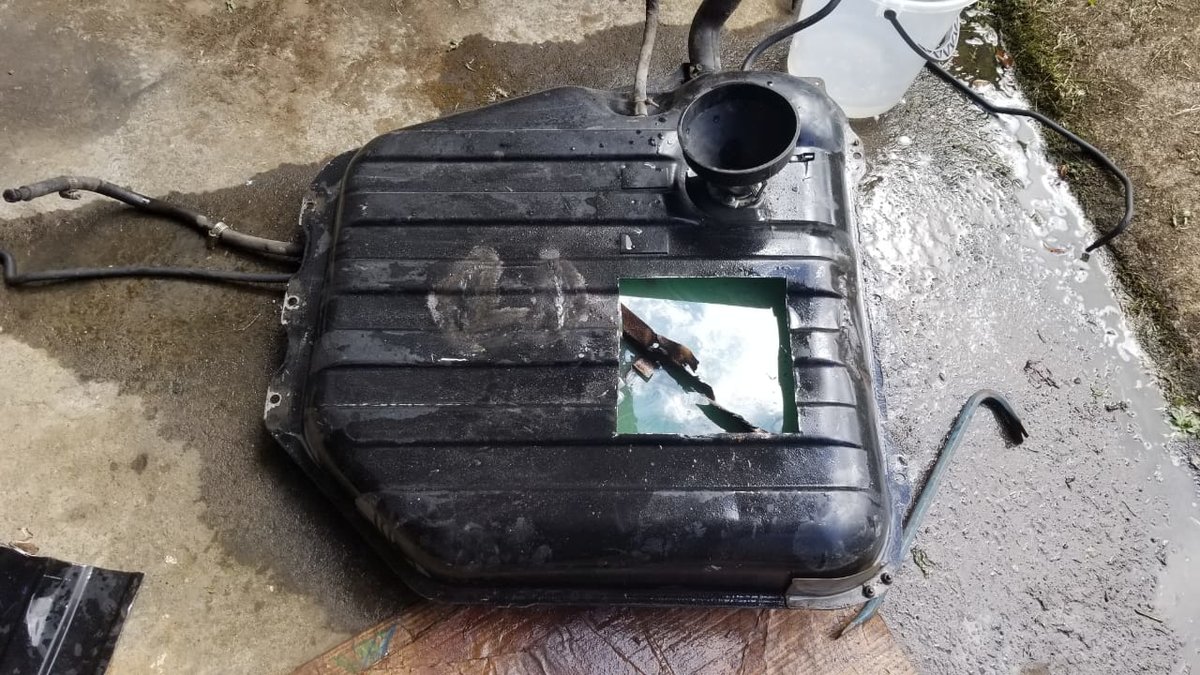
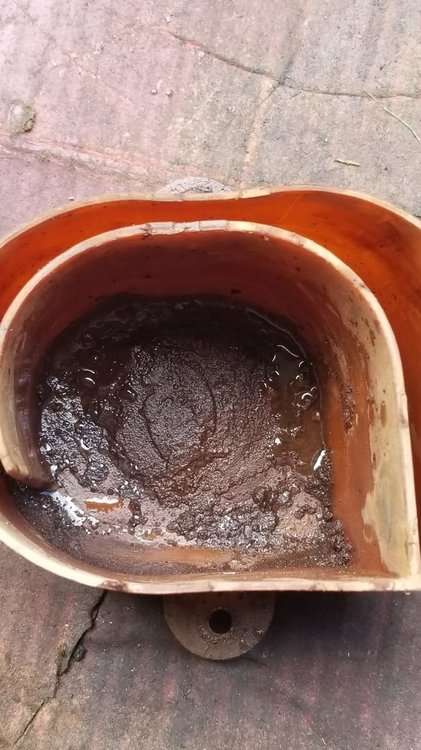
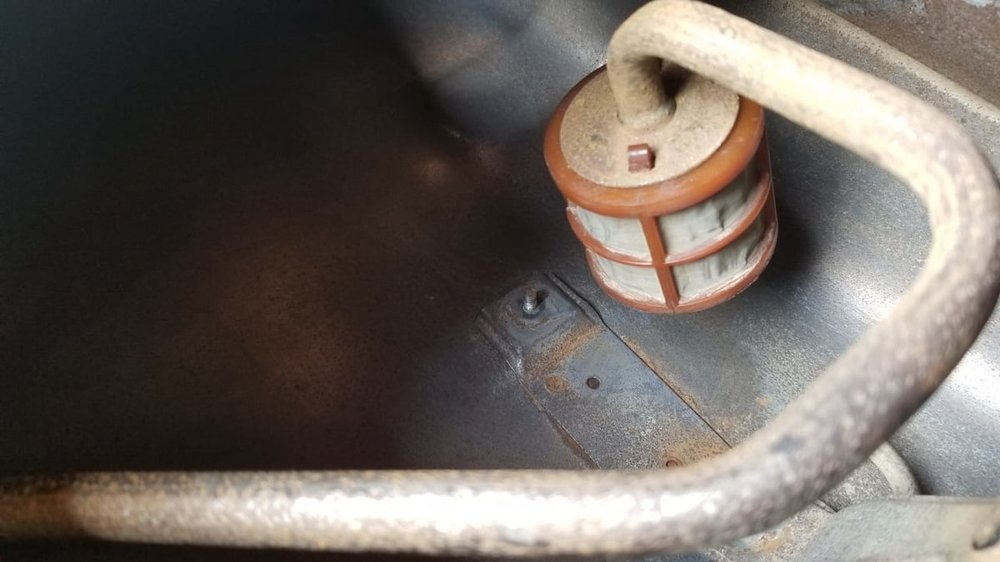
So the tank its on its way to be welded and sealed after the most laborious wash and cleaning I've done to a tank. 5 washes actually. I cleaned and reconditioned the inner filter of the suction structure, leaving not even a speck of dirt. The first picture speaks by itself. It was rusty mud in there. The inner filter's metal screen was clogged with super small particles. I have a busy week coming along!
-
Clooged beyond recognition

-
Hahaha the thought is enticing. But I remember seeing how unreliable (to me) the turbo's cooling lines were. It was water cooled and oiled cooled... I don't know.. Plus, it's a "toy turbo" not a pressure boost that'll make me go faster to do some grocery shopping hahaha About the tank.. I'll salvage this one. It suffered being abandoned for who knows how long building up rust and debris. I know I could get a second hand one from the guy at the junkyard.. But no need at this time
-
I'll address this pick up line today once I cut open the tank
-
Top tip @idosubaru! All done. Even the evaporation venting lines from the canister
-
I agree with you! The tank has been sitting filled with soapy water for about 2 hours. I'll cut an opening wide enough to have proper access to this suction structure and ensure no debris or dirt is left inside before putting it back together. In the meantime I painted the rear differential crossmember. Cleaned the differential, checked all fuel lines, brake lines and verify the operation of the two-way valve for the evaporation lines. I'll verify the gear oil level of the differential as well. Later on I'll put body filler on the quarter panel's dent. Next week hopefully I'll get fresh paint and clear coat for the paint job of that dent.
-
I'm not so sure if it is some epoxy.. But I'm planning to add a layer of a "siliconizer" product I have for the underbelly. And.. Yes that's a spot on tank for the XT. Won't be able to spend on a new one, but with this one is ok, I can make it almost as good as new. What's the bed liner product you used? And removing the tank wasn't that bad, but fiddly indeed. I used a jack to hold it in place then my dad lowered it while I held it. Eventually it came out. There wasn't much fuel in it so it wasn't that hard to handle
-
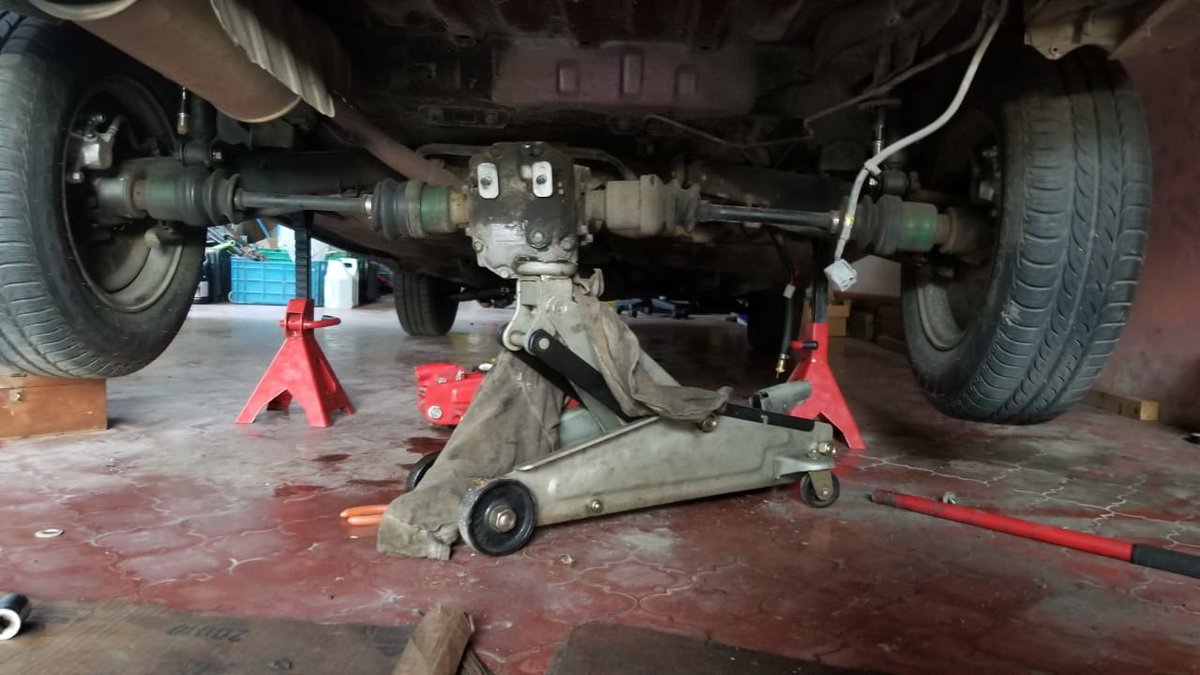
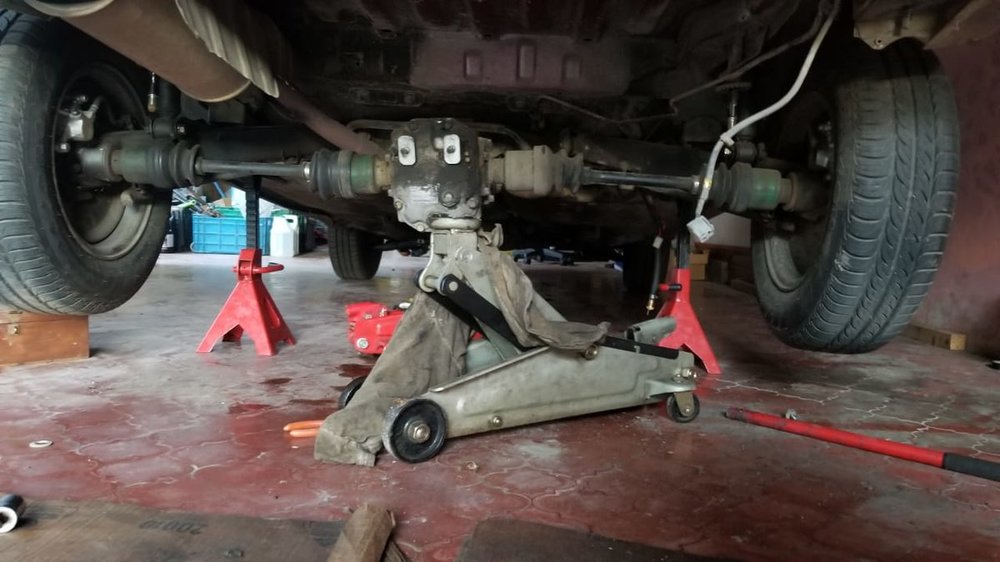
Oh and @idosubaru removing the fuel tank was not a task for the faint hearted. But not that bad actually, at the end I asked my dad for help in guiding it out. I needed to remove the rear differential assembly (like a crossmember bar that holds the rear differential) quite a bunch of hoses and it was out.
-
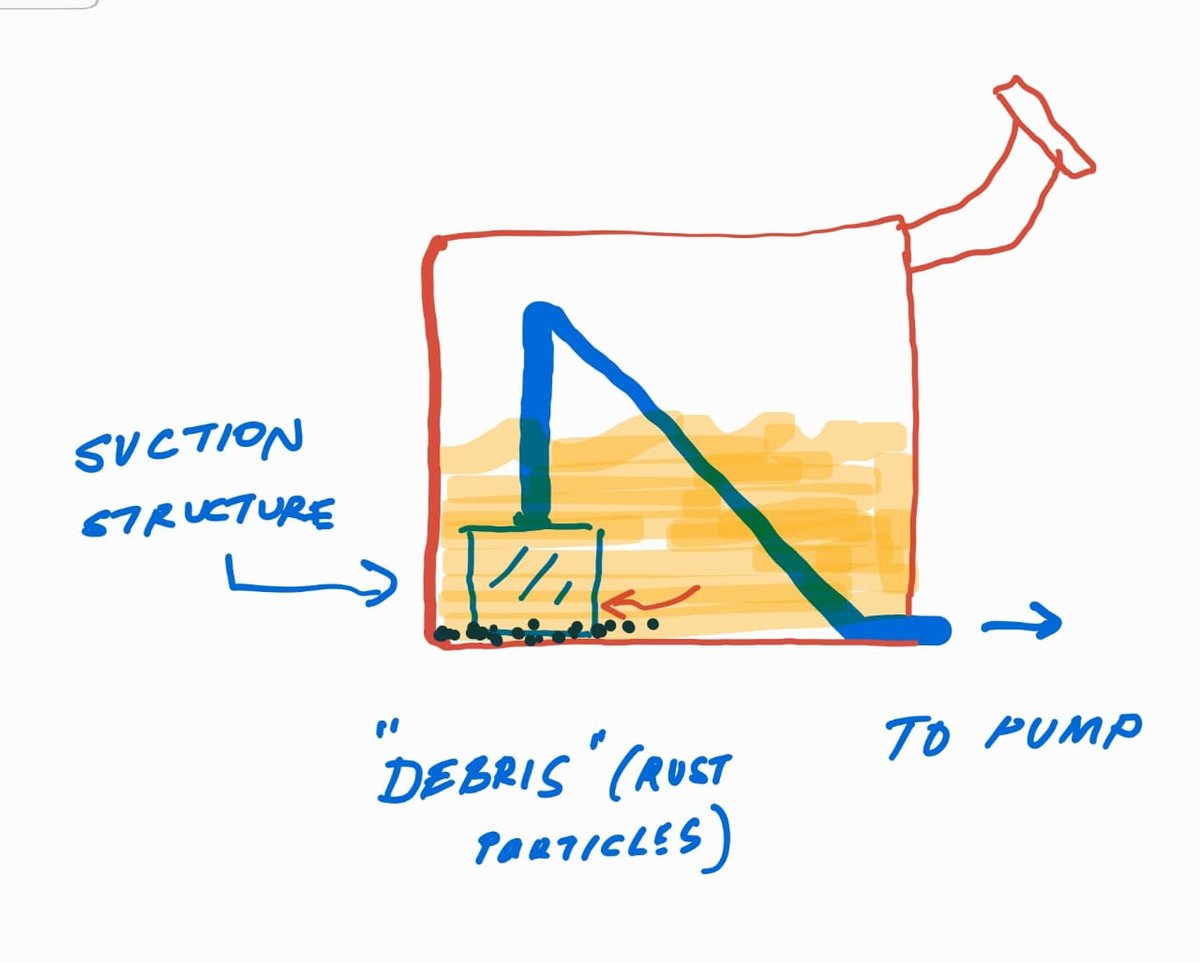
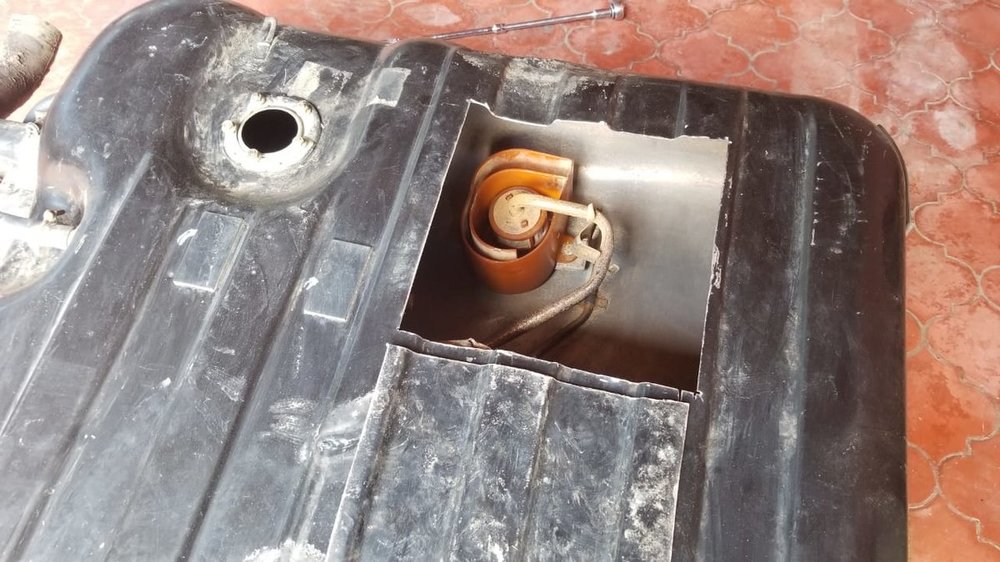
Oh dear this IS some investigative work! I confess I love forensic files. There is always some clue somewhere, and many times the most likely suspect is the actual killer So, I think the issue with the tank comes from the malfunctioning TURBO, it was toasted (back in 2015 or 2014 when I got the car) because of that and the UBER complicated amount of systems of this type of car, any Car technician working on it would never figure out.. anything in fact. All peripheral sensors were broken (coolant thermosensor, knock sensor, thermo switch, O2) As per the ECU being burnt, my thoughts are with a short circuit, and most probably the harnesses of the injectors. One of them smoked badly at one point and in the end I remade all 4 injector harnesses (and a second burnt computer) That wire of the pump (the shielded wire) was tampered with, here my dad gave me his 2 cents on that, because he knew about PWM, signals, noise suppression and more from his telecom times. The person who tampered there did not know about this and thought a ground point was needed for the fuel pump. But instead, it was a clean, unclogged fuel line what was needed. However, in splicing the negative wire and attaching a lead to the chassis, this would "send loose" the signal to chassis rather than the pulse control as ground coming from the ECU. (A potential additional problem to the ECU) The body work, yes, this car was in a colilsion, front end and sides, mainly the LHS rear panel. .. What a true investigative work. And Im not done. Below is a crude representation of what is inside the fuel tank. That blue pipe ends in what I call the suction structure, right at the back of the tank, where all the debris collects especially if the car is in a nose-up attitude. This will be examined thoroughly tomorrow after washing well the tank and cutting an opening safely.

-
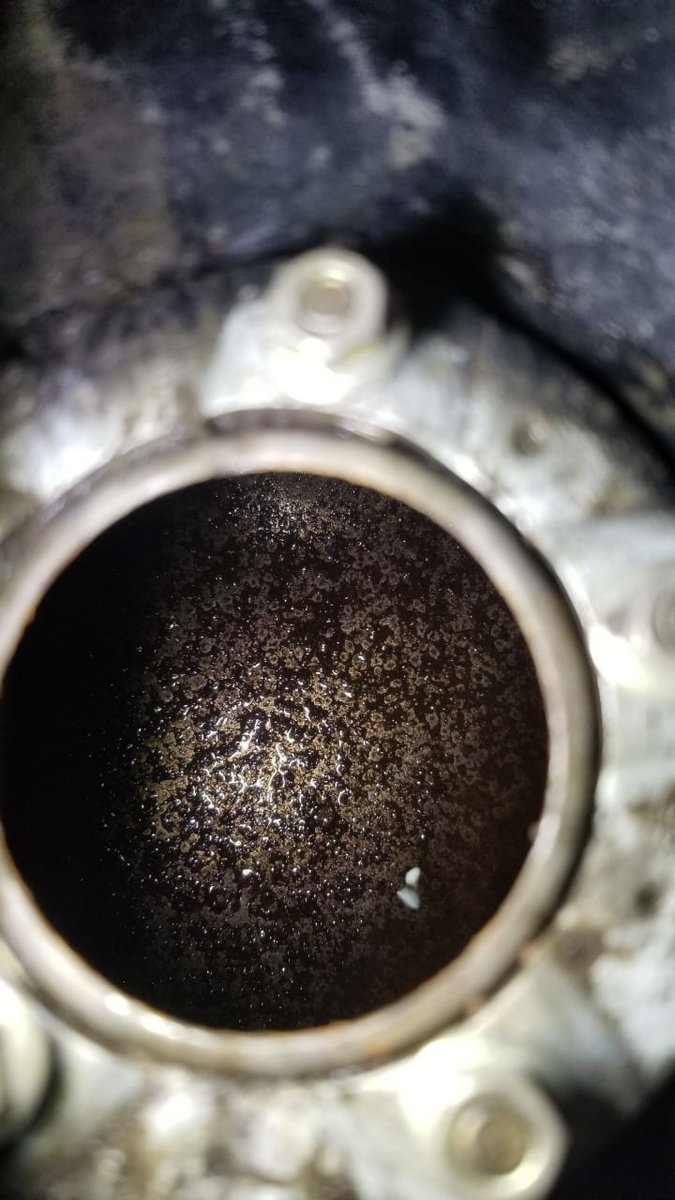
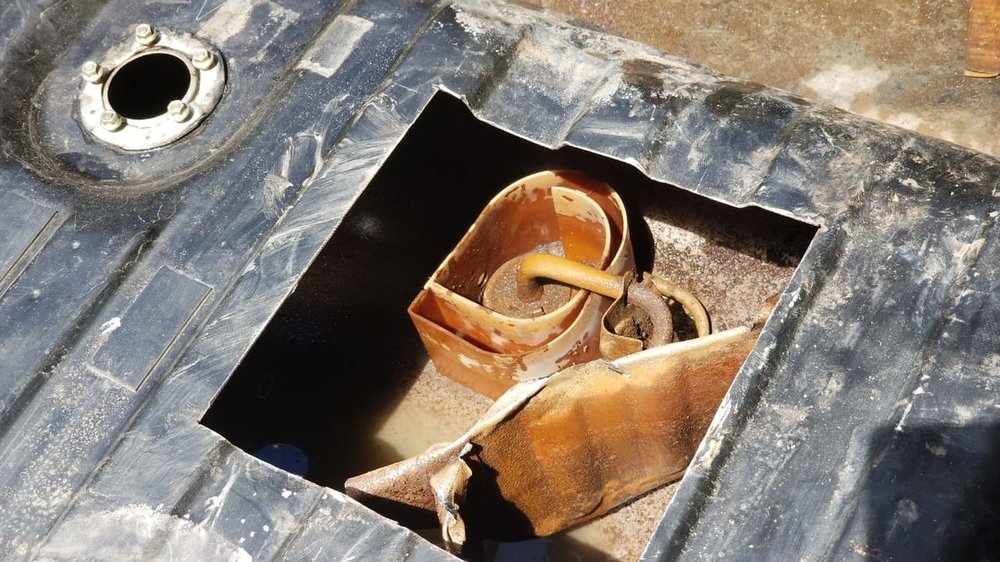
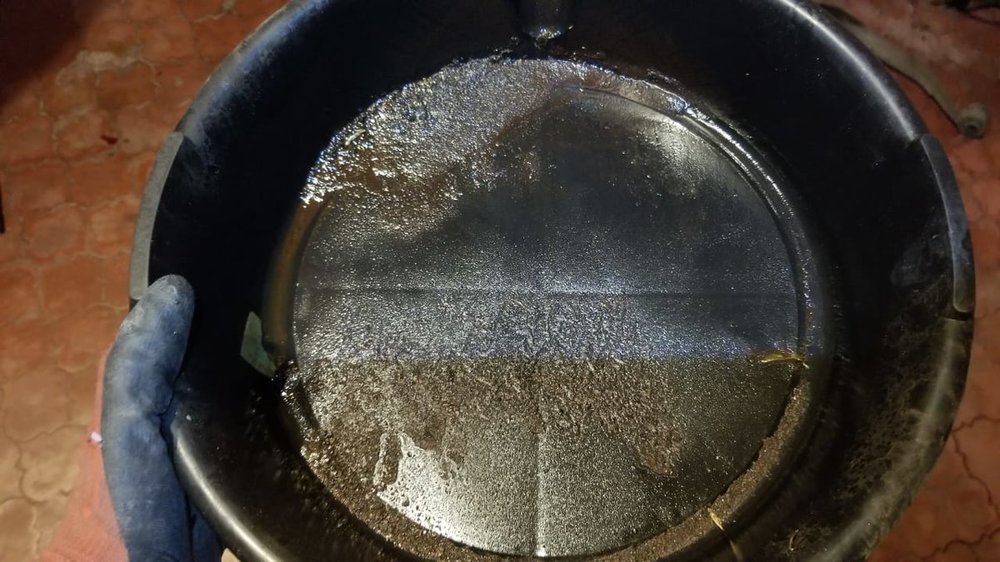
Debris just like ground coffee, like wet sand, when agitating the tank it sounded like sand inside a giant pan! These are chunks of rust!
-
Ha haha, I really dont want to do any more heavy work on this car, I just want to go do the darn groceries with it, or the odd ride anywhere
-
When seeing the amount of debris and dirt inside of this tank, I can see why the fuel pump would struggle. Imagine the Gold Rush era, I was holding a pan with so much dirt (looked like ground coffee) that I only wished it was gold!
-
New development: As a PITA as it is, I removed the fuel tank together with the rear differential assembly. Upon inspection (and plenty of suspicion) I found a lot of debris inside the tank, I also found the tell tale signs of work on the tank before. Someone had already cut the tank to address -most most probably- the same issue. Clogging of the inner filter/siphon assembly. And I mean a lot of debris. Curiously this suction structure is located at the very back of the fuel tank, which in an inclined position will concentrate the last amount of fuel if the tank has little fuel, but also all kinds of grime and debris if they were present. And boy they were. In retrospect.. This car had rode very little, my suspicion is a faulty TURBO and subsequent problems thereafter. As such, the tank had little fuel and the rest evaporated, leaving possibly water and a lot of air, perfect recipe for heavy corrosion. Once the tank was filled again (maybe months after) you have a tank with a lot of debris. To describe it, it looks like ground coffee! So the course of action is the inevitable: I'll wash this tank like there is no tomorrow, I'll fill it with soap and water, and when safe, I'll cut an opening to access that suction stucture and remove all residue, grime, rust and long forgotten thoughts that may still be trapped in there. In the mean time, I'm also addressing a collision dent on the rear quarter panel that was accessible when I removed the back seats and trim panels to address the fuel pump issues. Body filler and fresh paint coming soon. Cannot say I have nailed it, but it sure feels like it. Yesterday the car just stalled and died on my inclined driveway, and it only worked when I levelled it horizontally. Enough of a hint? Back when it worked a bit, it would drive nicely on flat road, but as soon as a steep hill would come up, it'll stall badly halfway and it would not work, I'd wait (like for a miracle ) and it would carry on badly, sputtering and coughing. The clues all point at clogging and heavily reduced fuel availability, despite the fuel pump's attempts to meet the requirements. It would simply suck in more but then get clogged more at the same time. Once again, the suction structure is at the back of the tank, where all the rust and debris collects. Darn! Is that welding joints in there?? This is some debris inside! And the amount I collected on the pan! I

-
Awesome inputs! This fuel pump has a pipe that enters the tank at the lowest point in the front of the tank and goes up to the top of the tank, then goes down to a "suction structure" as I'm calling it. Ill work on opening the tank and clean that real good. As per the shielded wire, thank heavens I read your comment about it, I left it as per factory, where only one side is grounded (via the ECU)
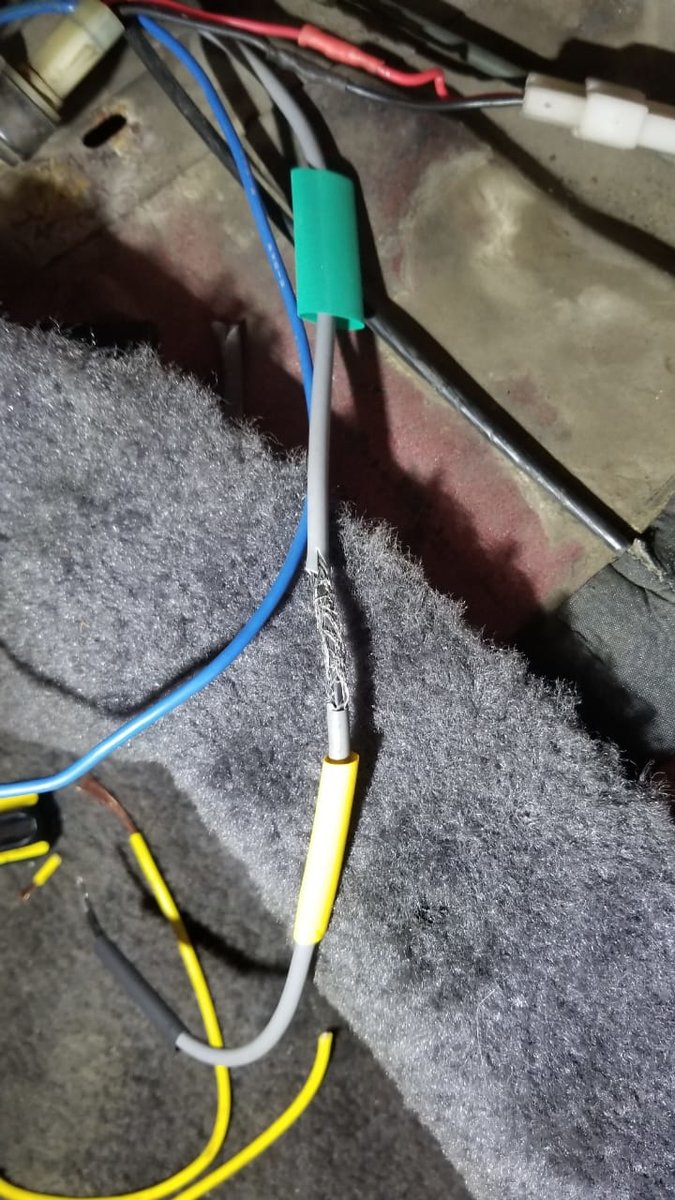
-
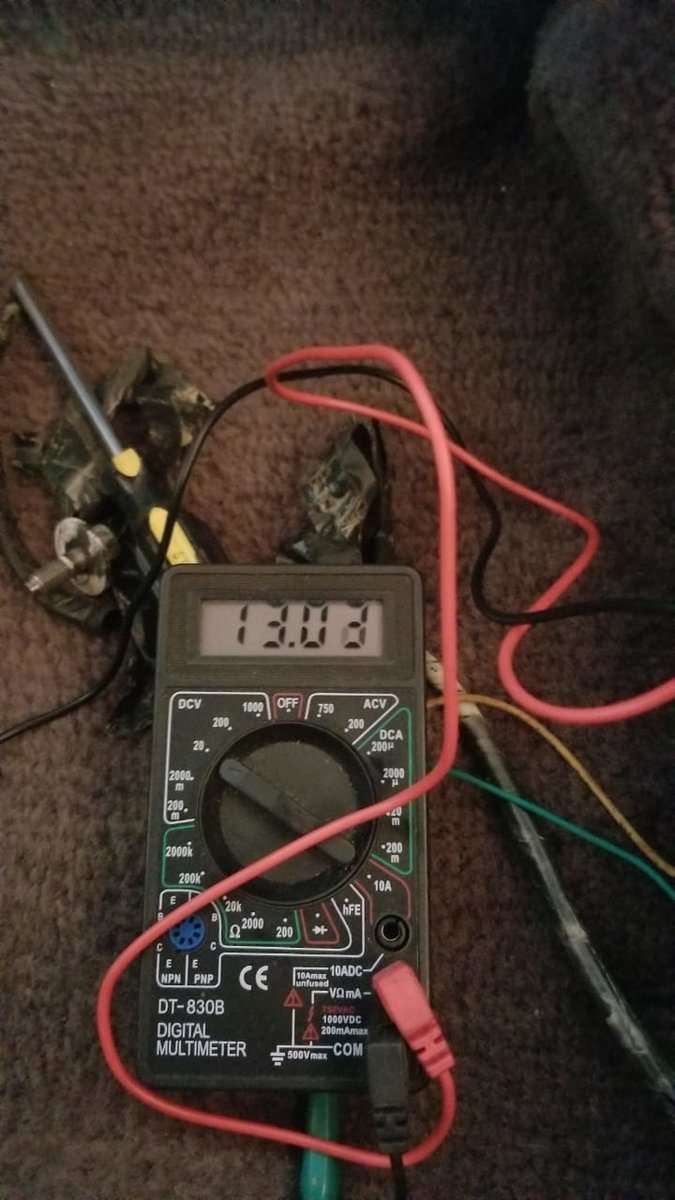
As discovered earlier, the DMM is off by more than a volt, giving me wrong readings. So the fuel pump receives the appropriate voltage, (see the pic) which goes up and down as per rpms and battery load..But it is in fact appropriate voltage, the shielded wire's function (the other pic) must be to act as a sheath that suppresses any noise along the wire loom from the ECU to very near the pump as pointed out by DaveT. (now those wires are properly insulated and protected. Here goes the next line of thought: Fuel tank issues? Remembering the car's behaviour since day one (my day one) it always had that sputtering, I remember replacing the fuel filter for the first time, to discover a lot of debris there. However, the car worked and it has had at least 2 more fuel filters in less than 500 miles of actual running. But yesterday, the car just stalled and died on my driveway, which has an inclination of at least 30 degrees. In the past and even recently anytyme the car is in a nose up attitude it will struggle, sputter and loose performance and driveability.It barely climbs and it is faster to over take it seated on a turtle. The other thing I managed to see was that there was no pressure measured at the regulator, a flat zero, I jumped the test connectors to cycle the fuel pump, it'll work but it would not build pressure. I backed the car up and once it leveled, I fired it and it started like business as usual. On my test drive on a flat road, the car would speed up great, but when I started to go uphill... barely going So then, the question is: Are there any issues affecting the fuel delivery from the tank somehow? What can I test or do as part of a troubleshooting?


-
Has to be a tiny subsystem to protect against noise, but not to be connected to the negative lead of the pump