


Step-a-toe
-
Posts
597 -
Joined
-
Last visited
-
Days Won
9
Content Type
Profiles
Forums
Gallery
Store
Posts posted by Step-a-toe
-
-
On 10/18/2021 at 9:41 AM, GeneralDisorder said:
OLD.
These days you just get a LINK Monsoon. The Nissan 360 optical trigger pattern works with the EA82 optical distributor - no need for any of that trigger wheel foolishness. LINK is out of New Zealand - should be pretty easy for you to find a distributor.
https://dealers.linkecu.com/G4X-MonsoonX-ECU-V3
GD
Bit late for that now, as I am too far into this old path. I like the idea of crank fire triggering, avoiding signal coming from the other end of a timing belt, and the limp mode of the EDIS4. I have a couple of EDIS4 modules, cost me nothing at the start
")
-
On 10/17/2021 at 6:13 PM, Turbone said:
I can contact oddcomp if you wish, he might make a appearance here if you have some questions
That would be great if you can get him in here from time to time as I go about this. Pics and maybe some timing map figures if he still has them and a continuation of how it went
-
I disconnected mine totally, electrically and air wise from intake system. Takes a bit more effort to warm up. Might be hard to get a wrecker interested in parting with such a small value item
-
talk about stirring up an ancient thread ...
One is about to embark on this .....just a little closer
Does anyone know if some of the originals are around ? Oddcomp ? etc ?
I have got a trigger wheel from the UK. The one very close to the same diameter of the EA82 crank pulley at about 130mm, in pilot hole form, not the ring gear, in order to turn out an ID to suit, turning it into a custom size ring gear. At 130 it will clear the water pump pulley. I was looking at 145mm OD ring gear style for its ID but this would mean cutting a water pump pulley down to just be the front pulley. Will be planning to use a twin pulley alternator pulley to use the front pulley for belt duties
I was initially measuring up the 2V pulley from Series 1 turbo , at the outer pulley ring sitting on the rubber , but considering these things can budge and come loose, the rear V will need to be machined down past the rubber and fix the trigger wheel to solid in an interference press on sort of fit, to be welded and balanced when in correct position
-
just buy it before someone else does first !
rust can be found poking around between windscreen and wipers, under floor around what looks like incorporated chassis rails near gearbox.
-
There is a measure, and a point to do it, to test if you are getting enough pull. The clutch fork, possibly black in an 87, often blue in earlier models. At about here is where you measure. From memory EA81 4 speed is ¬ 15mm.....
EA82 is 25mm, so when i fitted EA82 in my EA81 body you can imagine the stuffing around I got up to to sort the 15 mm to 25mm to make it shift properly - installed EA82 clutch pedal to match the EA82 cable and drivetrain.
Also check to ensure the bracket on engine side of firewall is not detaching from firewall. Can also get fatigue flex in the pedal box that takes up cable pull length
-
some later models Brumby in Oz came out with one sided key for ignition, double for doors - yuck !
-
only thin metal in them, that will bend when you don't want it to ! It should just need an initial shock factor to start it off. And thinking how in PDR the guys sometimes heat the panels a little, to help their dent tools then warm up the metal from lots of little flexes, too get the molecules moving - chuck some heat in there before you pull ....
-
Great work Moosens, thank you, and I copy on that supercession, or just for the later models was wondering if they were the same part number for the rear inner and front LCA inner (as if there was an outer on the front ! sheesh ! )
Here in Australia we have peeps using the after market poly bush kits to do the inner rear, hitting a few speed bumps as one company name listed a kit that fits two generations EA81 and EA82, but actual product packaging says L Series - bushes, crush tubes, bolt holes all the beefed up L Series EA82 sizes.
Those who use the front control arm kits have not mentioned any little mods to do to make fit Silent ones aren't they ?!
Original crush tube length 55.98 mm . Assemble a front kit, the bushes don't butt up internally by about 3mm, and finished bush length ends up 58.80mm.
58.80 mm aint gonna fit easily into 55.98 mm. I also want to see the crush tube longer than the bush total.
The poly bush halves have a flange length of 4-5mm . Another brand name , now owned by same company as the other, does flange lengths ( I would call it a width too myself ) down to as small as 2.00 mm so this is the path I am going to attempt to go down. A jig to hold the bush closer to the blade than my fingers dare go and put them through the timber cutting drop saw
-
Thanks. I used the same method for removing the old bush - the same method I have always had to resort to, that being - remove rubber surrounding crush tube, remove crush tube then fit hacksaw blade and cut through the original bush outer shell, then belt it out starting with a chisel to loosen things up. This time, I used a recipro saw, saving sweat and bent what was a new blade. I then trimmed up the cut line of the old outer shell, closed it up in a vice and welded it up in order to make a press tool to remove the moustache bar bushes , in a vice. Vice power even in my big Russian vice was not enough. They will go out same hacksaw cut method I think
-
 1
1
-
-
When those who hold part cats for the EA81 body have time. I am curious if the front lower control arm bush part number is the same for the rear semi-trailing arm bush - the inner arm, inner, forward most bush, where it bolts to the tubular cross member - specifically say 1984 4x4......thanks. If anyone has an e-copy of the parts manual, I would love a copy
-
10 hours ago, el_freddo said:
That or you’re wanting to show your money bags... er, note

Cheers
Bennie
Actually, I went digging for coins, could find nothing but my fuel money. Pretty rare to get any change out of a fifty anymore, sadly
-
Used a spring clamp. About the safest I have ever felt using these things!
That is install grease, not stress fractures

-
2
-
 1
1
-
-
11 hours ago, el_freddo said:
What’s the pineapple for Steppy??
hah ! Partly to indicate origin of photo, that it is not lifted from elsewhere on the 'net, partly to indicate a RHD component warning and a scaling for screw head size and a little to show off our polymer ! Gees, 33 years old now , the plastic money, started off with a mostly uncirculated $10
-
 1
1
-
-
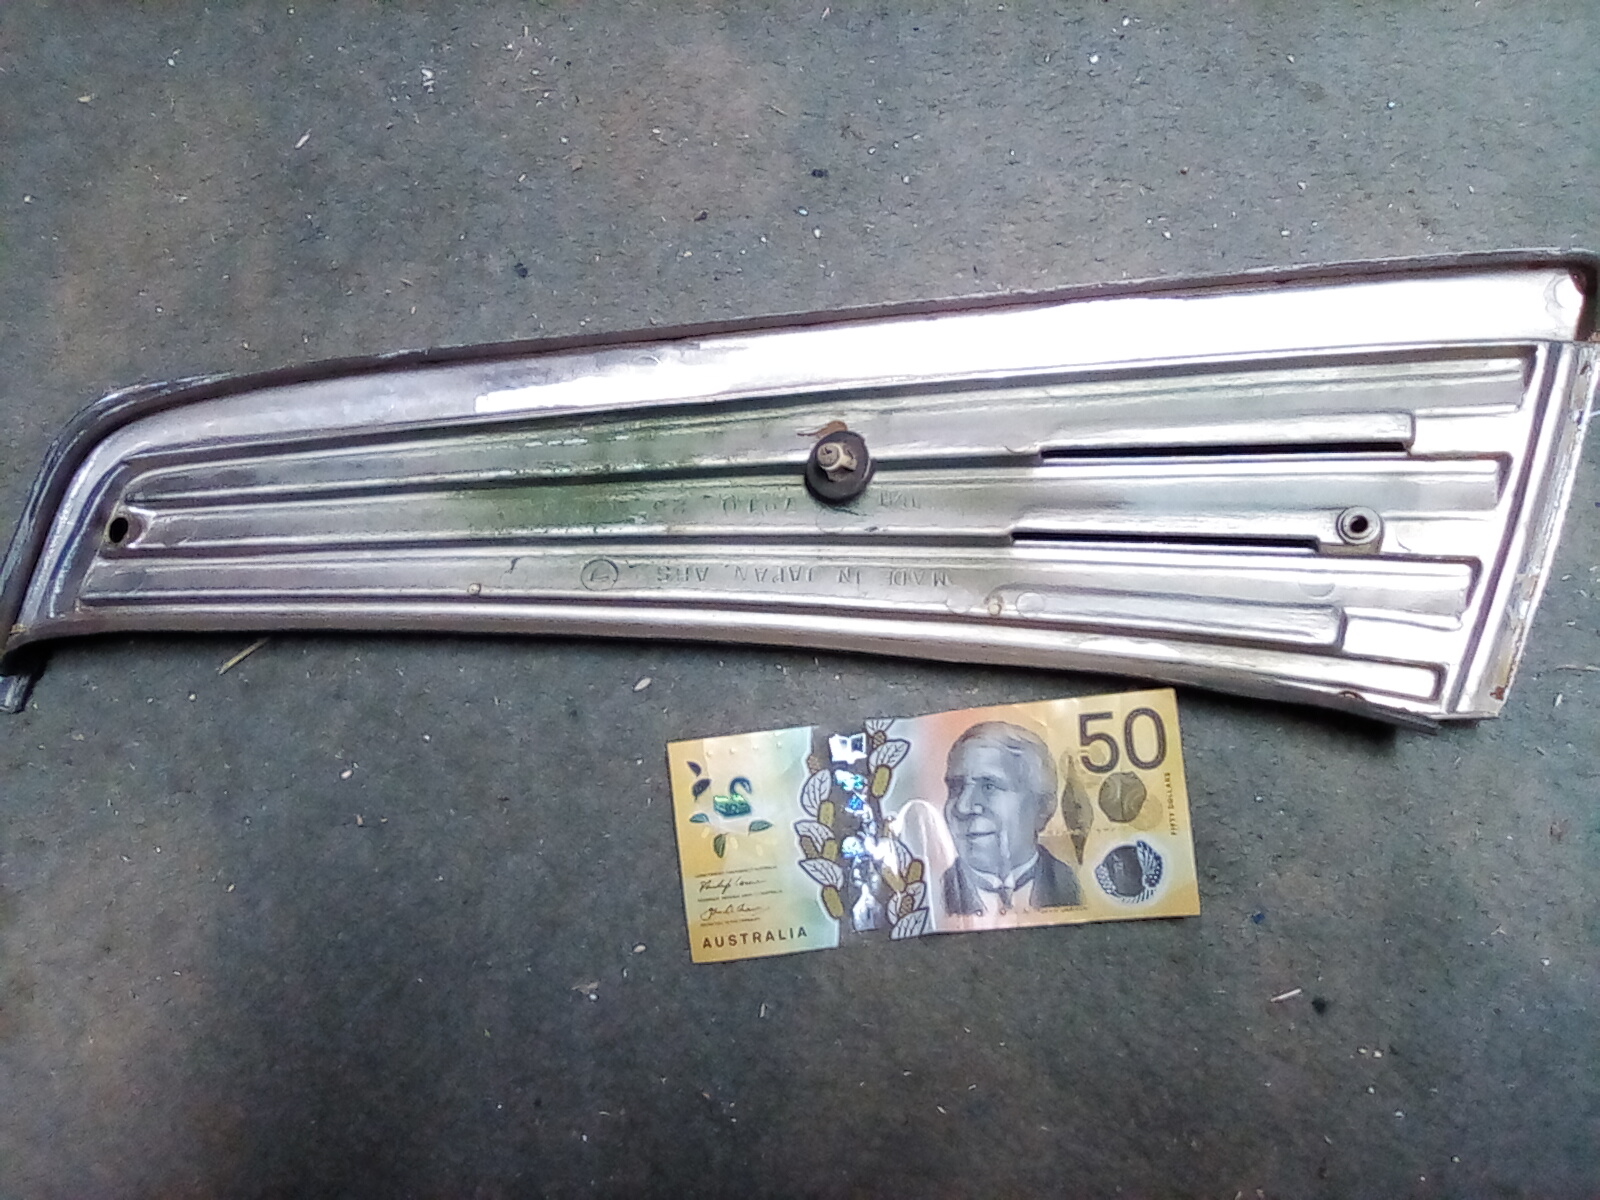
It is not a fake vent either, as it is the back end of subtle air flow.
The third screw...
-
I see what you see. Oh, Moosens, thanks, no E-form - yet , hee hee . I just took my two outer screws out to have a squiz. Yep, something rather centrally is retaining this, and it looks like the screw boss for a screw from the other side. If you are not in a rush, I can have a quick look for my spare..if I can, to pic its other side
-
crash test results for this era would not do well in todays tests on these. It may be something you have to wait until you leave the nest, to own. You are possibly asking people in here similar age to your parents, or older, and may hold their views on this safety thing. I would allow you to have it in the guise that it is a starting point to learn about a reasonably basic car for yu to pull apart and back together, drive up and down the driveway, and if a manual, that is the best place to learn the first two gears ! Then you might let your parents take it for drive to assess it's safety , maybe take it through driver safety courses with them and get some better qualified instructor comment on it and yourself at the wheel...
-
I really do not recall screws from the inside securing this vent... Moosens, do you have the parts catalogue in electronic form ? To share ? I imagine someone must have it in emailable size like 40,000kb EA82 one floating about. Absolutely awesome to refer to a parts cat diagram !
-
also look at the rear inner arm and rear outer arm. they each have a bush. four bushes in total, same part number for all four. They can flog out, sag etc.
-
I have removed these in the past, twice, left and right. I see the two screws, but also see that the chrome surround trim is also integral. Like you, I sort of think it should just come off after the two screws, unless someone bonded with some gooey stuff? Not a heat gun, but maybe hair dryer to warm things up a bit. From the look of the snow, maybe iced together ?
-
Decades long trusted Subaru dealer parts manager said no hydraulic EA81 sold by them in Australia, yet plenty of import engines makes it possible. I had one known as an API import. From memory the push rods are all mild steel tube, not alloy of our regular solid littered engines
-
sitting in a storage unit for 20 years can mean corrosion can rot your head gasket - it happened to me over 3 years, as I had not drained all coolant out. I do know of another that got a decent service prior to storing for 20 years. Went like a dream once running. Watch for rotten throttle body coolant port pipes, turbo coolant pipe from head to turbo, and its front and rear banjo's. Welch freeze plugs also go in the manifold. Spend more time than EJ admirers deem logical and you should have a lot of fun. The freeze plugs in head may have gone rather than HG anyway. The inlet manifolds have 12 and maybe 14 mm freeze plugs that rot to nothing also
-
1
-
-
I helped get one running after 20 years not on the road. It changed hands three times in the last five years of that 20. The buyer bought a job lot of three various XTs. The last one got a permit to drive it home, shipping the other two. He called back to say it did not miss a beat in that brave 1200 km trip !
-
First, don't even try to start it on old fuel or you risk following me down that foul mouthed adventure. I hope you can post some photos. Your granny had cool taste in cars !
EA82 cam differences
in Old Gen.: 80's GL/DL/XT/Loyales...
Posted
One way to check what you have physically is remove the rocker covers and look at .. I think it is the rings, by number, or their position along the cam itself. Compare left to right.
Hang, on, oddly enough, am sitting in a carpark and have my manual with me !! About the middle of the cam shaft are Identification Marks A and B. I think they shift about between different versions. Never tried mixing left to right , but you can't be the first. I run matched turbo cams in a non turbo. Not sure I can feel a difference. Early and late efi cams differed from each other. Carb differes from them