May 23, 20205 yr Greetings from the Boston area, I've used USMB for many years now but haven't started a thread for my car yet. Been on Nasioc and had a thread on New England Subaru Forums for this car 5+ years ago, but went off to college and couldn't bring the car with me, so it was left in the salt of VT... Found a nardi sti wheel on ebay, too, best $90 I've ever spent, what a work of art... It started life with the pre-face hood, grill, and bumper, but now runs the 97+ hood/ bumper/ grill. It also started life an automatic but the neutral drops by high school me took care of the torque converter. Sourced a fwd 5 speed out of a legacy and collected the other parts for the swap (probably won't do this swap ever again purely due to the sweaty struggle that is swapping pedal assemblies) but oh my gawd did it change the car. At the time I also threw on fresh stainless UEL's from ebay and the car went from absolute grandma snail to reasonably exciting slug that made great noises. It remained in my parents driveway up until last spring when I decided to attempt a rescue. All in all this little beast has been through a lot, but I plan to put it through more; the basic goal is to go lightweight, better brakes (jdm 4/2's with whole rear assemblies and ebrake cables, etc), simple stance set up (currently on KYB GR2's/stock srpings + just picked up LGT snowflakes 16x6.5 with 205), and na high compression set up (I helped build an ej25/ej18 frankenmotor back in high school and the NA torque from that motor was intoxicating.) Current set up: EJ18 Drilled airbox Stainless UEL headers, cat delete, 2 inch back (needs 2.5) Legacy FWD 5 speed with short shift mod (my friend did this by changing one of the shifter arms in the linkage- I'll try to get more info from him and some pics but I think its a widely known mod) KYB GR2's all around Hand R sport springs LGT Snowflakes Factory FSB no RSB (that needs to change, looking into tribeca 24mm) Nardi STI steering wheel Forrester interior matched seats, surprisingly high bolstered and probably going to keep them Stripped interior (everything except driver seat, headliner, and radio) The car weighed 2780 on a recycling scale before I stripped it, which was surprising but I guess it doesn't have any of the weight from center dif, driveshaft, rear dif, rear axels and all that other stuff I have't had to mess with lol. I'll go get pictures on the same scale, but post-stripping weight was a delectable 2460! It actually moves now too, still not anywhere near quick, but impressively better. I have some parts on the way and plan on getting my baby back on the road in the next couple weeks as my commuter tdi Jetta was hit and totaled. Figure I can put a small portion of the money they gave me for it into parts to get the suby on the road again and save the rest, so stayed tuned, its probably gonna get hectic... parts I have / have on the way for her: JDM WRX 4/2 pots with knuckles (and hopefully everything else I need to make the discs work in the rear, probably going to be some interesting DIY to make some form of outter axel stub hold the hub on) LGT 16x6.5 (still need to choose a tire) 1 inch spacers (to clear 4/2 pots) New Kyb GR2 H and R sport or Eibach's, still deciding on this one, but definitely needed, my front right spring is actually broken Tribeca 24mm RSB And Paint! I've been doing some rust repairs and practicing my thin sheet welding on the old girl so I'll throw up some shots of that. Really this car is a practice bed for me to learn more and continue to experiment with the incredible GC chasis as well as the FWD variant in general, but not too much... I plan on DD'ing it within the next 3 weeks into the foreseeable future so upgrades will be strategic, reasonable, and probably weekend-based. Stay tuned! Edited June 4, 20205 yr by zf2 Update to current set up
May 23, 20205 yr Author Vermont likes it's salt, and brine... really wonderful...Rebuilt with a BMW arch generously donated to me from the body shop next door. I rebuilt the other rear arch too but have no pics...The drivers side rear must have had water pooling in the compartment next to the trunk because the passenger side rear was fairly clean...Just decided to hack off the lower bit and box it in, with new drain holes at low cornerA few more bad spots to come, a bunch of hours grinding/sanding (all I have is time,) paint, a nice drenching of POR15 and I'm hoping I don't have to touch it again for a while. Surprisingly the classic New England patches (where the bumper cover meets metal) are pretty clean.
May 23, 20205 yr Author Attempting to drop the entire rear suspension by disconnecting struts and dropping the subframe: dropped the exhaust and did some other miscellaneous things.I have all the bolts on the rear subframe loose, brake lines disconnected, rear strut top nuts off, but was stopped by the salt monster at the trailing arm bolts. Let them soak in PB for the day and tried with all the PSI's from the air gun but no sauce. Even tried a 6 point with a breaker bar resting on a jack and another on retaining nut, jacking the 6 point lefty-loosey, no sauce. Probably going to cut or torch them out on Monday and get new hardware, I have trailing arms coming with the rear brakes so I'm not too worried if I trash them. Look at that monster truck height! The automatic springs raised the car a 1/2 inch when I swapped in the lighter 5 speed.Brake parts and pads should be in Monday, trailing arm bushings and hardware, new stainless headers (pretty rotted) and gaskets , but still trying to work with KYB and find the right spring for my set up. Sounds like there might be another run of P11L's from 2pot on NASIOC but not sure I wanna spend 300+ for springs. Any spring suggestions for a 1 inch drop and slightly more aggressive spring rate are greatly appreciated!
May 23, 20205 yr Author I managed to pull the whole rear suspension today, had to grind the trailing arms bolts at the body because they just weren't havin' it. I made a template and drilled 3, 2 cm holes (just large enough to fit a 19 mm) above each bolt holding the trailing arm brackets to the body so I could access the "welded" nuts because they broke off in the frame. I have them soaking in the good stuff now, but if they don't break loose on Wednesday, out comes the grinder and I'll at least be able to pull out the scraps and feed fresh new hardware with access holes from the top. Used a broken dolly that I could slide under the rear with a bottle jack between its rails and just lowered the whole thing and rotated it out from under. Now all I need is a FWD Rear subframe because mine is just too crusty to mess with. I know the AWD one could work but it definitely weighs more than the skinny rail I had in it. Only place I can find it is Subaru and they want like $400 for it, lol. I guess I'll just have to keep searching marketplace, car~part, or post a WTB, there must be someone near with a left-over from an AWD swap... Tank and hardlines out Replacements on the way while I brush, prep, and POR15 everything underneath. Also decided to give my rear subframe a shot, just nipped the old lateral link bolts and went to town... Quick sandblast, cut off the weird bracket on the back that literally does nothing, a couple coats of primer and more POR Filler neck too Gots me a donor car with a 251 that I'll use for the frankenmotor eventually. Exhaust, spacers and some other bits showed up today. More to come next week.
May 25, 20205 yr Author Thanks! Appreciate it. I'm going to daily drive it once I have the suspension and fuel lines finished, then I'll probably look into some autocross here on the east coast. I'm not going to cage it or anything, I'd like to see how light I can keep it while staying NA and hopefully be competitive in H or G street class. I truly believe, with the right set up, the FWD version with its inherent low weight, some things moved around, and a good set of tires can be competitive against the AWD. It's just going to take time to figure out the settings and find the right feedback to counter any additional understeer due to that lower weight in the rear and balance shift forward. Also may need to find a FWD LSD so I can actually utilize the 2 wheels, but that's probably going to break the old legacy trans so maybe further down the line... I've been researching and reading through FWD handling threads to find some good starting points, but I'm really going to be figuring it out as I go, stay tuned!
May 29, 20205 yr Author So I pulled an all nighter last night finishing wire wheeling, cleaning, undercoating the rear, gas tank area, and gas tank today, and then waited for parts to show up. Finally got the stuff, but I ordered the wrong fuel hard lines and need to sort that our tomorrow. Did get the proper brake lines and suspension bolts, though, so should be able to start getting those in while I wait for more fuel lines tomorrow. This all I got for now... Sub frame POR'd and ready I'll get some more shots tomorrow. If I get the right lines, I might be able to start it and maybe roll it. I unbolted the old rear struts from the hubs to see how they differ with my new knuckle set up. Wrecked a 19mm with the 3 speed Ryobi doing so~ Looks like the new knuckles have the axel behind the strut mount by an inch or so, compared to the FWD rear hubs that mount the strut directly above axel, but I haven't tried fitting both yet so we'll see tomorrow. Lots of things happen tomorrow...
June 3, 20205 yr Author Made a lot of progress in the past 3 days, cleaned and por~15 everything, got exhaust and inevitably spent an hour heating and banging until it fit. I literally bought the cheapest one I could find, but it fits not and is painted with some vmt. Got the rear hard lines in and fit the gas tank straps to receive the tank, freshly brushed and por15'd with clean rubber, but still waiting on 2 of the 3 gas lines running the top of the tank. Cleaned up the LGT wheels, which are now awaiting paint after I fit tires. I'm just going to assume the tire shop will scuff them and paint them after I also wanted to use the alignment bolts for the rear FWD subframe/suspension so I lathed and pressed some poly bushings that fit the FWD alignment bolt, into the STI lat links. Definitely an experiment, but I took 2 tries when the first pressed into the link too easily, made the second super snug to the lat link ID which took much more force to set with the press. We'll see how they stiffen things, probably will just go to Whiteline if bad things happen... Lastly I tried mocking up my strut to knuckle situation with the trailing arm bracket bolted in and it doesn't look good... *blue knuckle, *white strut: I've read the FWD struts should bolt up to AWD knuckles but these are 2+ inches apart at vertical so I was a bit stumped; and after 3 days straight of brushing, undercoating, swearing at, and sweating on this disgrace to Subarus everywhere, I gave in and got a beer. Let me know if I need AWD top hats, AWD struts, both, or something more expensive...
June 5, 20205 yr Author Its alive! Well it runs at least, after replacing the gas vent lines on top of the tank, reinstalling all hoses and throwing a new battery in it. I also only have the header and cat on it so it won't throw any codes and so far so good, gloriously loud though. Still trying to figure out my rear strut issue, I found that by using the opposite strut, the angle is perfect and the knuckle aligns, which seems strange. Did they really just make the top hat reverse-able? And if so will there be problems with me using them like that? Probably going to bolt everything in to get an idea for my tire fitment. H & R springs and set of General Tire G-Max AS05's arrived today, so Ill get those mounted up asap; I stepped the sidewall down to 50 to see how much it shifts the handling from the 205/55 and I also got a good deal from tire rack so we'll see how they do.
June 11, 20205 yr Author Brake lines are in, found some rubber ones that fit the JDM 4/2's off a 2017 or something impreza in a pull it yard, idk they fit and hold pressure so I'll keep checking them and we'll see how they do. Rear is all in and for anyone wondering, you can run GC8 STI rear suspension on the FWD crossmember, however the FWD lateral link bolt is 1 inch shorter so it requires a bit of a spacer, or you tighten it up and probably wear the front lateral link bushing far quicker than the rear; I chose to run a small spacer for now so the links aren't exactly parallel but I was able to align it just fine and torque everything to spec, after some short drives and more aligning, it tracks quite straight! I need to adjust the front toe but I'm going to wait until I can access a lift and a rear alignment tool and also replace my ball joints and sway bushings. Way out to start Right on, at least as on as I'm going to get it string aligning on dirt lol Cleaned up some 25rs mats As it sits, with my thumb, sorry Car feels good! I also deleted the AC and it definitely livened it up. Tires tomorrow and then paint for the wheels. Edited June 11, 20205 yr by zf2
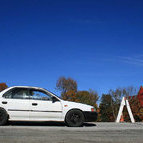
June 21, 20205 yr Author Pulled some trim pieces, gas cap latch, and other stuff that stripped while disassembling, and found a first gen bumper cover that I'm going to pick up tomorrow. I refinished the wheels, gave them a clear coat and the car feels great on the new tires, has a nice stance as well. And I made some arm bars with the Forrester door cards for now; super lightweight, but something to rest your arm on. They fit, but not perfectly... More to come, needs a bit of a drop (still need to replace the KYB's so I'm waiting to swap the springs when I do that) and head lights and a pre 96 grill too...
June 25, 20205 yr Author Swapped out my bumper with a pre facelift one, pulled the AC condenser and some other AC steel lines, and reinstalled my top windshield seals with some new sealant. Still looking for a pre facelift grill and headlights, though, I'll be in midcoast ME for the next couple weeks so let me know if you know any oldies with lights and grills lying around. About to get jiggy with another garden lip spoiler, too. This thing's like 8 different colors and about 21 different cars so I just don't care about the paint anymore. It'll have primer, base, and clear everywhere, but if it's different color, idc it's probably staying. I probably should rename the thread to "Bastard FWD multicolored subaru w/o an interior or AC"
June 29, 20205 yr Author Thanks! Ironically I just dove into some body work and prep for a little dupli~color glacier white color match, so I'll throw up some shots tomorrow. I also have a bunch of cans of a 2 part activated clear so we'll see how that goes! It's not going to be a professional job, or even good, but at least the bad bits will be close to original color. I'm also looking around for some 25d red top injectors, still need to order a lightweight flywheel, choose a clutch, and I few other parts and pieces before I pull the Forester motor. It feels good now with maaybe 90hp- my buddy's '99 v70 can just barely walk away at 60 mph, but if it had ~160 hp, it would be great. I'll re seal my 1.8 when I pull it and just have it as back up if my frankenmotor blows out a head gasket. Plan: ej251 block out the Forester My ej18 stuff (intake mani, wiring, ecu, the 1.8 cam pulleys, crank gear, sensors, timing belt and the UEL header I"m running now) I'm going to do little work on the heads because I'm curious. I know the 1.8 heads fall on their face a little in higher RPM, but I'm planning on building this for lower end street driving where the torque should be fun. ej25d red tops to push a little more fuel in and match 1.8 intake ports, maybe a walbro 255 if I can find one cheap. I've also seen people just do factory 1.8 pump and not have much pinging, but we'll see. This combo makes compression that definitely could kill a motor without a knock sensor so I'm going to attempt some preventative mods that I hope will help. I can get e85 near where I live so I think I'm going to wean it on to the corn juice mixed with 93. Also trying to decide what h gasket I want to use; I've seen sti gasket, ej251 with matched coolant ports, cometic hybrid -- all with great success. I guess as long as its MLS and the coolant ports are matched, they usually work. More to come!
July 7, 20205 yr Author Some primer Moar primer 1st light base coat; duplicolor glacier white Clear came out ok, I used a can clear coat with an activated hardener; could be even better but it got a little wet just a couple minutes too early so its a little froggy on the more horizontal surfaces, but its fitting and looks a hell of a lot better than primer and bare metal. Real backyard DIY job so it could have gone a lot worse... I stripped the roof down to the weird green-gray primer and decided to clear coat it because I like it- I also notched the bumper cover and bumper beam a while ago, but was done so with plans to brace and cut out the spare well for a tunnel and diffuser. The bumper was pretty cracked up through the center where I cut out and for now I've braced it with a piece of aluminum angle that I bracketed to the bumper beam and the hole cut ABS plastic tunnel cover/license plate holder. Bumper beam notched and boxed in, not much lighter than a USDM factory one but works while I look around for a JDM one Links fixed, thanks mike!! Reinstalled all my windshield and roof trim and it actually feels more like a car. Still needs some side trim or similar solutions. I'll upload more on the diffuser setup soon, but so far the place-holder makes no noise at any speed and has held up well over the past 1500 miles. I've already welded up a cross brace for the spare well but haven't gotten the guts to weld it in and cut the well yet/other things were more important in making it road worthy... but someday, maybe soon Edited July 7, 20205 yr by zf2

Please sign in to comment
You will be able to leave a comment after signing in
Sign In Now