mthoodsub
-
Posts
86 -
Joined
-
Last visited
mthoodsub's Achievements
Advanced Member (3/11)
9
Reputation
-
97 Outback Sport Outback Struts King Raised Springs for Forester 1/2" Strut Top spacers in rear 215/75R15 Studless Snows 4.11 swap with VLSD rear Primitive Skidplates Set up for winch receiver front and rear
-
Finally got around to replacing my mis-shapen 1-1/4" trailer hitch frame with a 2" receiver in the bumper. Now I can use my winch cradle front and rear Started by cutting out a hole, just big enough, through all the layers and structures of the bumper to slide the receiver into. Then used 3/16" plate as a spreader across the back of the bumper, was going to use 1/4" but after examining the structure I think 3/16" will be ok With the 3/16" bar I added to the mounting arms, I had to beat on the bumper to get it to slide into place. I like that, as I think those are the weak point of this setup. I also wanted something to help keep the bumper mounting bolts from tearing through the body, so I recycled my old trailer hitch frame into some shackle mounts, torched off the ends, and burned a hole for the shackles.
-
Got out and did some wheeling the past couple weeks, after last winter it feels great to get some snow. Only got some pictures of our pre-Christmas run. Winch and mods held up great. Aired down to 12 psi and the snow was still just too soft/sugary. Finally decided to just winch myself around in the ditch and head to another trail. Pretty happy with the way it wheels, but I think its time to move to some Grabbers or BFGs
-
Some recent updates Re-sealed my 2.2 Swapped over to 4.11 gears with VLSD rear Made and installed 1/2" spacers for front subframe and control arms, to help with my axle angle Reinforced bumper and core support to hold 2" receiver for winch cradle Only got a few pictures of the receiver install Here you can see the lower core support/skid plate mount I reused from my legacy. Its welded at either end to the tow loops with 1/4" plate caps. What it looks like all finished And with my cradle I haven't got to try out the winch on the Subaru yet, but we are finally getting some good snow around here and I will be going out soon
-
Finished my roof basket over the weekend. Got the last of the sides on and painted it. Holding it down using some 4" square U-bolts My light bar ended up a little crooked, but oh well This is what I have holding my Hi-Lift for now. With everything loaded up, I don't plan to use it for very much, mainly wanted my spare and the hi-lift out of the cabin and a more safe place to carry fuel. Got the light bar all wired up and working used a 1/4" grommet and just went through the roof. Its rained for a couple days and haven't had any leaks
-
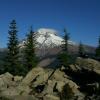
Finally got some wheeling in. Had some fun out in Sand Lake on Sunday Didn't get a lot of pics, not a lot of trail damage just a broken tail light. That night I had to drive to Bend for business, a total of 350+ miles for the day, including the wheeling. Then on Monday had some spare time and went over to Cline Buttes OHV area, its somewhat new, only been open a few years now. 4 Wheel & Offroad Magazine wheeled here during their Ultimate Adventure in 2012. Awesome views of the Cascades, It was fairly clear that day and I could see from Mt. Adams in Washington south to Broken Top. The green trails are pretty tame, mostly deep dusty stuff with some sharp rocks mixed in I stuck with the green trails and one of the blue trails, there are a good bit of black diamond trails too, Great views from just about anywhere in the area, Three Sisters in the background of this one.
-
Picked these up last night from Inferno Fab Friend and USMB member had them made in trade for my Borla replicas and dual port ej22. Stainless version, equal length
-
Got some more work done on the basket, added a bar across the rear for some future lights, worked up my spare tire hold down, and added some conduit down the length of the basket for the wiring of said future lights. This bar in the rear also covered up the ugliness of the fact I used an old bed frame, and hides those assembly slots I kept for tie down holes Nut welded into a piece of 1" square tube, then welded to one of the cross supports First time trying to weld conduit, i used my oxy/acetylene to burn off the galvanization and hit it with the wire wheel. Seemed to get a decent weld on it.
-
This guy builds some good stuff, he custom built my 2" drop spacers for my trailing arm bracket for my Impreza build. Im extremely happy with them.
-
Got to work on my Roof Basket this weekend, pretty happy with the progress I made. Started out with a basic layout using an old bed frame and some expanded steel. Finally got some shielding gas for my welder Made some uprights for the corners and kept everything as square as possible using the strap Corner Posts done Then I started tacking in the top rim of my basket, all the flat bar I used was 1/8". Then added some side supports Made a quick test fit Took some measurements and added some support for the expanded across the bottom And welded the expanded to the cross bars Added mounts for some light thing I got. And then test fit the light onto the basket 30" Combo Beam LED Bar, 3w each, 180w total draw Need to gather up some more expanded for the sides and figure out some hold down loops or locks for my tire and Hi-lift
-
I would definitely get one, especially if you do any wheeling alone. The extra expense can be worth the trouble of leaving your car stranded as you roll your flat, or bent rim down the road to hitch a ride. Just rotate the spare onto the vehicle on your first tire rotation and let it get rotated at all 4 corners before rotating it out. It won't be a perfect match on diameter but this is what I did with my 5-AT2's. Until I bent and fixed one rim and just kept it as my dedicated spare. Even then, I used it as a spare with probably %60 tread when the rest were down to %10. Got me home 80+ miles, never heard or had any trouble with drivetrain. But that's just my experience
-
Here's a peek at what will be coming up, also installed a CB over the holidays.
-
Here are some numbers and pictures, now that I have the 215/75R15's on, they are just studless snow tires for now. Will go with either Grabber AT2's or Dynapro MT's when I can afford it. Between the 2" spacers and the little cutting I did, I think they fit pretty well Right around 5/8" clearance. This is how the Impreza sits now, Im happy with how level it turned out, the 1/2" spacers in the rear turned out to be just right. Here is the measurement at the front. And at the rear Using just the measurements at the bottom edge of the doors, between the very beginning and after the tires, I have gained 5.75" in the rear and 5.25" in the front. Here are my ground clearance measurements 12.25" at my rear skid plate And its hard to tell in the pics, but I measured 11" at the lowest point of my Y-pipe. Also did some light wheeling over the weekend while looking for a christmas tree, 3-4" of snow covered in ice, the Impreza performed very well, but I am definitely interested to see how it does when I install the 4.11's
-
Got my 215/75R15's on last night, which are about 3" bigger than the 205/60R15's I had previously. So I'm hoping for 1.25"-1.75" gain from just the tires. I will post up my measurements soon, but here is a crappy angle pic to start.
-
Ok great, thanks for the tip! And I've got new tires scheduled for this week so more to come.