BirdMobile
Members
-
Joined
-
Last visited
Everything posted by BirdMobile
-
Thank you! I'll start checking... wonder why my blue wire is keyed +12V? Interesting. Appreciate the info!
-
P.S. Be sure to grab a thermostat gasket if you're replacing your thermostat.
-
NGK plugs - BPR6EY-11 Wires - I've heard NGK are good, I bought NAPA Belden set, because that's the only ones they had reasonable lead-time stock on. They seem OK... but I'm sure there are better.
-
I used a Hyundai thermoswitch: Hyundai part number 25360-24000 It runs about 10 Degrees C cooler than the Subaru switch and has the same radiator threading, but you'll need to splice the wires. I'm running 2 electric fans (one off the thermoswitch and one off a relay activated by the thermoswitch) and so far after 3 weeks it all works great! I highly recommend this part.
-
Hello! This list was compiled during my recent EA-82 Carburated engine rebuild. Hope someone finds it of use. These are OEM part numbers for EA-82 engines: Cam Tower to Head Metal Reinforced O-Ring 13089AA010 Cam Tower Retainer O-Ring 806958020 Cam Tower Shaft Oil Seal 806738040 Cam Tower Oil Relief Spring 15020AA011 Front Main Seal 806738070 Rear Main Seal 806776011 Oil Pump "Mickey" Oil Seal 15066AA000 Oil Pump Shaft Oil Seal 806718090 Oil Pump O-Ring 806945020 Oil Pan Cork Gasket 11121AA001 Water Pump O-Ring 806927010 Gasket - Water Pump 21114AA000 Gasket - Intake Manifold to Head 14035AA150 Gasket - Exhaust Manifold to Head 44022GA330 Gasket - Thermostat Gasket 11072AA030 RH (Passenger Side) Rubber Valve Cover Gasket 13270AA001 LH (Driver Side) Rubber Valve Cover Gasket 13272AA001 Throwout Bearing Clip 30539AA000 PCV Valve 11810AA000 Oil Cap 15255AA002 Head Bolt - Long 800211050 Head Bolt - Short 800211060 Head Bolt Washer 803011070 Exhaust Manifold Stud 800910290 Exhaust Manifold Nut 902170018 Intake Manifold Bolt - Long 800108790 Intake Manifold Bolt - Short 800108800 Enjoy! . .
-
My guess... You've either got the timing light on the wrong plug wire, or your timing light has a "offset" adjustment dial knob that is set to something other than "0". Might be a faulty light too.
-
Instead of using the dots on the distributor, I've always set the flywheel to TDC compression stroke of cylinder #1 at 0 Degrees (put finger over spark plug hole to feel for compression as opposed to no compression on exhaust stroke), then taken the cap off the disty and moved the rotor to point to #1 plug wire position while checking/fine tuning angle with cap on/off. I then drop disty into hole with the bolt hole centered on the oval slot, compensating slightly for helical rotation angle of the gear. I've done this half a dozen times, it's always super easy and always fires right up - though in need of timing.
-
Just a side note... does anyone have a schematic they could post for the fuel pump module wiring to the car? Or at least a functional description of the 6 wires and where they go? What I know for certain: Black - Ground Black/White - Distributor/Coil +12V Power Yellow - Distributor/Coil Neg. (Tach Pulses) Blue/Red - Fuel Pump +12V Power Blue - ? Blue/Black - ? (Seems to be keyed +12V, except when starter motor is engaged) The module is Subaru part # 22631AA080, Mitsubishi part # K8T65073 . .
-
Interesting. Apparently I have an "open" in the harness on the black/white disty power wire then... it measures 0V to ground with key on. Just assumed the module supplied it with power after measuring this. Two of the blue wires (Blue and Blue/Black) also seem to power the module - I'm measuring 12V when key is on at the Blue wire, and 12V when key is on (but NOT when starter motor is active) on the Blue/Black. Is this correct, or do I have another problem in the wiring somewhere? I'm currently taking the power for the fuel pump and disty from the solid Blue wire - it's working fine, but I'd like to have things wired correctly if possible.
-
.. Some NAPA part numbers for you, other parts stores should be able to cross reference most of these if you don't like NAPA: Large V Belt - NAPA PremiumXL 25-9447 Small V Belt - ? Long (Drivers Side) Timing Belt - Altrom TB4107 Short (Passenger Side) Timing Belt - Altrom TB4106 Nippon Denso Dist. Cap NAPA EP685 (Needs slight cutout modification on one tab - 2 min. with exacto knife. Best cap though... made in Japan.) Nippon Denso Dist. Rotor NAPA EP324 Thermostat NAPA Superstat 536090 Oil Filter NAPA Gold 1361 Fuel Filter NAPA Gold 3002 (Buy 2 - There's one by the fuel pump and one under the hood) A lot of people here say to go OEM only on the thermostat, but the NAPA Superstat is awesome, the only non-OEM thermostat that I would (and do) personally use. On the distributor parts, your 1987 GL most likely has a "Nippon Denso" distributor, I gave the part numbers for that. If you have a "Hitachi" disty, it uses completely different parts. In any case, rotors and caps are hard to source correctly - it took me 3 tries to get it right with the above part numbers, and I still had to do the Exacto cutout on one of the tabs to make it fit my distributor right. Works PERFECTLY though... and it's a super high quality Japanese disty cap that matches the original in all dimensions (except the tab cutout). Oh... one more thing. EA-82 seems to LOVE 10W40 non-synthetic oil, at least in warm climates. I've used Valvoline and Castrol, but heard from other Subie owners that the brand doesn't matter that much as long as it's mainstream brands and you don't mix them. Heard bad things about Penzoil though... something about high paraffin content... I unfortunately can't remember the particulars. Good use for the search function, I guess. . .
-
No prob... that's what we're here for. We were all beginners once...
-
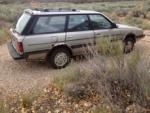
No... those are your "V" belts, not your timing belts. Looks like your covers are still on, from what I can see in the photos.
-
One other thing I forgot to mention about ditching the timing belt covers. The alignment marks for cam gear timing are molded into the edges of the rear covers. Once you remove them, you can use the "seam" where the cam tower and cam covers meet as your new alignment mark - it lines up perfectly with where the timing belt cover marks were. Disassemble it and look... you'll see what I mean.
-
Yep... people here do it all the time, without problem. Makes repairs and belt replacement MUCH easier, it turns a 2-3 hour timing belt replacement into a 20 minute roadside repair. Ditch the covers, and keep a spare set of timing belts in the car along with a 12mm deep and 21mm standard socket. That's all you'll need for a timing belt instsll.
-
$749 to replace the belts? Or $7.49? Either one seems WAY off... even if they're including timing belts in the job. Reasonable cost gor replacing ALL belts would be around $300... but you could easily do it yourself for under $100 and 2-3 hours of work. Even if you're short on time, you really should do the belts yourself,,, it will familiarize you somewhat with the engine, you will get the timing belt procedure down so you csn change them in an emergency and not need to be towed, and you can remove and toss the timng belt covers to make further repairs easier. The worst part of it is the crank pulley removal and replacement, but that's just one (difficult) bolt and you only need to do it once... never again if you remove the covers. Do you have metric tools? The timing belt procedure is very well documented on this and other sites... the biggest mistake most people make is using the distributor timing degree marks instead of the three vertical lines on the flywheel. Look for the "III" marks on the flywheel when doing the alignment.
-
Yep. Remove it... won't hurt anything. No place to run it when you Weber-ize your car anyway.
-
I think you'll be happy with it once it's tuned up, Webered, and de-emissioned. Once it's running well, don't be afraid to rev it UP... I wrap mine near 6,000 all the time and typically shift over 5,000. The EA-82 loves high RPMs. If you still want more, there's always the pre-96 EJ-22 swap as an option... beyond my budget and mechanical abilities currently, but I might try it at some point in the future if I ever tire of the EA-82. For now, though, the EA does what I want and still puts a smile on my face.
-
P.S. When it comes to these vehicles, speed is not the name of the game. Reliability, utility, ease of repair, offroad fun, and reasonable gas mileage is. Style too... if you're into retro-80's boxy station wagons with "back to the future" Mars mission cockpits... like I am! . .
-
Yep! Weber it and smile. Mine goes fast enough now to get tickets... and i occasionally find myself passing other cars too!
-
I personally wouldn't turbo it... read up on it, those engines are more fragile and problematic. Just my 0.02. If you decide you really must "go turbo", it requires an engine and wiring harness change - you can't just "bolt it on" to your existing engine. Different pistons, heads, intake, ECU and wiring, etc.
-
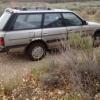
Very nice! Your color is even the same as mine... but without the rust! Edit: Just noticed you still have your cargo rollover cover. Unusual... mine is the only other GL I've ever seen with this piece still functional and in the car. Way to go!
-
I have the exact same car. Here's what worked for me: 1 - Make sure the timing belts are on correctly. My passenger side belt was off by one tooth, it KILLED performance - I could barely do 45 up hills. 2 - Replace the $H!7achi carburator with a Weber 32/36. HUGE increase in power, very noticeable difference, even after I got the timing belts correct. 3 - If you have the time and skill, rebuild and reseal the engine. Remove emissions garbage if you don't need it to pass inspections. Not sure if this will give you much performance increase (I did this after the T-Belt fix) but it will give you peace of mind that your engine is the best it can be inside, and won't unexpectedly strand you. 4 - Tuneup stuff: Change oil and filter. New belts and hoses. New distributor cap and rotor. Change transmission fluid. New spark plugs and wires. New air and fuel filters. Check timing. Check cooling system components (radiator, thermostat, fans) and replace if necessary... I'd probably replace the radiator and thermostat on a mid-80's Subaru I just bought on general principle. One last thing... lose the timing belt covers. If you carry a spare set of timing belts in the car (which you should anyway), you won't need the covers and they will only get in the way and slow down repairs. My '87 GL wagon is a whole new machine after doing the above... like night and day! Good luck! . .
-
Thanks for the suggestion... but no-go. Bought turbo GL-10 body only, no engine or drive train.
-
Hello! About a week after my EA-82 Rebuild for my 1987 GL (Carbed), my fuel pump control module (6 pin Mitsubishi cube) died. I figured out the wiring, and jumpered the keyed-12V wire to the fuel pump power wire. Works fine. Now... the other half of the story. Apparently, the distributor/coil ignition system ALSO gets its power from this module. I jumpered the keyed-12V wire to the distributor/coil wire, and that works fine (for the last 2 weeks) as well. My question: I showed my fix to a mechanic friend, and he told me I might have a problem... he says that many distributor/coil systems run 12V when starting, then some lower voltage (around 8V) when running, He thinks the fuel pump control module "shifted" the voltage, and that by running my disty/coil at 12V all the time I'll fry them. Is this true? Do Subaru distributors and coils run at 12V all the time, or only at startup? If only at startup, what voltage do they like during normal running? Much appreciation for any feedback!
-
Hello! When I sealed my water pump on my recently finished EA-82 rebuild, I used Permatex Anaerobic sealant instead of a gasket or RTV. So far, after about 3 weeks of running, it's held up fine with no leaks. I don't know if this is a "recommended" sealant for EA-82 water pumps, but it seems to work fine (so far...) on mine. I used Ultra Gray on my oil pan, covered both sides of an OEM cork gasket with a thin layer then let it dry before using it. No leaks there (yet...) either. Regards . .