TheBigJ
-
Posts
53 -
Joined
-
Last visited
Content Type
Profiles
Forums
Gallery
Store
Everything posted by TheBigJ
-
One thing I left out - it seems the pinch off bolt on the alternator adjustment screw was the wrong type. Not long enough to really get into the threads on the alternator. So, as I tried to tighten the old belt, this bolt wouldn't pull up on the alternator like it's supposed to. I replaced this bolt and the belt at the same time and was able to get the new belt to the right tension. I guess it's possible that the old belts were fine and it was the bolt all along.
-
I'm sure I've been using the right belts for the past several months. They're the same ones that have always been on the car.... which made me wonder more about the bad shimmy the crank pulley had for a while after I originally did the T-belt. Although the belts didn't show wear, they had stretched enough to make them impossible to tighten. This must have happened when the crank pulley was shimmying about - I remember noting that it was shimmying up and down as well as front to back. Replacing the belts did the trick.
-
Hey everyone. I've been looking at this for only about a day but I don't have a clue how this could be happening. Car: 1990 legacy 5speed AWD relevant history: I did the TBelt. I messed up the crank torque and destroyed the keyway, woodruff key, etc. I fixed that with a kit from S-wings - replacing the pulley, timing gear, and woodruff key. The pulley is fixed to the gear with 2 spring pins, the woodruff key essentially only used for alignment. I torqued it properly with a chain wrench to hold the pulley. Then I drove the car for 4-5 months until today. Had no problems. A few weeks ago I started having some belt squeel at start up. I didn't do anything about it until last night when I looked under the hood. Well, I can't really tighten the belts any more. The power steering belt tensioner (rotates the alternator) is about to the point where the pinch-off bolt "bushing-looking thingy" starts to interfere with the power steering bracket. If I tighten the tensioner, the pinch-off bolt starts to deflect because it has no where to go. The AC belt tensioner goes the opposite way. This one I can probably tighten but there won't be many threads left sticking out the bottom when I finish. I compare this to the setup on my 1991 legacy, which has about an inch or more to go on both tensioner assemblies. Is it possible that I've stretched the belts? They don't show any signs of unusual wear. I compared them to the ones on the 1991 legacy and they aren't grossly out of whack (didn't remove belts from 91). It's like the crankshaft pulley shifted up or everything on top of the engine shifted down. Neither of these things seem possible. I have have checked the crank pulley several times in the past and not noted any severe wobble. Any other ideas? Thanks so much....
-
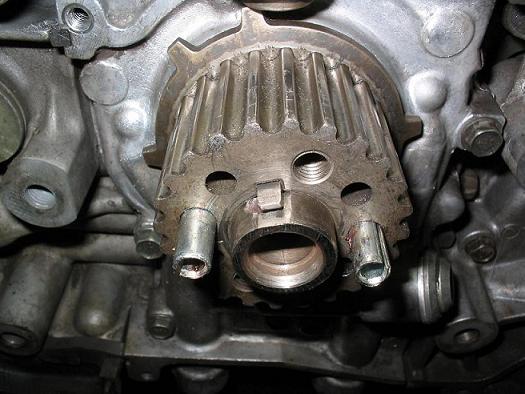
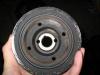
Sorry to resurrect thread... maybe this update will help someone. I finally ordered the kit and started installing it today The kit is made from good quality used parts. The gear and balancer assembly come fitted together with the roll pins, with the keyway fit into the notch at the back of the gear. You have to remove the key from the gear, and seperate the gear and balancer to perform the install. The roll pins are 1" length and will slide further into the timing gear if you bump them (I was using a hammer to get the gear on the crank). They can be bumped back out to the correct insertion (1/2") after removing the gear if this happens. I recommend putting a socket longer than 1/2" around the center of the gear and tapping on that to prevent pushing the roll pins in any further. I'm somewhat surpised the holes in the gear aren't just drilled to 1/2" depth to prevent this from happening. But I'm not complaining. The holes in the balancer are drilled slightly larger than those in the timing gear. It is still a snug fit but can be seperated by hand, and the pins will remain in the timing gear. Seems like a good fit with the timing gear, now to line up the belt, install the balancer and torque the bolt down properly! This car has been sitting 4 months!

-
I just did this on a 91 legacy that was for sale, and then bought it. I found the connectors on the injectors difficult to remove so I disconnected the fuel pump instead. It is easily accessible from the trunk area by unscrewing the passenger side carpet attached to the rear seat and removing the cover underneath this carpet section. Just 8 screws, and 1 connector instead of 4.
-
Yes, sounds like throwout bearing to me too. When you press the clutch pedal there is no longer any load on the throwout bearing so the noise goes away whether the car is moving or not.
-
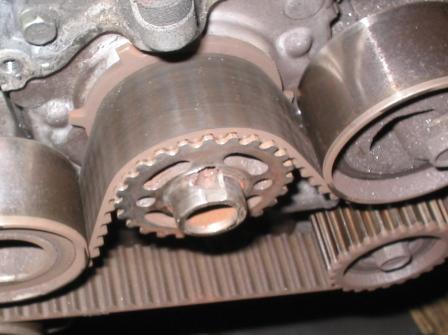
Yes, you should be able to find the info you need with the search function. I have the same car and have done this with Haynes manual and it went ok. If you do not have notches for whatever reason (broken etc) on the upper part of the inner timing belt covers, you can count number of teeth and you will be ok. Your new timing belt should have marks on the belt itself indicating # of teeth (3 marks, be sure the belt is facing the right way and they will all line up). If you have not taken off the old timing belt, get the crank in the right position and the two cam sprockets will have marks pointing straight up. I am assuming your old belt did not break, slip, etc. The good news is, if you do it wrong, you will not damage the engine. Your car may run like poop until you get in there again and set it right. Be sure you install the harmonic balancer/crank pulley properly. You must put about 130ft lbs of torque on it or it will come loose and you will have all kinds of problems. Don't ask how I know. Be sure to get a chain wrench as the manual suggests for this torqueing or immobilize the engine at the flywheel.
-
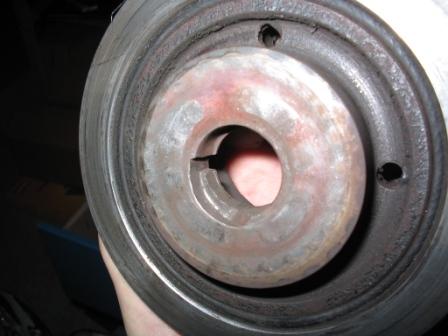
I called to check price and availability. I didn't understand from your description that what they are selling is a balancer assembly that has the pins mounted in it which interface with the two holes in the sprocket. So I don't need to pull one of those from the yard. Price is $175 but he has to order some parts and make them, so they are not currently available. In the meantime I haven't been able to get the sprocket off of the crank. Any suggestions here? I already tapped the two holes and put some bolts in. I would say that your estimation that the keyway is now only used for alignment and the load is transferred to the pins is correct. Depending on the tightness of the fit I would still think that some of the load is on the key but not very much, especially since the keyway is now garbage and can't really take any load. I hope those pins are hardened steel because there is a lot more torque out there!
-
That sounds like a hot tip. Let me get this straight, the pins are installed into the timing sprocket, parallel to the crank, and extending into the balancer/pulley assembly? Do you have to do any drilling, welding, tapping etc? Thanks for the help guys, I am going to pull off the T-belt and sprocket now and see what the real extent of the damage is.
-
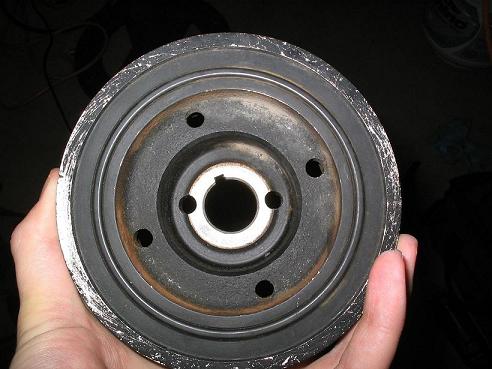
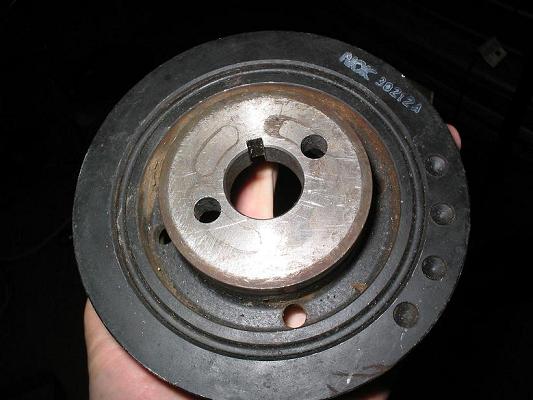
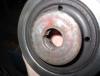
Well guys it's been a while since I needed or was able to offer any help. Now I am in it pretty deep I think. I was having probs with temp guage in my car. Found a bolt in the wiring shorting something to ground erratically. While under hood noticed severe vibration in harmonic balancer so I checked main pulley bolt. Sure enough, loose. Removed it and took off the pulley. The woodruff key had busted up pretty good, carving out the inside of the main pulley/balancer. I know it needs to be replaced. On the other side, the keyway seems damaged. In some of the other threads I have read about welding this back together. I have a 235A AC welder but I am a mediocre welder at best. Does this need to be spot welded or a full penetration weld? If so, how would I ever replace timing belt/work on this area again? Can it be done with engine still in car? I am confident the engine has many more miles on it but I do not see the value in yanking it for a teardown. I'd rather sell it and move on. I am also tempted to work some other solution out in which I drill through the sprocket and crank, and then the pulley and crank in a radial direction and then tap and thread a set screw into each to hold the pulley and sprocket in place. I realize I cannot do this by hand, just tossing it around in my head. Need to devise a jig if I am going to explore this. Anyone ever successfully repaired this before? Pics/methods much appreciated. I think I can source parts from a local yard.
-
When I bought my 90 legacy the crank pulley was kind of shimmying like that but I decided to live with it. I looked again at a later date and it seemed fine. Weird. I think it probably has more to do with engine timing and smooth idle than a bent crank at least in my case. I have noticed improvement since I replaced my plugs, but that doesn't mean it was BECAUSE of my plugs. Also I noticed when I re-sealed the oil pump that the T-belt cover under the pulley had worn away as the pulley rubbed against it. It was warped, so it's possible that the extra friction on one side of the pulley was causing the shimmey. Or, maybe the pulley wasn't torqued right and it's actually mounted on the crank a slight angle instead of true 90 degrees. Take it off and inspect the area, see what you find.
-
I would think that being off by one tooth would not cause the car to not start. I think it should still start but not run very well - although I haven't verified this. There are many other things that can prevent the car from starting. When I did this, I was confounded that my car was not starting either. Fortunately for both of us the 2.2L is non interference so you couldn't have bent any valves or done any other damage. Pull out a spark plug, ground the body, and see if it's sparking. Mine wasn't. Turned out to be the crank position sensor which is mounted in the top of the oil pump. I forgot to put it back in and this prevents the car from starting. I think the cam sensors can cause this to happen as well. The timing belt I got from NAPA had marks on it at the appropriate number of teeth for installation. If you are removing the belt, look for these, they can help with the installation quite a bit. But don't expect them to line up after you turn the engine around with the belt installed.
-
What kind of car/engine is it? What is your question?
-
Here is the ignition coil check procedure (in my words) from the Haynes manual. If you havent found it yet, the coil is located where all the plug wires come together (opposite end of spark plug). 1) primary resistance check. with engine off, disconnect 3 terminal connector from the coil. Measure resistance across pins 1 and 2 (if you are looking into the connector attached to the coil with the latching part of the clip up, pin 1 is on the right). Then measure across pins 2 and 3. You should get about .62 to .77 ohms - it is ok if your meter says it is a bit higher, because there is some resistance in the lead wires of the meter and in the contact. I think mine came in a bit over 1 ohm (crummy meter). 2) Secondary resistance check. Measure from the cylinder 1 plug to the cylinder 2 plug on the coil (these are towards front of car). Then do the same for 3 to 4 (towards back of car). Should measure either 10.4K to 15.6K ohms (hitachi) or 17.9K to 24.5K ohms (diamond). This measurement will not be affected by lead resistance like above.
-
There is a way to test the coil pack with a multimeter as described by the haynes manual. If you want me to type it all up for you, PM me. Otherwise maybe you can get it at the library... or at the parts store.
-
Front Seals?
TheBigJ replied to rbregn's topic in 1990 to Present Legacy, Impreza, Outback, Forester, Baja, WRX&WrxSTI, SVX
If you are getting in there to replace the seals, be sure to replace the o-ring in the oil pump and re-seal that. I have found it's easier to remove the oil pump with the crank seal still installed than to pry the seal out before removing the oil pump. You can do all this with the engine in the car, and you won't destroy anything if the timing belt breaks. You will just be stranded. I recommend the Haynes manual over chilton. PS the easiest way to get the crank pulley bolt off is to put a large pry bar on it and secure that against the body of the car (driver side). Then crank (but don't start) the engine. -
My 90 Legacy has the sensor mounted in the oil pump housing, comes right out with one screw. Based on what you say I would guess they started doing this with the EJ22 engine. I can't explain the high cost (nor did I confirm it). For you electronics guys - is this a hall effect sensor? I don't know what else it could be...
-
Could be, I spose, but I really doubt it. 265K on one clutch? And I can't get it to slip if I try? I figure it was replaced with either the engine or tranny, or sometime slightly earlier. It could have up to 100K on it but I doubt any more than that - especially since it was slipping because of improper adjustment for an unknown # of miles (at least 4K).
-
90 Legacy 2.2 AWD, 265K, engine has 90K - replaced at 200 with a 30K engine, supposedly. Tranny replaced since then, (again, supposedly) with another of unknown age/miles.
-
That's what I suspected. That cap is wired in series with the tweeter to filter out the low end, because the woofer takes care of that. The rating would give some idea of the amount of filtering going on. I suspect that is all that's in the "bass blockers" crutchfield's sells. Or used to sell, anyway. Don't use those bass blockers if you see something like this on your speaker, as the extra cap will actually REDUCE the amount of bass "blocked" from the speaker. Thanks for the info, I didn't know they were doing this now.
-
The spring it shows in the diagram is "V" shaped and is attached in the engine bay to the clutch lever, on the opposite side from the cable adjustment nuts. It presses the lever towards the front of the engine bay (lightly) so it's not free to move around (free play about 3/16" front to back) while the clutch pedal is up. The adjustment instructions said I should check free play in the lever as well as in the pedal. My understanding is that the cable should be slack on the lever when the pedal is released... so that there is free play in the pedal.
-
I finally adjusted my clutch yesterday after 4K mi of driving gingerly on a slippery, not fully engaging, clutch. Seems pretty stiff now. I can jam it up to 5k without slippage (previously slipped mid 3k's). But I didn't seem to be able to adjust the pedal play to within spec. Haynes told me to remove a spring before loosening the lock and adjusting nuts in the engine bay. I couldn't find any such spring - diagram shows it is not a coil spring. So I loosened the nuts and felt the play in the lever which seemed correct. Then adjusted the nuts so the pedal free play was about where I wanted it... slightly more than the 10-20mm the manual suggests. Any reason not to just put it where I want it? Any reason not to drive without this spring now that I know it's missing? Also I managed to destroy the boot on the bell housing to keep dirt out of the clutch assembly. Any idea where to get one of these for a decent price? My junkyards don't have legacy's as much as I'd like (on the other hand, I like to see them still on the road)
-
I'm pretty sure thats a 2.2l, not a 2.0. As for the problem you are having... try doing a search for "torque bind." There are several threads on that and it might give you some more information about your car, if not explain what is happening to it right now. I recommend going to a gravel parking lot with an assistant to see if you are REALLY not getting any power to the rear wheels
-
outback_97: I notice a cap on the aftermarket speaker, did you install that or did it come that way? Is it wired between the two terminals or do you wire through it on only one of the speaker leads? I realize it may already be mounted and hidden.. but if you remember that would be cool to know. Also, any markings on it as for rating?
-
If you are still wondering about this, your car uses a "component" speaker system, so if you want to replace with similar type parts, don't buy the 2 way or 3 way speakers. I would call your larger speakers mid-range, reserving "woofer" for something 8" and up. I am not into car audio like I used to be so I can't recommend any specifics. If you are shopping crutchfield, their calculator should tell you the size and then you can pick the right speakers based on that... just get the component audio stuff as I said before.