
jonathan909
Members
-
Joined
-
Last visited
Everything posted by jonathan909
-
jonathan909 replied to xntryk1's topic in 1990 to Present Legacy, Impreza, Outback, Forester, Baja, WRX&WrxSTI, SVXOkay, go to p.44 of the PDF, titled "13. ENGINE ELECTRICAL SYSTEM LHD model" (it says p.51 at the bottom of the page). There's your fuel pump on the left side of the drawing. Print this page - people who try to debug stuff like this on their phones drive me nuts. As you can see, the connector at the tank is R58. Look at the bottom of the page and they describe it. Pins 1 and 4 are the ones you're interested in, and the drawing says that the positive side (which goes to the relay) is LY (Blue + Yellow) and negative (ground) is B for Black, respectively. Don't ask me why they chose L for Blue; I think it's stupid too. Confirm that those are the wires that correspond to the correct pins. Unplug the connector. Connect pin 1 to the positive (+) side of your battery and pin 4 to the negative (-), and you should hear your pump run. There may be a little spark when you connect it up; as long as the pump is running, don't worry about that. But if you get a spark and the pump doesn't run, the motor may be seized/shorted and you'll start burning wiring if you leave it connected, so unhook it without delay. Be careful. If you short the wires together - even with a battery you don't think is very good - you're going to get some or all of: sparks, heat, melted insulation, burnt fingers, and damaged connector pins that will add to your repair job. I do electronic stuff, so I've got lots of little grabby clippy things around; if I didn't, I'd go to the junkyard and snip off one of those connectors with as much wire as I could manage to give me a "pigtail" connector to do these tests with. How you do it is up to you based on what you have around, how much of a hurry you're in, how close the nearest wrecker is, etc. Follow all that?
-
jonathan909 replied to xntryk1's topic in 1990 to Present Legacy, Impreza, Outback, Forester, Baja, WRX&WrxSTI, SVXDid you get the wiring diagram PDF I linked to in my previous post? Fwiw, my '95 rustbucket has 450K km on it - it got a new motor+gearbox a couple of years ago, but no problems to date in the fuel delivery department.
-
jonathan909 replied to xntryk1's topic in 1990 to Present Legacy, Impreza, Outback, Forester, Baja, WRX&WrxSTI, SVXDon't worry, you're not going to need any electrical theory - or a mechanic. But you will need the diagram, because that's where you're going to see which pins on the fuel tank connector you have to connect power to. Assuming it's like the later ones I'm familiar with (I've never had to mess with the fuel assembly in my '95), there's a single connector that supplies power to the pump and sends the fuel level information back to the dash gauge, and you can mess things up if you power the wrong pins. Next, what is your power supply? Are you just running wires back from the battery, or do you have something else that can provide 12V at the back of the car for this test? [Edit] Here - go get this: http://jdmfsm.info/Auto/Japan/Subaru/Legacy_Outback/1995/1995 Legacy Wiring Diagrams.pdf and I'll walk you through it.
-
jonathan909 replied to xntryk1's topic in 1990 to Present Legacy, Impreza, Outback, Forester, Baja, WRX&WrxSTI, SVXWell, there comes a point at which you either accept enough "jargon" (the actual word is "terminology") to get the job done, or you don't. If the words "connector", "pin", "wire", and "positive" are too intimidating, get a friend who can handle it to help you out. You have a choice of locations where you can feed power to the fuel pump. The best one for testing just the fuel pump is the connector beneath that cover you removed. IIrc, the fuel pump relay is in a nasty spot under the dash where it's a hassle to do this sort of thing (I have a '95 Legacy as well, so I can look if necessary). But first, do you have the correct (meaning the exact model and year) wiring diagram for your car? You're going to need that, and this is a good time to learn to read one.
-
jonathan909 replied to jonathan909's topic in 1990 to Present Legacy, Impreza, Outback, Forester, Baja, WRX&WrxSTI, SVXI can measure the clearance and the shim, but have no way of measuring how much I grind off the stem. I just did that with one of the exhaust valves I replaced, and it went okay, though it was an even more tedious process. I had to take the valve out a couple of times to take more off - then still go through the shim hassle.
-
jonathan909 replied to jonathan909's topic in 1990 to Present Legacy, Impreza, Outback, Forester, Baja, WRX&WrxSTI, SVXGrrrrr.... The EZ include the H6s, right? That's actually what I want to get, and I thought I'd be getting back to the land of adjustable rockers. So my choice is a later SOHC EJ25 or the DOHC EZ30. Bummer.
-
jonathan909 replied to jonathan909's topic in 1990 to Present Legacy, Impreza, Outback, Forester, Baja, WRX&WrxSTI, SVXSure, but isn't this the only Subaru engine with nonadjustable lifters thanks to the DOHC? Aren't all the others like the EJ251 - SOHC w/ adjustable rockers?
-
jonathan909 replied to jonathan909's topic in 1990 to Present Legacy, Impreza, Outback, Forester, Baja, WRX&WrxSTI, SVXWell, I think I have one head in the right neighborhood, but I know one thing for damn sure: I want to sell this car and never own another D engine. Adjusting clearance with these bucket/shim lifters is a fate nobody should have to suffer.
-
jonathan909 replied to 5000fingers's topic in 1990 to Present Legacy, Impreza, Outback, Forester, Baja, WRX&WrxSTI, SVXI get what you mean about there not quite being room to get an offset wrench into there. In the event you don't have an impact driver, another option is a "pass through" socket/ratchet that lets you run the allen key down through it, but they're kinda rare. Still, though, I'm with everyone else here in that I can't see a valid reason for removing that nut while the strut is in the car, and that makes it unnecessarily dangerous.
-
jonathan909 replied to jonathan909's topic in 1990 to Present Legacy, Impreza, Outback, Forester, Baja, WRX&WrxSTI, SVXI don't mind a little extra noise. So you're saying spec +0/-2 on both - that'll certainly help it breathe better. But how much over spec on the clearance can one get away with before it starts to suffer? I'm just trying to get a sense of how nervous I have to be about grinding the stems.
-
jonathan909 replied to jonathan909's topic in 1990 to Present Legacy, Impreza, Outback, Forester, Baja, WRX&WrxSTI, SVXThat looks sweet. Still suffers from the sucker problem, but if you say it's the best way to go, it'll get added to my wish list. Trying to get the clearances right on this thing - especially with a very limited set of spare shims - really is a PITA. I'm taking a stab at grinding the stems, and controlling how much I take off doesn't seem to be too bad. But the constant dis/re-assembly with each adjust/measure iteration is something else. I'm working to the .008 intake, .010 exhaust spec, but what it doesn't tell me is what the tolerance is. What say you?
-
jonathan909 replied to wmaney's topic in 1990 to Present Legacy, Impreza, Outback, Forester, Baja, WRX&WrxSTI, SVXWe briefly had some transient vibration problems with our '98 Legacy - turned out we were losing a CV joint. But it didn't smell like it at first, so I was digging around a little in discussions that may apply to your newer ride. I didn't get far into it, but the upshot seemed to be that Subaru didn't get the damping right the first time around, so there's a field upgrade that includes adding a weight to the column. I'm sure there are those here who are familiar with it - perhaps there was a recall notice.
-
jonathan909 replied to jonathan909's topic in 1990 to Present Legacy, Impreza, Outback, Forester, Baja, WRX&WrxSTI, SVXNo - too hard to find. Probably have better luck using Faraday cages to make Forester grilles.
-
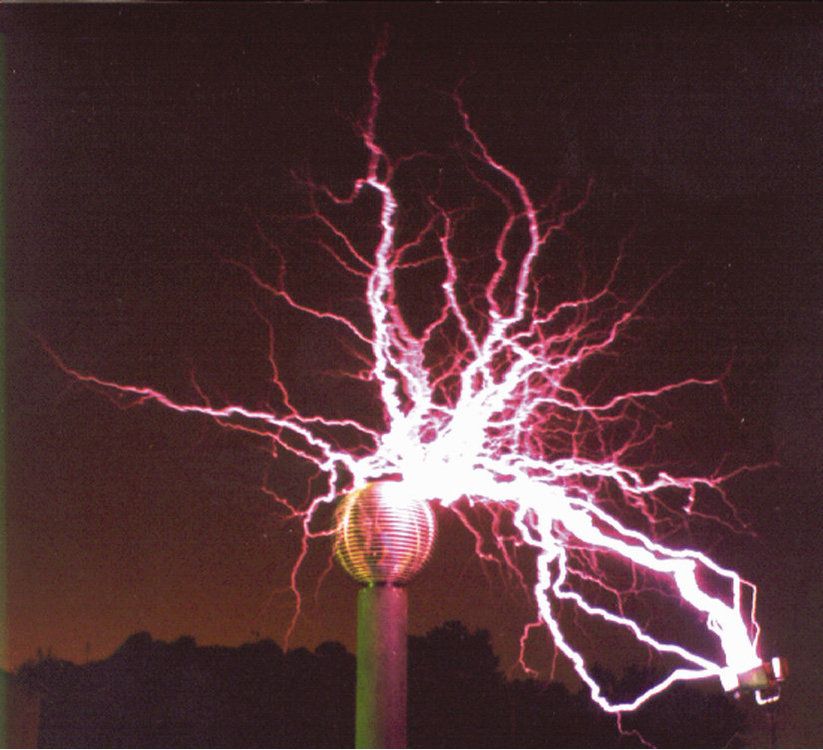
jonathan909 replied to jonathan909's topic in 1990 to Present Legacy, Impreza, Outback, Forester, Baja, WRX&WrxSTI, SVXUmmm... sorry about that. If you think that got OT, you should join my pals and me for coffee tomorrow morning! Short version: A Faraday cage is why I could stand inside a ball made from rings of stainless tubing and radiating a couple of million volts of RF energy without getting zorched - what's outside doesn't get inside. Pretty cool, huh? Now, back to our regular scheduled programming...
-
jonathan909 replied to jonathan909's topic in 1990 to Present Legacy, Impreza, Outback, Forester, Baja, WRX&WrxSTI, SVX1. I don't have any direct experience with that sort of design, but I expect with an excess of specialized circuitry meant to absorb/dissipate the pulse energy, and/or circuits that slam the door shut (i.e. isolate the antenna from the input stage) for the duration of the pulse - really fast stuff. Also, there's that whole 1/r^3 thing that helps out a lot at altitude. And on the ground, well, EMP is about their last concern. 2. Surprisingly, they're probably rather more immune than you might think, since high-power RF transmitter output stages are still to a large extent the province of vacuum tubes. Of course, just because the transmitter still works doesn't mean you're going to hear anything, because it's the most rugged component in the signal chain. The STL (Studio-Transmitter Link) is usually solid-state microwave, so it probably won't survive. Nor will your radio's input stages. So it's all going to be a scattershot mess of stuff that's working and not.
-
jonathan909 replied to jonathan909's topic in 1990 to Present Legacy, Impreza, Outback, Forester, Baja, WRX&WrxSTI, SVXSure... I'm pretty familiar with Faraday cages. The photo below is me inside the discharge electrode (that sphere is about 2m in diameter) of a 10m-tall, multi-megavolt Tesla coil, taking measurements. The coil now lives in New Zealand. But you're a little off wrt the EMP stuff. First, the IC package size isn't actually much of a factor; if anything, a larger package (with a bigger lead frame and longer interconnects) provides a greater length conductor for the pulse to induce a current in, which is worse than a smaller one. But the issue is less the interconnect and packaging than it is the size of the junction on the die. The smaller it is, the less voltage is needed to destroy it, CMOS traditionally being the most susceptible because you just have to punch a hole in the oxide - or, for that matter, induce latchup (and then the heat from the short-circuit will burn it out for you). But I was talking about a radio, which you can't put in a Faraday cage - at least, not if you want to listen to anything - because the input signal has gotta get in, and that antenna is gonna carry the pulse directly to your high-gain front end. And if it's a semiconductor junction - even a normal bipolar one - BOINK!
-
jonathan909 replied to jonathan909's topic in 1990 to Present Legacy, Impreza, Outback, Forester, Baja, WRX&WrxSTI, SVXGD: I get it - the stuff we talk about here is pure practicality for me: Cheap, easy and fun to work on, good parts availability and interchangeability, good fuel economy 4WD (since we live out in the country and actually need it), and a platform I've really been enjoying learning about for the past few years. I understand what you're talking about, and it's interesting that there's reasonably high aftermarket tech available for the older rides you're working on. Me, I do embedded systems, so I'm entirely comfortable with that stuff, but for fun I want low tech - the hobby ride I'm working on at the moment is a '64 Rambler Classic. This one came with a 196 (straight six), but it's going to get upgraded to (an AMC) 327, and rather than upgrading the electronics, the plan is to find an old tube car radio to replace the stock transistorized AM of the era. If I can pull that off, there's a set of vanity plates in my future: EMP HARD.
-
jonathan909 replied to jonathan909's topic in 1990 to Present Legacy, Impreza, Outback, Forester, Baja, WRX&WrxSTI, SVXI'll pull them, but suspect one or more may be NFG, so I guess I'll be sticking with stock this time. Back to valves, though: I'm just coming to fully appreciate the high-magnitude SNAFU that is the suction-cup-stick hand lapping tool. I like listening to the abrasive and getting a feel for it, but the non-grippyness of the cup to the valve is taking all the fun out of the job. Is there a better way e.g. someone who makes a cup that really sticks?
-
jonathan909 replied to jonathan909's topic in 1990 to Present Legacy, Impreza, Outback, Forester, Baja, WRX&WrxSTI, SVXThat seems to be a growing sentiment. I did a bit of a garage cleanout last summer, and the chap who came out to relieve me of a bunch of disused Jeep parts was an HVAC tech who used to be a mechanic - and who switched trades for exactly the reasons you articulated. So if you don't mind my asking, what are you collecting?
-
jonathan909 replied to jonathan909's topic in 1990 to Present Legacy, Impreza, Outback, Forester, Baja, WRX&WrxSTI, SVXFwiw, I think anyone who buys a new car has stripped some threads. And it isn't just cheap SOBs like me who hold that opinion; read Warren Buffet's view of the subject.
-
jonathan909 replied to jonathan909's topic in 1990 to Present Legacy, Impreza, Outback, Forester, Baja, WRX&WrxSTI, SVXI don't know how you could describe the prices for those things other than "barmy". Spending five times (5X) what the vehicle cost for this frill is just not on.
-
jonathan909 replied to jonathan909's topic in 1990 to Present Legacy, Impreza, Outback, Forester, Baja, WRX&WrxSTI, SVXGotcha. So where do I find EJ251 pistons? Is that what my '02 Forester had?
-
jonathan909 replied to jonathan909's topic in 1990 to Present Legacy, Impreza, Outback, Forester, Baja, WRX&WrxSTI, SVXPlease elaborate. What are the differences, and what would the benefits be? I'm jamming econo, so buying (new) pistons is probably out of the question, as is buying an entire junkyard motor in order to get a used set. It doesn't strike me as practical to try to remove a set in the boneyard. [Edit] I'm kinda stoopid and haven't actually laid hands on any engines other than EJ22, EJ25D, and EJ25S. Now, is what's commonly referred to as EJ25S actually EJ251? If so, I have a borken one out of my short-lived '02 Forester (PO ran it dry and busted a rod through the crankcase, so the engine swap was my first work on it). Given the circumstances, it's unlikely there'll be usable parts in it, but getting a look at the pistons might be educational.
-
jonathan909 replied to jonathan909's topic in 1990 to Present Legacy, Impreza, Outback, Forester, Baja, WRX&WrxSTI, SVXNo, just rebuilding with what I had. It's a low-budget, first-time, try-not-to-screw-it-up job. Did I make a mistake?
-
jonathan909 replied to jonathan909's topic in 1990 to Present Legacy, Impreza, Outback, Forester, Baja, WRX&WrxSTI, SVXI figured what the he11, I paid for 'em, might as well use 'em. I took care to clean out the holes under the oil rings, and the PCV is on the list, so no worries on those fronts.