December 25, 201312 yr Awesome! I have 205/60 R 15 (25") tires due to the Mixed drive I need to do with my "BumbleBeast" which is 60% on road (Daily Driver during week days) and 40% Offroading (On Weekends' mountain trips with my Family). Kind Regards.
December 26, 201312 yr Wasn't my idea.. just did some looking around and came across jes's post... all credit to him... just thought it could help out yur rubbing... and it sure as hell did!
December 28, 201312 yr Author Just ordered some parts for my 4" lift kit. Ordered from SJR. the 4" fronts, the 4" backs, and the diff lowering plate. I'm going to fab the rest of the parts with the help of my dad, shouldn't be too challenging. Edited December 28, 201312 yr by nick1208
December 29, 201312 yr Awesome! Keep us updated, post Photos of your fabrication and installing processes. Good Luck! Kind Regards.
January 21, 201412 yr Author Lots of progress made today! Here's the beam we used to make the parts before any cuts were made. first cut! finished piece makes bolts easier to access. just cut one big circle in the middle, then cut it in half to make things easier. the parts we made. the whole kit hanging painted with 1 coat, sorry for bad picture but it's a pretty vibrant red. Planning on another coat since this one is pretty transparent. Now all that's left is to go buy the rest of the bolts and figure out a steering extension then it will go on!
January 21, 201412 yr So, you did everything, except the Strut Blocks, and the Rear Diff Plate, isn't it? Awesome!!! About the steering shaft, I removed it from the car, cutted it and lengthened it welding extra material between the cutted edges, it is not "Rocket Science" but you must take the proper measurements before welding it back together. Also, if you still has the Mechanical fan attached to the Waterpump, remove the Frame around it, from the Radiator, before droppin' the Crossmember, or the fan blades will hit it... Kind Regards. Edited January 21, 201412 yr by Loyale 2.7 Turbo
January 21, 201412 yr not sure but you may have to extend your shifter linkage also . i did even on my 2 inch lift only after i put the d/r tranny into it
January 22, 201412 yr Im think you should have gone with 14 in wall box tubing... or beef it up how was telling you cuz in my head that does look like it will flex when off road(the spacer blocks)... just a thought.. but other than that its good to your progressing and it all looks very presentable thus far... congrats!! marcus
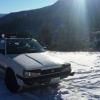
January 27, 201412 yr Author Well it happened. I had the help of Marcus and my dad. Started around 9:30am and ended around 3:00am with our only breaks being to go to McLendons for more hardware. Sorry I don't have more pictures of the whole process, I would have never of finished if i took pictures of every step. Dropped the diff off. One of the first steps we took. You can see the red parts are the lift parts. The drop plate in the back and the spacers in the front. Done with the rear! I don't have any pictures of the lift pieces or process from the front of the car. I can crawl under it and take some tomorrow. Here are some pictures I took today while out on a drive. It drives a little different. The steering is off, but that's a given. The ride is quite a bit higher, I was turning lots of heads when I took it out today. And my shifter feels a little stiffer. Other than that I can't complain I love the raked look that It has right now. Might lop a few rungs off the rear springs though because it does look pretty wonky and offcenter. I love it! bigger mudflaps to come next.
January 27, 201412 yr Lookin' good Nick. Let everything settle in before you chop the spring. Having that extra height will help when you're carry a full load in the car.
January 27, 201412 yr Lookin' good Nick. Let everything settle in before you chop the spring. Having that extra height will help when you're carry a full load in the car. His spring rate is alot higher in the rear thanks to his hinda front coils... id bet it would take almost 600lbs to leval the rear... it could use a chop really... the back wheels almost touch the front within an inch... they are very stiff springs.
January 28, 201412 yr Author who made the rear diff drop plate that you are using ? Scott from SJR. Pretty disappointed with it honestly. If I knew this is what he was going to send I wouldn't have paid the ~$70 that I did for it. I would have made it myself. http://www.sjrlift.com/index.php/catalog/lift-kits/3-diff-lowering-kit-detail That is the plate that is advertised. As you can probably see I didn't get the full cool shape, with the oval in the middle SJR print deal. I received a block of steel that would have taken me 10 minutes to cut. Sorry if it comes across as harsh but it's the truth. Lookin' good Nick. Let everything settle in before you chop the spring. Having that extra height will help when you're carry a full load in the car. Thanks! I'm not cutting them right away. But it is on my agenda. Just a rung. It sits pretty offcenter and isn't pleasing to look at. If I had the stock springs on still I wouldn't cut them, but since they are the Honda springs they are way stiffer. I jump on my rear bumper and there is little give in them. It shouldn't effect my payload much, nor the ride height. Believe me I wouldn't do it if I was sacrificing functionality. I just want to get it away from the back doors. It's too damn close.
January 28, 201412 yr no worries . i was wondering why you didn't just make the diff drop but that makes complete sense now . i would have wanted the one with the nice shape also . dont care to much his his logo but still . glad it worked though . did you have to space the carrier bearing on the driveline down at all ?
January 28, 201412 yr Author no worries . i was wondering why you didn't just make the diff drop but that makes complete sense now . i would have wanted the one with the nice shape also . dont care to much his his logo but still . glad it worked though . did you have to space the carrier bearing on the driveline down at all ? Marcus had a great idea to flip it. It spaces it down and gives me enough room that I need. Not as much stress on it.
January 28, 201412 yr I think a 1 inch block with the carrierbearing flipped would take out all the stress in the drivline and keep it stock geometry.
February 11, 201412 yr Author So I went wheeling with Marcus and Kevin. I drank a bit of water....well actually quite a bit of water, half my filter was soaking. Luckily Kevin had an extra filter and after a lot of high rpm idling it runs fine. On the way home i noticed the steering had a lot of play in it. I can describe it as turning my wheel back and forth 10 degrees both ways with no resistance or turning. It was a pretty scary ride back home. I figured I had just loosened the linkage since I replaced my OEM one with a gen 1 legacy link to go with the lift. When I got home I wiggled the linkage around and sure enough there was some play in it, the axle would turn a bit inside the linkage before it started turning with the axle. I tried tightening the nut down and snap. I snapped the bolt and the nut both in half. steering still has play in it but it easily drivable.
February 11, 201412 yr I think a 1 inch block with the carrierbearing flipped would take out all the stress in the drivline and keep it stock geometry. 3/4" PVC End Cap with a hole drilled in it for the bolt to pass through makes a good spacer.
February 13, 201412 yr Author My K&N re-useable filter came in the mail today. Snorkel in the works? stay tuned.
February 15, 201412 yr Author So i clicked my car into 4WD and i heard funny noises on the way home in 2wd. Checked it out. I guess the bolts came off the mustache bar to hold my diff up!?!? It's wedged under at this crazy angle and I can't kick it out. I don't have any jack stands so i don't feel comfortable kicking at it while its lifted. I guess i'll see what I can do tomorrow. Anyone had this happen before?
February 15, 201412 yr ouch! i think it works better to lower the whole mustache bar... thats partly why!
February 15, 201412 yr Dropping The mustache Bar can Cause It To Catch or Snag Offroad And Bend... There Are Better Options For dropping The Diff, But Basic And Affective diff Drop Plates Do An Awesome Job of Keeping Most The Things from Hanging Up But It Still Happens With It Up.. A Good Option Could Be Tube Diffdrop That Attaches At The Oem Locations And Triangulates To The Diff ..seems Like A nice Strong Happy Medium There Is A Guy On the Board That Sells Them... Edited February 15, 201412 yr by marcusgl10z28
February 15, 201412 yr thats why im covering the whole underside in skid plates Sounds Like Alot Of Work And Weight gain.. Light Strong And Effective in My Book... These Cars Are Not Trucks... Im Thinking Yur Ea81 wouldnt Be To Happy With Hummer Status Armor Underneath But This All Just Opinion And to Each There Own.

Please sign in to comment
You will be able to leave a comment after signing in
Sign In Now