Gloyale
Members
-
Joined
-
Last visited
Everything posted by Gloyale
-
First we need to clarify. The *hub* is the piece that the rotor bolts to. The *Bearings* are what you had a hard time pulling the axle through, and the *Knuckle* is what holds the bearings. Once the Axle is installed through the bearings the hub slides on and is held with the castle nut. If you are going to replace the bearings, they need to be pressed in. Remove the whole knuckle, with the axle still attached to it(just knock out the roll pin at the trans end) and take it to a shop to have the bearings pressed. They can remove and reinstall the axle easily while pressing the bearings. Don't forget to get new seals for the bearings inner and outer.
-
The SPFI TPS is similar to the Spider TPS. But again it is opposite rotation. The SPFI throttle body has the injector mounted in it. You could remove the injector, but it's mounting would still be there blocking air flow. the rest of the setup would be tricky to figure out as well. If anything better to use a standard MPFI throttle body on the spider, but it would still take adaptation. In any case you need to match the type of TPS to whichever ECU setup you have. If you have the early flapper maf and the 3 plug ECU, you need to use the old switch style TPS. Or perhaps some microswitch mounted. But really, drilling a hole in the plastic case and flipping it over would be super easy. I did it in 20 mins. Then it is plug and play. and once you have it setup, you could replace it if it ever went bad and all you'd have to do is switch the plastic cover to the new one and drill narrower mounting slots.
-
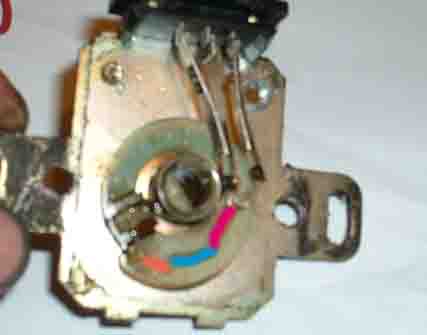
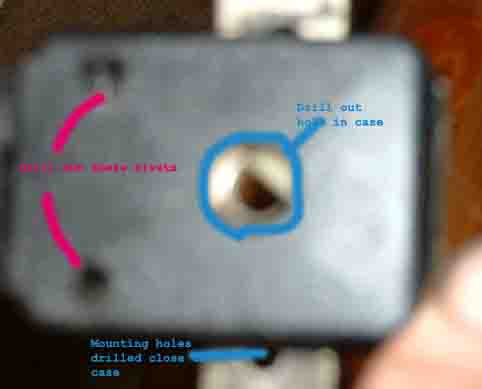
Here's what I found out. First off the mounting holes on the Spider Throttle Body(TB) are closer toghether than the standard TB. So mounting it would require drilling new holes in the mounting plate. No big deal. you could mount it directly and switch the Idle and WOT wires and it works, sort of. Look at this picture. the red part is the idle portion, the blue neither at idle nor at WOT, the purplish red is the WOT section. It is designed so that the idle portion is very small, only in contact until the throttle is at about 2-3 degrees open. The WOT portion is supposed to activate when the throttle plate is between a 45 degree angle and 90 degree angle, 90 being as far as it can go. The problem with simply switching wires and directly mounting it is adjustment and range. using the idle portion as the WOT makes it so you only get the signal at almost 80 degrees open. And likewise the idle will be signaled until you open the throttle almost 20 degrees. Notice though that the hole for the throttle shaft is open all the way through. So here is what I suggest First you need to drill out the rivets holding the plastic cover on. Then drill a hole allinged with the throttle shaft big enough for the shaft to go through. Now with some longer mounting bolts, and some kind of spcer as thick as the TPS case(so it doesn't crush and stick)you can mount it flipped over and Voila! Now it rotaes correct direction and can be plugged directly to harness. No wire switching and it will still contact at the appropriate range. The mounting slots will still need to be redrilled closer to the case.

-
The frame of the Sunroof has drains at all 4 corners, connecting to tubes that run down the front*a* and rear*c* pillars. Not the middle *b* pillar. The front tubes connect to a Grommet in the fender well. The rear drain connects to the vent assembly on the *c* pillar of sedans and to a grommet at the very rear corner of the wagons and coupes.
-
Spider TPS is opposite rotation. As far as reversing the idle and WOT switches that's an interesting idea. I'll go out and test fit it and see if it would work. Ihave a spider and an old style TPS in my garage.
-
Maybe this is a dumb Question, but are you positive it's not just brake noise? Are you're rotors smooth? on both sides? I had a noise like this that I was convinced was wheel bearings. The outer side of the rotor looked fine, and I couldn't see the inner side well because of the backing plate. Until I went so far as to actually remove the disc, and low and behold the inner side of the disc was rough and actually flaking of pieces of the brake surface:eek: Sounds like you are experienced enough to have checked this first. Just something to rule out first.
-
The Spider TPS can be made to work with the Hotwire MAF system easily. Basically, both are potentiometer types with a Power, a signal, a ground and an idle switch that gets grounded at closed throttle. on the 3+3 type, if you look carefully, the plug that goes right onto the TPS only has 2 wires in it(so really it's 2 +3). It is the idle switch portion. One wire is ground, the other carrys the grounded signal back to the ECU to tell it that the throttle is closed. The 3 seperate wires are a gound, a power, and a signal form the potentiometer portion. To make this style work with a Spider TPS you just need to combine the 2 ground wires(or just cut ff one of them, since they are already combined further up the harness) and match the remaining 3 to their respective pins(power, signal, Idle) on the Spider TPS. As far as using a Spider TPS with the older type, I can't see how it would work. The old style is not a potentiometer. It has an idle switch and a wide open throttle switch. the standard(non-spider) TPS from the newer type (3+3)has the same idle switch and may even have the WOT switch inside it as well(the unused pin) They seem to be a hybrid, almost as if they added the 3 wire pigtail as a retrofit. So it's possible that it would plug and play onto the old system. But the spider ones are totally different and have no WOT switch. It may run the older style to an extent, but you will never get WOT signal so may run lean under full throttle. On the old style when the idle switch is off, but the WOT switch hasn't been activated, the computer uses the MAF and the O2 sensor to determine fuel mixture.
-
Yeah, it's simply a vaccum reserve to operate the controls inside. it just need a single vac line hooked to it.
-
Is that a Legacy dash frame I see? Is the leagcy dash going in? I like the Legacy 4EAT shifter too.
-
Yeah I knew I had read it. If you haven't seen this check it out http://home.comcast.net/~trilinear/EA81_SPFI.html Thanks to General Disorder for the write up(GD, I know we keep buttin heads but I do respect you're knowledge of Subies) Sounds like you are trying to use a Nippon Denso Drivegear. You need to find an EA81 Hitachidistributor and get it's drive gear. The pin location is different though, it will still need drilled.
-
I haven't done the swap personally. But I think I read that you need to actually drill a new hole in the shaft to mount the gear in the proper location.
-
Gloyale replied to Gloyale's topic in 1990 to Present Legacy, Impreza, Outback, Forester, Baja, WRX&WrxSTI, SVXThanks to everyone with the info. I got them done and it worked out fine. The kit I bought was a Hub/Bearing assembly.
-
Gloyale replied to Gloyale's topic in 1990 to Present Legacy, Impreza, Outback, Forester, Baja, WRX&WrxSTI, SVXI said that it puts me "close" the cost of shipping from California to Wisconsin on heavy items like these would not be cheap, possiblly $40-50 so about $150, plus waiting a week. Autozone lists a bearing kit(pressumeably with seals) for about 75$. so $150 for both, plus the pressing cost. Not much more really for Brand new as opposed to used. Anyway, I did the job already. But thanks to everyone.
-
Seems to me that as long as both are Turbo ECUs there should be no diference. It would help a little to know what years we are talking about. It's also hard to say because in the US, there were no Turbo *vortex*(xt) after 87. We got the XT6 instead. All the turbo ones here used the old flapper style and the 3 connector ECU. So all of my 88+ XT manuals show only non turbo info.
-
Is the fitting on the rubber line stripped? If not then just replace that 10 inch piece with a new line with the fittings on both ends already. I don't think yuo'll have much luck trying to cut/flare and refit. It really needs to be a double fold on the flare to compress and seal correct. The simple flare kits you buy at auto parts stores are not capable of this type of *bubble* flare. A piece of brake line should only cost about $5 bucks and will have the fittings on both ends already. It's easily bent by hand to fit. It's made to bend without crimping.
-
Hitting the Cam housing? That isn't right. The rocker shoudn't copme anywhere close to the housing. At anyrate, I think youd be fine to just replace the Cam and rockers. You're head is probably fine. If you need a set of Cams and rockers I have some. You have to be careful cause the Carbed cams are different than the SPFI and later years. PM me if you are interested. You're car is an 85, and you didn't mention a turbo, so I'm assuming Carbed. Is this correct?
-
I had mystery clunking noises come from brake pads that are somewhat loose in there brackets. Espsecially if someone has put on cheap pads without the wear indicator tab, which for these cars also serves as a sort of preload device to keep the pads from shifting. Just a guess. Perhaps play in a tie rod or a wheel bearing as well. I would not rule out axles entirely but I agree they usually make a repeating clunk with the movement of the car.
-
Yeah, I just hate to wire an extra relay. Really the best, best solution would be to add a relay, that can be activated by a button if the switch fails
-
A loud whirring noise? That doesn;'t sound valvetrain related to me. What is the condition of you're timing belt tensioners?
-
I'm assuming that when you did the disc conversion you simply connected the fitting that used to go to the wheel cylinder to the rubber line for the caliper. There is another rubber line further up the swingarm that allows for the travel of the arm relative to the body. There should be a hard line in between the 2 rubber ones. about 10 inches long, going through a small hole in the trailing arm. It connects to the rubber line that comes from the body. Perhaps you can remove the line back at that junction and replace it with a new piece of bend to fit line, with connectors in place already?
-
I am not sure it would nessecarily cause a vacuum drop though. Check all the other things like vac hoses and throttle body base seal.
-
If the EGR is stuck open/not seating then yes it could make the drivebility of the car suffer.
-
even if someone did this(which I doubt) there would be no control unit or sensors to activate it. I think you are being B...S...ed by the seller. No Loyale/Leone/GL or any EA82 ever had an airbag
-
I'll let him answer DL is the base, base model, almost no options. Only available with PT 4wd
-
This is the classic ignition switch issue. I've seen it sooooo may times. Try this to test. Put it in nuetral(or P for auto) and turn the Key to *on*. Now go under the hood and use a wire to run 12v from the Battery, and touch that wire to the Starter solenoid tab. If it cranks over this way but not with the key, then it is poor contacts somewhere, probably in your ignition switch. But clean the solenoid connector and crimp it a bit(or just put a new connector on) I've seen poor contact there be the problem. If cleaning the contact has no effect then you need to run a button to start. Run 12v with a inline fuse from the either the fuse box, the battery, or my favorite, the positive battery cable post of the starter. Run that line into the cab and to a pushbutton and mount it. then run the wire from the button back to the starter solenoid. If you use a Piggy back spade connector on the end then you can reattach the original wire too. Others will say to install a relay, signaled by the original solenoid wire. This works too. My only issue with it is that it still relies on the ign. switch making contact, which eventually it won't. I've seen this issue over and over. If you want to be really ambitiuos and spend a bit of money you could try to buy a new ignition switch, but they are tough to find. Button and wire are less than $10 and will ALWAYS work. Just be sure to put a fuse in. You don't want unfused 12v coming into the cab, if it shorted you're whole car could go up in smoke.