kmix99
-
Posts
34 -
Joined
-
Last visited
Content Type
Profiles
Forums
Gallery
Store
Everything posted by kmix99
-
An update: I replaced the Transmission Control Module (Original Subaru Part #: 31711AB354) with a used one from Ebay (Subaru Part Number: 31711AC031). No more flashing Power light and the torque bind is gone!!!! This was purely and electrical problem on the TCU circuit board causing the code 24 Duty-C error. From my limited testing, my original TCU had a problem in one of the integrated circuit chips on the board that sends a signal to the base terminal of the transistor for the Duty-C circuit. This controls the voltage output to the Duty-C solenoid.
-
I'm reviving this post as I have run into the same issues on my 1992 Legacy LS AWD. First I changed the tranny fluid 3 times, and the rear differential fluid twice. Next, I replaced the Duty C solenoid assembly and gaskets, transfer gear set (new), and transfer drive-gear shaft with seals (new). Transfer clutch plates looked fine so I left them alone. Got everything back together only to fine out I still have the dreaded code 24 flashing. Next, I removed the TCU and traced the circuit pathway for the Duty C (big thanks for the great pics posted by "Eulogious" in "Fixing a fried 4EAT TCU" post). I desoldered the corresponding Duty-C transistor off the board and it tested fine. Nothing else on the board looked burned/ fried. All of the under-dashboard wiring from the TCU to the engine compartment tests ok (no breaks or shorts), and I have a good ground to the solenoid. Service Manual Test for Duty-C: When I test the output at TCU pin 3 (white wire with black stripe) with shifter in 1st gear, I get 8.5 volts. With the gas pedal fully depressed, I get 5.4 volts. Service Manual says voltage should be 0.5v at pin 3 with the gas pedal depressed. Not sure why I'm off on this reading. With FWD fuse installed, I get approx 12 volts at pin 3 with or without pressing the gas pedal. Driving with the FWD fuse installed makes no difference...still have binding. At this point, I'm either going to find a used TCU and swap, or remove the center drive-shaft. What are the chances I'll find a good TCU of this vintage that doesn't have the same problem? Man, this is frustrating......
-
Wondering if you folks could help.........I'm in the process of replacing the Duty-C solenoid assy on my 1992 Legacy LS. I noticed there is a small bolt with o-ring on the outside of the tail housing. If you open this bolt, you'll see the end of the metal tubing that runs to the Duty-C valve assembly. Is this the port for pressure testing the solenoid? Do I need to do anything special with this during the install (like bleed this line through the bolt hole or something)? Thanks in advance.
-
Yep, sounds like they got you. That is why I avoid chainstore mechanics at all costs (Sears, Pep Boys, Midas, Monroe, etc, etc). The minimum thickness on the front brake rotors is 22.0 mm. They come new with a thickness of 24mm. That leaves only 2 mm for wear and resurfacing. I feel it really is a waste of money to have the rotors cut because you don't have a lot of room to spare. I would reuse the pads if they are not unevenly worn. Maybe if you get a day or two free from work, you can replace the rotors yourself. Good luck!
-
I know this thread is old but it was very useful in solving my 1992 legacy door lock problem. My locks would work hit and miss---seemed better in the cold weather. I will only add that my 92 door lock assembly in the driver's side door looks a little different than the 95's and up. The part you want to take apart and clean is the black rectangular piece where the larger of the 2 electrical connectors attaches -- it has a black accordion-like boot with a plunger arm. Once you remove this switch from the assembly, remove its cover which is held in place with 4-5 small screws. Once open, you will see 4 copper sliding contacts that activate when the plunger moves in and out. Mine were very dirty and black. I cleaned everything with rubbing alcohol & an ink-pen eraser. I also bent the the contact arms down a little so there would be a better connection/ more tension. Use di-electric grease as lube and re-assemble. Solved my problem--- I'm so happy they work again!
-
You apply the anaerobic sealer just like the RTV. When you tighten the mounting bolts, you'll see a little squeeze out of the joints. There are detailed instrux on the package or you can visit the Permatex homepage for more info and part numbers. Like I said, I used the activator as well and haven't had any problems.... no leaks.....dry as a bone. Very happy with the results. Maybe next time I'll use Permatex Ultra-Gray for comparison.
-
Do a search in this forum on "IAC valve" or "idle air control valve" and you will find a wealth of information on this topic. It does indeed sound like it is time to clean it.
-
The anaerobic sealer made by Permatex sold at Napa and elsewhere is expensive. Be aware you also need to buy can of Permatex Activator that you spray on both matting surfaces before applying the anaerobic sealer. Read the tube of anaerobic sealer and it will instruct you how to do so. I did this and had very good results so far---- extremely happy with this product except for the price.
-
There are a lot of very poor quality remanufactured alternators being sold out there. A lot of the people rebuilding them get minimum wage and hate their jobs, rebuilding hundreds every week. Not all of the internal components are replaced with new ones. I have had several encounters with faulty rebuilds--- for that reason, I always buy new or have my old one rebuilt locally. If you think/test your new alternator is ok, then I would do as the others have suggested and reset the ecu.
-
On the 90-94 sensor, there are three wires, two to the sensor and the third wire is for interference shielding purposes. I am not sure about the 95 and on sensors and why they are cheaper... it must be the wires. Both sensors are simple inductive types...nothing fancy.... old technology.
-
sounds like that timing belt was probably the original belt. why not get another subaru belt and get another 200,000 miles on it.
-
You can get a used crank pulley and a new key for under $75, cheaper if you go to a "U Pull It" junk yard. Any pulley from an impreza or legacy with a 1.8 or 2.2L engine will fit. It is most likely that they did not tighten the bolt to spec and use thread-lock. It probably came loose over time, started to wobble and sheared the key. There may be damage to the crankshaft where the pulley sits, but chances are good it's ok. It could have been a lot worse if it came off (damage). To replace it doesn't take long, so I can't see why labor charges would be high. Your engine is non-interference, don't worry about any damage (valves, etc) If the shop is reputable, they will stand behind their work. If not, I would go elsewhere.
-
I too have the same stereo unit and have a problem with the driver's side door speaker being quieter than the others. I have checked the speaker and the wiring several times and they are good. I switched wires on the back of the unit to see if another channel would have normal output to the driver's door speaker and it DID. This leads me to believe amp channel 1 is shot. I was able to find another stereo unit (same kind, Panasonic 80w cass) at the junk yard for $15 dollars. Hooked it up and guess what---same problem. I am stumped. Could it be that there is some kind of factory defect in these units or am I just losing my mind.
-
I got the o-ring and seal from a local subaru dealer. If dealer is not close by, you can try www.1stsubaruparts.com or www.subaruparts.com. Not sure if they ship to other than USA.
-
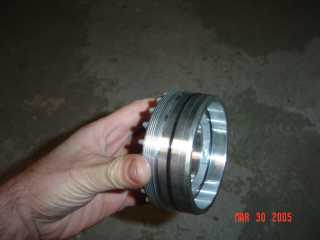
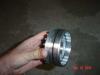
After removing the one bolt and retainer clip, the whole circular "teeth" retainer will spin off counter clockwise. You may need to buy a special spanner tool to remove it, or a truck spindle socket (see pic) or use a screw driver to catch two of the teeth and loosen. Mark the retainer to a reference point on the transmission or count the number of turns when you remove it. It must be reinstalled to the exact same depth, since there is a bearing race on the inside of the retainer. You will need a new seal and a large o-ring pn #806730031.


-
Sears sells a wonderful 3/4" Sliding T breaker bar, which you can grab with two hand, one pushing down, one pulling up, with the socket in the middle. I broke several 1/2 " breakers myself, so you are not alone.
-
A bad ignition coil would not cause your oil consumption. A misfire, hard starting and fouled plugs are symptoms of a faulty coil. There are simple tests you can do at home to check your coils and plug wires using a volt meter (see a Haynes Subaru Manual). Some autoparts stores will test them for free if you bring it in to them.
-
I bought a valve cover gasket kit for my 92 Legacy EJ22 from Advance Auto ($24.00) and it's the exact same as the one from the Dealer. The bolt grommets are identical as well. Upon further inspection of the Felpro box, it states the gaskets are made in Japan. I thought I would pass this along --- save yourself some money from Dealer markups.
-
"The main pulley has started to slip off the harmonic balancer, so I replaced it. " Oppps, I didn't read you correctly. Forget my comment about the Loctite.
-
If the crank pulley is coming off, you need to put Loctite on the crank pulley bolt and tighten it to 120 ft-lbs. My friend had a similar problem with his 2.5L overheating. Turned out when he replaced the timing belt, he lined it back up slightly off, by one tooth, thus causing all the weird overheating problems.
-
Yes, a large screw driver in the bell housing access hole works great. If you have a scrap length of pipe to make your breaker bar longer, that helps a great deal too.
-
I went to the local "pick and pull" to find myself a crank sensor for my 92 Legacy after finding out the new OEM sensors were expensive ($250+). I pulled an extra one, which I tested and works. If anyone wants it (from a '94 Legacy), e-mail me. kmix99@yahoo.com
-
I snaked a thin wire cable through one of the holes in the crank pully, then looped it back up around the alternator bracket. The wire ends were secured with a small u-clamp to complete the loop. Works great and very secure plus it's cheap. I plan to post some picks.
-
I'm putting things back together on my 92 Legacy. Based upon a few search results, I think this is the consensus as far as sealants. Oil pump= use Permatex Ultra Gray. Water pump= just the factory gasket, no sealant. Is this correct my friends? Anyone using Permatex Anaerobic Gasket Maker for the oil pump-- I happen to have a small tube.
-
OEM that is.