rickyhils
-
Posts
224 -
Joined
-
Last visited
-
Days Won
7
Content Type
Profiles
Forums
Gallery
Store
Everything posted by rickyhils
-
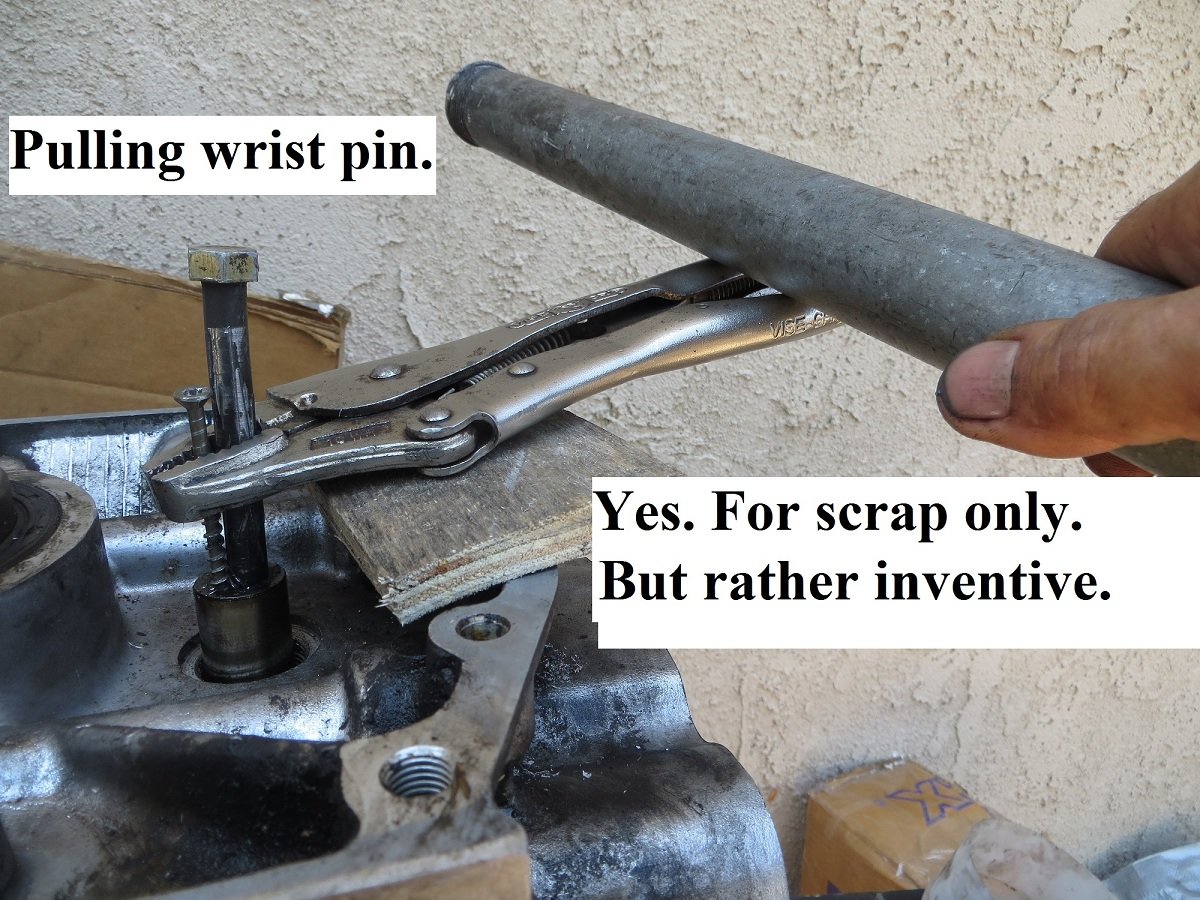
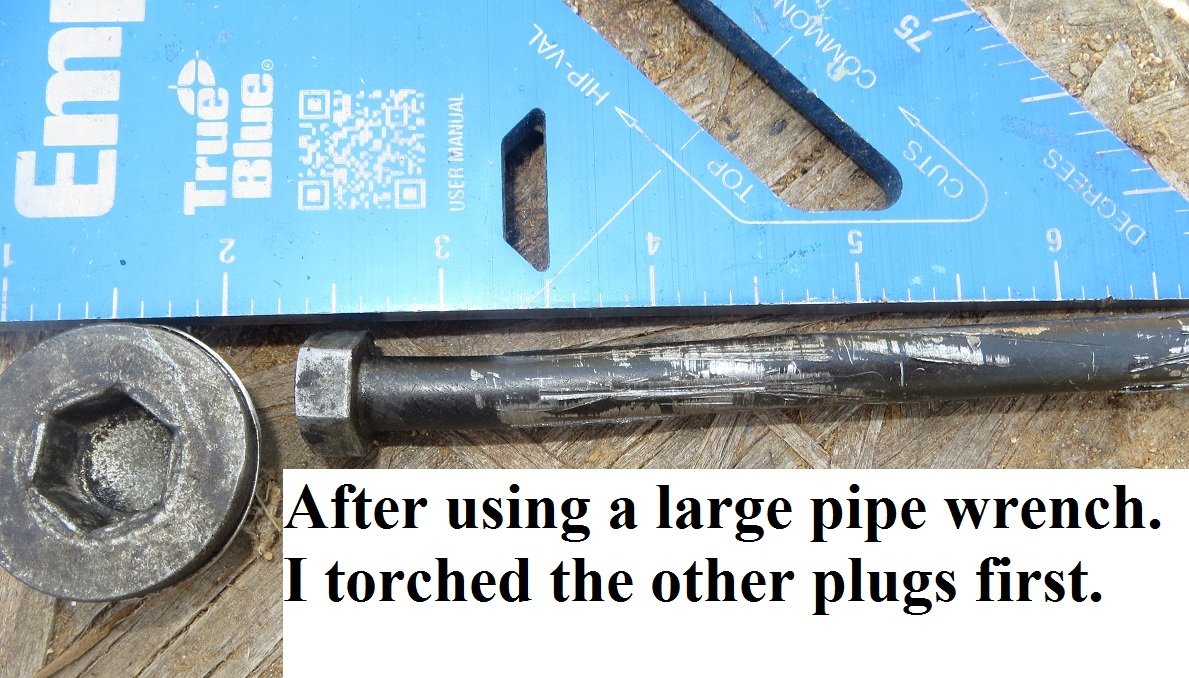
This is NOT any rebuild project. My only purpose is to learn more the old stuff. 1.) Getting to the piston wrist pins was a formidable task for me. You guys have done it a hundred times, I know. I started with a 14mm bolt and a larger pipe wrench. No go. Just look at that poor bolt. I tried propane heat. No go. Then I gave the plug a "love tap" with a 15lb sledge hammer. That finally worked. As this is scrap I was not concerned very much.


-
EA82. Could be a real "find"
rickyhils replied to rickyhils's topic in Old Gen.: 80's GL/DL/XT/Loyales...
This rebuilt EA82 [with no history of who did the work or when it was done] turned out to be ok. I found it on Craigslist. Local pickup. It was my lucky break. 160 miles on it so far. Shows to have a reliably functioning bottom end. -
EA82 chafing noise from cam
rickyhils replied to rickyhils's topic in Old Gen.: 80's GL/DL/XT/Loyales...
That I will do. And a side note- The cam belt was off by one notch because I think that I had not tightened the belt tensioner and it slipped when I rotated for the other side. The idle was sort of ok but there was low power on acceleration and a wee bit of occasional backfire when I let off the throttle. I though "Oh, Ricky, just when you thought you had it, you messed up." (I run it with no cam belt covers). But now it runs really well with good torque. Till next next time with new topic. -
EA82 chafing noise from cam
rickyhils replied to rickyhils's topic in Old Gen.: 80's GL/DL/XT/Loyales...
Engine now runs well with no remarkable "extra" noise volume from left side that was there before. After reinstalling cam with capable HLAs it took a few miles of driving at varying rpm [up to 4500] to have the HLAs pump up and quite things down nicely. Engine purrs like a kitten at idle. -
Engine cylinder head stains
rickyhils replied to rickyhils's topic in Old Gen.: 80's GL/DL/XT/Loyales...
OK. And any need to remove block dowel pins? And. I see you are electronics engineer. I fixed the EGR cel code 34 by changing out a transistor array chip inside ecu. Dummy load 35 ohms worked but then down the line the chip failed. So, will try 80 ohm 5 watt dummy load. -
Engine cylinder head stains
rickyhils replied to rickyhils's topic in Old Gen.: 80's GL/DL/XT/Loyales...
So, I imagine that the channel should be 11'' x 7'' for flat coverage. End with 320 grit? Have read that a shallow fire ring might be ok, meaning only slightly noticeable using fingernails. -
Engine cylinder head stains
rickyhils replied to rickyhils's topic in Old Gen.: 80's GL/DL/XT/Loyales...
The left head was sealing ok. Only reason for removal was to verify condition of the valves. After lots of cleaning with carb spray, plastic scraper, and paper shop towel I just put the head back on. -
Engine cylinder head stains
rickyhils replied to rickyhils's topic in Old Gen.: 80's GL/DL/XT/Loyales...
Are you saying while engine is in the car? -
Engine cylinder head stains
rickyhils replied to rickyhils's topic in Old Gen.: 80's GL/DL/XT/Loyales...
Idosubaru- First - Let it be said that we all highly value the advice from DaveT. However in my present situation I can only go with it as is, so your advice is as reasonable and practical as any at this point. The fire rings are not "deep" as they barely catch the fingernail. I'll do ft/lb sequence 22, 37, 55. Then, I'll just drive the car and CHECK COOLANT AND OIL every chance I get. A side note: As far as the ancient EA82 goes- here is a FWIW comment. On a junk EA82 block I tested some head bolt torque amounts. I worked up to 70 ft/lbs, with the bolt coming back out clean with no aluminum pulled. AND - One of the bolt holes was Heli-coiled 12 years [160,000 miles] ago and it went to 70ft/lbs just fine. And, against all good advice I installed two [2] coils in that same hole. I carefully measured so that there was a gap between them. AND - the stock EA82 head bolt hole accepted the Heli-coil tap without need to drill. At the time it was either take a chance or junk the car. The new threads were cut without a snag. don't we love it! -
Engine cylinder head stains
rickyhils replied to rickyhils's topic in Old Gen.: 80's GL/DL/XT/Loyales...
DaveT- Yes. That is the ONLY way to be sure of the head. However, on the block surface at the fire rings I can only give it my best shot with carb spray, plastic scraper, and paper shop towel. I'll work on that for 30 minutes and then I will have to call it quits and go with it. -
Engine cylinder head stains
rickyhils replied to rickyhils's topic in Old Gen.: 80's GL/DL/XT/Loyales...
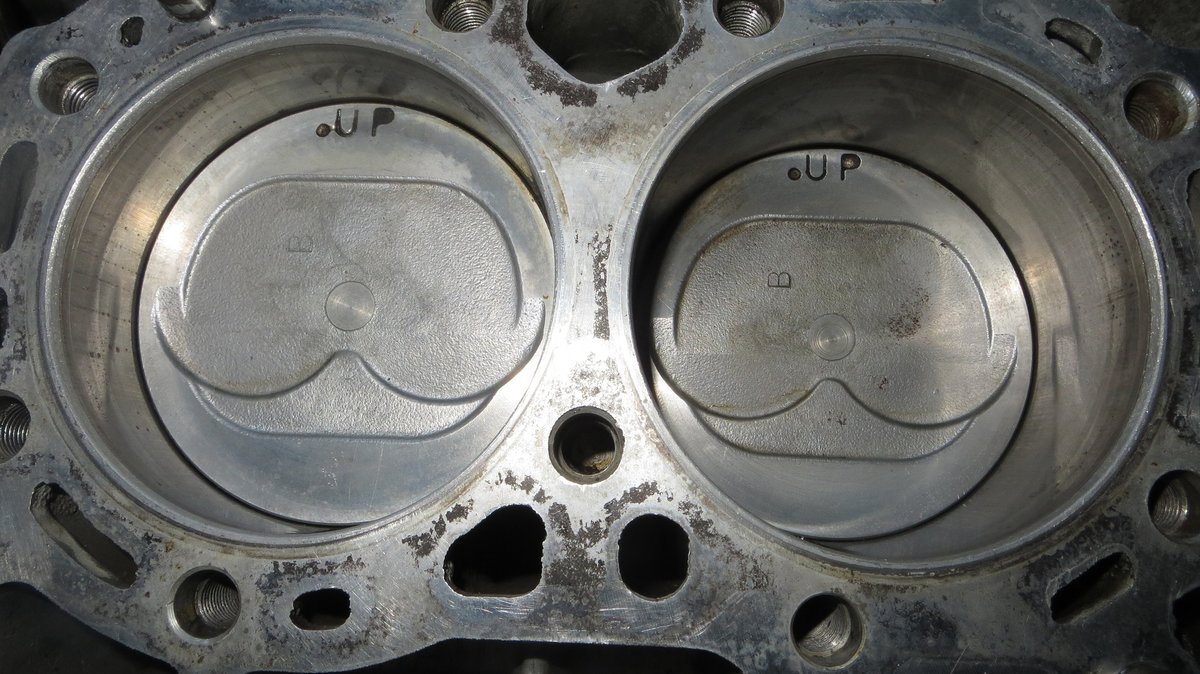
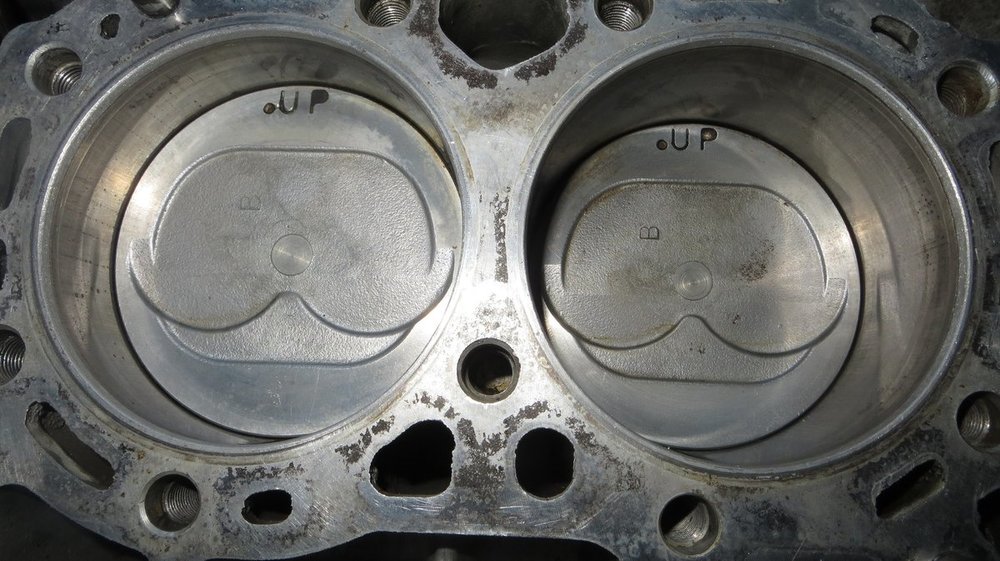
Thanks for the info. Head looks clean and has no overheating issues. Recent operation had no issue at all on ability to seal. Only purpose for removal was to triple check valve condition. Stains ONLY on engine surface where [questionable use of] brown colored sealant made contact AT WATER JACKET AREAS ONLY. Compression sealing will be ok. Purpose of my OP here is to hear from you guys as you've "been there-done that" . My experience is that I once put gaskets on the removed EA82. That was back in in 2008 and after 160,00 miles they held up just fine. But doing it the first time and being successful is still no substitute for previous experience. Sometime we noobies "get lucky" and become over confidant. I will be installing head now. Felpro Permatorque . *** Old Gloyale post said finish up this final sequence: Go to 45 ft/lb. Back off 90deg. Retorque to 45 ft/lb . Then a final 90deg. I can see how this should bring a more reliable final clamping pressure, rather than just relying on what the torque wrench says. I have a salvaged engine I can practice on. -
Engine cylinder head stains
rickyhils replied to rickyhils's topic in Old Gen.: 80's GL/DL/XT/Loyales...
Stained, yes. And this block surface is Smooth to the touch. I can not feel anything. Nothing catches by fingernail At All. No protrusions. The head cleaned up nice. This head has no overheating issues or flatness issues. Removed from engine only to check valve condition. The sealant compound was not needed and that is what caused the stains.
-
Valve spring installed upside down
rickyhils replied to rickyhils's topic in Old Gen.: 80's GL/DL/XT/Loyales...
I have a new topic at under: Engine cylinder head stains -
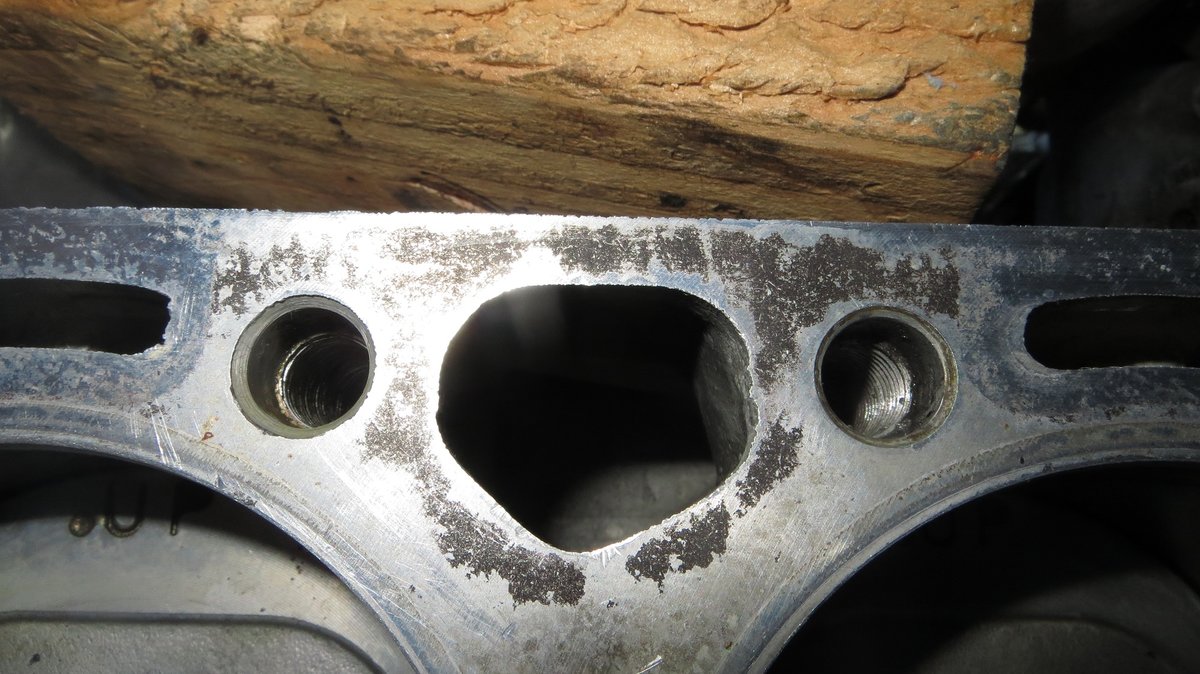
These stains remain after an hour of scrubbing with carb spray, plastic scraper, shop paper towel, and MORE carb spray. From what I saw on this engine before it was installed was some brownish sealant at the water jacket area where the previous gasket was visible at the edges. I cannot catch any of these stain marks with my fingernail and all is finger smooth. So it is some kind of stain on the aluminum . A shown here, the rebuilder chose to add sealant at the water jacket areas. Also between the cylinders. I have a Felpro Permatorque gasket ready to go. EA82 non-turbo.

-
Valve spring installed upside down
rickyhils replied to rickyhils's topic in Old Gen.: 80's GL/DL/XT/Loyales...
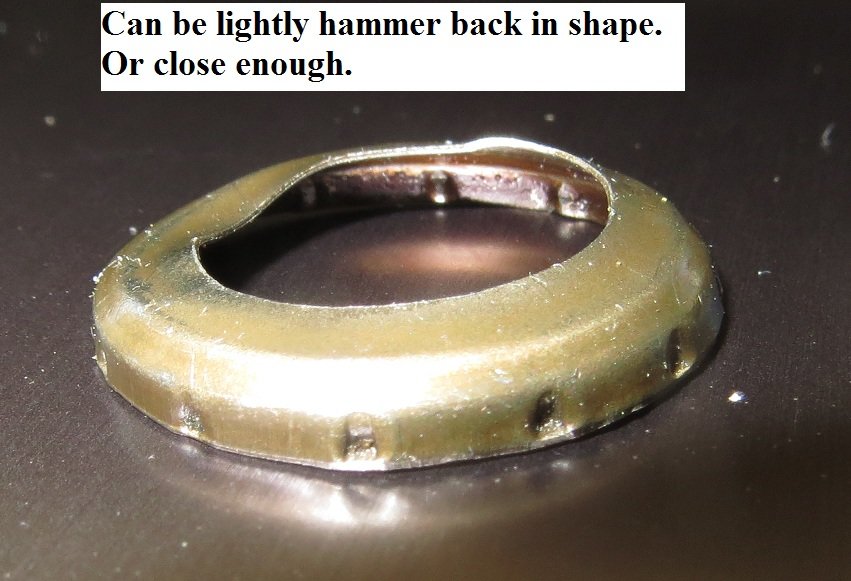
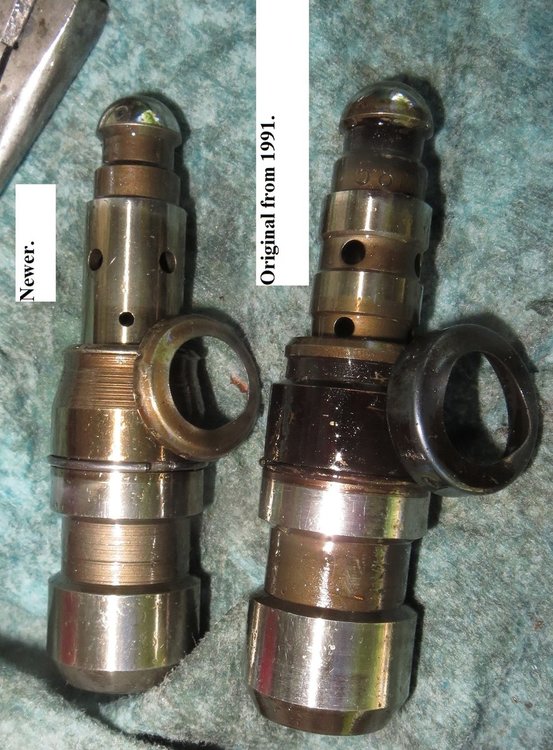
I put a "stuck" HLA in a vise and carefully pried off the cap. The cap can be lightly hammered back in shape to use again. A 13mm deep socket taps it back on. A little careful peening with a very small punch can tighten the cap up a little better. I used a dulled large wood screw on the cap dimples and the soft metal didn't take much. That "stuck open" HLA now feels a lot better. It was that little bit of corrosion [or just gummed up] at the inner piston that was stuck. Some needle nose pliers pulled it as there is inner hollowed out space to get a reverse grip. The OLD (1991) HLA has a different piston bore size than the NEWER HLA.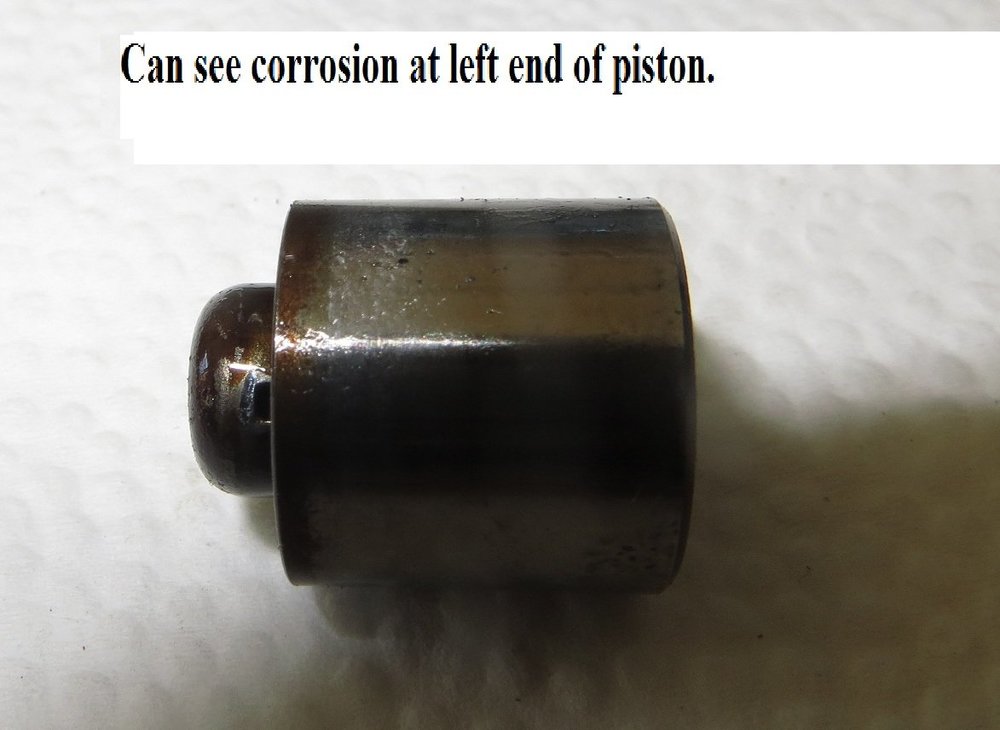
-
Valve spring installed upside down
rickyhils replied to rickyhils's topic in Old Gen.: 80's GL/DL/XT/Loyales...
There has to be a way to carefully reshape that HLA retainer cap and then peen [or stake] the cap surround. -
Valve spring installed upside down
rickyhils replied to rickyhils's topic in Old Gen.: 80's GL/DL/XT/Loyales...
And I have a Felpro permatorque gasket handy. And, since the head is OUT of the car, I can easy enough put the springs back on. I'll try for Right Side Up this time [bunched coils at the bottom] -
Valve spring installed upside down
rickyhils replied to rickyhils's topic in Old Gen.: 80's GL/DL/XT/Loyales...
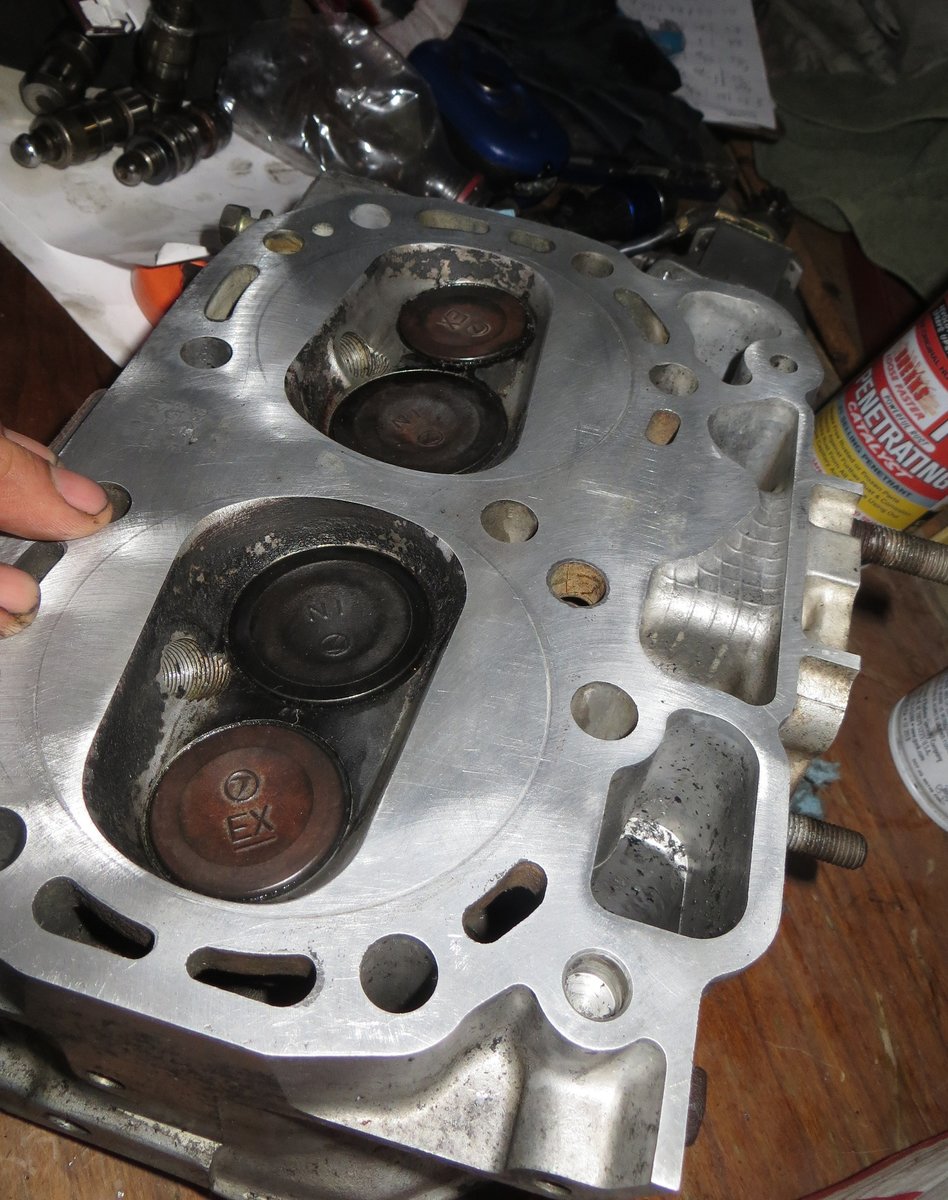
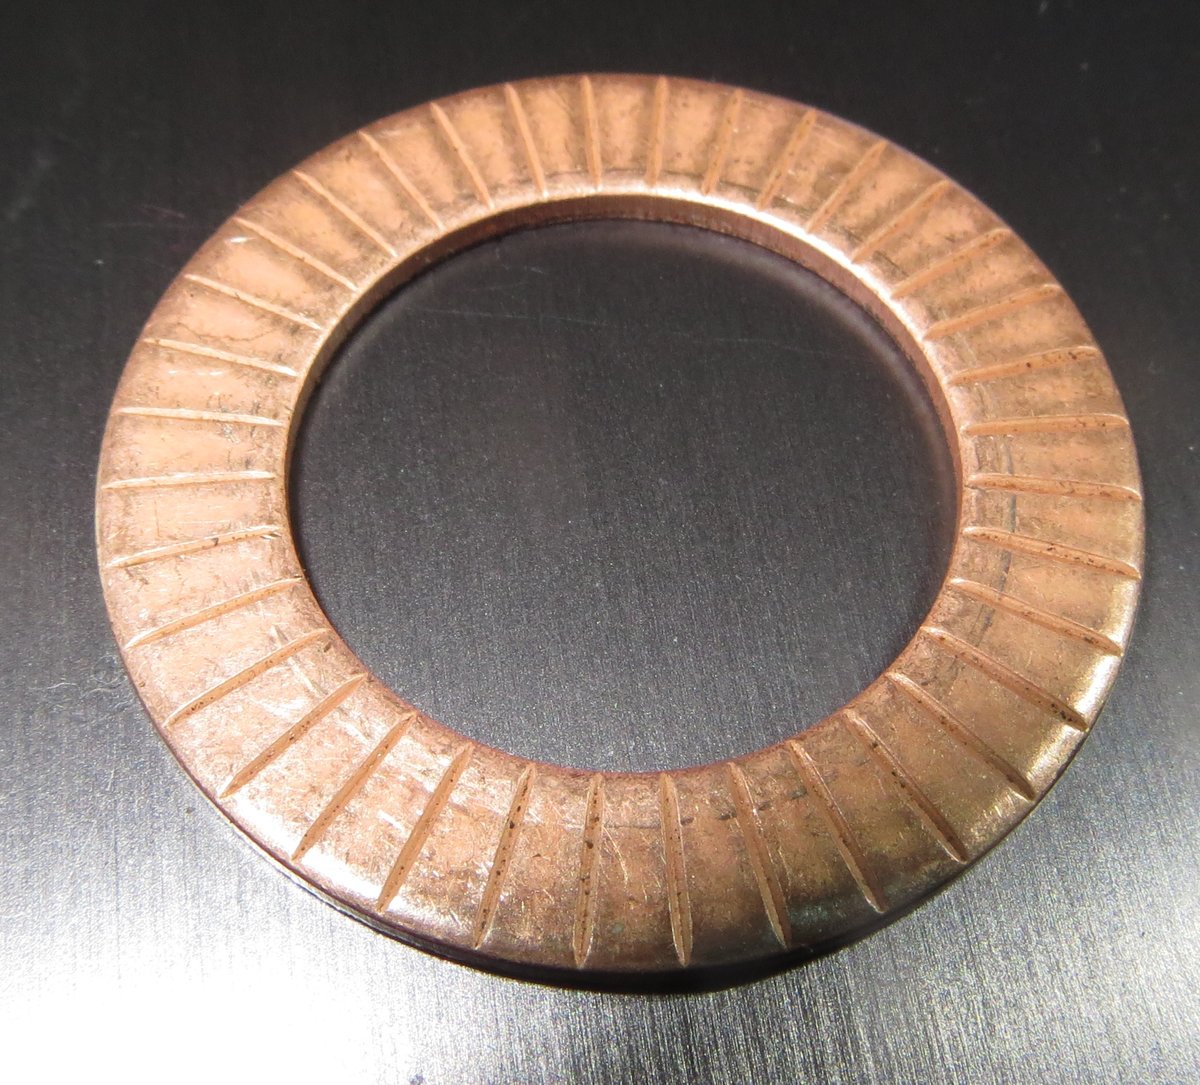
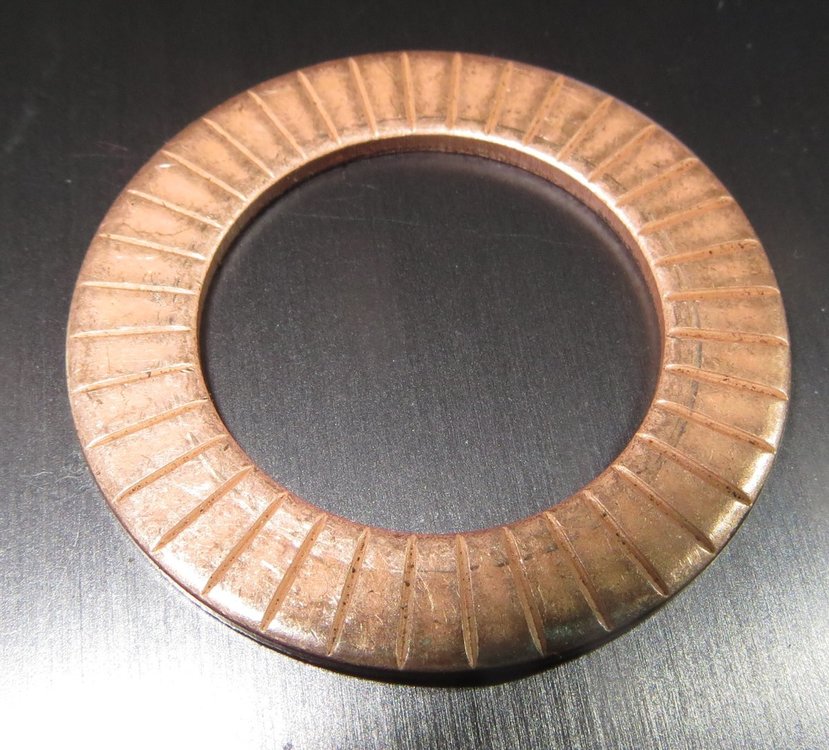
i The retainer cap on the HLA needs to be properly peened to be reinstalled, and I don't know yet how to properly do that. But go get an old HLA and pry that retainer cap off and you'll see what I mean. Just a little cleaning is like night and day. I used a piece of thin galvanized wire to poke that tiny ball valve just a little to let the carb spray in . And, at the base of each valve spring there is a .050" insert [V.S.I. 203 Insert] that was not on the original old engine. I made some inquiries. The rebuilder was knowing enough to restore the spring tension after the valve grind. see pic. So, I spent an extra 5 hours today just to replace a . . . (wait for it . . . ) a perfectly good head gasket! But I just had to know exactly what was up with those valves before moving on.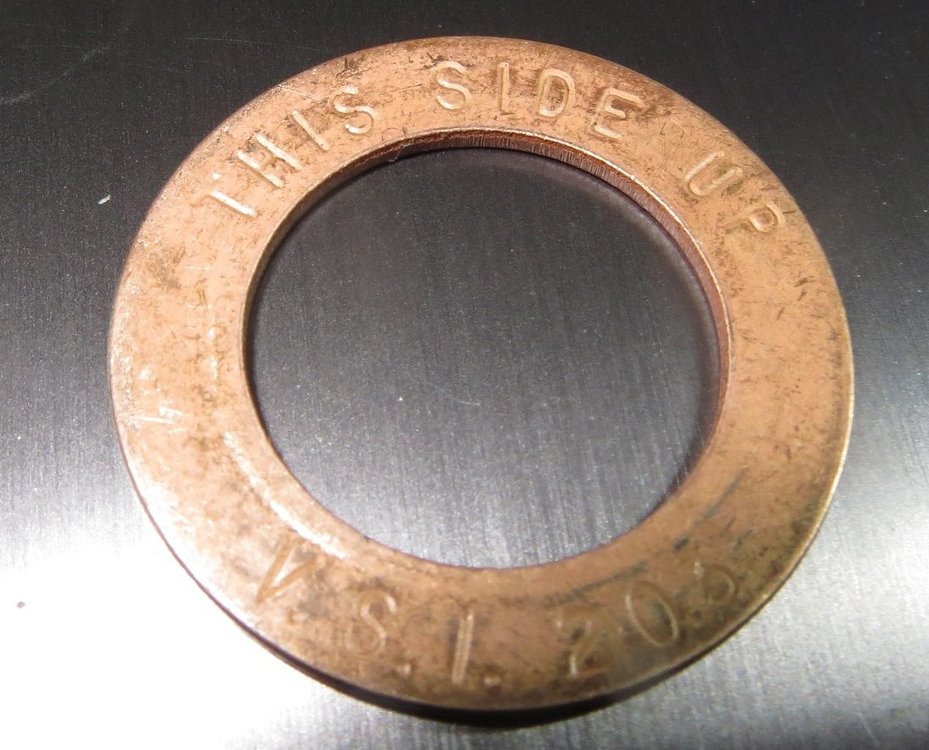
-
Valve spring installed upside down
rickyhils replied to rickyhils's topic in Old Gen.: 80's GL/DL/XT/Loyales...
1.) Valves and valve seats look to be ok . After some research it may well be that a backyard valve lapping [using a drill] has left three valve seats .009 deeper than that #2 exhaust valve seat. That is how much the straight edge test showed. I will just run it as is. I won't be spending 150+ bucks at a machine shop at this point. 2.) After talking with Mizpah, it is possible that the four HLA on the left side have become stuck on the high side after all these years . And that could account for the louder [different] machine noise I was hearing. When squeezed in a vise they simply do not want to compress. So, I took apart one on those HLAs [compromising the retainer cap] and after cleaning out the bore with carb spray and using a wire to operate the tiny ball valve I put it back together and it worked nicely. But without proper tools to reinstall retainer cap I cannot use it as is. So, I will pick the best four operating HLAs out of the old engine and install those. At worst, I can deal with any ToD that shows up. I will send those four HLAs out to Mizpah as they look like they were new when installed years ago.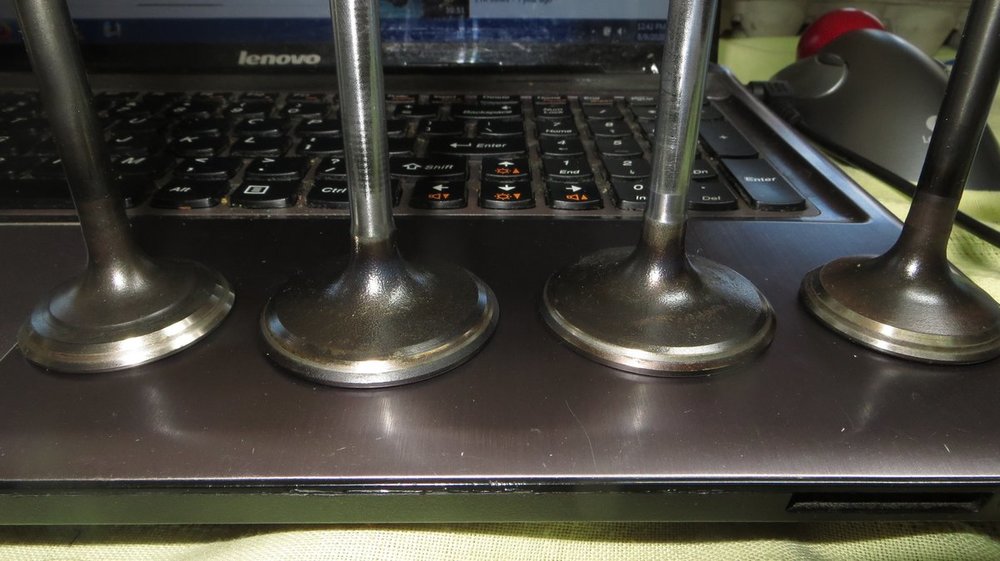
-
Valve spring installed upside down
rickyhils replied to rickyhils's topic in Old Gen.: 80's GL/DL/XT/Loyales...
Have heard that double reverse valve spring was in theory a way to reduce vibration. Now, did EA81 have them? If not then maybe the same brains behind the OHC was behind this "doubled reversed" spring. -
Valve spring installed upside down
rickyhils replied to rickyhils's topic in Old Gen.: 80's GL/DL/XT/Loyales...
These valve springs pictured are from a salvage yard EA82 (SPFI) . I don't recall what model. I also bagged the distributor which has the crank position sensor, if that helps identify the model or year. However, I just checked the recently removed EA82 from my 1991 Loyale. It does have those reverse wind inner valve springs. -
Valve spring installed upside down
rickyhils replied to rickyhils's topic in Old Gen.: 80's GL/DL/XT/Loyales...
I'll use that extra pump method. -
Valve spring installed upside down
rickyhils replied to rickyhils's topic in Old Gen.: 80's GL/DL/XT/Loyales...
Yeah. I didn't do it correctly. Thanks for giving the spec. -
Valve spring installed upside down
rickyhils replied to rickyhils's topic in Old Gen.: 80's GL/DL/XT/Loyales...
EA82 valve springs. Closer winding is towards engine. [I learned THAT the hard way].JPG.bb6147615a1674907e0c84a12df502f5.JPG)

-
Valve spring installed upside down
rickyhils replied to rickyhils's topic in Old Gen.: 80's GL/DL/XT/Loyales...
-History unknown.Seller had no info. -I was first to run the engine after rebuild. Rebuild had only assembly lube with no oil. No heat issue. -Will look at valve seats. -I have an extra head or two. - No ej for this car. California smog check issue. Also wiring nightmare. - IF ever scrapped, will make those parts available.