


O.C.D.
-
Posts
690 -
Joined
-
Last visited
-
Days Won
5
Content Type
Profiles
Forums
Gallery
Store
Posts posted by O.C.D.
-
-
Lookin good Sir!
-
Long shot but could it be a valve rod that is bent or wearing wrong? Maybe not seating properly?
-
Well it dosent hurt to ask. I found original bed carpet thru here when someone said it will be impossible to find sooo you never know,. Just got to be patient and ask once in a while and keep your eye open for parting out brats.
Oh I am not saying you won't. I am a positive person as well and you will eventually.
-
Anyone????
Original?!?!?! Good luck.
Many NOS parts come around but NOS carpet or even used that someone would give up?
-
Dremel tool with thin wheel cut down one side to relase it the get new nut
I hadn't thought of that!!! If I can get the Dremel in there you might have the answer. Already have the nut ready to be ordered.

I suspect you need a bigger impact. or more PSI? My $30 Campell Hausfeld wouldn't have moved it either, even tho it was 1/2 inch drive- utterly useless. Harbor Freight has a pretty good one for under $100. It's a tool you will always need...
You know I am not sure what this Craftsman puts out. Maybe I should just bump her up to 120 PSI and have at it. I only tried at 90 cause I don't want to snap a ring or pinion tooth.
Thank you guys!
-
is this the first gen1 brat with aribags? lol
Nice but can you even get into the brat now??? LOL!!!
Well, you'd think not. But I can get in and out just fine and there is a little leg room like before. Only real issue is my head is about 1/4" from the roof as opposed to 3/4" like before.
is this the first gen1 brat with aribags? lol
Yes indeed. lol
-
Thank you for the reply. So far the impact has not made it budge?
I still have not been able to get it off.
-
And the final assembly and paint complete.


And without further ado, WRX seats in a gen 1!


Lined up perfectly.

-
 1
1
-
-
So, to the seats. My little drawing above may not have been too descriptive. But my idea completely worked and I have 2002 WRX seats in this 1980 Brat!!!
Here is what I made 4 of.

Here is how they offset the needed 2".

You get the idea.

Here is an example of one seat set. I had to notch out the recess for the spring mechanism and slide clamp. Plug welds were also done for strength.

Before final clean up.

Stock sliding adjustments work and the modification can be removed for future if I sell the seats, etc..

I then notched the edges.


Couple of misc. pics.


-
1
-
-
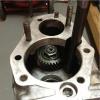
But first, the trany. This thing was caked with oil and grime.

Bellhousing then.
 '
'Bellhousing now.

Took off the 4wd selector plate. Shift fork seal is ok still.

And all cleaned up.

Got the 4wd case off.

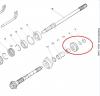
And here is another shot of that damned gear I cannot get off.

Wheels make good trany stands.

-
Haha! That's basically my motto =P
Well, I was right, pure genius!
-
Well, I could not locate a 26mm socket so I tried a 27mm one instead. Fit was a little loose but it was better than nothing.
I brought out the 1/2" impact and had at it with no luck?! I put screwdrivers in the output stubs to stop it from rotating. There was enough torque that the screwdrivers almost snapped!!!
And I cannot get the damn nut off.........
Any one know what to do for this nut?
-
FSM uses a special tool to hold the mainshaft while undoing that nut,so pinion teeth should be OK.
I can`t see the forces involved being any greater than while driving.
Prayers wouldn`t hurt.
May I ask how to acquire a copy of an FSM from you? If not, I understand.
Are the threads reverse by chance?
Are you saying go for the socket and impact idea then?
Thanks.
-
Thank you all for the responses. I have already punched the stakes back and tried my best to get the nut off.
Ivan - I cannot separate the case as this middle protion of the trany has to be removed. If you look at the EA71 4sp with 4WD there are three separate parts.
1. Main transmission housing with diff.
2. Secondary that houses the gear for the transition to the rear.
3. Rear that supports output shaft to driveshaft.
I have the rear off but this nut is the issue to get the secondary portion off. I cannot split the case until I get the secondary part off.
What I need to know is how to get the nut off. The shaft itself has a cross cut into it and then the nut has the stakes. If you use a 26mm socket you can get to the nut but how do you prevent the shaft from spinning. Is the socket the way to do it?
Or do you use that cross and a special tool?
This is where I am stuck. Do I just get a socket and throw some air at it and pray I don't snap a pinion tooth?
-
On a side note....
While fighting this gear I started mounting a 2002 WRX seat into the Brat last Saturday. Needless to say it is a chore as the new seat is wider, taller, and deeper than the little gen 1 seats. But,.......... I have found a way and I think it will work perfectly. I will post pics later after I mount it but in general this is what I am doing.

By using 1"x1" angle iron I can compensate for the 2" width difference. As is the passenger seat is ready to be welded and when I sit in it my head has about 3/4" clearance. So this is either ingenious or I may have it wrong. But ya never know until you try.
And to have the first Gen 1 Brat with WRX seats in the world, I will make it work.
-
I know this is to be in the older forum, which it is. I thought I would hit you guys up as well cause I need to get this gear off.
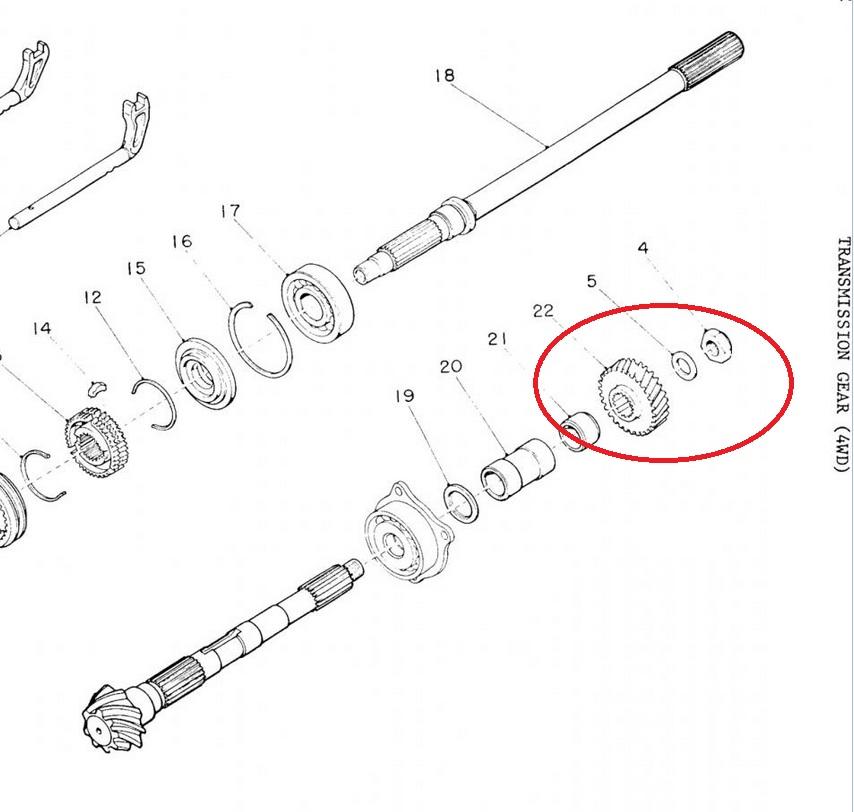
I am in the process of rebuilding my trans and I cannot seem to get the 4WD pinion shaft gear off of the trans. There is a gear with a lock/castle not on the shaft and I cannot get it to budge. Can any of you please tell me how to get this off?


-
I am in the process of rebuilding my trans and I cannot seem to get the 4WD pinion shaft gear off of the trans. There is a gear with a lock/castle not on the shaft and I cannot get it to budge. Can any of you please tell me how to get this off?

-
In for answer as I have my EA71 trans torn apart. I see the 4WD selector shaft seal - it is about an inch wide. Is this the same seal that is on the gear selector shaft?
-
it looks like there is a locking collar on the nut. so the lip on the nut is pressed on the shaft to keep it from backing off.
Yes indeed and I have used a punch to push the locks out. Someone else has been in this before so it wasn't too hard.
I will ask in the other forums.
-
I should have identified properly. It looks like the pinion shaft for the 4wd. Gear #22.

-
And I give up, lol. Any way I am sure you can see the nut. I built a special tool and have even torched it. I cannot get it to move. And from what I can tell this gear has to come off to remove the next part of the case.
-
Try again. Needs to be rotated 90 degrees.
-
Guys I need some help. I was able to get the 4wd portion off of the case but I am stuck. There is a castle nut on the shaft and I cannot for the life of me get it to budge. Can anyone lend a hand on this one?
-
Spline count is the same and the hub is the same then yes, go for it. Good luck finding that though.
Drilling them isn't too bad, FYI.


EA71 4spd trans teardown - help
in Historic Subaru Forum: 50's thru 70's
Posted
Ironically I have not attempted to remove it again cause of free time. I think my approach will be full psi on the impact and if that doesn't work I will Dremel the nut. As it has been removed before you would think it easy to remove. We shall see.
Thanks to everyone for the responses.