BeefaRu
Members
-
Joined
-
Last visited
Everything posted by BeefaRu
-
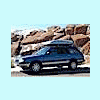
I had the same problem.....new paint + old trim/bumpers = bummer. This is what I did. Wet sand with 1000 or with 0000 steel wool. Sandpaper won't clog with wet sanding. When the oxidation is off and bumper is clean, bulldog adhesion promoter was sprayed on. It allows paint to stick much better. Then SEM trim black 39143 was painted on (spraycan). Just a light coat dusted on or two coats. Any more and you start filling in the texture. That picture is how the bumper looked after doing it. This picture is the same bumper next to a brand new from the dealer rear bumper. Blacks are the same. Pretty cool.
-
Ha ha! What do these wagons total out at....maybe $1500? Hey with that paint it probably skyrocketed in replacement value to $1600 I'd have to have a serious Subaru lover appraise it. --E
-
Bingo! That was me. You must have been sitting in or on the way to that big backup westbound from a passenger van wreck. I was going to pull n save for two final pieces of trim. Cool you spotted it just from the pix I posted. --E
-
Thanks for all the encouragement and compliments! It's been a real blast having everyone along for the ride! I wouldn't have bothered doing the photo albums, but I thought you guys would enjoy watching it all happen. I've had fun putting them together for you. I might put up an Overhaulin' album on the Beefaru website someday. I have 2 gigs in the next 5 days, then I fly out of state to see family. So I wont get a chance to fix the peeling window tint or interior, but I'm going to try to finish exterior today and schedule clear bra asap. If no clear bra, I'll have to remove the grill and mask the front of the hood...... ha ha. I never feared nicking hood paint till now. It's totally naked up there I want to do a post that gives the run down of materials and techniques for reviving/restoring/painting trim & bumpers as well as any other materials used that might be helpful. As soon as I get a chance I'll post a reveal shot, and put links to all overhaulin' days in the first post. --E
-
Overhaulin' photos' Day 11 Not much to see just a couple hood shots (holy crap) and a couple other photos. The painter kept saying as he buffed and wiped off the font end...."yes sir, by cracky.....smoother than a frog's hair" We put on the wheels and pulled it into daylight which was a great feeling. The paint color is really rich. I like it a lot. Moved into a larger working area, I did all prep and buffing of window trim & door moldings. That took 8 hours by itself! The rear view mirrors, rear wiper arm and some door chip protectors (junkyard score) were prepped and painted. The last thing to go on today was the grill. I drove it 2 blocks away to my house. I'm dying to get a clear bra on the front of the hood. Still need to get the mudflaps and a just a few more trim pieces. When I get it all together maybe I can get a couple pictures in before Fridays gig (singer guitar thing) at a country club. It'll be nice to pull up to with a cherry exterior rivaling or besting the paint on the pricey cars. --E
-
Overhaulin' photos: Day 10 Top, tailgate, and sides were hand sanded with 1000, wet sanded with 2000 and 3000, then hit with two levels of buffing. I wasn't expecting that....but wow does the paint SHINE! And it was a real kick wiping off the buffing compound to reveal the finished shine. We left the front buffing for tomorrow and began reassembling the wagon trim, lights and bumpers. Day 11 will just be a few photos of the finished hood. When we're done assembling and detailing I'll take some "reveal" pictures of the final completed project. --E
-
I forgot to link the text to the day 9 photos. You can see them now. Lots more color to see there. Yes! come scope it out! It should be ready to roll tomorrow or Thursday. We can hook up this!weekend, or... I'll be at Parfet park in Golden on Tuesday evening. I'm performing on stage for the big Police/community party about 5-8pm. I'll be setting up as early as 3:30. Last year I parked the wagon behind the big stage right there in the park.
-
Thanks for the input! We figured it out today. The driver's lock solenoid sends the commands for all locks. I was guessing it was that, but my friend wanted to troubleshoot everything else to be sure. After 3.5 hours, we ended up getting the part for $3 at a junkyard 10 minutes away. Thanks again, and now this particular problem has a solution on the forum. --E
-
All doors but driver are lock/unlocking constantly when the battery is hooked up. Disconnecting the drivers "sender" wire cuts the signal and all the doors stop. Anyone have a clue? Doesn't matter if driver door is open or closed, or whether it's locked or unlocked. The second the battery is hooked up and I plug in the electric lock on the drivers door it starts happening. We changed the rear gate to loyale and are using the loyale harness. Its newer than the 88 rear gate harness. I'll change that back today and check back here tonight. Any insights are very badly needed. Thanks! --E
-
Overhaulin' photos: Day 9 The last day of painting! Doors and hood were painted. After sealer, the hood and some fender & door areas were hand sanded with 1000, then I think with 2000. My friend always puts in a "wake up" hour of work before I come over. Here's a teaser shot of the new color showing the blue and purple casts. After paint dried, we pulled a lot of the masking off to reveal the two tone paint. That was really cool. The rest of the day I was roped into helping another friend of my friend move. who He owns a british auto & body shop called car crafters. He had about 25-30 MG's, MGB, MGmidget, Triumph, Austen Healy, and a few Jaguars all in different states of paint, engine and body work. Saw a lot of those small british engines and lots of parts. We can be thankful we don't own those cars....whew. Still it was a unique experience pushing cars onto trailers, and moving all that gear. He had a lot of stuff. They've bought out Arvada auto body and are moving in there. Day 10 coming soon. I thought we were done with paint related, but day 10 was all hand sanding and buffing the paint. Came out pretty glassy. --E
-
Well, I think you're referring to picture 10 on day 8. The first reason they look so black is they're not original. Back bumper is brand new, and the front is only about 6-7 years old. Even with just 6 years difference, the front bumper need to be a lot more black to match the back. The first step was to clean off dirt and particles, then scrub it wet with a scouring pad like the green one people use for dishes. But this one was red and he also had a grey one. They're for auto and they have a certain amount of abrasion about the same as 1000 grit sand paper.....which is why you want things clean so you don't notch a groove in there with a larger particle getting under your sanding surface. Anyway after wet scrubbing, he wanted me to steel wool (steel wool with four zeros) the black part of the front bumper to get rid of any additional oxidation. That made it blacker, but did put a minor haze to the finish. Then he dusted it with a very light coat of trim black paint and it blackened right up. Anything more than a dusting of the trim black will start to fill in and flatten the texture, so be careful. EDIT: The name of the product is "bulldog" its an adhesion promoter. He did spray both bumpers just before painting with something he called "glue in a can". Its a spray can surface treatment that's really sticky and lets whatever is sprayed onto it stick much better. I think its purpose is more to make sure that the colored paint doesn't peel off, than to make sure the trim black stuck. The trim black looked really good. Don't know how long its lasts, but just dust on a really thin coat after cleaning and prepping the surface. Another thing I think works great on trim and possibly bumpers (after cleaning surface) is to steel wool it and then buff it with the 3M buffing liquid I talked about in another thread. The 3M product REALLY makes it black and shiny but you need to get off the oxidation first with the steel wool. Probably doesn't work with heavily textured stuff because it's a white paste, but it really makes the door molding trim very black & very shiny because you've taken the surface down to new rubber and buffed the new rubber. Should work for bumpers too if you can get it cleaned off OK --E
-
Overhaulin photos: day 8 Finally painted blue color onto the wagon and was able at last to see the colors together. The new blue is pretty amazing. Hard to describe. Day 9 has a good shot of it. All the gritty details of the prep & techniques are in the photo album. After sealer, color and clear coats, we took off to the viewing of an estate sale. Biggest estate auction I've ever seen: The guy (recently deceased) had an acre just of cars, vans boats and car trailers. Then there were two more acres of his stuff laid out on tables....crazy. I liked the $150 truck dragster, 37 roadster hot rod and a 1930 tbucket roadster. Hard to believe it was all being auctioned off. Anyway gang, need to run. Day 9 was really cool too. Great pictures of the paint color on that day. Will post asap. ---E
-
I think it would've been really cool to go over fenders. I think it's easier to change to that than to undo it. You just sand each fender/quarter and mask/paint for that small section of paint. Logistically, paint above the trim couldn't be done in this paint booth. The ceiling is too low. Long story short, he can't paint the whole car at once from top to bottom. To pain the top, we drop the car onto the floor (without wheels) then to paint doors, the front & back have to be jacked up. That's why the wagon's getting painted in sections. --E
-
Nope. That was a tough decision. In the end I thought it fit the body lines better than going under trim and over the wheels....there's no continuous line doing that on the car like there is on the plastic outback body fender molds. edit: here's a shot showing what I'm talking about. Going over the trim AND over the wheels was going to be a lot harder logistically. This was the easiest, and the silver is so chrome in the daylight, I was a little spooked that going over the rim would give it that mexican chrome over the wheel look.....not my style. Still a hard decision, but it should come out really clean and tasty. I'll know for sure because painting will be complete tomorrow. --E
-
Overhaulin' day 6 Overhaulin' day 7 Rock guard painted, sealed, and silver color painted on at last. Silver and blue colors will come together on day 8. Painting should be complete by day 9 which is tomorrow.
-
Awesome. Thanks for the recon trip. I think I pulled the front bumper off of that loyale sedan. --E
-
Overhaulin' Day 5 I'm a couple days behind for photo albums. Today (day 8) was VERY cool. The wagon has silver and the new blue/indigo on it. They look sweet together. I'll combine days 6&7 into an album. ON days 6-7 the wagon was blocked, then sealed, then he pulled out a spray gun for rock guard for the lower 1/2 of the sides, then actual COLOR was sprayed over the rock guard. Silver went on on day 6. Day 5 was lots of masking in preparation for putting primer on the car. After primer is applied the car can be "blocked" and ready for sealer and final color & clear coat. We broke in the middle of the day to pick up a flat bed trailer from another body shop for a 26 chevy my friend wanted to turn into "yard art". At the shop they had an SS Nova in there getting this incredible 2-tone pearl/candy paint and over a half dozen vintage Camaros in various stages of being prepped for body work. Couldn't get photos of that stuff, but day 5 is up for viewing. ---E
-
I used a product by 3M today. About $20 for a quart sized bottle. Its a multi use buffer material for paint, chrome, rubber. Worked WONDERS for my door molding and rear hatch rubber window trim. Takes away the oxidation right down to the pure rubber. I'll get the name. I'm getting some for myself. After the 3M, I would use the auto black/black majic/armour all etc. Until you remove the oxidized/broken down plastic, all you'll be doing is sealing in the oxidized plastic.
-
Blue on top and silver on the bottom.2006 Jaguar color for the blue (same as original color but with more depth and pearl reflections) and 2006 subaru for the silver. Its called crystal grey metallic . That part was painted yesterday. The silver pearl REALLY jumps out in the sun.
-
Overhaulin' day four. A lot of sanding tight places that the rotary sander cant get to. Hand to bandage up the fingers...... sand sand sand. Not much exciting to look at there, so I threw in some extra pictures of previous projects my friend has done. Plus the Vette owner picked up his car so I took a couple more pix. That thing redlines at 7200 and is detuned DOWN from 620 horse to around 550...in a 2700lb car....spooky.
-
Interesting. I think the tailgate and grill from that one are in my overhaulin' project. Its the maroon gate in the pictures.
-
I kinda know whats out there now. There's an empty area where they put the latest arrivals. If you see a post 1990 loyale show up there drop me a note! Thanks! --E
-
Thanks Jerry, things are moving fast. Too busy to put up the pix and story today, but it's primed and ready for blocking (sand before final color). The optimus was set up before I went to Hurricane Katrina to run a heavy duty car fridge and laptop/gps office thing. The guy who maintains the car put it together. Cool idea to weld a quick bracket and use the spare tire bolt to bolt it down. Works great & makes life using the fridge/mobile office worry free...never have to think about juice running short. I'll find a link for that fridge....its awesome. I'll get up today and tomorrow's pix maybe tomorrow if I get a chance. --E
-
I think server is running again. Web guy switched to a new server. I'll post day 4 and today when I get a chance.
-
Pardon the cross-post, but this applies to here and offroad forums so I posted in both. Please remove if necessary. I need to know if anyone has researched the available alloy 15" 6 lug rims that have a similar offset to stock EA82 rims. I'm running Peugeot 15" turbo sedan wheels (the 505 sedan - 1986). They've done a pretty good job of chipping up the paint on my wagon with the wider offset. They're also wobbly and very hard to find straight. Since I'm getting fresh paint on the car I'd like to minimize the chipping. I've seen toyota 6x5 or 6x5.5 (not sure which size) mentioned quite a bit, but there's no word about how much of a difference there is in the offset. I like this one:http://www.buycarwheels.com/zoom.htm...69305U1026.JPG this one looks less "dated" http://www.buycarwheels.com/zoom.htm...9346U10N26.JPG I did another search and found this http://www.ultimatesubaru.org/forum/...ad.php?t=59657 but I don't want a vintage brat or ea82 look. This page mentioned this rim, http://webmaster.beverleypaine.com/i..._rearwheel.jpg which has more of a look I'm after, but it's an Australian company and the offset still has the tire jutting out similar to mine, but its not an EA82. Anyway, thanks in advance for info and insights. --E