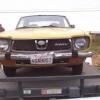
Datsunrides Posted June 20, 2009 Share Posted June 20, 2009 (edited) It's time to start a thread to follow the restoration of my 1973 Coupe. For starters, I purchased this car in the beginning of June 2009. Car is in semi-running condition as purchased. Here are some pics of it as it was brought home. Actually not that bad a platform to do a restoration on. It does have some rust issues (nothing real serious though), body damage (mostly a damaged front bumper and it took a pretty decent hit in the back that the PO tried to "fix", which let to some of the rust issues. There is some damage to the right front of the hood and other minor dings), and the interior will need a complete redo. Besides being rough, it would seem the car is pretty complete. There are some "interesting" fixes the PO did to the car such as replacing the quarter windows with plexi held in with silicone! I plan on eventually completing a full ground up restoration on this rare old Subie. I have done this to a few other Old School Japanese cars and am currently trying to finish up a 72' Corolla wagon with a 6G72 Mitsu V6 drivetrain. The plan is to get the bugs worked out of the Subie and collect the necessary parts while I complete the wagon. Once the wagon is done (hoping to have it done within a year), I will tear the Subie down and rebuild her. For now, I will post up the things I am doing to make it a solid (if ugly) driving car. With a little time, alot of hard work (and $$$), I hope to return her to her former glory!Mark Edited October 12, 2014 by Datsunrides Quote Link to comment Share on other sites More sharing options...
Datsunrides Posted June 20, 2009 Author Share Posted June 20, 2009 (edited) So, first order of business was to get an exhaust system installed, as the PO had cut the old system out, leaving only the open header pipes. Loud little sucker! Supposedly the PO was planning to do some sort of dual exhaust and abandoned the project. Took it down and had a new system made up. Got a new Y pipe welded up to the stock header pipes and flanged right after the Y, so I would have a spot to break the system when I eventually will make new headers. Sorry the pic is kinda cr*ppyDecided to run 2" pipe back to a Magnaflow SS muffler with dual outlets. From the muffler outlets, I ran dual 1 1/2" tailpipes. I am pretty pleased with the sound. It's a little on the loud side, but could easily tone it down if I wanted with some resonated tips or a resonator before the muffler. Definetely has a nice tone. Quite different than what I'm used to hearing WRX's sound like. Now that I could run it without all the neighbors wanting to kill me, I could set off and see whats what. The PO told me it had an issue with hard starting and dying out so I figured I'd start there. Gave all the fluids a quick check and started her up. Basically figured out in short order the accelerator pump is not working at all. There is the hard starting problem and the dying issue also seems to be carb related. Basically it won't idle without the choke 2/3rd on. If you release the choke, it dies and is hard to restart due to no accelerator pump. So, I will start with a carb rebuild and see what happens. I just hope the PO did not try and do this and ended up botching it to the point I can't fix it. With a grasp on the dying issue, I figure it's time to take it for a spin. I found if I leave the choke on, it will stay running so away I go, or so I though. I slowly leave the driveway to head to the end of the street. When I get there and step on the brakes, I get a horrible pulsation/wobbling and noise from the brakes. Ok, time to turn around and head back to the driveway and pull the wheels. I found out on the uturn that I will need to replace the outer CV's. Click city! Clutch is probably on it's last leg also. Anyhow, pull the front wheels first, as that is where I expect the problem to be. Get the wheels off and all looks OK. There is meat on the pads and the wheel bearings are tight. Since that looked OK, I started it up and slowly applied the brakes while running the car at 30mph (on the stands, with the opposite wheel blocked so only one side will rotate). Left side felt OK (rotor could stand replacing as it is scored a bit). Right side had a little vibration, but not so bad as to be the cause. I did check the runout and it seems that the hub has a bend in it. It has a replacement rotor on it so I wonder if it got bent during the install? Well, time to go to the rear. Pull the right rear and all's good there. Pull the left rear and look what I found,When I pulled the drum, the lining came with it! I am taking a shot in the dark that this may be an issue! Guess I'll be heading down to NAPA monday to order some new shoes. Once I get those on, (and the carb rebuilt)we'll try another road test and see what else will pop up. I also need to find some good temporary tires as the ones on there are checked pretty bad. I don't want to get new tires because the plan right now is to take the stock wheels to Stockton Wheel and have them widened to 6" so I can run 205/60-13 tires. I plan to powdercoat the wheels black and run the original hubcaps (rechromed, of course). Kinda an asian baby moon theme! Probably will do a valve adjustment and compression check later this weekend just because. That's it for now.Mark Edited October 12, 2014 by Datsunrides 1 Quote Link to comment Share on other sites More sharing options...
Kostamojen Posted June 21, 2009 Share Posted June 21, 2009 Get a video of what it sounds like! Sorry those brakes didn't work out for you, and you could have used them it looks like Quote Link to comment Share on other sites More sharing options...
Datsunrides Posted June 21, 2009 Author Share Posted June 21, 2009 That may be an excuse to get a video cam! I have never even owned one. I was listening to it a little after posting, trying to come up with a description of the sound. It has a definite 2 stroke tone to it, but is more raspy than sharp. Usually Subaru's seem to have a flat tone to my ear. The 4 port head must have something to do with the sound, or should I say the exhaust header arrangement. It was a bummer about the brakes. When I saw the problem, I was like, piece of cake, I have those parts sitting inside. Alas, it was not to be. Mark Quote Link to comment Share on other sites More sharing options...
Jerry DeMoss Posted June 21, 2009 Share Posted June 21, 2009 Good job for showing that super cool coupe some love! That thing is sweet. I like the exhaust too. 1 Quote Link to comment Share on other sites More sharing options...
moosens Posted June 21, 2009 Share Posted June 21, 2009 Geez Steve,What were you looking at that looked so bad on this car? This should be another fun thread. Wish I could help. No more Coupe stuff here. Quote Link to comment Share on other sites More sharing options...
Subieguy Posted June 21, 2009 Share Posted June 21, 2009 I might have the rear glass for you. Maybe Paul can answer this one. I took them out of a 76 DL sedan I had. Not sure if they are the same shape as yours though. Richard Quote Link to comment Share on other sites More sharing options...
Datsunrides Posted June 21, 2009 Author Share Posted June 21, 2009 Thanks for the comments so far. As best as I can figure from pics, the DL glass is different, more square in the back vs. tapered for the coupe. It's interesting finding out what will interchange between the various models/years. I can tell you guys one thing, I have gotten more offers of assistance in the month or so I've been here than I have gotten in over 2 years on a certain Toyota forum. You guys ROCK! Mark Quote Link to comment Share on other sites More sharing options...
Kostamojen Posted June 21, 2009 Share Posted June 21, 2009 Geez Steve,What were you looking at that looked so bad on this car? Its going to take a full restoration to fix this, its not in as good of shape as the 78 wagon I had before the FF-1 even though that had roof rust problems due to the accessory roof rack. I was hoping for something that wouldnt be another full project car, but I'm quite glad someone did take this on as a project Quote Link to comment Share on other sites More sharing options...
kiwi subbie Posted June 22, 2009 Share Posted June 22, 2009 Good luck with the project some ways your coupe looks better than mine but other ways mine is better too. same colour and same cool fake wood grain dash I got some vids of my gsr on youtube Quote Link to comment Share on other sites More sharing options...
Leeroy Posted June 24, 2009 Share Posted June 24, 2009 Hey Datsunrides, I actually have a NOS drivers side (in your part of the world anyway!) indicator lens which is broken on your coupe in the photos. If you cannot source any in the US (and don't mind paying for the shipping) it is yours. I also know a mechanic who has several of the passenger side lenses which I may be able to get my hands on. Cheers Lee Quote Link to comment Share on other sites More sharing options...
moosens Posted June 24, 2009 Share Posted June 24, 2009 Hey Datsunrides, I actually have a NOS drivers side (in your part of the world anyway!) indicator lens which is broken on your coupe in the photos. If you cannot source any in the US (and don't mind paying for the shipping) it is yours. I also know a mechanic who has several of the passenger side lenses which I may be able to get my hands on. Cheers Lee There's an abundance of those lenses here. NOS as well. Quote Link to comment Share on other sites More sharing options...
Datsunrides Posted June 25, 2009 Author Share Posted June 25, 2009 Care to share the source kind sir? Mark Quote Link to comment Share on other sites More sharing options...
Leeroy Posted June 25, 2009 Share Posted June 25, 2009 There's an abundance of those lenses here. NOS as well. Yes I did not think they where hard to find in the US or here in Australia for that matter! Unfortunately in Oz we need the lens that has an amber indicator and clear parking light (Only our very early 1973 models had the all amber assembly like the US with an aftermarket clear parking light added by Subaru Australia!) - now they are like hens teeth! I have tried to fit the full amber lens on the 'split' amber/clear light assembly and although they are the same shape the screw holes are in different positions.:-\ Quote Link to comment Share on other sites More sharing options...
moosens Posted June 25, 2009 Share Posted June 25, 2009 Care to share the source kind sir? Mark I have some. But at this time I'm not able to dig out parts. There's at least one other guy here who had NOS of those and there's plenty of used ones in my stock and my friend's. I'm sending a contact thru PM. Quote Link to comment Share on other sites More sharing options...
Datsunrides Posted July 13, 2009 Author Share Posted July 13, 2009 (edited) Well, I was able to pick up an early EA71 today, thanks to 4x4brat. Got home and disassembled it to see what's what. What I found may or may not be an issue. There is a crack between the bores on the passenger side bank. I do not think this will be a problem as it seems to be in a solid part of the block with no water passage behind it, but I am asking because I don't know whether it's a problem or something to not lose any sleep over. If it's superficial, I may have it ground down and welded up just for peace of mind. Is this a good idea? Oh, and EVERY bolt on the top of the engine and waterpump broke, so if the block is useable, I will have a lot of broken bolts to remove. Another couple of questions I have regards what will swap between the 1400 in my 73' and this 1600. Can someone clarify the following,1- Are the bellhousings the same between 1400 and 1600?2- Are the oil pans the same between 1400 and 1600?3- Will the flywheel from the 1400 fit the 1600 or will a 1600 clutch setup fit the 1400 trans?4- Are the motor mounts/brackets the same?I have been giving serious consideration to building a supercharged engine after seeing those pics kostamojen posted earlier. The M45 superchargers can be found pretty cheap. That SC pulling fuel from a single 45mm Mikuni should make good power. If I go foward with this, I will probably limit boost to 8 psi or less. What is holding me back right now is figuring out how to make sure I get more fuel into the engine when pressurized, or should I say how to do it cost effectively. There is/was a product that was sold for motorcycle carbs that basically was a spraybar that mounted in front of the venturi's to add additional fuel that I'm trying to get info on. While I would love the cool factor, I also am not going to sink thousands into a motor that may make 150 hp. I hope to get the brakes and carb fixed this week so I can actually drive it around and see what other gremlins rear their heads.Mark Edited October 12, 2014 by Datsunrides Quote Link to comment Share on other sites More sharing options...
wombatsauce Posted July 13, 2009 Share Posted July 13, 2009 Nice!! I really really wanted to pick this car up but was suddenly faced with no ability to pay for or restore it. I assume you picked it up for less than the $3k asking price! Looking forward to see what you do with it - absolutely love these cars. Quote Link to comment Share on other sites More sharing options...
Kostamojen Posted July 15, 2009 Share Posted July 15, 2009 1- Are the bellhousings the same between 1400 and 1600? 2- Are the oil pans the same between 1400 and 1600? 3- Will the flywheel from the 1400 fit the 1600 or will a 1600 clutch setup fit the 1400 trans? 4- Are the motor mounts/brackets the same? 1 - No. 2 - Possibly, but they bolt on the same, and are swapable between all early EA's. 3 - I believe it depends on the bellhousing, but the piece on the crankshaft that connects to the flywheel IS swapable with a bit of work. 4 - Don't know, but the mounting location on the engine is the same. Quote Link to comment Share on other sites More sharing options...
kiwi subbie Posted July 15, 2009 Share Posted July 15, 2009 1 - No.2 - Possibly, but they bolt on the same, and are swapable between all early EA's. 3 - I believe it depends on the bellhousing, but the piece on the crankshaft that connects to the flywheel IS swapable with a bit of work. 4 - Don't know, but the mounting location on the engine is the same. 4- I beleave its is... My 1400GL coupe has 1600 fitted into it. from what I remembered it fitted in all the right places. will have to have another look tho Quote Link to comment Share on other sites More sharing options...
moosens Posted July 15, 2009 Share Posted July 15, 2009 Oil pan is somewhat different from '72-3 and the '74 and onward. I have smaller crush rings that my FPM said were from pre-'74 cars. I'm not sure if the shape and size is different but the plug sure is. Quote Link to comment Share on other sites More sharing options...
Kostamojen Posted July 17, 2009 Share Posted July 17, 2009 Oil pan is somewhat different from '72-3 and the '74 and onward. I have smaller crush rings that my FPM said were from pre-'74 cars. I'm not sure if the shape and size is different but the plug sure is. There were a few sizes of pans actually. The 1100's are smallest, followed by the 1300's. The 1400's and 1600's start to be the same size at some point. I've got like 4 oil pans now. I'll double check, but I think the bolt pattern is the same. Quote Link to comment Share on other sites More sharing options...
Datsunrides Posted July 17, 2009 Author Share Posted July 17, 2009 My main point in asking those questions was primarily to see how much of the engine I could "pre-assemble", using the EA71 parts vs. the EA63 stuff. It was very hot out the day I asked and I could not be bothered to go and look myself. Mark Quote Link to comment Share on other sites More sharing options...
Datsunrides Posted July 19, 2009 Author Share Posted July 19, 2009 (edited) Got a little work done on her today. Managed to install some new brake shoes to get the brakes to work properly so I could do a test drive. On the test drive, some other issues arose . As I had expected, the left outer CV is toast. I think the right may be OK, but couldn't hear it over the racket the left was making . Also found out the clutch is roasted. It probably died from lack of adjustment. It was super tight when I got it and I had hoped that a correct adjustment would help. It did a little bit, but it still slips pretty good. May be glazed, but if I have to pull it, it will get a new one. I also have a broken right motor mount AND trans mount. Now I need to try and hunt those down. On a more positive note, I managed to get a carb rebuild kit ordered last week so I should be able to rebuild the carb next weekend and a compression check tells me the engine seems to be in good health. 180 psi across the board! . So now come the questions, Engine/trans mounts- Are these available anywhere? I did look a bit and could find nothing. I would think there is an interchange? Axle- Looks like NAPA has a listing for $60. Do these early axles interchange with newer models? Clutch- Here is where I have to make a decision. Sorry for the long clarification, but I want you to see what my plan is. I would like to pull the drivetrain out this winter and clean up the 1400 motor/trans and paint the underhood area, and reinstall the 1400 until I can build up a nice 1600 for it. Now, I don't really want to spend the money for a 1400 clutch if it won't swap to the 1600. If the 1400 flywheel won't bolt to the 1600, will the 1400 clutch pack bolt to the 1600 flywheel (I don't know either way)? I would rather hold off a bit on rebuilding a motor since the one in there seems solid and I would rather spend the money fixing more pressing issues. As always, and help or insight you can provide will be appreiciated. P.S. I love the way the exhaust sounds on the road! I just ordered a vidcam yesterday (Kodak ZX1), so I should be able to get sound clips posted in a bit, and I found out the 1600 oilpan is a fair bit deeper then the 1400 pan. Would be nice for a capacity increase but it would hang below the crossmember. Mark Edited July 19, 2009 by Datsunrides Quote Link to comment Share on other sites More sharing options...
Datsunrides Posted August 3, 2009 Author Share Posted August 3, 2009 (edited) Well, I started what I will call phase 1 of the restoration today. What I am expecting to accomplish during phase 1 is basically the folowing,-Pull the engine/trans and replace the clutch. I want to also upgrade to a 5 speed. Clean up the existing engine.-Sandblast and repaint the underhood areas and front valence with base/clear-Sandblast and re-undercoat the wheel wells-Clean and paint the crossmember-Possibly rebuild the suspension based on finding parts while it's apart.-Repair any rust.With that as my mission statement, here is today's progress.Pulled the engine/trans. Took me a bit to figure out how to disconnect the shifter! (noob, remember) Pulled the trans off to inspect the clutch.You can see why my clutch was slipping! Here are the before pics of the engine bay. Still need to pull a couple items off. Pulled the fenders off so I could get paint under them and also so I could inspect the front of the rockers, as there tends to be issues with trapped water in this location on other cars. I was pleasantly surprised. No rust at all there. Only rust I found so far is in the passenger wheel well. This will be real easy to fix. My next step will be to sandblast the underhood and wheel well areas and epoxy prime. As of right now, I plan on repainting it in the original yellow color. I already have a new clutch on it's way and will be ordering the 5 speed on Monday, hopefully. I also need to remove a few broken bolts also. Only broke like 5 off, which I think is not bad in the scheme of things. I did manage to rebuild the carb during the week. I now have a working accelerator pump but it's running lean at idle. The carb has been apart before so I need to see if a jet has been installed in the wrong spot. I put them back where I pulled them from, but that doesn't mean the are in the right spot. The idle mixture screw has no effect at all so I think the slow air jet may be the culprit. Until next time,Mark Edited October 12, 2014 by Datsunrides 1 Quote Link to comment Share on other sites More sharing options...
carfreak85 Posted August 3, 2009 Share Posted August 3, 2009 I'm surprised your under fender area is so solid, nice update too, keep them coming! Quote Link to comment Share on other sites More sharing options...

Recommended Posts
Join the conversation
You can post now and register later. If you have an account, sign in now to post with your account.