987687
Members
-
Joined
-
Last visited
Everything posted by 987687
-
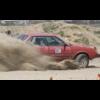
So I realized I haven't posted my pics of this car on here yet. I bought the car from bratman, so there are most likely already pics of it on here, here's some more! Stuff that was done before I bought it: ea81 swapped into the 82's spfi 2" lift 14" pugs fwd 3at swapped out for a 5mt d/r other stuff I've probably forgotten. Stuff I've done to it since buying it from bratman: replaced cap and rotor. runs MUCH better replaced rear wheel bearings replaced a front axle. Yay for lifetime warranty! rear disk brake swap new thermostat probably some things I'm forgetting Things I plan on doing when I get back in state: mud angled lift blocks to fix camber mud new front tires off roading with bratman and his brat fix things that I break PICS! fixed a huge rust hole! both my cars
-
Grab ahold of the wheel and shake it side to side, it shouldn't be loose! Front or rear bearings? I wrote a guide for 4wd rear bearings, and somewhere on here there's a guide for fronts. Not overly hard. Just a little time consuming, especially your first time doing it.
-
that's sad. That's hard to see. Sorry. Moment of silence for the RX.
-
What a painful thing to see! :'( what happened?
-
987687 replied to tricked919's topic in 1990 to Present Legacy, Impreza, Outback, Forester, Baja, WRX&WrxSTI, SVXA friend and I did my clutch in one day. As long as nothing goes horribly wrong it isn't a bad job pulling the engine.
-
Bad diodes will ruin a VR. So if the diodes are bad it isn't surprising at all that you blew two VRs in a row.
-
Did it run fine before winter? Good chance your gas has gone bad. Try adding some fuel conditioner and see if the situation improves.
-
Could be the diodes. But you're beating a dead horse. Just get a new alt.
-
If you think there's water in the bottom of your oil pan, DON'T RUN IT! Drain the oil and put fresh oil in. You should after sitting for 12 months anyway.
-
You can rent 4x4's in Iceland, yes.
-
That would be really cool!
-
That would be really cool!
-
I had to drive my legacy quite a ways with a snapped clutch cable, just be smart about when you do it. Obviously rush hour is a bad time... I don't know if you'll be driving on back roads, highways, through cities, or whatever. But if it's generally really busy 3am is always a good time when not many people are out... And about what happens if your TOB grenades, it causes a mess. It can do anywhere from just seize up to buggering up the input shaft, messing up the transmission, etc. TOB is something you really don't want to have break. I've seen some pretty catastrophic pictures of the damage.
-
Pictures please! I've wanted to build a hovecraft with an ej22 for YEARS!
-
Thanks! I'd do it again. Now that I know what I'm doing it wouldn't be so bad.
-
Thanks! I'd do it again. Now that I know what I'm doing it wouldn't be so bad.
-
Cool! thanks for the link!
-
Cool! thanks for the link!
-
I don't plan on doing more ... I'd rather not But if I do end up doing more I may grab one. It would make that step a lot easier. And about how much grease to put in the bearings, I wasn't entirely sure. So I did some searching around. I found answers ranging from what you said to pack the as tight as possible to avoid water getting in. I went somewhere in the middle, I got a lot of grease in the bearings themselves, but I did leave some air space in the assembly for expansion and contraction. We'll see how it goes ... I'd really rather not have to open them back up though.
-
Thanks Jason! I really appreciated the help. Both coming over and setting me in the right direction on getting suspension apart, and via text message! I almost asked for help when I got to dealing with brakes and the bearings... But I got it all figured out in the end. Overall, it wasn't to bad. Knowing what I know now I could do it a heck of a lot quicker!!!!
-
Thanks!
-
Once you get the shaft through, bolt the suspension back together. I didn't take detailed pictures of this because it goes back together the same way you got it apart. I advise doing it exactly the reverse of how I said to take it apart. The hardest part will be getting the strut back on, I had to kneel on the knuckle and simultaneously thread in the bolt. Now you have it all back together. At this point, if you were keeping your drum brakes all you'd have to do is put the hub on, put on the cone washer, the flat washer and bolt it all together. Don't forget your brake line! But I'm not keeping the drum brakes. So I bolted on the backing plate for the disc brakes. Now if you're using either drum of disk brakes you'll want to clean up the part that mates up to the bearing and outer seal. Shine it up nice and make sure it's devoid of dirt. Don't contaminate that brand new bearing! Next put the drum hub or disk hub back on and tighten her up! Don't forget the cone washer and the big flat washer! Here's the cone washer, the flat washer looks like, well, a big flat washer. Here's the hub all bolted back on with the cotter pin in. DON'T FORGET THAT!! The way I torqued the castle nut on is more or less the same way I got it off. Stand on the breaker bar until I can't get it to turn anymore, the jump on it until I can put in the cotter pin. And remember, I only weigh 145lbs, so if you're a lot larger you might break something, I don't know... Then you'll want to bolt on the calipers. They'll go on the same way they came off, if you're converting refer to TheSubaruJunkie's swap thread. As a final part of the brake swap I decided to shorten the metal lines. The metal line goes directly into the drum brake, and the disc brake caliper has a length of plastic hose. So the plastic hose on both ends of the metal line has a lot of stress on it. I decided to cut the metal line to a more appropriate length. I did this partly because it makes sense and will prolong the life of the plastic lines, and partly because I couldn't get the brake line off the left caliper. I just turned the head off the nut. In order to shorten the line you need a double flare tool. After all the brake lines are connected up you'll need to bleed the brakes. I'm not going to go into detail because it's easy and there are probably guides on here how to do it. But a very important note whenever removing brake lines is that you never want to run out of brake fluid in the reservoir under the hood! Then you'll be bleeding the master cylinder and yuck yuck yuck. So if you lose a lot of fluid flaring a line, or bleeding just keep it topped up. Pretty easy especially considering what happens if you don't. You are now DONE with your wheel bearing AND brake swap! CONGRATULATIONS!!! BUT, don't drive your car yet. As excited as you may be. First get under the car and check EVERY nut and bolt you touched. Make sure they're all torqued down. Make sure they're all there and you didn't forget to put some important bolt back in. Make sure you're brake lines aren't leaking where you made new flares and connections. Make sure the brake bleeders aren't leaking. Make sure you have the cotter pins in the axle nuts. Make sure you put the axle pins back in the axles if you removed those. Before you put the wheels back on the ground grab a hold of them and make sure they don't wobble. This would very quickly destroy your new bearings. Make sure that if I left something off this list that you check it so your car is safe. NOW. FINALLY. You are ready for your test drive. Take it slow, make sure everything is alright, and be amazed at how insanely quiet your car is!! After your test drive do another double check. Check axle nuts to see if you can get them any tighter. You REALLY don't want them loose. And also VERY important check to make sure you don't have any leaks in any connection in the brake lines you touched. Some final notes: The reason the suspension arm must be removed is because you can't pound the stub shaft out without either removing an axle or the arm. I couldn't get my axles off. After you remove one arm, you do not need to remove the other. Just drop the differential and slide the axle out. If you do this, you take the gamble that you won't be able to get the race back in and the arm will have to be removed for pressing the new race in. Then the arm will have to come off anyway. Now you should be done! And very greasy as well ....
-
Once you get the shaft through, bolt the suspension back together. I didn't take detailed pictures of this because it goes back together the same way you got it apart. I advise doing it exactly the reverse of how I said to take it apart. The hardest part will be getting the strut back on, I had to kneel on the knuckle and simultaneously thread in the bolt. Now you have it all back together. At this point, if you were keeping your drum brakes all you'd have to do is put the hub on, put on the cone washer, the flat washer and bolt it all together. Don't forget your brake line! But I'm not keeping the drum brakes. So I bolted on the backing plate for the disc brakes. Now if you're using either drum of disk brakes you'll want to clean up the part that mates up to the bearing and outer seal. Shine it up nice and make sure it's devoid of dirt. Don't contaminate that brand new bearing! Next put the drum hub or disk hub back on and tighten her up! Don't forget the cone washer and the big flat washer! Here's the cone washer, the flat washer looks like, well, a big flat washer. Note from years later: The flat washer IS NOT A FLAT WASHER. It has a concave and a convex side. The convex side (the side that bulges out) goes toward the cone, the nut rides on the convex side. Here's the hub all bolted back on with the cotter pin in. DON'T FORGET THAT!! The way I torqued the castle nut on is more or less the same way I got it off. Stand on the breaker bar until I can't get it to turn anymore, the jump on it until I can put in the cotter pin. And remember, I only weigh 145lbs, so if you're a lot larger you might break something, I don't know... Then you'll want to bolt on the calipers. They'll go on the same way they came off, if you're converting refer to TheSubaruJunkie's swap thread. As a final part of the brake swap I decided to shorten the metal lines. The metal line goes directly into the drum brake, and the disc brake caliper has a length of plastic hose. So the plastic hose on both ends of the metal line has a lot of stress on it. I decided to cut the metal line to a more appropriate length. I did this partly because it makes sense and will prolong the life of the plastic lines, and partly because I couldn't get the brake line off the left caliper. I just turned the head off the nut. In order to shorten the line you need a double flare tool. After all the brake lines are connected up you'll need to bleed the brakes. I'm not going to go into detail because it's easy and there are probably guides on here how to do it. But a very important note whenever removing brake lines is that you never want to run out of brake fluid in the reservoir under the hood! Then you'll be bleeding the master cylinder and yuck yuck yuck. So if you lose a lot of fluid flaring a line, or bleeding just keep it topped up. Pretty easy especially considering what happens if you don't. You are now DONE with your wheel bearing AND brake swap! CONGRATULATIONS!!! BUT, don't drive your car yet. As excited as you may be. First get under the car and check EVERY nut and bolt you touched. Make sure they're all torqued down. Make sure they're all there and you didn't forget to put some important bolt back in. Make sure you're brake lines aren't leaking where you made new flares and connections. Make sure the brake bleeders aren't leaking. Make sure you have the cotter pins in the axle nuts. Make sure you put the axle pins back in the axles if you removed those. Before you put the wheels back on the ground grab a hold of them and make sure they don't wobble. This would very quickly destroy your new bearings. Make sure that if I left something off this list that you check it so your car is safe. NOW. FINALLY. You are ready for your test drive. Take it slow, make sure everything is alright, and be amazed at how insanely quiet your car is!! After your test drive do another double check. Check axle nuts to see if you can get them any tighter. You REALLY don't want them loose. And also VERY important check to make sure you don't have any leaks in any connection in the brake lines you touched. Some final notes: The reason the suspension arm must be removed is because you can't pound the stub shaft out without either removing an axle or the arm. I couldn't get my axles off. After you remove one arm, you do not need to remove the other. Just drop the differential and slide the axle out. If you do this, you take the gamble that you won't be able to get the race back in and the arm will have to be removed for pressing the new race in. Then the arm will have to come off anyway. EDIT ********************** EDIT ******************* EDIT It's almost 8 years later and I'm editing this to change my links to imgur from photobucket due to a few requests to repair this guide. I'd like to note that, when I did this, I had absolutely no idea what I was doing. It's probably abundantly obvious by reading through so take it for what it is. GD lists a few good points in the next post and even though some of my techniques are poor, the pictures tell a pretty good story on their own. Most of the time knowing what something looks like inside is better than words.