Legourde_Nux
Members
-
Joined
-
Last visited
Everything posted by Legourde_Nux
-
Since it's release, I've heard of customers upgrading to wider tires and rims......what about using the BRZ stock rims in older Subies??
-
Hi Luisvermillon, this is and old treat.....if you're having issues with your carb, I suggest going to the Performance Tech Forum: http://www.ultimatesubaru.org/forum/forum/64-carburated-engine-tech/ Remember to provide info like Model, engine (EA## or EJ##), etc. Good Luck
-
Welcome!!!!!!....nice RS!
-
Ok....As with all new cars check your manual for maintenance and to know your BRZ a litlle more.......try it in "sport" mode and go from that point forward.
-
You got the Kicker bass amp in the trunk area?
-
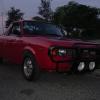
Legourde_Nux replied to junk250's topic in 1990 to Present Legacy, Impreza, Outback, Forester, Baja, WRX&WrxSTI, SVXSomething like this? http://www.facebook.com/photo.php?fbid=10151287177831536&set=a.10151287049076536.1073741825.633381535&type=3&theater 1994 Impreza, FWD, 5speed.
-
Mmmm, no 86 Toyota in US????....here in Dominican Republic we don't get the Scion so the 86 is in Toyota dealerships.....anyway, the BRZ is a different flavor.
-
jajajajajajaja, lol get the keys!!!
-
Welcome to the board!!!! Inspired by the last rear wheel drive, 2 door, Toyota Corolla (called "Trueno" in Japan) back in 1986.....Toyota and Subaru joined forces and brought this beauty.
-
Here's the thing when I got the truck back in 93 a bunch of parts were given to me, one of those is this: http://www.facebook.com/photo.php?fbid=10151289039051536&set=a.10151287049076536.1073741825.633381535&type=1&theater I believe it came with a plastic container or canister of some sort....I don't know if it's part of the evap system. Bed area, passenger side, behind the panel.
-
Stewartkb, if you plan to take the metal panels on the cargo area, would like to see detailed pictures of the passenger side, there is some kind of plastic canister that I haven't been able to reassemble correctly. Thanks
-
The joys of hurting your knuckles for what you love. 1. Rotors, you can either get new ones or have them cut in order to eliminate any bends or grooves.....min thickness 8.4 mm 2. CV joints, take both axle drive assemblies and check the them completely. You can remove the axle drive assembly by removing a pin that keeps the back joint attached to the transmission. 3. Rotor, it spins in neutral because the inner grooves of the Disc hub are in bad shape......happened to me once. Source: My good ol' Chilton handbook and 20 years of ownership.
-
Just like mine, same color in and out. Good luck on your proyect.
-
Great!!!!...so it was 24mm, my bad. A special socket?, was the difference?
-
What da!!!!!!....there are mini versions of the Brat?!?!?!?!?! ....not fair. Seriously guys, need one for my "son or girl" proyect......where can I find one of this to be shipped to Florida?
- 19 replies
-
- 1st
- generation
- mini
- brat
-
Tagged with:
-
Number used for Japan spec EA71 Brats in Dominican Republic OEM 829956100.
-
-
-
-
It's always a good idea to keep the area you're working on, as clean as possible. In this case, it's a good idea to remove all that gunk, varnish and soil that's around the switch. 1. Remember once you take the faulty switch out, the oil passage is exposed and all that dirt could go inside if the area has not been cleaned before. 2. Remove the oil pressure switch cable if it's still connected. 3. You'll need a socket wrench (22" if I'm not mistaken).....with patience and in a counterclockwise motion take the faulty switch from the engine. 4. In my case I put a drop of new motor oil to the thread on the new oil pressure switch before instalation. 5. Tight by hand first, clockwise, then use the socket wrench to finish the job. No info on necessary torque. Just don't use superhuman strength. 6. Clean the cable and inside the tip that's connected to the new switch and make the connection. 7. Check oil level on the engine. Start the engine, the "Oil" light in the instrument panel should come on for a few second and then come off. 8. Let engine idle for a few seconds and then turn off. 9. Check for leaks. 10. Enjoy Note: If the faulty switch seems to be frozen, it's not because is over tight, most likely is due to the time is been sitting in that area.....patience, it will come out.
-
It's the oil pressure switch. Looks like you should put plastic bags on the carb, the dist and alternator, use an orange based dregreaser all around the engine and rinse with clear water after a few minutes. Take the plastic bags off, start the engine, let it IDLE for a few minutes, turn off the engine and check where the leak is coming from. Looking good
-
Based on my own experience.....before putting the new fuel filter, take a look at the gas tank by removing the rubber gas line form the tank, drain some fuel....check for mud, sand, metal chips and especially water.....had to take my fuel pump apart. Everything was working fine until I drove the Brat to one of those underground parking lots, that when I knew my gas tank was dirty.
-
No, LPG will only save you money on gas prices and keep the engine cool. No "power gain" here, when you switch from LPG to gas is like hitting a turbo button in city streets. Great for commuting. Tried it on a GL-10.
-
Nice proyect and it's rust free. Loyale 2.7 Turbo a question from someone outside the US. The Charcoal canister (Evap canister) came on first gen Brats worldwide or just the US?
-
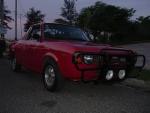
By the way is a 1994 Impreza....FWD.