heartless
Members
-
Joined
-
Last visited
Everything posted by heartless
-
as was noted, use as little bondo as possible. bondo is meant more for finish smoothing, than filling large areas. fiberglass is a MUCH better choice for repairing larger holes. remove the nasty rusted metal - the stuff that bends easy, flakes off, etc - get back to something solid. sand or grind with a coarse grit to give some tooth. for large fairly flat areas use the fiberglass mat for your patch, not the woven cloth. the cloth is great for complex curves, irregular areas, but not as strong as the mat. cut your basic patch shape before mixing your resin and test fit. follow the directions for mixing the resin - dont mix too much at a time - a couple ounces at a crack is usually sufficient unless you are working a very large area. using an el-cheapo type paint brush, brush resin around the area to be patched, lay in your mat patch, and apply more resin to saturate the mat completely using a dabbing motion, being sure to work out any air bubbles. for repairing a large hole you may want to use a piece of metal screen or similar material to support the fiberglass mat until it sets up - leaving it in will help strengthen the repair too. once the resin sets up it is pretty easy to sand, file or otherwise shape/blend into the surrounding area. if need be, another layer of mat/resin can be applied to build up and strengthen the repair area. just sand the first layer with a course grit first to give a tooth for the next layer to adhere to. good luck with your adventures in body work!
-
may also try the MAF cleaner - helped with the other half's car that had very similar symptoms as yours - hard to start in cold, wouldnt idle without some help...
-
after reading all the replies, only one person even mentioned an obvious possibility - fuel leak somewhere... would thoroughly inspect all fuel lines, pump, and tank for even a tiny leak - as it can/will affect your fuel mileage. look for any damp/wet spots when weather has been dry... had to completely replace a metal line on my wagon with a rubber one as the metal line had rusted out in a couple of spots. have an 88 coupe that had a leak at the fuel pump (common in the snowbelt for the style pump this car has) swapped fuel pump out, fuel mileage has improved dramatically Winter weather will cut fuel milage - warm up time eats it up. my 89 EA82 wagon will run about 34mpg in the summer, but drop to 28-30mpg in the winter - that being said, you should still be seeing better than 18mpg, even on a carbed EA81 good luck
-
i can sympathize with ya man - having just been thru something similar myself!
-
another vote for the plywood stand supports. even just one thickness of 3/4" is better than nothing. also, get a piece large enough for a roling jack to fit on, with extra length for movement when jacking up/down. if you can find them, the rubber mats used under large rolls of paper during transport are AWESOME for throwing down on bare ground before crawling under the car. check with larger printing companies, or the truck drivers that deliver paper to them. most of the time they get tossed...
-
just an FYI - water in the rear floorboards "could" be coming from a rusted out rear wheel well - have this problem myself. tires throw water up in the wheel well and some of it will make its way into the car, pooling in the rear floorboard. a quick way to check for this - pop the cover from the seatbelt mounting area...if you see daylight anywhere in that area, under the plastic you have found your hole...
-
possibly the brake light switch gone bad/loose??
-
congrats on the 200K birthday! still got a little ways to go to catch up with Hildy tho - she has 244K.
-
control switch: the knob that you turn for the different speeds...
-
interesting...very possible the ol girl had a windshield replaced before i got her...good info to know too... the parts car we took a good windshield out of had had it put in less than 6 months before we aquired it...might be why it is still in good shape under there. it does show signs of beginning to rust, but no where near as bad as mine...not sure which car you are doing this on, but the basics are: 1. pull the hub off the car - it does make it a LOT easier. 2. remove the old bearings/races - drive them out with a drift from the opposite side of the hub 3. clean up the hub, get all the old nasty grease out of there, and check for any damage... 4. pack new bearings with good quality hi temp grease. I prefer to use the disposable glove method so I can see how much grease i am getting into the bearing. grab a glob of grease in one hand, the bearing in the other and smoosh it into the grease with a swiping motion, you will see grease coming thru to the inside when you have it well packed. 5. install the new bearing/race into the hub. if you dont have a press for this job, it can be done using a large socket and rubber mallet, just be careful to keep it square with the hub (little tip - put bearing/race in a baggie and put in the freezer for a couple hours, then when ready to install, heat the hub with a propane torch, you dont have to get it cherry red, just warmed up good. the new bearings/race will almost fall into place with very little effort) 6. on my 89 wagon there was a space between the inner and outer bearings, i filled that with grease as well...may, or may not be applicable to your situation. 7. reinstall hub on the car. getting the axle all the way back thru the new bearings can be difficult, i had to use some spacers and the axle nut to pull it all the way thru. Do NOT beat the hub into place, can damage the new bearings and/or the CV joint on the axle. (go ahead, ask me how I know that one!:-\ ) Good luck with yours, hope this helped even a little.had a rebuilt alt blow its internal regulator and was throwing 16-17 like yours - had ALL my lights on, including the after market driving lights, stereo, heater fan, everything I could think of to get it home, pulled the alt, took it in to where i bought it, they tested and said "holy crap!" - got a new one for free. would take the alternator out, and take it in to your fav parts place and have them test it for ya...it is a well known fact that the guages in these older soobs are not 100% accurate.4x4 welder - ok, so if I am following you right, i want to cut my car where the green line is shown (there is a slight ridge at the upper edge that would make a great guide) the pinch welds i was asking about are shown as green dots...anyway, cut my car on the green line...donor car would be at the yellow line on the lower edge, upper edge would have to be pretty close to the green line again...obviously this would continue all the way to the drivers side... section outlined in red is gonna need total replacement, be it from the donor car or creating a patch...thinking donor car would be best, for the shape... zzz Phizinza - wish I knew somebody that could do it for me, would get done a whole lot quicker!! but since money is more of an issue than time...well guess i will have to do it myself. besides, i like having the satisfaction of doing stuff like this myself. :cool:
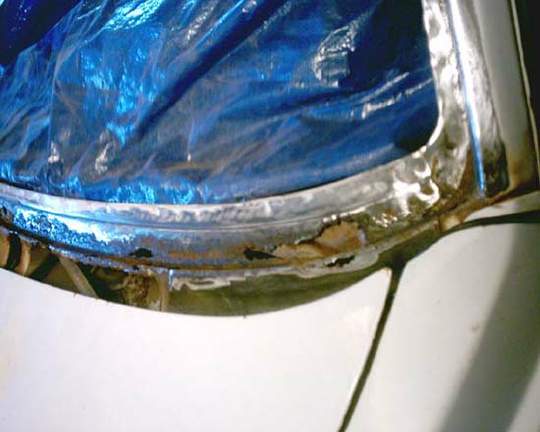
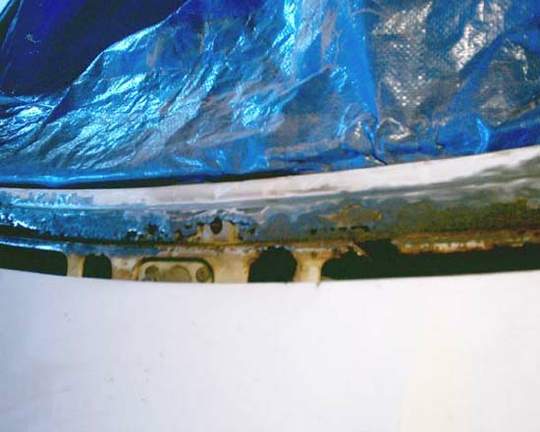
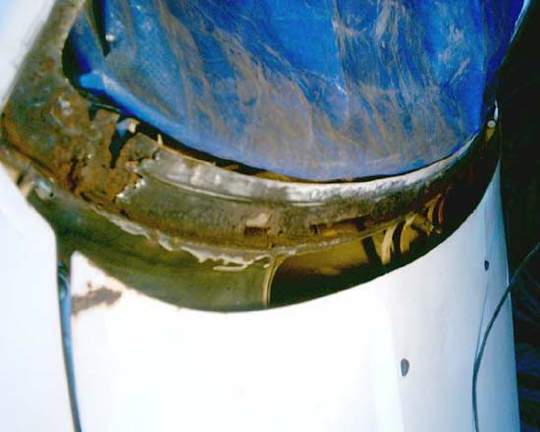
 thats a thought, but i took a look at the area in question on the parts car that windshield came out of - that one is in 1000% better shape, so had delusions of cutting that one out and putting it in my car...only question i have is how does one "cut" the spot/pinch welds along the inner edge without major distortion??? i dont need the whole piece, just the portion close to the windshield...well, the rebuilding has started after my little run in with the ditch last week... had the auto glass guys come out to salvage a good windshield and cargo window from one of the parts cars to be transplanted into Hildy (short for Brumhilda, my 89 GL wagon)they also removed the cracked glass from Hildy so I could do some rust repair. Only one problem tho - WAY more rust than I had anticipated! NOT pretty at all... passenger side lower corner is by far the worst, but the entire bottom edge is pretty bad... "A" pillars are decent, top edge has a couple of bad spots, but easily fixed...just that bottom edge that is gonna be a nightmare...

 we have 6 Subarus here - 3 Drivers, 3 Parts cars of the drivers, I still have my very first one, purchased a little over 5 yrs ago, altho she is off the road at the moment due to a minor run in with a steep ditch, she will see the road again. only one of the three parts cars is in really bad shape, rust wise...gonna need a big fork lift to get that one outta here! bad thing around here is they dont keep them at the junkyards...so we kind of had to start our own! good thing we live in the boonies!!very sorry to hear of your accident. But whatever you do - DON'T sign anything without a lawyer looking it over.wow, very nice job HatchMonster! bgd, waiting to see some more pics!!things to look at before alignment... shocks/struts ball joints tierod ends wheel bearings suspension bushings any one of these items being worn/damaged, or a combination of them will cause tire wear problems - even if the car does go "straight" down the road.one of the hazards of buying an 18-20 yr old car that wasnt taken care of before you bought - it may take a while, and a few dollars to get all the "little" things sorted out, but if you keep after it, you will eventually do so and have a GREAT vehicle on your hands. case in point: bought my 89 GL wagon for $150, before I could even get it home, I had to spend roughly $200 for tires all around. then it was $100 for an alternator, several hours sorting out rear hatch wiring (PO had broken the rear glass and decided it would be easier to swap the entire hatch), then it was off to the repair shop for a new clutch and front axles - that was $600... there were several other things that had to be sorted out, radio wiring (really hate it when people just cut wires) and assorted other nonsense, just to get her running/driving right and on the road i spent roughly $1200 including purchase price and license/registration fees. But - this has been an AWESOME car with very few problems over the 5 years I have owned it, and most of the "problems" have been basic maintenace type things - timing belts, oil seals, brakes, etc, and some were just age/rust related - leaky fuel pump and lines....oh yeah, and a couple of cheap rebuilt alternators (60amp alt dont like those after market driving lights! ) moral of the story is this - yeah, it can be frustrating to sort out stuff that wasnt taken care of by the previous owner, but once you DO get it all sorted, and maintain the car properly, you have a great, reliable car on your hands.bearings arent all that hard to do, just time consuming if you have never done it before. it is MUCH easier to do if the knuckle is off the car. Just make sure you pack the new bearings well with fresh grease - messy job to be sure, but vital for bearing life, disposable gloves are great for this job. do a search for wheel bearings - LOTS of info out there.if you have front end issues already, then, yeah, you are gonna wear those tires a LOT faster. Hard cornering with the softer rubber will also wear them faster - they werent made for that kind of driving. the pair that i just recently bought are Bridgestone Winterforce tires - they are currently on the back end of the 88 coupe we have with decent all seasons on the front. Dont even have a weeks worth of driving on them yet, so hard to say how they will wear. I do about 100 miles a day to work and back. hasnt snowed since monday (see wild ride post) so roads have been clear, mostly dry since... if it were mine, I would be getting it in for an alignment check at least. (and slow down a little in that canyon!! LOL)Sweet82 - yeah, Hildy has LOTS of character!!! "We have the technology - we CAN rebuild her!! Better, faster, stronger than before" (well, maybe not the faster part! ) had the auto glass guys out on wed. to pull a good windshield & cargo window from a parts car. they did a nice job of taking them out in one piece. also removed the cracked windshield from Hildy - got to do a bit of rust repair work before they can put the good glass in - i'm gonna be busy this weekend. When i had originally called the auto glass place I got a quote for about $411 and change for both windows, new, installed - ouch! (we just replaced a hot water heater and a chest freezer - cash is tight at the moment - this was also the reason for only buying 2 tires instead of 4) well, got to thinkin and asked if they could pull the glass from one car to put in another, and he says sure, they do it all the time as long as they can get the piece out in good shape. $50 out, $50 in + install kit @ $20 - per window! $240 is a whole lot better sounding to the wallet than over $400. This morning (thurs) I am feeling and moving a lot better. Still sore - bruised feeling, but the stiffness is pretty much gone. Thanks again for all the well wishes. let the rebuilding begin!!! ps: this was the first time in 5 years of driving my Sube that I had the back end break loose - can you say "overconfident"? damn good reminder that it can happen in a flash, to say the least! Stay safe out there guys & gals!!well, you know what happens when you assume, right?? anyway, couple of pics for you pic hounds first is the car itself pointing out some of the damage. http://img.photobucket.com/albums/v628/heartless500/car01.jpg nice thing about this ol girl - she wasnt pretty to begin with, so it isnt nearly as heartbreaking to get a few bumps and bruises as it would be if she were cherry. What the pic doesnt show is the exhaust twisted way off to the left...gonna have to rebuild that again. the window that is pointed out has tint on the inside - only thing holding the glass in place. you can see the impact spot near the center... The next pick shows where i ended up. What it doesnt do a good job of is showing how steep that sucker is! http://img.photobucket.com/albums/v628/heartless500/ditch01.jpg arrow shows the direction of travel (spinning), blocked out area is where the car finally came to rest - facing the road (note the fencepost - drivers side rear door was directly over the post) also, note the creek a short distance away! another small obsticle not in the pic is the telephone pole that was to the left - missed it by a couple of feet... thanks for all the well wishes guys. feeling a bit better today - still sore, but not nearly as bad. Hildy will be getting "new" glass soon, along with a set of frt fenders i have had for a while. the back end is gonna be the hardest to fix, not as easy to replace metal there! She has definitely shown the will to survive, so she is worth fixin to me. And definitely drive safe gang - it happens in a split second, and can happen to even the best driver. it's been a long time since i had been in the ditch prior to this, and this was by far the worst for me.