Rupart
-
Posts
29 -
Joined
-
Last visited
Content Type
Profiles
Forums
Gallery
Store
Everything posted by Rupart
-
1987 GL-10 Turbo wagon strange rattling noise
Rupart replied to backwoodsman7's topic in Old Gen.: 80's GL/DL/XT/Loyales...
hi, the exhaust pipes on the orig cars have an inner pipe inside the outer pipe,, it is actually 2 layers. the inner pipe gets rusted and eventually breaks allowing it to sag and rattle against the inside of the outer pipe. i've seen this on almost all of my old subarus (80's). best way to check is get under and just bang around on the pipes , rubber mallet is good , even just by hand with base of your fist. check all along front to rear , muffler too. -
hi, i have these corners, i'm out of town right now, will try contact you here when return, wk-10 days? they are the chrome/ black edge, underside tabs good, finish nice, thanks. 4- pc, ll, lr, ul, ur, proper.
-
hi, i have some suspect that you have the timing a couple degrees fast,, if anything more than this gives hard pinging, it is very close to too much advance, especially using the 98 fuel. is that like premium here in us? anyway, at cruise, the vac advance can and does advance the timing a bit, any acceleration from that point will slightly retard the timing some, heavy acceleration will fully retard the timing to the extent of total movement of the timing plate in the distributor. i have had the same symptom on some of my vehicles, usually feels like a slight surging feel at cruise on level road. mark the dist at its present setting,, then retard it 2-4 degrees, test drive some to see if the surging sensation is still there, if yes then no harm and no cost to move it back. also check for play in the dist shaft as someone mentioned, a little is more than it should be, is this a points type or electronic pickup type?
-
EA 81 valve cover washers
Rupart replied to Dwayne Oxford's topic in Old Gen.: 80's GL/DL/XT/Loyales...
hi, i am looking in a 1984 oem parts book, # is 81276 4110 ,, it may have been superceded but that was the # back then. no help to get them but i know they come in some gasket kits. -
hi, yes it's ok to run the wheel like your pic shows. on getting the other side off, squirt some pb penetrant in the pin hole so it can soak into the splines, sometimes they can be Very difficult. since the pin is out and the joint needs rebuilt you might try and tap on the edge of the bell end of the joint ( as if trying to knock it on instead of off) this is only to get it to move a bit, then more penetrant and taping on it in the off direction. don't hammer real hard on things , you could damage the wheel bearing , and the cv joint bearings & races ,, or both! and the rear axles are hard to come by. good luck on it, it's just rusty splines .
-
hi, you can run the loyale in 2wd with both rear axle assemblies removed. yes, drive out the pins on both ends, and they should slip off the diff splines and the wheel drive splines,,, if you let the diff down. ( i take the moustache bar loose at the ends, it makes a good handle to move the diff too). the nose bushing on the diff needs to disconnect too,, i don't think it necessary to take the shocks off. obviously need to have the drive shaft back in place when finished if you took the rear flange off the diff to get enough movement to get the axles out.
-
hi, just to start, no the loyale axles are not the same as brat, the end joints are not either. i am not certain the rear Assemblies for brat are the same as my 84 gl wagon but i think they are. i have the 84 and also an 88 rx the rear axles do not swap. the 84 has doj on both ends of each axle,, the joints are alike,, but are not the same as the doj on the 88 axle,, the 84 doj is shorter ( the cup is not as deep as the 88 doj.. the 88 assembly has a doj on inner end and a fixed cv joint at the outside end,, these rx are same as loyale.. the loyale axles are too long to fit on the 84,, however the splines are the same on both ends of the joints of both vehicles.. i can't tell you anything about where to get remans,, but if your's are not clacking or knocking , get some boot kits and regrease, and reboot them.. the outside joint on the loyale type axle is not meant to be removed,, they can be hammered off but i would not, just flush it out and regrease then boot,, this must be done before you reassemble the inner joint because you have to slide the boot all the way down the shaft and cannot be done with the inside joint in place. my 84 has doj's on both ends, these are meant to be disassembled and can be done 1 or both , either end first. i suggest both since it is a job taking them off the car. i did have to disconnect the rear diff so it could be moved some,, put 1 axle back in , then push the diff over to collapse the joints, then install the other side,, then rebolt the diff in place. hope this helps some. oh , just in case you did not know, the retainer pin hole in the joints and the axles will only align in 1 place,,, it looks like it aligns from either of 2 spots, don't be fooled!! one will let you start the pin but will not go all the way through,, pull it back off , turn it 180 and reinstall it, the pin goes all the way through.
-
GL/Loyale Windshield Moulding
Rupart replied to scoobydube's topic in Old Gen.: 80's GL/DL/XT/Loyales...
hi, these would have come from a 4dr or a wagon. -
auxiliary belt power steering pulley missing
Rupart replied to Hamm3y's topic in Old Gen.: 80's GL/DL/XT/Loyales...
hi, i see in your pic that you have a p/s pulley that has only 1 belt position, you going to need the 2 belt version, close look at the two pics you posted seem to look like the single pulley is set back and the 2 belt one is set forward allowing the second belt room to fit. i will try to post another pic showing the idler pulley and bracket that is also on the rear(2nd) belt, if your setup does not have this you gonna need it. well my pic was too big and i am not allowed to post it. this idler is also an adjuster setup for the rear belt so check it out. it's all down under the compressor. -
GL/Loyale Windshield Moulding
Rupart replied to scoobydube's topic in Old Gen.: 80's GL/DL/XT/Loyales...
i have a set of corners in great condition, chrome/black, all 4 proper positions. 35 & free ship -
EA81 3spd Auto -> EA82 5spd Manual
Rupart replied to StinkBinko's topic in Old Gen.: 80's GL/DL/XT/Loyales...
oops, i forgot to say, i dont know if a manual trans will mount to the auto trans bell housing on your engine. the rear engine cover is also a bell housing/adapter that the trans mounts to. i do know that the ea82 manual trans will bolt up to an ea81 engine that had a manual trans with it, so if you locate a 4x4 ea81 parts source you might want to get the rear engine cover/bell housing also.. some other member may know if the manual trans will mate to your auto cover/adapter. the ea82 eng adapter will not work on your engine since it is different. actually the rear of the engines are different, ea81is open,, ea82 is closed block. -
EA81 3spd Auto -> EA82 5spd Manual
Rupart replied to StinkBinko's topic in Old Gen.: 80's GL/DL/XT/Loyales...
hi, some of what you need to know: the ea82 turbo 5mt has more splines than the non turbo 5mt so your front axles wont match. most turbo manual trans had 3.7 ring/ pinion, non turbo had 3.9 ring/pinion, so you can use the turbo trans if you also match the rear diff too it. not sure what the auto trans had in back. on the pedals, i think you need to use the ea81 style , you may be able to add the clutch pedal or may have to have the whole pedal box. you do not need the ea82 flywheel,, you should use a ea81 flywheel that was a 4x4 225mm clutch, you also need the ea81 clutch, and use a ea82 4x4 clutch disc.. the ea81 and the ea82 flywheels have a different depth where the clutch bolts to them.. use ea81 4x4 flywheel and clutch with a ea 82 4x4 disc, use the ea82 fork on ea82 trans. also use the ea82 throwout brng,, no adapter to mate to eng to trans. jerrys kit has to do with shifter and trans mounts. you would need to put the turbo trans inner cv joints on your axles to make that work out. driveshaft is 2 piece on the ea82, brat and other ea81 used a 1 piece driveshaft. basically you need ea81 clutch& flywheel (4x4)225mm,, and ea82 disc. also need the ea81 manual trans crossmember!! pedals and stuff from ea81, and drive shaft, ( will need modified). do get the shifter stuff from the ea82. -
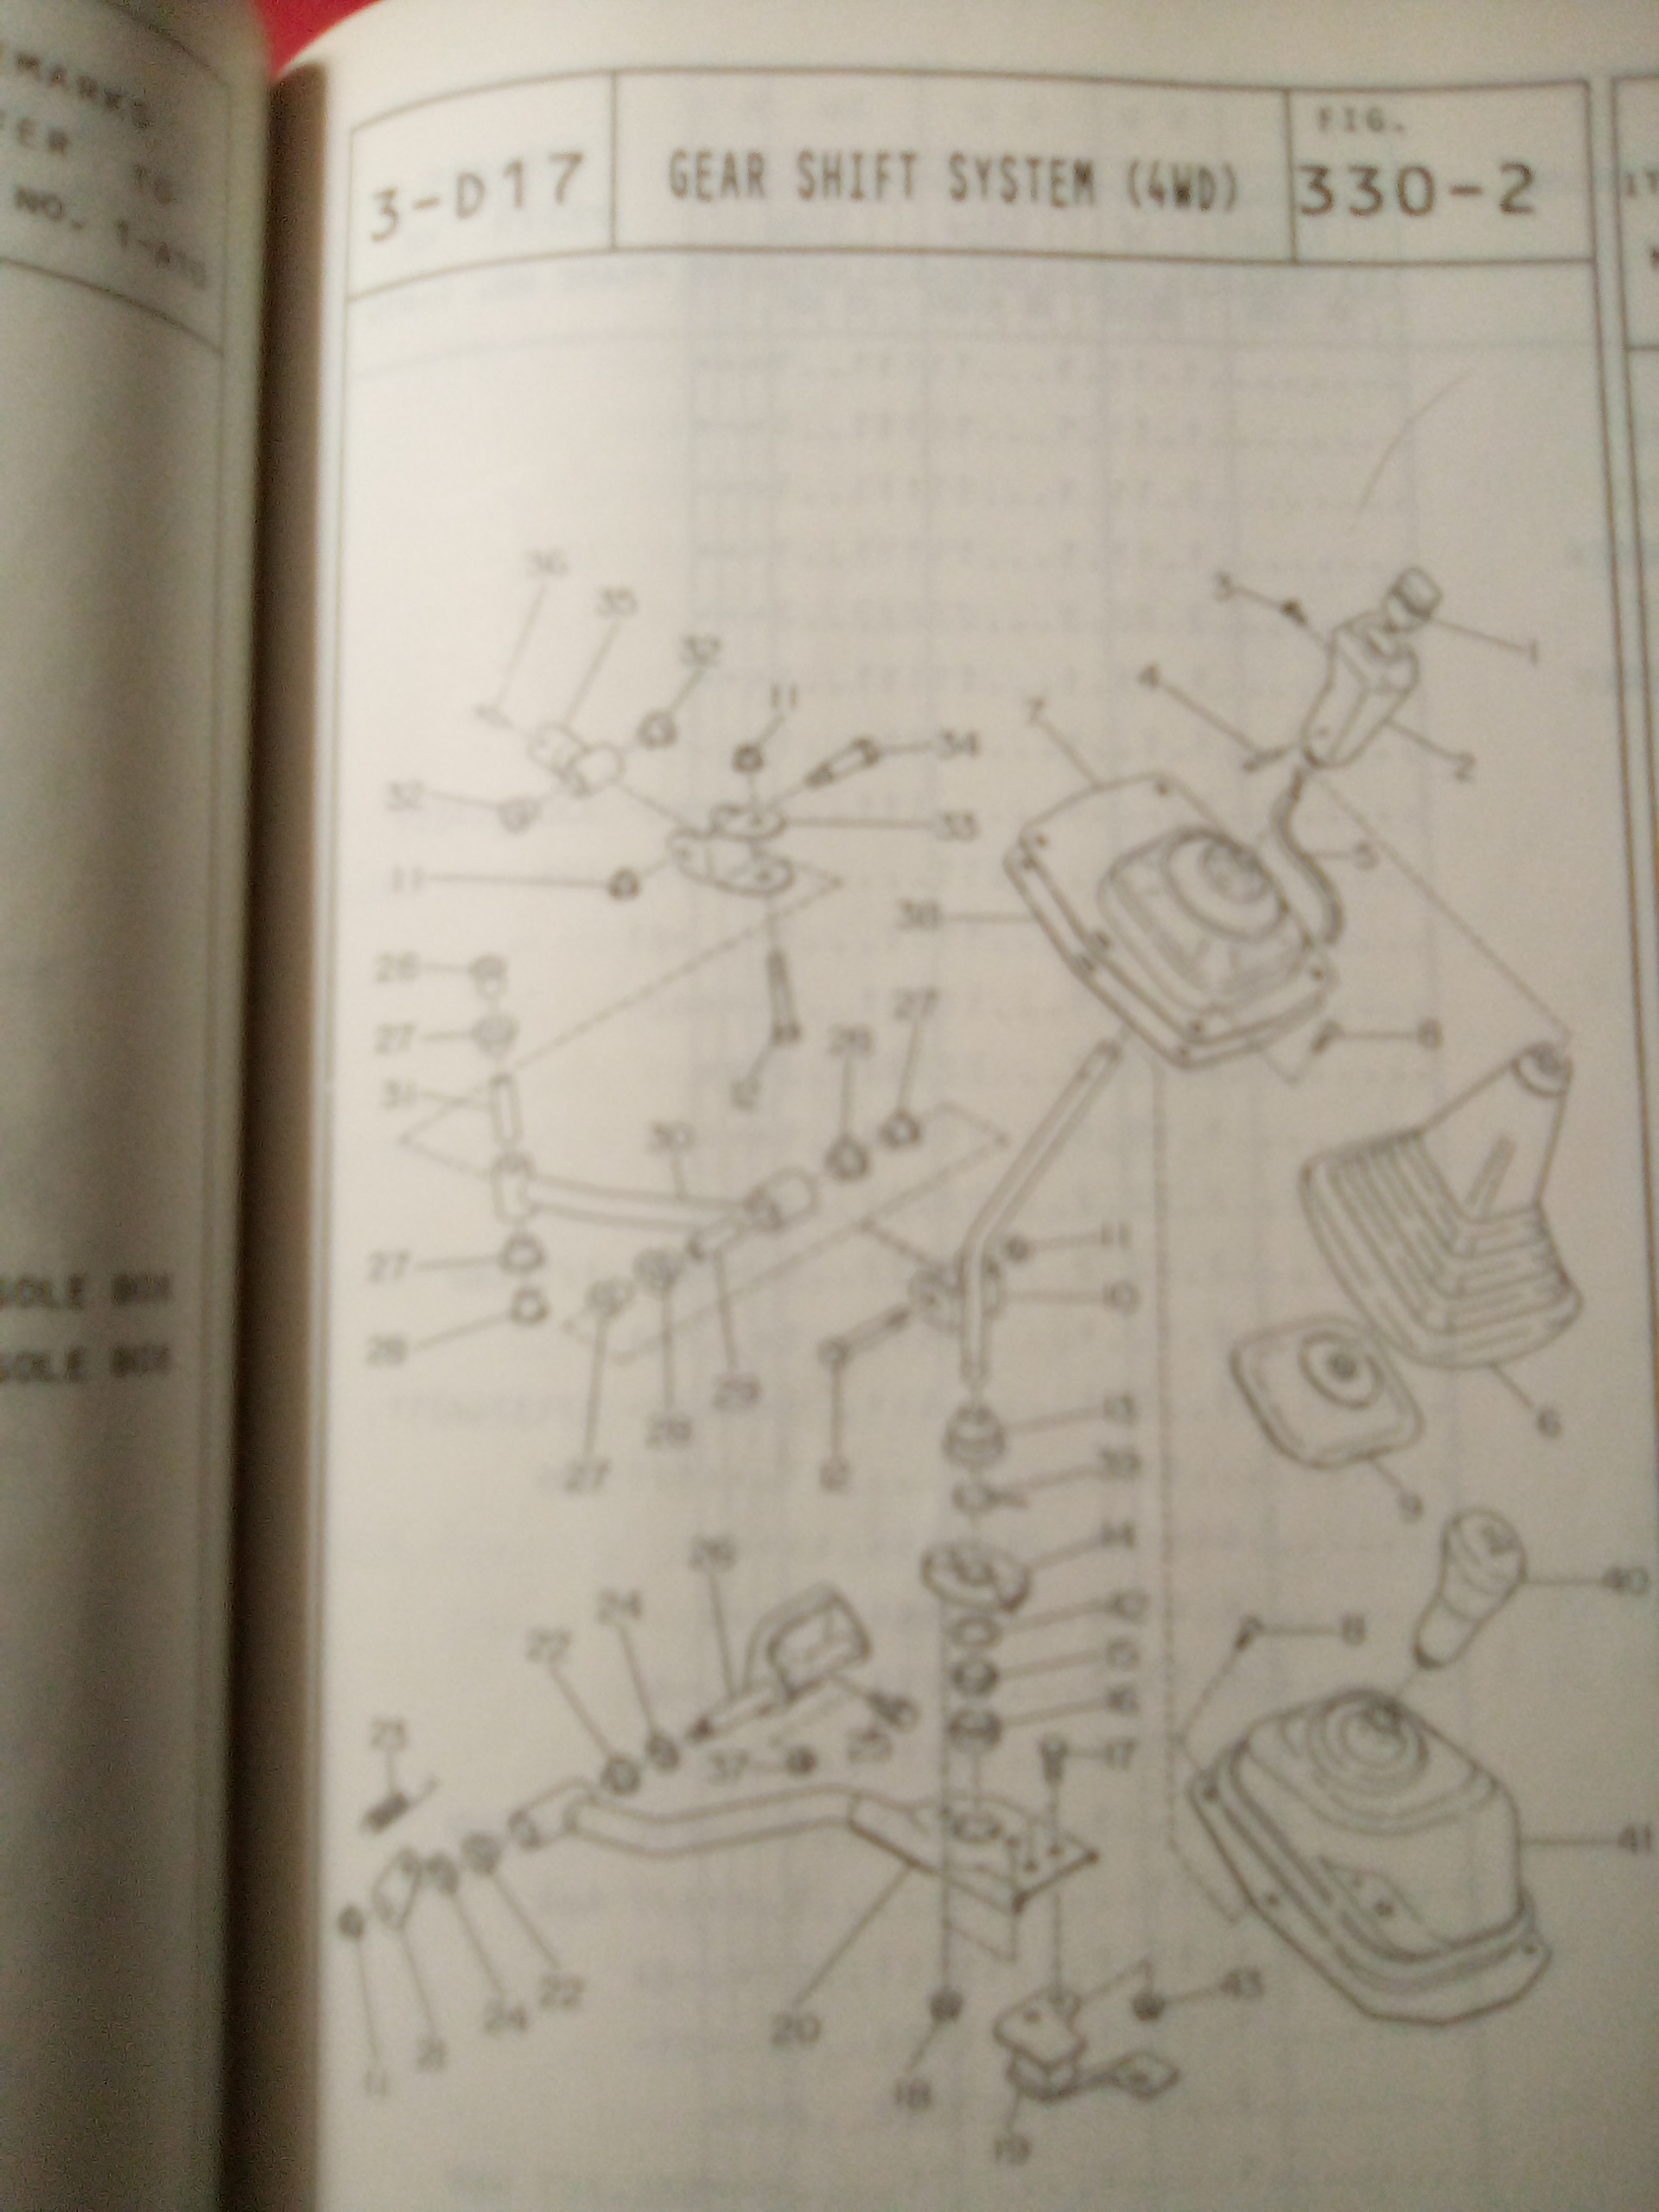
ok, i just looked at my shifter set, the upright flanges that are in your 2nd pic are the pivot flanges for the ea82 hi-lo shift lever mount,, you can remove that,, it is no longer used. the other tab sticking out the back, is one side of the rubber sandwich bracket,, the missing rubber and longer side are gone,, the longer tab is what would go to the tunnel stud. by taking off the orig 5spd hi lo mount tabs allows the main rod to go up a good bit. i tried to buy a new rubber bracket from subaru, "discontinued", also not able to find one in aftermarket parts, so no advise there. the rubber part is about 1 inch thick, and the lower tab is longer and 2 bends, and a hole in the end to reach the tunnel stud. Looks just like #19 on the parts page pic.
-
hi, i see what you have there. The parts book i posted from is 86-88, #20 is the rod/bracket i had mentioned, note how it is bent to offset up and to the right at the rear of it, and the shifter cup studs go front to rear in it. Also note the front end of it with bushings, that go on a stud on bracket#26, which mounts to the trans at that shiney spot we mentioned. The rubber cushion bracket is#19, it bolts to the rear of #20,, and the long end of it is supposed to go on that tunnel stud.
-
hi,. i just looked again and realized you are not showing the lower mount bracket,, what is in your pic is the actual rod that goes to the shift rod in your trans. there is another lower bracket( mounts on trans) at that shiney alum spot on your trans, then another rod that connects to it and goes back to the shift pivot cup, mounts with the 2 studs on the cup. then the rubber cushion piece also boltsto the rear of that bracket rod piece. Check the pic i posted, i think its clear enough to make out the parts, click on it to expand. Sorry , i may be wrong about your pic being 2wd parts,, i was looking at the other rod bracket, but,, both shift rod brackets and the bracket that goes on the trans are different for 2wd or 4wd, so basically you gotta have all 3 parts for a 4wd to work right, all from an ea82 setup.
-
hi, the pic you show is what is a 2wd shift bracket here in usa, the 4wd bracket is a little different, going to try and post a pic from the oem parts book for 85-89 era. ea-82. page 3-D17 & 3D16 show the pic for each version. there is a rubber cushion piece that bolts to the bracket, and then to the tunnel on a stud that is said to be there, i hope mine is since i have yet to find time to install my kit yet. the 2wd & 4wd shifter bracket and the cushion mount are different from each other. i could only load the 4wd parts pic, i think it is on here. hope this a little help.

-
Hi, i can shed a little light, the guy who used to do the mount kit was name jerry, had a place called brats r us in washington state,he is still living and retired, maybe would provide a mount kit. what is needed to do the 5mt, the 5mt clutch disc, and throwout brng, your ea81 pressure plate, the shifter set from the 5mt, the ea81 trans crossmember gets modified, the rubber mounts from the 5mt crossmember, both side ones and the one in center. the 5mt is shorter, requires longer 1 piece driveshaft to be built. jerry made mods so inside your vehicle everything looked/worked as original. If you should decide to sell as is, price range ?
-
Hi, i have a 84 gl wag that did a something like this, only i lost all the lights. turned out to be a ground wire under the dash. it was black had a large brass ring lug located on a harness near the floor by the steering column left side of it. i had to take out the ecm to access and find this ground wire, once i did locate it and made it good ground all was well again. since you have the low beams this may not be your issue, but there are grounds at the back of the headlight fixture that may be, each side has a ground to body, they can look good but have rust under the bolt attachment. fairly easy to check and might be the problem. btw the headlight hi/lo & turn switch is not too hard to do, remove the steering wheel, and it is right there and slips off the shaft, it is held by 2 small screws in the bottom of the column covers under the wheel. at least this is how my tilt column style is done.
-
XT6 1988 where is the flasher relay?
Rupart replied to xXArchusXx's topic in Old Gen.: 80's GL/DL/XT/Loyales...
i think the system does what you describe when one or more of the bulbs ( outside ones) has an issue, bad connection or burned filament. i'd start with a close check of them first, especially if it started suddenly, and had been working ok. -
the round support rod in your pic is the radius rod, 2wd will be same. Easy fix, looks like the body work is more serious. sorry for your bad luck, hope the person is caught or is caused their repay somehow.
-
XT6 won't crank, out of ideas
Rupart replied to linkthehero1234's topic in Old Gen.: 80's GL/DL/XT/Loyales...
I agree what he just said!! on another note, since you mentioned putting together an axle with on hand pieces. the xt6 cv is slightly larger than ea-82 4 cyl vehicle cv's, they have 25 splines like some ea-82 cv's, that is for the trans stubs. legacy cv has a male spline on trans end so they don't work on your trans. i'm not sure if the legacy actual shaft is same or not but i think they work if fitted with ea82 , or xt6 25 spline inner cv. -
XT6 won't crank, out of ideas
Rupart replied to linkthehero1234's topic in Old Gen.: 80's GL/DL/XT/Loyales...
The roll pin is 6mm dia. If someone installed it 180 degrees off the pin will not drive through. if you can determine if that is the case (look to see if it extends out to the edge of both sides of the cv). i have found many installed incorrectly and they are a real pain to get the pin out, if yours is like this the pin has to come out from the side it was started in,, if it is in correctly it can punch through from either side. if it's in wrong you can use a smaller dia punch from the bad side ( you will be working with about 1/2 hole misalignment). Just hope you don't have this being your case.. -
XT6 won't crank, out of ideas
Rupart replied to linkthehero1234's topic in Old Gen.: 80's GL/DL/XT/Loyales...
I think the xt6 oem cv's were black. Don,t toss it, if it is not making noise yet, just clean, regrease, reboot and run it. Btw, the retainer pin only fits 1 way! The cv will slip on any spline,, the pin will seem to be ok in 2 places,, no, pin can start but will not align all the way through, only 1 is correct. Outer cv can be serviced while you have the inner one off, but they don't come off, just flush it out and repack grease, slip new boot over shaft. -
EA81: oil control piston rings alignment
Rupart replied to torpedo51's topic in Old Gen.: 80's GL/DL/XT/Loyales...
Hi, i found the information you asked about. 84 fsm pg 3-80 fig 3-169. the rings are refered to as Riken , it shows the tab as upper rail and the tab points down inside the expander in one of the lo gaps in it. Also stopper pins, point toward each other on each bank. so 1&3 pins face each other and 2&4 face each other. the two compression rings should have a letter mark both to be facing toward top of piston. hope this helps some. -
1984 gl 1.8l oil pump
Rupart replied to Leatherneck1992's topic in Old Gen.: 80's GL/DL/XT/Loyales...
X2421AA000 subaru #