
azdave
Members
-
Joined
-
Last visited
Everything posted by azdave
-
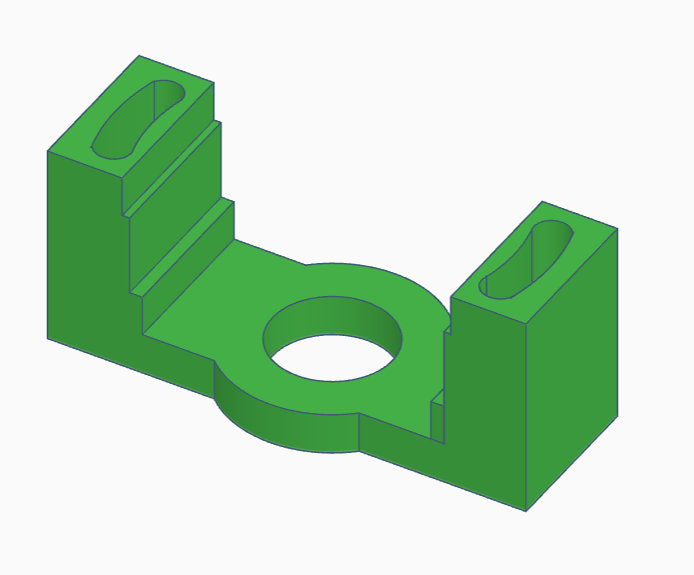
The ebay seller just cancelled my order for the SERA484-10 TPS saying they don't have any in stock. I've just now placed and order with an Amazon vendor instead and I wonder if it is the same seller. I'll find out in a week or so. Apparently, no one has these in the USA or they are stupid expensive if they do. I suspect the Amazon seller is shipping from China. Here is a graphic of the holder I am 3D printing in order to cradle the new TPS in the reverse position. The two slotted holes allow for the idle position contact switch setting to be adjustable. I'm not going to print more brackets until I have the new TPS modules in hand, just in case they are not identical to what I am using now. Stay tuned! I'll reply back here but also start a new how-to thread if this all works out.
-
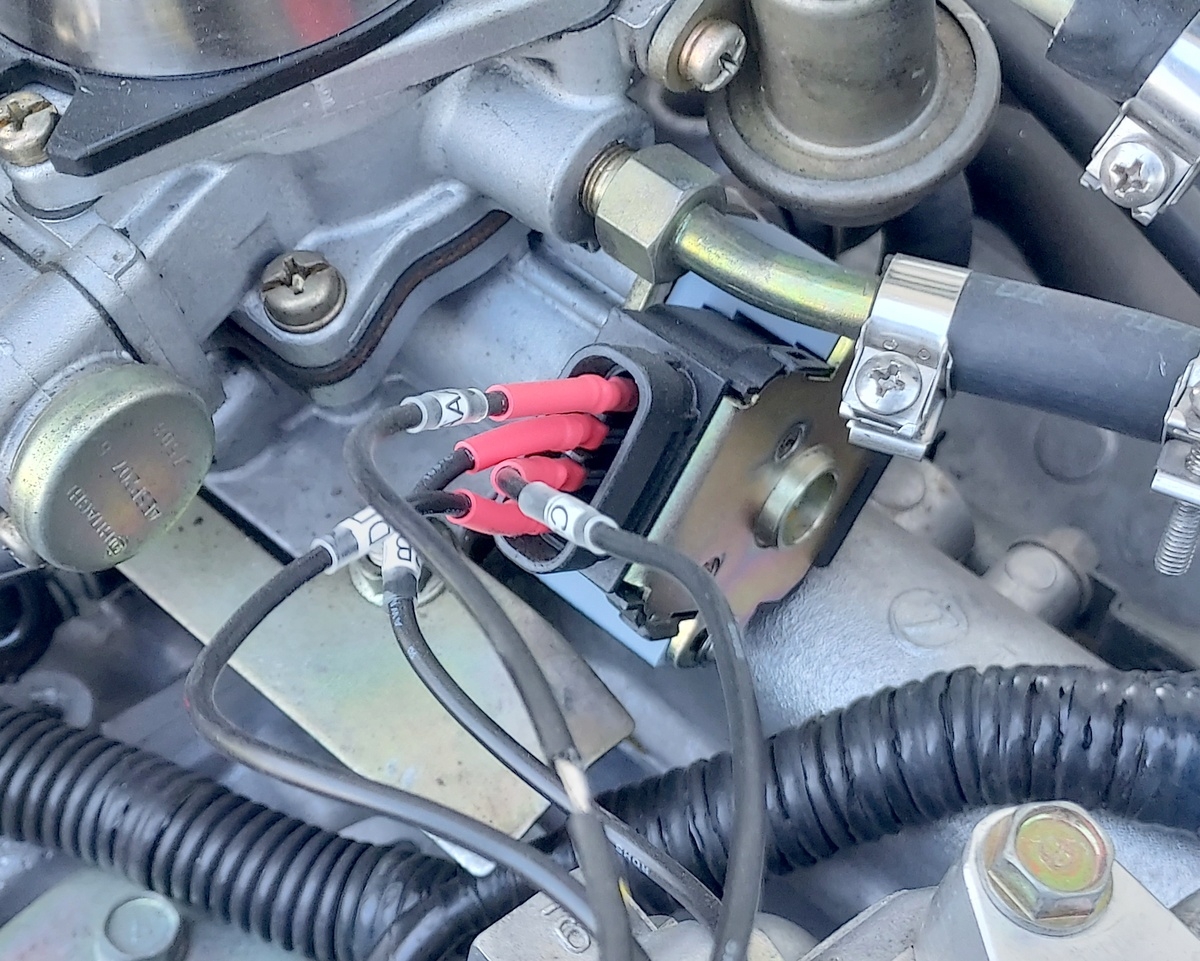
Sure will. I have another unit on order so I can create the step-by-step instructions and also take some better detailed photos. I plan to offer the bracket adapter, dust cover and a small hardware pack at a nominal fee so people can buy their own SERA484-10 TPS and then modify/install it themselves. It's hard to see the bracket in the image below but it is medium gray in color and wraps around the TPS. Red arrows in the photo point to the bracket and longer screws are required but easy to find. The wiring sounds confusing but is actually straight forward. Since the TPS is reversed (but then installed upside down) the wires go to the same A,B,C &D positions as before. I'll post up some more details soon. I 3D printed the backet using ASA filament, which is one of the best for high heat areas.
-
I'm quoting my own post from 2025 because I have since revisited the question of using a SERA484-10 4-wire throttle position sensor as a $30 alternative to the OEM TPS that, when available, sell for over $300 (if you are lucky enough to find one). It's not a quick PNP solution but it is working for my 1987 EA82 DL wagon with the SPFI engine and not that difficult to install. The functions of this substitute TPS are all a mirror image of the OEM part and it even had the Hitachi logo on the plastic case. By mounting the TPS upside down, and creating a new mounting bracket, I was able to make it work quite well. I have about 150 miles on it so far with no issues. The idle switch is still adjustable and functions properly. The resistance range at idle and full throttle are easily within the range of the factory service manual recommendations. I will clean up the wiring in the near future but for now, I have simply made a set of jumper wires to go between the old TPS plug and the new TPS body as the 4-wire plugs are not compatible.
-
Okay. Sketchy repair maybe (because I don't know 100% what I did) but it is running as well as it ever has. I set out to shoot a short video of the issue last night and decided to check the IAC one more time. It is NOT a b-metal control. It is an on-off solenoid that has the flow metered by a small adjustment screw that is in the throttle body, not in IAC itself. That screw allows minor adjustments to the idle speed while the IAC is active. I turned it in a few revolutions and then backed out to the same spot where it was. I went to start the engine and then do the same adjustment while it was idling but nothing else was required. The engine started as well as ever but never stuttered or bogged down. It idled perfectly and I've now driven it about 45 miles with zero issues. Maybe the port was blocked inside and turning the screw opened up something that has been blocked or too restricted. It runs like a champ now so we'll see if it ever repeats again. The really cool part about all of this is trouble that I figured out a way to use those reversed TPS sensors (SERA484-10) that others have experimented with. I'll detail that in another thread.
-
I've been working on this problem on and off for almost 4 months and starting to wonder if I am overlooking something obvious because I've been at it too long. It was my daily driver up until this engine issue and honestly, I would rather drive this to work than my 2003 WRX so as much as I hate to ask, I need some help to review my problem. My engine had been running like a champ for well over 2 years since I originally bought this wagon home and repaired a leaking head gasket. I put a least 50 miles on it daily with both freeway and city driving. About 4 months ago, it fired right up as always but then stumbled for a bit and died. What? It has never, ever, done that since the first day I fired up after the rebuild and that was probably 20,000 miles ago. It is the SPFI engine so I never touch the gas pedal when starting. It will restart instantly over and over and runs great for the first 2-3 seconds before the stumbling begins and barely stays running or dies. Sometimes, it will continue to idle very poorly in the stumbling condition for 3-5 minutes, right on the edge of dying. If I step on the gas, it will instantly increase engine speed very quickly and strongly until the desired RPM is reached, but then it begins to stumble again as soon as the RPM is held steady. If I had to guess, I would say it seems to be running very rich during the stumbling phases but I don’t know for sure. It runs fine as long as the engine is increasing in RPM. If I hold the throttle steady at any set RPM, it begins to stumble. I can race the engine over and over by blipping the throttle over and over and it seems okay until I try to let it idle or hold a steady throttle position. I checked and cleaned the MAF. No change. I then replaced the MAF with a known good unit just in case. No change. The MAF was not dirty and I do get a rising and falling voltage signal from the sensor when I back-probe the signal wire at the connector. Wiring harness checks out per the shop manual procedures. I'm working from an 1989 dealer repair manual but pretty sure it's the same for my 87. I don’t have a check engine light and the only code I get from the little red LED hidden inside the ECU is the 5 or 6 short repeating flashes indicating the ECU build series. The 2-wire temp sensor used by the ECU is fairly new and reads the proper resistance range for the engine temp. The IAC seems fine. I took it apart, cleaned it and confirmed it opens and closes when power is applied. When it is closed, it is sealed tightly and flows air easily when it is open. It is a 100% open or 100% shut, although I don’t know if it is modulated by a PWM signal from the ECU. It seems to be active all the time during my testing. It is not a bi-metal heated type valve that closes slowly over a 5-6 minute period after a cold start. If I unplug the IAC connector the engine won’t run at all so it seems to need that bypass air for sure, at least when cold. I thought that maybe I had a large vacuum leak but a smoke machine only showed a very tiny amount of leakage around the throttle shaft at the TPS. The TPS is set correctly with the idle contact switch inside closing only at idle per the FSM. The resistance of the TPS matches the factory manual for all positions. The resistance changes are smooth throughout the rotation from idle to full throttle. Fuel is fresh, filters are clean. Constant 23 PSI measured under the hood with ample flow when I open the line for a test. What causes an SPFI EA82 engine to start perfectly with no issues but then immediately run poorly, except when under acceleration? The fact that the engine starts normally at every attempt but seems to only run well when accelerating makes me think of an ECU that is going in and out of a closed loop/open loop program but I know very little about that possibility with this OBD1 technology. I recently tried a new Bosch 1-wire O2 sensor but it made no difference. Figured that was a long shot but it was cheap and easy to change. At this point, I’m wondering if I can’t see the forest for the trees. Am I missing something obvious? She's to pretty to just be sitting in my driveway.
-
Glad you got it fixed! A very interesting thread and timely too. I was just about ready to post up my own appeal for help with my 87 DL SPFI 5-speed that has nearly the same symptoms. It starts as easily as it ever has, over and over but will not idle or run at a steady throttle position. It runs great if under acceleration but I have to keep blipping the throttle to keep it running. I'll review the info here first and make sure I haven't missed anything before I start my own thread.
-
No luck looking at the suggested SERA484-10 TPS as a possibility. It arrived on Friday and I took a look inside. Knowing the wiper function of nearly any standard potentiometer is reversible I hoped to use the same trick here but no joy. The total resistance value of the carbon trace is in the proper range but the wiper does not maintain contact with the trace throughout the full range of the sweep. That means it can't be reversed. I was counting on being able to invert the pot function and maybe 3D printing some of the plastic bit to make a mirrored version. I could probably make it work if I had no other choice but it would not look pretty.
-
Yes, I saw that comparison photo in your link before I ordered the module. I don't expect it to be a simple swap and likely use parts from both the bad and good TPS in my attempt to make it work. It is unfortunate that the base broke when you took it apart. I suspected that you had a crack already but hard to tell now. On fragile parts, I grind out any rivets with a Dremel tool and small stone tips. As you discovered, a drill bit expands the soft rivets as it goes through and cracks the hole quite easily. The black base material is likely phenolic (Baklite) which is great for high heat and chemical resistance but quite brittle at times.
-
I have a EA82 87 DL wagon and as noted, they have two different water pump pulley heights (because of A/C options). In my case, I found the pumps and shafts were actually the same parts between the two choices. The only difference is how far they press the pulley onto the shaft to create a long or short version. I got the long pump version before I discovered I needed the short, but was able to use a hydraulic press to push the pulley onto the shaft a little further and make it work, instead of doing an exchange through Rock Auto. If you can believe the images offered on Rock Auto, there does appear to be two different pulley choices in your application. One pulley looks like it is slightly deeper than the other so it might not be like mine where I could "fine tune" the pulley location on the shaft.
-
The ebay vendor just cancelled my order for the SERA484-10 TPS because it is out of stock. Looks like I'll have to order one shipped from New Jersey instead of California and wait an extra few days for it to get here.
-
I offered to help, not knowing your electronics skills but maybe you can figure it out with careful inspection. I would basically take it apart and find out if it failed due to a mechanical issue (like a hidden crack across the carbon path) or if it failed due to somehow suffering from an over-current condition. Your test results seem to indicate it failed in more than one way. I would be looking very closely for any hint of heat damage or circuit board burns. Also look for cold solder joints and micro cracks in any circuit traces. I will sometimes heat and cool a circuit to look for failures caused by expansion and contraction. You say you get no continuity on any of the pins after the new TPS failed. Using the diagrams immediately above as reference, it does not make sense that you read nothing across R-B, nor across R-G or G-B. One or two of those paths should still be reading some type of resistance whether the part overheated or cracked. Very unusual to read an open circuit on any combination across the R,G, or B wires. That would have to mean the carbon path failed as well as the wiper on the G-wire. The connection between the B-LG wires we don't care about right now because it is a simple on/off switch and you can physically see if that contact is working at idle. I had TPS issues when I first got my EA82 SPFI 87 wagon 3 years ago, but I was able to clean it up and make it work. I'm really temped to buy one of the cheap SERA484-10 TPS modules on Amazon, just to learn if it can be configured to work in our application. I see one example online where a person said it worked on their EA82 but yet another where they said it did not. I think I will order one and find out for myself. It would be good to know the answer and have a spare for myself if it is possible. I'm not concerned with connectors being plug-n-play of course. Update: I went ahead and ordered one of the SERA484-10 TPS modules off eBay and should have it by the weekend to check out.
-
I don't see what you could have done wrong if all your readings were as you say. It a simple potentiometer setup with an on/off switch on the side to let the ECU positively know when the throttle is in the full idle position. If you currently have no continuity between pins B&D, unlike when you tested it new, that would indicate that the carbon trace on the board had burned in half or was separated somehow. If you now connect the Ohm meter between pins B &C and then turn the shaft from stop to stop, do you ever measure anything but an open connection as the wiper sweeps around the carbon trace? The 5 volt signal should not be able to supply enough current to damage the sensor. Even if that supply wire measured 12 volts, it would barely generate 0.003 amps (0.04 watts) which should easily be handled by the carbon wiper. I don't know what kind of time schedule you are under but I can offer to bench test the TPS and see if I can determine what failed. Not much to lose except for the time to mail it back and forth and the postage cost. I myself would not risk another new TPS until I had a better idea what failed.
-
You will be perfectly fine.
-
I own multiple classics and rarely install extra gauges in any of them. I'll confirm the OEM gauges are operating normally and leave it at that. The KISS principle makes life much easier for me. I don't need to know the exact numbers, only that I'm in a normal range. Engine temperature is all I really monitor closely since I drive my wagon through the Phoenix summers with A/C always cranked to the max. I know from using an infrared gun that 3/4 needle sweep is normal in the summer and about 206F measured at the thermostat housing. In winter, the needle reads about half way and equates to around 190F. For oil pressure, I installed a temporary T with a mechanical gauge at the filter and after a good hot freeway trip with the engine at idle, I still have good pressure. When you have good oil pressure at hot idle, you will always have good oil pressure at any other engine temperature or RPM. Since I have an idiot light for oil pressure, I make sure the bulb is working as I start it each day. If I let the clutch out a little fast and almost kill the engine, I'll see the oil light flicker when the RPM's drop below spec. That's another confirmation that the oil pressure switch is working fine. For fuel pressure, I only check that if I install a new pump. Again, I have installed a temporary port under the hood and confirmed pressure is in spec. After that, I remove the gauge and forget about it.
-
I'll agree that extra data is fun to work with but constantly monitoring your fuel and coolant pressure in an EA82? I have the ultra basic (no tach) factory instrument package in my 87 DL 5-speed. The coolant temp gauge and the oil pressure idiot light are enough for me and got this wagon to 255K miles so far. Sometimes less is best for simplicity sake.
-
I could not tell you the part number as the sales history is gone now but it is the same type as listed by several eBay drop shippers that pretend to be legitimate parts houses. The radiator had plastic end tanks. Just be sure the radiator cap and filler neck pair together correctly. If the spring in the radiator cap can move a 1/2" when you push on it manually, then make sure when you install it that it isn't being pushed in any further than maybe 1/4". The relief spring needs room to move after the cap is in place and when pushing down and turning to install my cap, I didn't notice that the spring was fully compressed and therefore had no pressure relief at all. I had burped the system really well so with no air trapped in the system, the hydraulic pressure built quickly as the engine heated. If I'd had some big air bubbles in the system, I probably would have been fine.
-
My problem was a stupid radiator cap and how it fit (improperly) to the filler neck. The cap seemed to fit great when I installed it but unseen by me was the fact that when it was installed, the overflow relief spring was fully compressed and therefore, would not allow excess pressure to vent to the overflow bottle. It was basically a radiator cap with no safety relief whatsoever. I had just installed a new radiator, new cap, new clamps, all new hoses, new thermostat and new temp sensor but had to stay with the original heater core as it was not blocked and working fine until then. Guess which part split open when the coolant pressure was unable to vent? Note: I bought the radiator and cap from the same vendor who showed them as a correct fit but clearly they were wrong. Moral of the story here is to carefully check the fitment of your radiator cap to the filler neck. Half the stuff being sold online these days shows as "compatible" when it isn't and it cost me a heater core repair, which is a nightmare. After that mess, I got one of those radiator cap testers and confirmed that the cap released pressure properly. I also used a caliper to confirm the depth of the sealing ring within the radiator filler neck and compared it to the requirements of the radiator cap.
-
azdave replied to 5000fingers's topic in 1990 to Present Legacy, Impreza, Outback, Forester, Baja, WRX&WrxSTI, SVXIf it is off by as much as you say, I can't imagine it is going to "settle in". You likely got a set of struts that fit, but not a set that are proper. I had a similar thing happen with new front struts for my older Subie wagon. It raised the ride height noticeably and also gave me excess positive camber that could not be adjusted out. The seller assured me they were correct and he proved it by showing me some cross-reference chart online. The cross-reference chart was a no-name document from who knows where and showed that the same front struts would fit any of the three models for that year, even though the factory clearly made three different versions with different spring rates and ride heights to cover the available models that year.
-
azdave replied to Sonicfrog's topic in 1990 to Present Legacy, Impreza, Outback, Forester, Baja, WRX&WrxSTI, SVXWelcome back to USMB! I doubt I can help much with questions about your Outback but you never know. I DD a 87 DL wagon and also enjoy my 2003 WRX wagon so that is what I know best. No shame in your new car not being "new". I'll be 66 soon and have never owned a new car in my life and have no plans to ever make that mistake decision. The most I've ever spent on a vehicle was $9500 and only once have I ever bought a car from a dealer. Every other vehicle has come from a private party. The amount of money I have saved by avoiding depreciation and not being in debt constantly, has allowed me to enjoy owning multiple classic cars while on an average salary and being comfortably set up to retire at the end of this year.
-
My 87 DL wagon with a stock EA82 just popped on the CEL light upon first start today but went out about 100' down the road. I'm at roughly 254K miles. I haven't checked yet to see what code(s) are stored. I hope the light was one of those "service reminders" that really mean nothing. I have not tried to get the DL to pass Arizona emissions since I got it three years ago. I insure it as a classic vehicle instead and get an exemption. Once I put the full new exhaust and converters in place, I may try to run it though the DMV the test just to see if it will pass. It is $17 to have them sniff it and find out.
-
I have a 4-channel temp reader with a handful of 6' long thermocouples. I put the thermocouple touching the fitting and hold it in place with a One-Wrap style Velcro tie. If doing a driving test, I can temporarily route the wire into the interior past the door weatherstrip and monitor the temps while driving. I also have a set of those wireless A/C pressure gauges so I can watch the high and low side pressures while driving. Too much data probably, huh?
-
That is only true in a narrow range of ambient temperatures. For you to have read 65 PSI (assuming there was at least enough gas in the system to reach the saturation point) I'm guessing it was about 66F outside at the time you measured the inactive system pressure. You can find online gas/temp charts that show the relationship and values. Adding gas the way you did is a great way to sneak up on the proper fill if you don't know how much was in the system to begin with but don't be temped to "add just a little more". The compressor will cycle on and off for three reasons. Low gas charge, evaporator coil too cold or system overcharge. A compressor cycling because the evap coil temp is too low is the only time it is acceptable to routinely cycle. Cycling due to a low charge is not good because the refrigerant also carries the lubrication oil that the pump needs and an overcharge will wear out your pump and blow hoses. I fill my systems by monitoring the evap coil return line temperature too. When I know I am close to the proper fill, I watch the temp of the fat line leaving the evap coil. You put in a little gas and watch to see if the outlet line drops a few degrees accordingly. You do that a few times as long as the temps keep dropping a little each time. Once you add a little gas and the temp stops dropping, you know you have reached the point that the evap coil cannot boil off any further addition of refrigerant. It's a more nerdy way to do it but I'm in the SW desert and I need my cooling when it is 110 outside. I daily drive my 87 to work each day and driving home in the afternoon on the freeway really loads the system. Your low 30, high 150 readings sound about right for a properly charged system on a day that was in the 70's but you don't mention the ambient temps on the day you did the work. Sounds like you have it dialed in pretty well. Speaking of R134a, a local farm store had 16oz cans of R134 for $5 a can this weekend. I stocked up for sure.
-
Welcome! USMB has been a great resource to me as well and glad it is still around. I'm grateful to all the contributors throughout the years.
-
Great! Thanks for the follow up. I hate it when repair threads have no resolution, good or bad.
-
Yup. Corrosion creates high resistance connections that will heat up and ruin the compression/slip fit of the terminals and then it melts everything around it, all without ever blowing a fuse. I'm okay with the non-electric fan on my DL but it was tough finding a good thermostatic clutch when mine seized up last fall. I ended up finding one at PicknPull from a GL-10. It looked brand new and has been working great.
