Scott F
Members
-
Joined
-
Last visited
Everything posted by Scott F
-
S'ko, your BRAT looks level in the pic, but appeared raked in the video. Could it be driver weight? I also prefer the silver on the wheels, or bare aluminum look. Not polished, but maybe scotchbrited. Rather than two tone, I would like to see Line-X on the lower section, below the door bumper level.
-
Yes, that is my current strategy. Anyone need a EA82 pedal set?
-
I am trying to do a EA81T 3AT to 5spd D/R swap. I got almost everything I may need from the donor, except the speedo cable and trans crossmember. So, on Saturday I decided to do the pedal swap first, then continue driving it until I was ready for the trans swap. I started at 1pm, and it turned into an 8 hour marathon nightmare. After much struggling, and removing the steering column, I finally got the pedal assembly out. Comparing it to the EA82 assembly, I began to realize that it was NOT a direct swap. The more I looked at it, the worse it got. The firewall mount looked the same, but the bracket length and two upper bolts were off by at least an inch. There were other differences such as pedal distances from the firewall, which would have affected throttle cable and brake push rod. So then I thought maybe I could reuse the old bracket, and swap the pedals onto it. No, that was not possible either. At this point I knew I was screwed. I was at an outdoor workshop in an industrial area, all alone, and 11 miles from home. My only way home was to drive, or call a taxi. I really wanted to sleep in my own bed that night. There was nowhere to bunk in the shop. I was forced to reassemble it back to how it was when I started, and didn't finish until well after dark. The final torture was getting the U-joint back on the rack's input shaft. I was hating my car by then, and I wasn't too happy with anyone who said the pedal assembly swaps, because it DOES NOT. So now I think I have to find an EA81 4spd pedal assembly. Can anyone offer further technical advice on this subject?
-
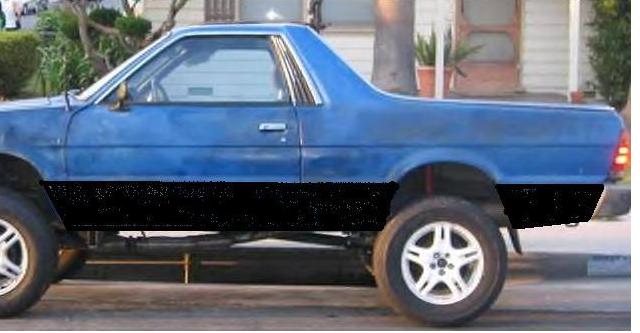
I also have a 84 Turbo BRAT, and I want to lift it 4-6". I have a 5 speed D/R ready to swap in soon. Those Pug wheels are the nicest looking wheels I have seen on a Subaru.
-
You're like me, working on one crazy project, and dreaming about the next. I would rather see a dual drivetrain 4WD, with two engines and two trans. This could be neatly accomplished in a BRAT or similar. The trans rear output could be used for a PTO winch. I don't know how one would synchronize the rpms, or even if it would be necessary. Obviously throttle and shifters would be synched. If you gang two engines, you may need to use a big American auto trans to handle the power. That all adds up to a very long drivetrain.
-
I have a 5 speed D/R in the shop. I will try to remember to measure it.
-
Can you elaborate on the clutch return spring?
-
Your idea of measuring runner volume has merit, but flow is more important. Maybe you can find an affordable place to flowbench your heads before, during, and after porting.
-
Grav, have you looked into Extrude Hone? Consider these steps: 1) Hand port and cleanup, matching to gaskets 2) Flow bench 3) Extrude Hone 4) Flow bench to confirm balance You know not to polish your intakes, right?
-
I have a tow hitch on my 84 brat I would be willing to sell if anyone needs it.
-
How much can you lengthen the LCA without over extending the DOJ? If I keep my BRAT for a long time, I will build some custom arms, or maybe an A-arm conversion.
-
Whoever brought up U-joints, thanks for nothing. What I am talking about is using a complete half shaft from another Subaru or another car. Or, use the DOJ cup, and the axle from another application to make a hybrid half shaft. IOW, a cheap and easy combo that does not require custom components or machining. I am a machinist/welder/fabricator, so I can come up with a custom solution if I need to. For the inner joint, I would cut off the cups and weld on 930 flanges, so I could use 930 CVs and off the shelf axles from SAW. The question is what to do about the front outer joint? Maybe a 930 CV could work there as well. Has anyone made a long travel Subaru yet?
-
I am curious if there is a convenient way of running longer axles on my 84 BRAT. I don't mean 1/2", but more like 3"+. The long term goal would be to redesign the suspension as an A-arm system, with 10-15" of travel. The rear would also get longer axles and trailing arms.
-
Thanks Ian! I want to fix my A/C now in the off season so I am ready for summer. :cool: How much would it cost to have this work done at a shop?
-
Thanks for clearing up the spline question.
-
I also want to do the 5 spd D/R swap. My 84 Turbo BRAT with 3AT has a 3.7 rear diff and 23 spline DOJs up front. I thought turbos had 25 splines? So, I need a non-turbo 5 spd D/R with the 3.9 rear diff, right? Is there any chance I can find a 3.9 LSD? If anyone has a 5 spd D/R or knows of one in SoCal, please let me know.
-
Good eye Bucky. I would def change that res, and measure or change the diode. Don't conformal coat until the board is clean, dry and working.
-
You might be able to persuade me to go look at it if necessary. I also know of an 84 Wagon for $200 in Irvine. Let's meet when you come down.
-
I would be happy to swap the rear diff for a 3.9. Every little bit of low gearing will help. I would like to run 28-30" tires eventually. I have to do some calculations, but I may need to use low range most of the time if high range is too tall. Is it possible to shift between low and high range on the fly? That would make a great combination of gear choices.
-
My thoughts at this time are to swap the 5spd D/R for now, because this engine still runs like a top. If and when I go crazy with suspension and chassis mods, I would follow it up with a major power upgrade. The custom fabrication does not bother me. It's half the fun. I am not yet fully familiar with all of the possible swaps and upgrades, and I am open to any suggestions.
-
It's ironic that you would post this. Today I noticed this problem for the first time on my new to me 84 BRAT. It has been "cold" here in SoCal, close to freezing. Once I drove for a few miles it started working again. I will see if it does it again tomorrow morning.
-
Thanks Mike! We may have the only two left in CA. I am in OC. Look me up if you ever come down. It turns out that the 3AT really do suck. This one does not down shift when cold, but I can do it manually. Once it is warmed up, it shifts normally. I am strongly considering a 5 speed D/R swap, especially if this tranny craps out. Further down the road, I may want to do an EJ turbo 5 speed swap, especially if I do some major suspension redesign.
-
I left out the source on purpose, as a teaser. Here are the results of my search. Draw your own conclusions. The real puzzler is why AZ charges for a core on a new axle. Autozone Duralast new 7306 64.99 15.00 core lifetime warranty Pep Boys Proline reman 40-18606 66.10 50.00 core Kragen A1Cardone reman 67001 78.99 30.00 core GCK Axles 13400 S. Western Av Gardena, CA 310 532 9222 bought at: Pronto 14020 S Van Ness Gardena, CA 310 851 6844 GCK #SB-8002 new 1 year warranty 49.99 boots 7.93
-
Saturday I bought an 84 Turbo BRAT, knowing that the PS inner front boot was wasted. After much searching and thought, I was 'torn' between boot or axle replacement. This morning I found a great deal on two new GCK axles for 49.95 each. That made it a no-brainer, since boots alone would cost around 20.00 per axle. These axles come with a one year warranty. I think the old axle is fine. I plan to take it apart, clean and inspect it, then buy new boots and reassemble as a spare.
-
Thanks for the removal tips, but this time I was trying to install the glass. The rubber was already in place, and the glass was out. The standard method is to put the glass in the rubber, then install them together into the cab, with a wire all the way around the groove. Here is what worked for me: 1) Start with the rubber top and sides in place, and the lower run of the rubber sagging on the outside. Alternatively, you could put the bottom and sides into place, and leave the top out. 2) Place a wire or small rope into the rubber lower channel, to be pulled out later. 3) Slide the top of the PS glass into the top of the front channel, then get the rubber to sag just enough for the glass to push and slide into the channel. Repeat for DS glass in the rear channel. 4) From inside the cab, carefully pull the wire to lift the lower rubber channel over the cab sheet metal. Use a small screwdriver or a small putty knife to assist the wire trick. My window rubber was original, and somewhat stiff and dry. It was not as flexible as new rubber, and it tore easily. A little lube would probably make it go on easier.