craigmcd
Members
-
Joined
-
Last visited
Everything posted by craigmcd
-
I finally tracked down the oil sensor on our 2012 Outback. On this 6 cylinder engine, it is down low, screwed in just above the oil filter assembly. If I remove the sensor when the engine is full of oil, will it leak all over me and the floor ? Would it be best to do this as part of an oil change, and pull the sensor after draining the oil? The sensor comes with some red sealant on the threads, is that all I need when putting the new one in? Thanks for the input! Craig
-
craigmcd replied to Stevo F's topic in 1990 to Present Legacy, Impreza, Outback, Forester, Baja, WRX&WrxSTI, SVXThe vibration in the wheel and throughout the car (and particularly under your seat) may be a bad driveshaft. I had to replace ours on a 2005 outback at 168,000. It could also be a bent wheel, particularly if it is on the front. $2,000 seems fair for this older car with a swapped engine. You’ll have the usual repairs in the future, hopefully nothing worse.
-
craigmcd replied to nicholi2789's topic in 1990 to Present Legacy, Impreza, Outback, Forester, Baja, WRX&WrxSTI, SVXI recently did a big repair to my sunroof (2005 Outback), replacing both pieces of glass (to get better rubber seals) and lowering the headliner so I could clean everything, particularly the drain tubes in each corner of the assembly. That is all described in a different post thread. Yesterday morning I took out my Weathertech floor mats to shake them out, and discovered on the driver side floorboard a pretty good puddle of water. I took off some plastic panels and pulled the carpet back as best I could, and found a lot more water. With two large towels I sopped up the standing water from the floor pan. All of this ruined my mood for the day. I left it all open, and the doors open all day to air out - which helped dry the carpet and pad. Last night and this morning we had 1/8 rain, and when I checked this morning, with the carpet already pulled back, there was an inch of water in the low spots of the floor pan. I could see a steady drip from the dashboard side panel, near the door trim. The telltale sign is that the front corner roof pillar panel, which is fabric coated, is soaking wet. Following that up, the front drivers corner of the headliner is damp. The car sits in the driveway with that corner of the sunroof at the lowest point. The DRAIN TUBE hole was clogged with some particles from a tree, which has been shedding a lot of debris all spring. The drain is at the bottom of a small “bathtub” collection area, but once it is clogged, the water simply overfills the bathtub and into the headliner. On this car, if you open the sunroof completely, you can reach in there with a long screwdriver or forceps, and remove obstruction. An air hose works if you have a long extension. I had cleared all of this just several weeks ago, but the tube opening is pretty small, and it does not take much to clog them. For me, the best solution is to never open the sunroof, and don’t park under the tree. For now, the Subi is in the garage with a small heater in the passenger seat, and a heat gun airing out the carpet from the drivers side. Maybe by tomorrow it will be dry. Agh.
-
craigmcd replied to craigmcd's topic in 1990 to Present Legacy, Impreza, Outback, Forester, Baja, WRX&WrxSTI, SVXYes, the wiring can be unclipped. On the black wire on the driver side of the car, it runs the length of the headliner to the left rear pillar, where it unclips behind the pillar trim. On the front of the headliner the wire bundle coming from the passenger side front pillar is for a number of things, such as visor lights, garage door button, dome light, and sunroof switches. In the center (under the headliner) are three wire clips for the console. In each front corner are the visor clips. Fair enough. The problem I chose not to solve, is that all these wires are taped down to the headliner, and thin insulation sheets are glued over the top of them. It just looked like a big pain in the rump roast to cut them out to free them. The black wire would be easiest to just splice somewhere easy to reach. If you left the rear seats up with the headrests on, they would support the headliner so it would not fold, and with it shoved forward, you would have sufficient room to work on the rear tubes. I can not recall why I folded the seats down, but it was probably just for better access. One last note - the first step on this project should be to disconnect the battery negative terminal.
-
craigmcd replied to craigmcd's topic in 1990 to Present Legacy, Impreza, Outback, Forester, Baja, WRX&WrxSTI, SVXWith the sunroof open, the front tubes can be seen, and either a skinny skinny vacuum hose or compressed air can reach them. I pulled out a larger piece of debris with long plier device. The rear tubes are 34” back and very difficult to reach with just the roof open. I might try to rig a long 1/2” plastic tube to snake back there and vacuum out the drain channel occasionally.
-
craigmcd replied to craigmcd's topic in 1990 to Present Legacy, Impreza, Outback, Forester, Baja, WRX&WrxSTI, SVXHi All, I want to follow up on the repairs of these sunroof leaks. Phase 1 was to access the drain tubes and clear obstructions, and Phase 2 was to replace the sunroof glass because the rubber seals are shot. There are a couple key tips in this if you are about to do this project. This is a 2005 Outback VDC (Limited, LL Bean) wagon. Phase 1 > I thought the headliner would have to be completely removed per the suggestions above, but that is niether necessary or advised. This is because there is a black wire which runs in the front left pillar, and a wire bundle which runs in the front right pillar. The black wire would have to be cut and spliced again, and the larger bundle on the right side is also problematic, but would be removable with considerable effort. The solution is to lower the headliner enough to clear the rear view mirror, then gently work it forward about 16-18 inches (watch not to yank on the wiring). Let the headliner rest on the driver row headrests. I lowered the rear seats, so the headliner was not supported in the rear. The headliner DID FOLD on the headrests, but when reassembled, the fold was really not noticeable. Now you can reach all four corners of the sunroof assembly. This car has only four tubes, one in each corner of the assembly. As instructed previously, remove each tube and clean it out. Clean the drain channels throughly. I reduced the pressure on the compressor to 40 psi, and blew out the tubes. Use a little pipe cleaner brush to clean each corner drain hole. A hose clamp or plastic tie strip should be used on each tube. There was no Velcro, and only 5 plastic clips in the rear area. The headliner is largely held in place by the pillars, and you have to pull those away. I did not fully remove any of the pillar column trim, just pull away the top area as best you can. To accomplish this, remove the plastic cover (w the logo) on the side pillars and unscrew the bolt. Be REALLY careful not to drop this bolt inside the pillar! Be careful with sharp tools, the airbag is running above the side windows! Removing the light assembly’s are a little tricky, but they all hinge towards the front of the car. On the reading light console in the front, you do not remove the whole thing, just the light cover so you can reach the screws. At the front corners you need to unclip the visor light wire - be really careful unplugging these, and all wire connectors (use pliers). Drop the sunroof enough to unclip the three wire connectors above the center console. One of the hardest things to remove was the rear seatbelt cover. Drop the headliner a little so you can see how that works, and to reach it with a tool. The other part which was tricky is the two visor support clips. They are removed by sticking two screwdrivers simultaneously into each side, and pressing the two clips as you pull the thing out. I took a lot of time carefully removing the headliner and cleaning everything, with reassembly taking about 90 minutes. You should figure 4 to 5 hours total for this project. There is an amazing amount of stuff hidden by that headliner, try not to break anything. Phase 2 > After much searching, I found a 2008 Subaru in a salvage yard with a decent sunroof seal. It is used, but should last at least 3 or 4 years. I paid $200 total for both the front and rear pieces. To my surprise, the salvage yard removed and sold me the entire sunroof assembly (about 33” x 60”), saying it was easier for them. The replacement of both pieces is really pretty easy, just a few 10mm bolts, which are hidden by four pieces of plastic trim. I spent a decent amount of time cleaning the hard to reach areas. Make a note of how many shims are under each bolt. Before you start, look at how the original window aligns to the top of the car, and shim to match. When reassembling, don’t overtighten, I think you could crack the glass if over enthusiastic with the wrench. This little project took me about 90 minutes. Could be done in less than an hour. I am good at working on the cars and have plenty of tools, but for my sanity and enjoyment, I set aside a decent amount of time for a project, and I take my time. A pro in a shop could probably do Phase 1 in 3.5 hours, but also might damage something along the way - and won’t clean things as I do. I also used a tiny fountain pump and tested the drains before reassembly.
-
I have followed this very entertaining thread (which I started) and really enjoyed all the comments. I am on my 6th Subaru, and will continue to watch for the right Brat or Baja - but would buy the Brat first just for the fun of it. In regard to the jump seats: Back in high school, circa 1978-80, I owned a ‘67 El Camino SS with a factory 396. I skateboarded a lot, and several times drove with 2-3 kids riding in the back (no seats) from Colorado Springs to Boulder to go to the only skate pool in Colorado. It is a good 2 hours each way on the Interstate. Now, as a father, I would never let my kids take that trip in the back. Different times. We drank out of the garden hose too. Thanks for all the comments. C
-
craigmcd replied to craigmcd's topic in 1990 to Present Legacy, Impreza, Outback, Forester, Baja, WRX&WrxSTI, SVXThank you for those helpful suggestions and specific info on those center clips. Yesterday I dropped by Harbor Frieght for a clip removal tool set, that way I don’t damage the headliner so much using pliers and screwdrivers. I am not excited about removing the whole headliner, but I do agree it is the best way to go - otherwise it is just going to be constantly in the way while doing the rest of the work. I will also try to clean it and see if any of the water stains will come out. Yesterday I did take a closer look at the sunroof, and easily confirmed that the rear tubes are blocked (now that I know where they drain). I sent a small amount of water right into the very back of the headliner. It just moved a few positions up my ‘to do’ list. Later, C
-
craigmcd replied to craigmcd's topic in 1990 to Present Legacy, Impreza, Outback, Forester, Baja, WRX&WrxSTI, SVXProcrastinating this project. I have watched a couple videos to show the headliner coming out - not fun. After watching the videos I agree with the suggestions above, and that the drains are plugged. The window glass seal edges are in bad shape (front sunroof and rear sunroof). On the 2005 Outback LL Bean can the glass be replaced without removing the sunroof assembly? I know the answer is yes on some models, but can’t find this one specifically. Thanks again for the suggestions. For now been keeping the car out of the rain.
-
Thanks for the replies. My wife guessed that 2 or 4 doors was part of the answer. The cab pass through is cool. Is one of these more 'disireable' then the other? I see them in my region occasionally, usually the Brat. I don't know how to spell disireable. Thanks for the info. C
-
craigmcd replied to craigmcd's topic in 1990 to Present Legacy, Impreza, Outback, Forester, Baja, WRX&WrxSTI, SVXIt has been just about 2 months since I did this VB replacement, so I thought I would follow up. Everything is working perfectly! No CEL or other issues. No leaks, no loss of fluid. The car has been on several longer interstate trips now with no problems. The rough shifting I noted above seems to have settled down, or else I have gotten used to the new norm (it is hard to tell). Glad this went well. PS: Definitely do NOT do this job on dirt. Cleanliness is essential.
- 11 replies
-
- p0768
- valve body
- control valve
- solenoid
-
Tagged with:
-
craigmcd replied to craigmcd's topic in 1990 to Present Legacy, Impreza, Outback, Forester, Baja, WRX&WrxSTI, SVXGbhrps (and everyone), Thanks for the advice. I am not a big fan of tearing into interior headliner and door panels, but it looks like I am going to have to do a deep dive - if for no other reason then to positively identify the source. Very good ideas for me to look at. A couple years ago, on the same Outback, I had water trickling into the spare tire compartment. I thought it was a leak on the bottom of the car, and sealed it very thoroughly. Later I found the water originated at the top of the tailgate opening, where the rubber flextube protects the wire bundle, and followed interior parts all the way down. It can be vexing. The leak was partly because where the rubber flextube meets the metal had built up grim, allowing water to pool higher than it normally should. I good cleaning (and some caulk) fixed that. Thanks again for the ideas. C
-
After rinsing bird poop off of the car recently, I noticed water stains in the roof liner, rear corners, approximately in the area of the rear mounts of the roof rack. Has anybody had to fix this leak? Are there seals available? I seriously do not want to remove the roof liner and insulation - is there anything I can do instead? Similarly, I have had significant water in the rear hatch door. The left side back-up light is constantly fogged up. When I open the door, remove the cover, then remove the light, water pours out. Several years ago I cleaned around the rubber fittings (which cover wires) at the top of the door, and put a little sealant on. I will probably do that again. Can I purchase those rubber tubing seals from a newer year? Has anybody tracked water leaking to other areas? Ideas to correct either problem are welcome. Thanks, C
-
What are the main difference between the Baja & Brat. Were they made in different model years? Are all the models 4 cylinder engines?
-
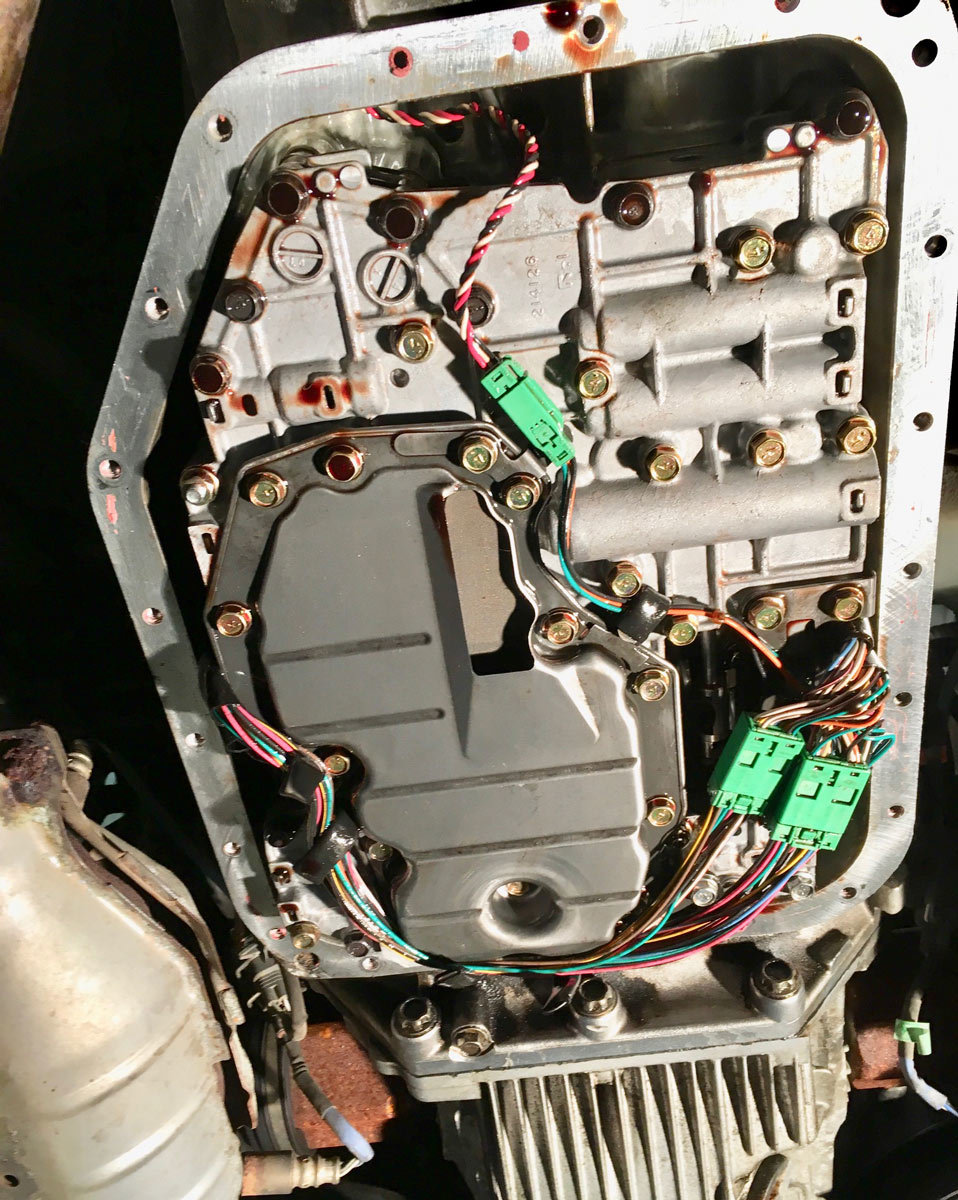
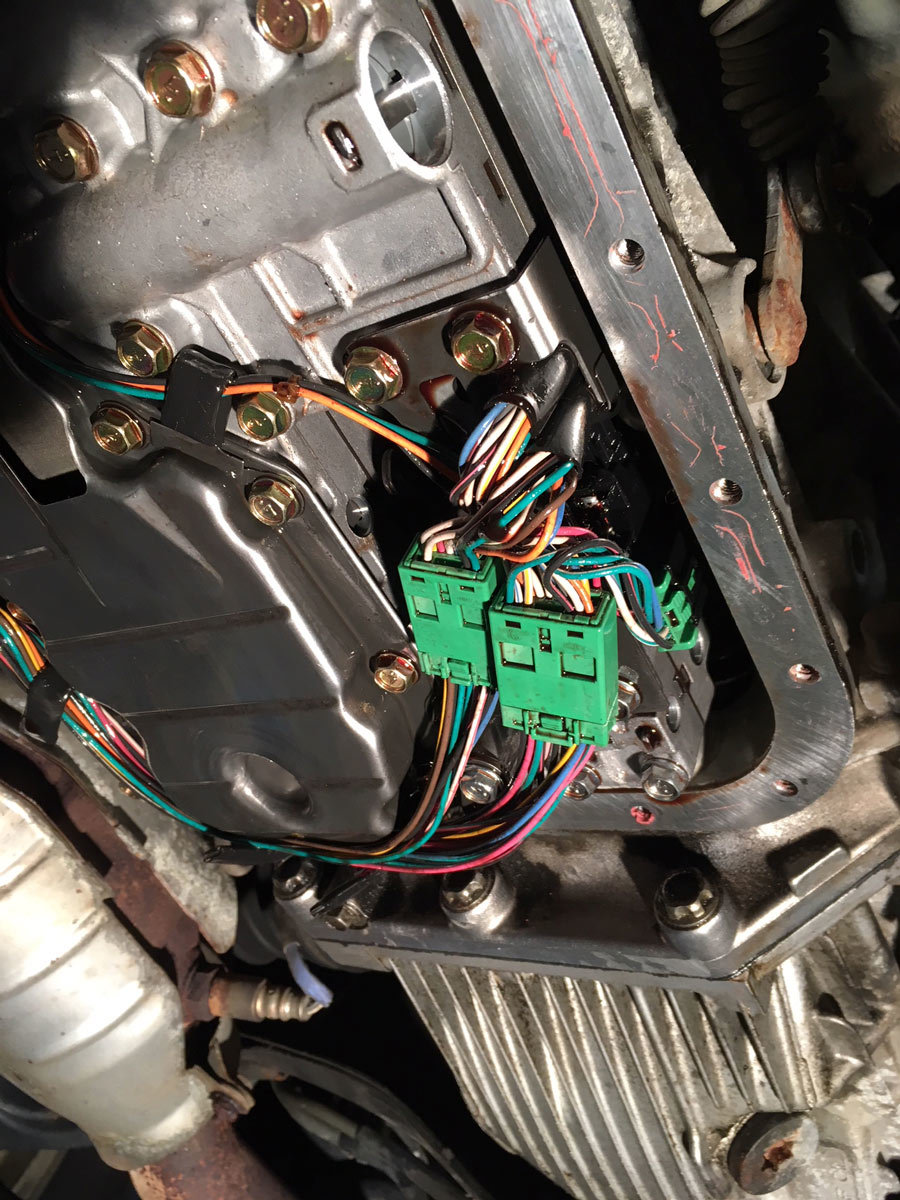
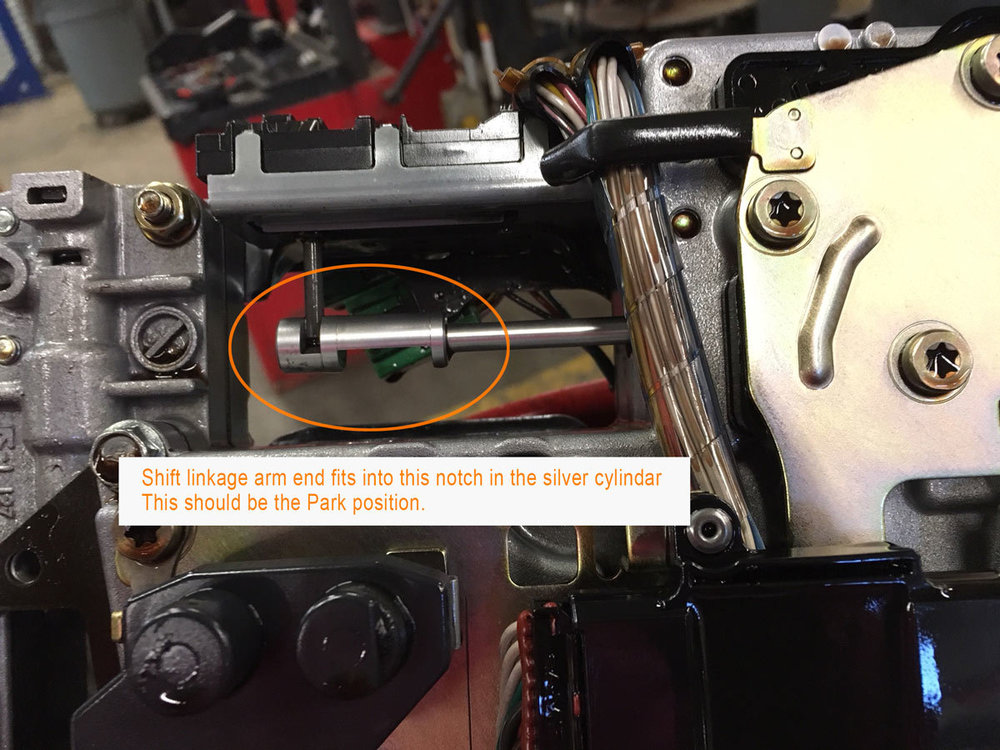
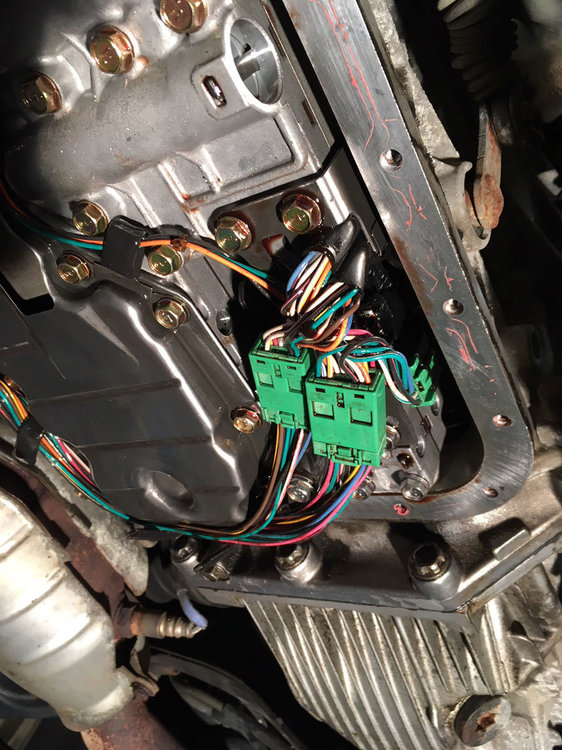
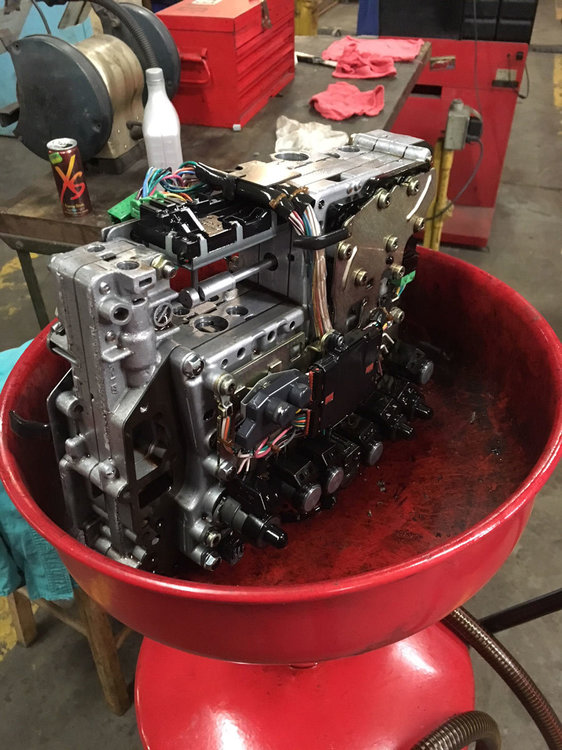
craigmcd replied to craigmcd's topic in 1990 to Present Legacy, Impreza, Outback, Forester, Baja, WRX&WrxSTI, SVXThanks GD - that gives me more confidence. My wife took the car to work today, 40 minutes on the Interstate. Here are the photos I promised with a couple of notations.

- 11 replies
-
- p0768
- valve body
- control valve
- solenoid
-
Tagged with:
-
craigmcd replied to craigmcd's topic in 1990 to Present Legacy, Impreza, Outback, Forester, Baja, WRX&WrxSTI, SVXGD - every thing seems to be fine, in fact I drove the Subaru tonight on a 40 mile trip and it did great. I was concerned about not having the Subaru Select Monitor, but apparently it is not hyper critical. Do you use the SSM after installing the VB to bleeed the air. Before doing tha job I read about resetting the computer, is that exactly what they were talking about? Also, is my guess if 2.5 to 3 hours for a dealer or experienced shop about right ? I spoke to my regular independent garage who have done a few things for me, and they were not real fired up to replace this particular part. They are Subaru / Japanese guys.
- 11 replies
-
- p0768
- valve body
- control valve
- solenoid
-
Tagged with:
-
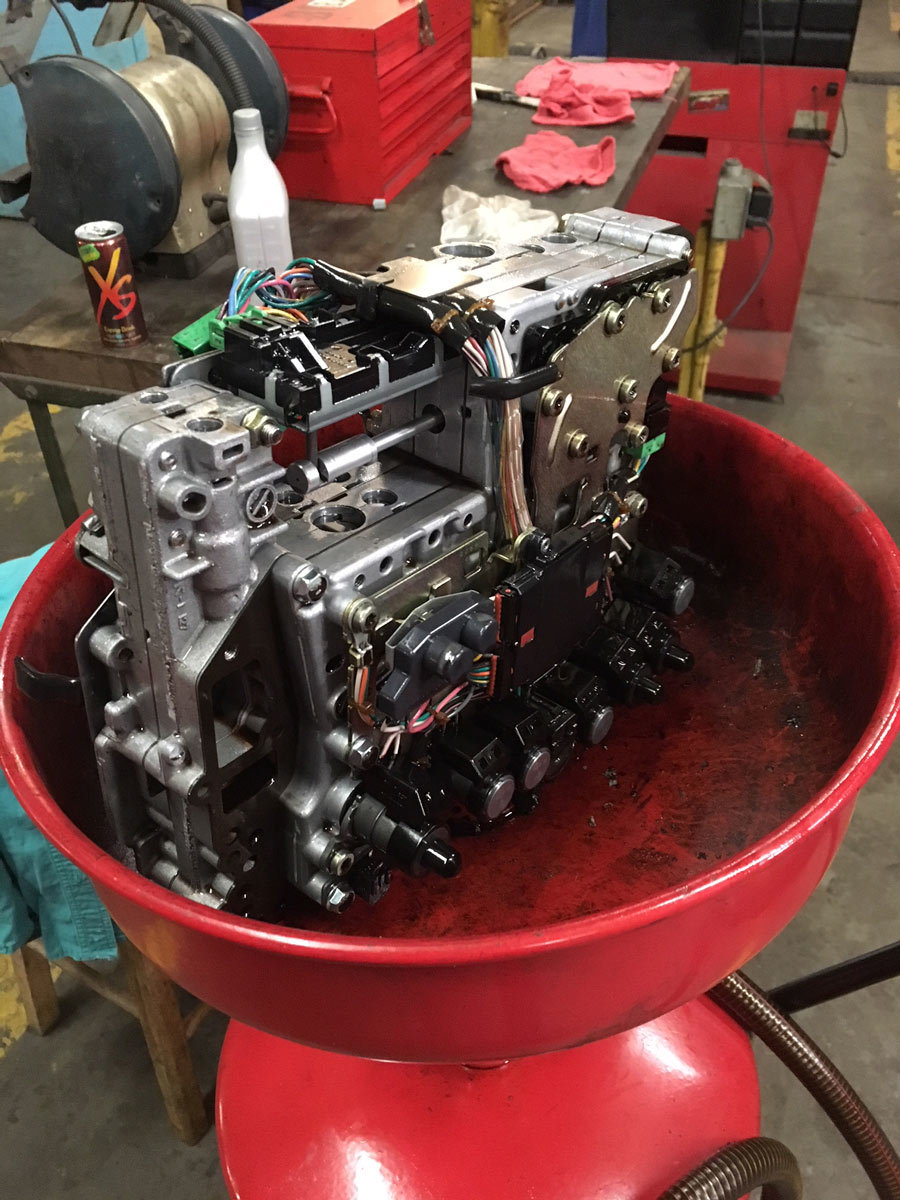
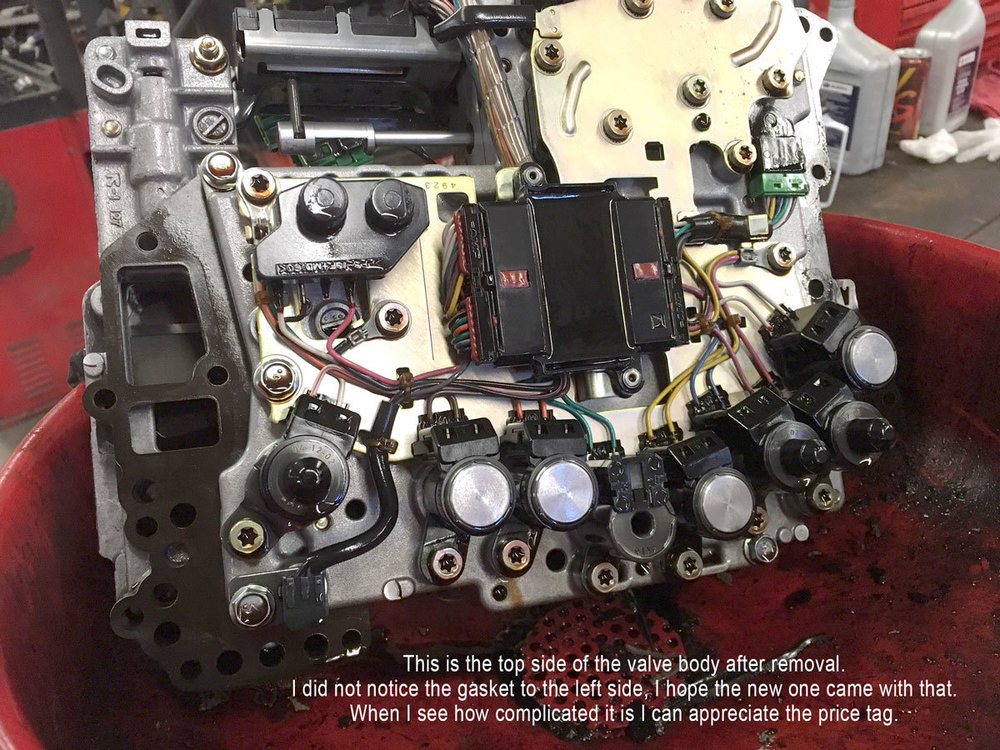
craigmcd replied to craigmcd's topic in 1990 to Present Legacy, Impreza, Outback, Forester, Baja, WRX&WrxSTI, SVXIt has been about a month and I want to follow up on this code P0768, and the replacement of the control valve body. The code shows the ‘D’ solenoid has some sort of error, it is either stuck open or closed, or not responding. The solenoid is an intragal part of the valve body and can not be purchased separately. I was not able to find any after market options other than used parts - there is nothing remanufactured. So, I ended up at my local Subaru dealer purchasing a brand new control valve body. These list at $956.00, but I was able to get it for $745.00 (by showing them a competitive price). This is a 5EAT in a 3.0 R Subaru VDC. I have access to an automotive shop on an army base, so was able to do this repair with a hoist - which is a tremendous help. Step 1 - remove the negative battery terminal. After draining and removing the pan, I was staring at the valve body, which fills the entire cavity. Note: it took me a long time to clean the factory sealant off of the 21 small pan bolts - you should consider buying a new set. There was no gasket, only the Three Bond sealant. There are 13 bolts in two colors and two sizes which remove the valve body. You MUST keep track of them, and be sure to put them back in the same holes. The official repair manual shows the location and length of each of these screws, which is really important because they look just like other bolts on the VB that you should not loosen or remove. I used a cardboard box lid and made a diagram of the valve body, and put each bolt in a corresponding hole. There are three electrical connectors to remove the valve body, plus a fourth one which goes from one part of the valve to another. On this fourth one, it was NOT connected on the new valve body, so be sure to connect that. Take great care in unplugging these, do not pull on the wires at all - any damage to the wiring harness or connectors is a BIG problem. Once most of the ATF was done draining I was down to four bolts supporting it, one in each corner. At this point things were going well. I loosened the two bolts to the rear, then moved to the front. When I loosened the third screw the valve body dropped slightly, burped, and drained at least a 1/2 quart of fluid onto the floor from the rear (at least note down my shirt). So, pay attention to breaking that final seal, and have a wide pan ready to catch it. From this point on there was a constant drip of fluid, mostly from the rear area. I got help when it was time to fully remove all four screws. With one of us on each side we made sure to lower the VB straight down - then put it in a container to drain. After a final clean up of the pan, and the transmission surfaces, plus an inspection of the wiring harness, it was time to put in the new VB. There is a mechanical shifting ‘slider’ which MUST be in the correct position. The open slot area on the shiny cylinder must mate with the shifting position linkage arm, (the one which enters from the side of the tranny). I looked at the original, and noted the position. Then I moved it one or two positions, and then back again. You can feel the click as it engages each gear position. Then on the new VB, I made sure that the cylinder was in the same position, which should be for Park, since that is what the Subi was last engaged in. Failure to correctly position this, or to have the little arm come down and fit into the cylinder slot, will spoil your hard work. Triple check this !!! So the two of us had four bolts ready, and lifted the new VB directly up into the cavity and inserted the bolts into the correct holes. Again be careful that these are the right holes. Be sure to get someone to help, the VB is slippery, a bit heavy, and costs $800-900 ! Put in the remaining bolts, but be careful not to over tighten initially. Finish off with the appropriate torque. After that put on the pan with fresh transmission sealant, torque the little bolts, put a fresh crush washer on the plug, and prepare to fill with ATF. I saved the old fluid and measured it into a gallon jug. That showed I needed at least 6 quarts of fluid to get on the stick. Put the negative battery terminal back on. Here is where Subaru has a big advantage. There is a procedure (see PDF) to BLEED the valve body before operating, but it requires the Subaru Select Monitor - which I don’t have. With the car off, but the key turned to Assesories (so the shifter will move), I went through each step of the procedure two full times. Taking plenty of time at each step. Then I checked the fluid, and added a little. Then I raised the tires off the ground, started the car, with no acceleration at all, gently went through each gear slowly a couple of times. I was trying for zero stress on the tranny while the fluid moved throughout the valve body. This whole procedure took about 20-30 minutes. With the car idling in Park, I checked the fluid again, and topped off until I got to the high spot of the cold mark. No CEL. Time for a test drive. I took the car on a 1-2 mile gentle drive on flat surfaces, with as little stress as possible. Shifting seemed okay in 1,2 and 3. Then back into the garage for a final check on the fluid level, which seemed fine. So far so good. With my wife following in our other car, I drove it home about 12-15 miles, making 4th gear and 50 mph. After another more demanding test drive (5th gear and 65 mph), I noticed that the fluid was not even touching the end of the dipstick. I had to make a special trip (in another car) to Subaru for 2 more quarts of ATF-HP. It took almost a full quart to get back onto the dipstick and to the operating level. So the total was 7+ quarts. Yesterday I took the car on the interstate and went up one exit and back, about 17 miles. No CEL, normal operation. A note on shifting. It seems to take longer to shift into fourth, at a higher rpm. I think the same can be said of shifting to fifth. It is smooth through all upshifting. I notice more of a clunk in downshifting from 3 to 2, but not alarming. There is no other unusual thing to note. So, that’s my experience with this issue and the replacement procedure. There are some videos on YouTube, but they show the replacement on the bench, which is notably easier than under the car. Plan on throwing your cloths away after this repair. You will want a stack of clean rags and throw away gloves. This took me 5 to 5.5 hours. I also took my time and was very careful at each step. Cleaning the old pan bolts took about 45 minutes, maybe more. On the shade tree mechanic 1-10 (1 easy, 10 most difficult) scale, this is about a 7 or 8. Mostly because if you screw up any step with the VB, it is a very expensive screw up. Do NOT attempt to do this on dirt, any foriegn particles in the VB will ruin it. This was my first time inside a transmission. If you don’t feel up to this repair, there is a lot to be said for the diagnostics and professional service of a Subaru dealer for this particular repair. I would imagine they would do this in 2.5 to 3 hours, and most likely will replace the pan and pan bolts rather then clean them. They have the special monitor, and will warranty not only the valve body, but also the work. If you go this route, but sure to check the ATF after a drive or two, and top off as needed. I will try to include a pdf and a couple photos (which is not going well). The one chart lists the compatibility guide for my 2005 model. Control Valve Body 2005 Subaru.pdf valve body 2005 Subaru 3.0 R.pdf
- 11 replies
-
- p0768
- valve body
- control valve
- solenoid
-
Tagged with:
-
craigmcd replied to craigmcd's topic in 1990 to Present Legacy, Impreza, Outback, Forester, Baja, WRX&WrxSTI, SVXThanks again, I asked for advice and I value your response. Certainly not meaning to be argumentative. I used a pick-n-pull yard for a cruise control module for my van, and that worked out just fine. To be honest, it has been very rainy here, and I don’t look forward to being under a car in a field draining transmission fluid (probably onto myself). In the garage it is not that big a deal. I will make a call or two tomorrow and see if my local yard has one. It is a good idea and a money saver.
- 11 replies
-
- p0768
- valve body
- control valve
- solenoid
-
Tagged with:
-
craigmcd replied to craigmcd's topic in 1990 to Present Legacy, Impreza, Outback, Forester, Baja, WRX&WrxSTI, SVXJ909, thanks for the idea. I have been in contact with several salvage yards, and they are more than willing to sell me a whole tranny. To remove the valve body is basically to remove the heart of the thing, and completely devalues the remaining transaxle - so that has been a non starter. As I mentioned, I am considering buying a used tranny and then removing the control valves for my car. Today I spoke with my regular independent garage, the one I use for high level work, and he thought I should buy a new one from Subaru. So, unless someone can suggest a Remanufactured part, that is what I will most likely do. I am still not sure about the need to reprogram the computer. Any thoughts, anyone ? Thanks.
- 11 replies
-
- p0768
- valve body
- control valve
- solenoid
-
Tagged with:
-
Hi Subi Fans, I have a 2005 Outback, 3.0R VDC 5AT w sport shift. Recently the CEL came on and produced code P0768, which has to do with the Shift Solenoid 'D' electrical. The solenoid is located on the control valve assembly, which is inside the transmission pan. The problem is intermittent, and I have been able to reset the code several times, but within a few miles the CEL comes on again. This last time while pulling a steady hill as it went to shift between 3 and 4. Until my next reset, it is stuck now in one of those gears. The sport shift would not work either. Of course, about half the lights on the dashboard are going wild, and cruise control is dead. After much investigation I am pretty sure no one is re-manufacturing or rebuilding these valve bodies, and no solenoids can be purchased separately. 1) Does anybody know where I can get a rebuilt valve body with tested solenoids? I have found a used transmission (131,000 miles) for $485, which includes shipping. 2) Is it a good idea to purchase a used transmission and then remove and reuse the valve body from it? Subaru still sells the valve body under part #31705AA4309L, and those run $750 to $935. It is a new part and has at least some warranty. This valve body fits a good number of 6 cylinder 5AT Subi models from 2005 to 2007. 3) Is my best bet going to be a new valve body? Last question. It is kind of a messy PITA job to get inside the tranny case just to look at the wiring and make sure things are plugged in, and replacing all the tranny fluid is not cheap. If I am opening it up I want to replace the valve body (or the D solenoid). 4) After replacement, does the car's computer need to be reset? Or can I just drive away? 5) If so, is that something I can do, or must the dealer (or my good independent garage) do it? If anyone can help, or has any resources, please let me know - I am OPEN TO IDEAS. The car is great otherwise, but has a salvage title and 208K, so we are getting leery of big expenditures to keep it going. I have had it for eight years. THANKS !!! Craig
- 11 replies
-
- p0768
- valve body
- control valve
- solenoid
-
Tagged with:
-
craigmcd replied to dadpups's topic in 1990 to Present Legacy, Impreza, Outback, Forester, Baja, WRX&WrxSTI, SVXThanks Texan, I was not aware of that kind of service. I live in between Baltimore and Philadelphia, so good possiblities (plus a bunch of junk yards)
-
craigmcd replied to dadpups's topic in 1990 to Present Legacy, Impreza, Outback, Forester, Baja, WRX&WrxSTI, SVXThanks heartless, that is what I had in mind. It would be fun to put on a nice new set of wheels, but this older car is just not worth it. I have this on my 'to do' list.
-
craigmcd replied to dadpups's topic in 1990 to Present Legacy, Impreza, Outback, Forester, Baja, WRX&WrxSTI, SVXJust able to get back. Last Friday I brought the car into our local military installation, where I am able to use the auto craft garage. They taught me how to use the computer wheel balancer, and I went through each tire. It turns out one of the front tires has a slightly bent wheel, and there was a lot of weight on there to compensate. The tire was out of balance anyway. We took off all the weight and started over, but in the end it still took a lot both inner and outer. Two other tires were balanced okay, and the fourth needed some work. I moved the bent rim to the rear. At the magic 65 to 75mph, the car drove a lot better - with no vibration. I checked everything else, including the ball joints and all is good. Thanks for the input everyone, I appreciate it.
-
craigmcd replied to dadpups's topic in 1990 to Present Legacy, Impreza, Outback, Forester, Baja, WRX&WrxSTI, SVXThanks all - I am working on the car today, and doing a highway drive tonight, so I will let you know. C
-
craigmcd replied to dadpups's topic in 1990 to Present Legacy, Impreza, Outback, Forester, Baja, WRX&WrxSTI, SVXGlad to see the original post. I came onto the forums tonight to ask about this same issue. I drive a 2005 Subi Outback H6, 206K. Very recently it got new tires, mounted and balanced. Pep Boys did the work, and I would not be surprised to find out the tires are out of balance. I did have an alignment right after all four tires were replaced (500 miles ago), they noted one setting slightly out of spec, but the Subi dealer was not alarmed. The car drives really great until about 65 mph, then it has a vibration in the steering wheel - it moves back and forth about 1/8 of an inch, but very quickly. It does even out again about 75-80 mph. While the steering wheel is vibrating I can touch the shifter or dashboard and there is NO vibration. The steering rack was replaced within short memory, and the lower control arms 6 years ago, and the tie rods were done perhaps 3 years ago. The shocks and struts are from Dec 2015, Not sure about CV joints, but there is no other indication they might be bad. The annual mileage is well below average, so none of this has huge mileage. My gut feeling was bad ball joints, mainly based on checking off what has been done in last few years. I will check the balance, and move tires forward and back to test as suggested. I will check for the frozen caliber - I had not thought of that. When the lower control arms were replaced, would that have included new ball joints? Any other thoughts ? Thanks, Craig