craigmcd
Members
-
Joined
-
Last visited
Everything posted by craigmcd
-
craigmcd replied to craigmcd's topic in 1990 to Present Legacy, Impreza, Outback, Forester, Baja, WRX&WrxSTI, SVXI have a feeler out to Paradise Auto in Elkton for a wheel. They are supposed to call me this morning to confirm. It is $86, but also much closer to home. The car-part.com web site was very helpful - good resource to know. I did see that Hartlaubs should have some wheels as well. Thanks. C
-
craigmcd replied to craigmcd's topic in 1990 to Present Legacy, Impreza, Outback, Forester, Baja, WRX&WrxSTI, SVXYes, I bought a sunroof assembly from Condon for this car last spring, mostly for the good seals around the glass. That went well (though I still parked it in the garage during Sunday’s drenching storm). Cleaning the sunroof drain tubes was a pretty major project which I never want to do again. I will check out those contacts and try again for the wheel. I am certainly willing to pay the money and fix the problem. I have a printout from the manual showing the four styles which came out that year, and can send a photo of my wheel to them in advance. Mine is variant #4, and I would call it more silver (but not chrome or shiny). My wife and I are from Colorado, and have been to many places in the region, but not Gettysburg yet. I wrote down your restuarant recommendation and will certainly visit there for lunch or dinner. Many thanks. C PS: duhhh - the wheels are shown in the photo above. ha
-
craigmcd replied to craigmcd's topic in 1990 to Present Legacy, Impreza, Outback, Forester, Baja, WRX&WrxSTI, SVXGettysburg is doable for us. Do have a name of a particular salvage yard ? I have been as far as Westminster for parts, which is about 3/4 of the way to Gettysburg. Let me know the yard. Thx
-
craigmcd replied to craigmcd's topic in 1990 to Present Legacy, Impreza, Outback, Forester, Baja, WRX&WrxSTI, SVXI am sure about the wheel issue. I mounted and balanced them myself, and felt the shimmy in the front. That completely went away when the tire was moved to the rear. It messes up the rotation. I have tried to get a rim, but no luck within a reasonable distance. I could see the bent rim when spinning on the balance machine. I will disclose it, but nothing more. The buyer will get a multipage printout of everything done to the car in 9 years, nothing to hide.
-
craigmcd replied to craigmcd's topic in 1990 to Present Legacy, Impreza, Outback, Forester, Baja, WRX&WrxSTI, SVXIdo - that is about how I feel about things. This is a good first car, something that will last a long time but if it gets hit - not the end of the world. Maybe a good car for a college student, just have a decent little car for a couple of years. I think being on the low end of the comps is in the right place, probably about $3500. We have been paid for this car once (but I do have money into it as well), so I don't need to make a killing. We mostly want a decent down payment on the next Outback. I have fixed three different water leaks into this car, so seeing it go won't kill me. I will say, it is a better more fun driving car then our 2012 Outback. Thanks for the input.
-
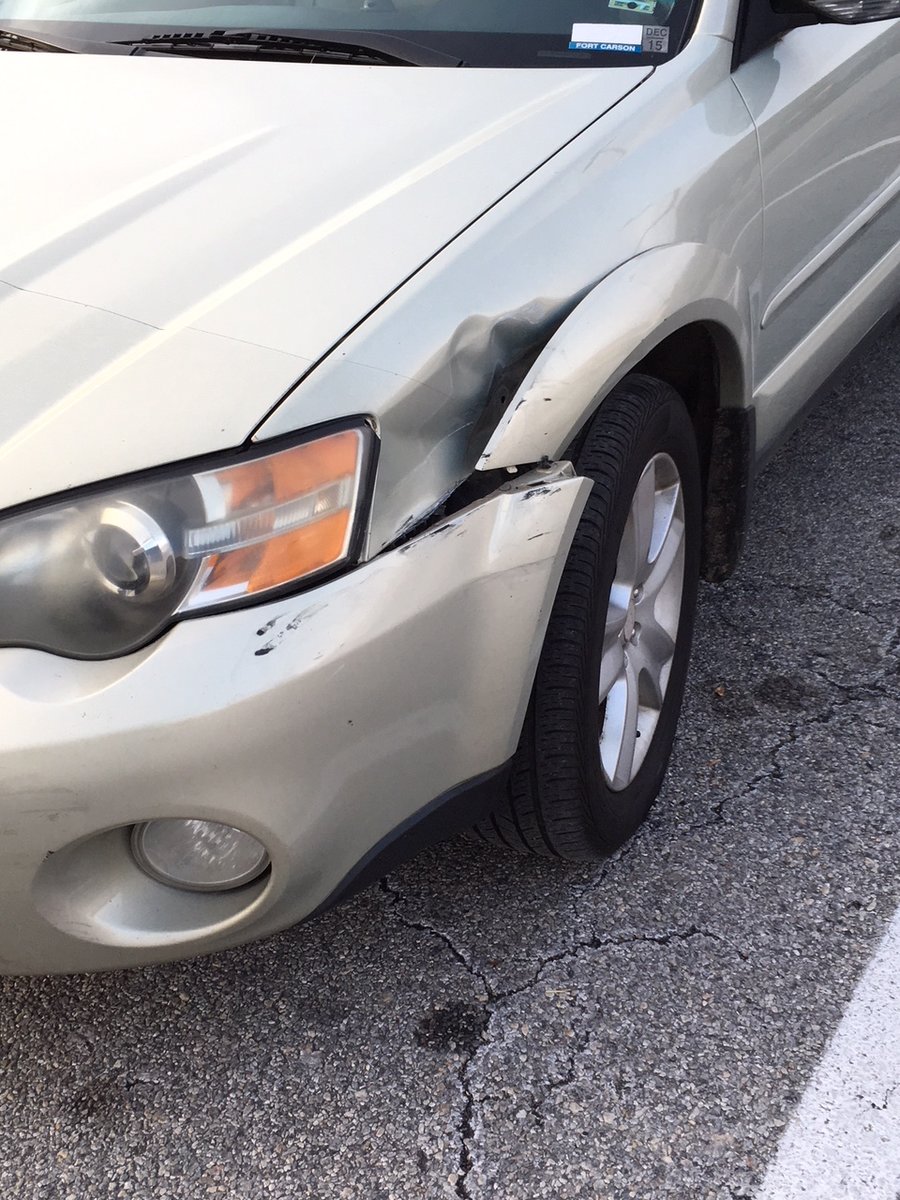
craigmcd replied to craigmcd's topic in 1990 to Present Legacy, Impreza, Outback, Forester, Baja, WRX&WrxSTI, SVXThanks Imdew - here is the photo you asked for. Are you saying LESS $2000 from what ever sale price I come up with ? Not that much damage for totalling the car. BTW - I was born in C Springs, and grew up there. Seen a lot of changes since the early '60s. Craig

-
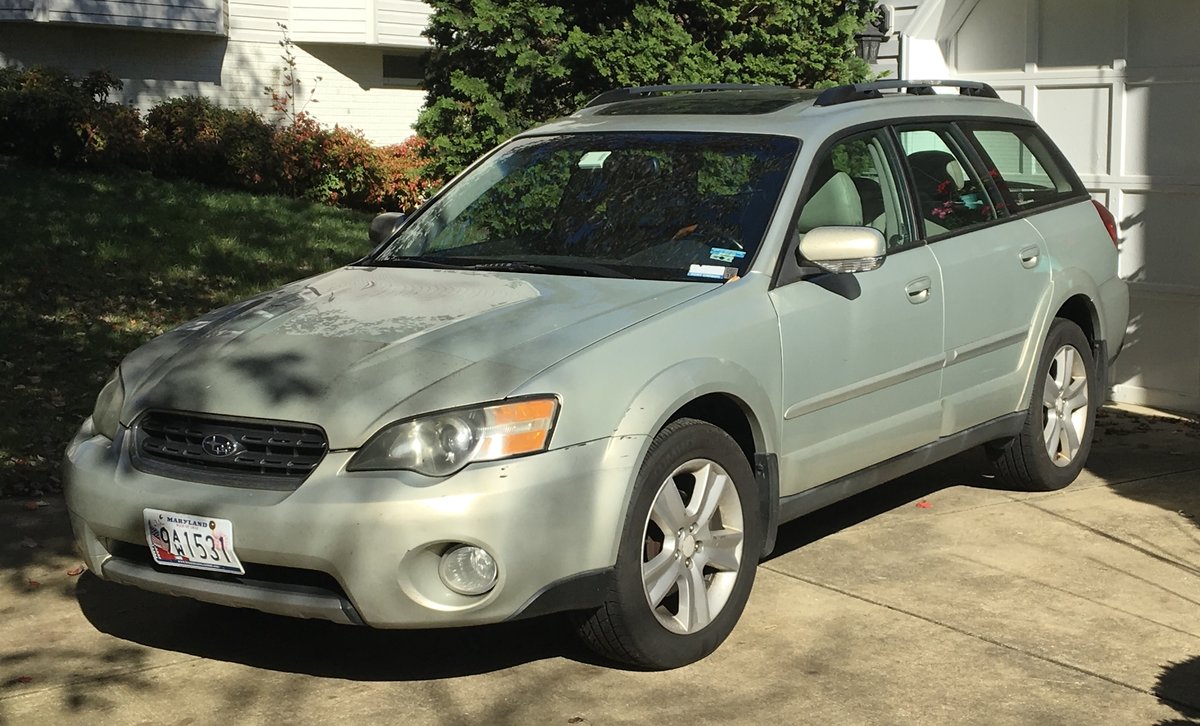
Hi All, I have had this 2005 Outback 3.0 R VDC, for about 9 years and it has all the high-end features of 2005. It is well maintained and runs really well. Gets good consistent gas mileage, and there are no significant leaks. It has a very nice (expensive) set of seat covers in the front, and the tranny valve body is about 8 months old and working great. The tires are in good+ condition and everything works. It has about 205,000 The only known issue is a bent wheel on the rear, which balances, but was noticeable when mounted to the front of the car. I have not been able to find a replacement. In 2018 a tall truck backed into the Subi in a parking lot, damaging a) the left front fender and b) the transmission filter and bracket under that fender. The hood, head light, bumper and wheel well trim are a little scuffed, but undamaged - as shown. I bought a new fender and painted it inside and out with an exact match color. On a nice March day I removed the old fender and put on the new one, while installing new filter parts. Pretty easy repair, no residual problems. Despite the minimal damage, the insurance company totaled the car, and we bought it back from them - so it has a salvage title. We are looking to sell the car and I was wondering about how much I need to reduce the price because of the salvage title. The new buyer can certainly register it, and it will pass all inspections (part of getting the salvage title in the first place) - but they won’t be able to buy collision insurance. Normal pricing in MD for this H6 car is $3700 to $6300. I averaged out the price on eight higher mileage comparables (XT Limited and LL Bean) and that is $5077. My car has higher mileage than all but one. The KBB suggests a mid price from a private sale at $4315, but from a dealer at $5250. Anybody want to suggest a fair price for this great running car ? (Or the amount to reduce for the salvage title). Thanks, Craig

-
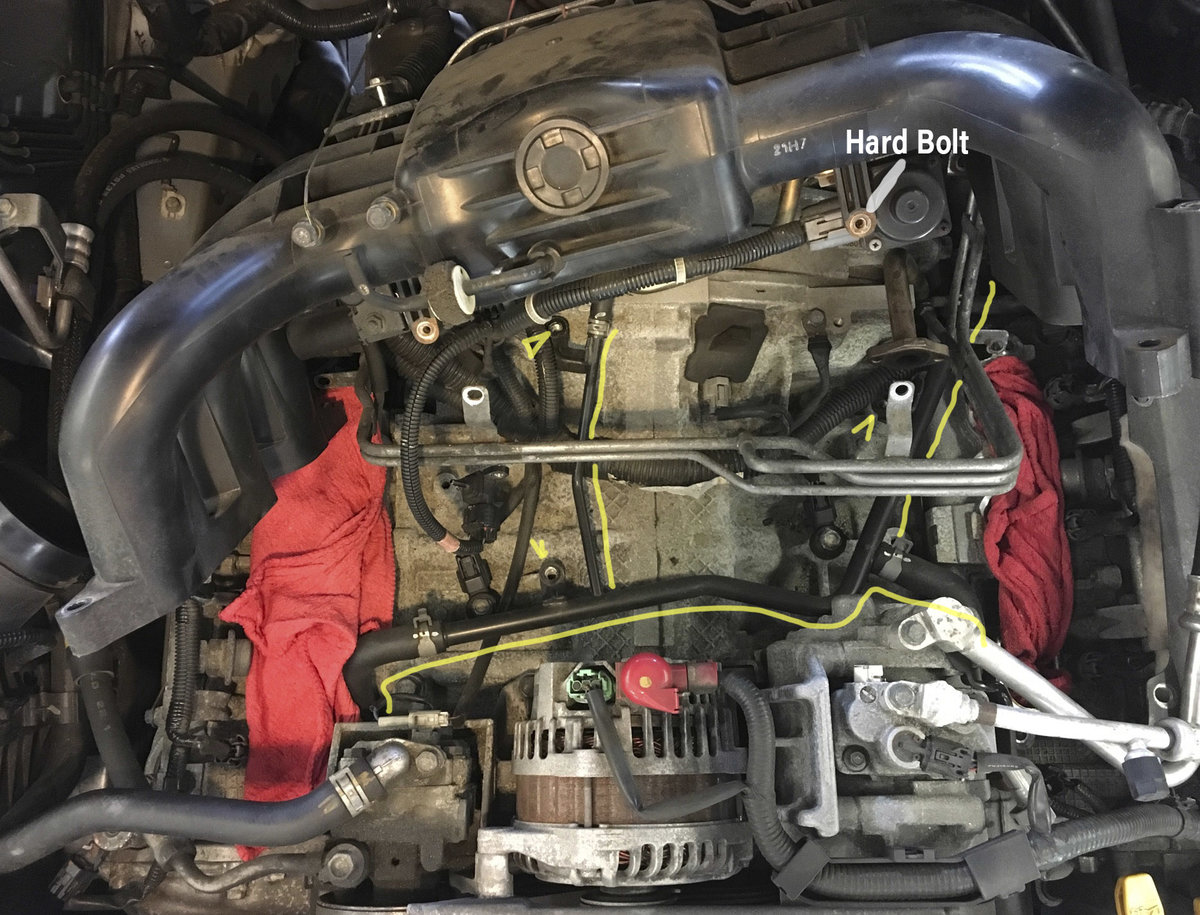
craigmcd replied to craigmcd's topic in 1990 to Present Legacy, Impreza, Outback, Forester, Baja, WRX&WrxSTI, SVXHere you are - I highlighted the crossover pipe and the three bolt holes for it. Also, the hard to reach bolt I mentioned, which should be installed early in reassembly.

-
craigmcd replied to craigmcd's topic in 1990 to Present Legacy, Impreza, Outback, Forester, Baja, WRX&WrxSTI, SVXSo I did this repair yesterday and just thought I would do a quick review which might help others with this. My parts list was about $200, which included the black crossover pipe, small rubber hoses, thermostat, manifold gaskets, throttle gasket (not used), rubbery egr gasket (not used) and two jugs of Subaru coolant, but NO sensors. I should have bought the rigid egr gasket which connect the vertical pipe to the egr w two bolts. The repair took me 5.5 hours, which includes a lunch while the radiator drained out. I was working on a hoist. Subaru says I need the coolant sensor KA140, which is the more expensive one. They did not have one in stock. The one special tool I recommend is long plier designed to remove the rubber hoses - they are hard to reach. All the bolts are 8, 10, 12 and 14mm. The main thing is that you should separate the manifold from the silver fuel lines assembly (4 bolts) which run in the front and down the sides in an area under the intake manifold. I am NOT talking about the fuel rails which connect the fuel injectors, I did not touch those. Do not loosen or remove the fuel lines or rubber connectors, they are flexible enough to hinge up out of the way. You will take out two bolts so the egr is free of the pipe which runs down to the exhaust manifold area - the little gasket will fall down (it is hard to reassemble, I held it with needle nose pliers until I could get the first bolt started - buy a new gasket, and maybe a spare). Once you get enough vacuum tubes and a couple electrical connections undone, you will be able to tip the manifold / fuel lines back and lift a little. At this time, remove the right side bolt on the fuel line bracket which is hard to reach behind a/c component - the one on the left is super easy. Now wire the manifold back out of the way, and lift the fuel line assembly enough to access below it, but no so much as to twist or tear the rubber fuel lines you are hinging on. You do not need to remove the throttle or the egr valve, just move them with the intake manifold as a whole. Now is a good time to drain the radiator fluid. You should now have pretty decent access to the black crossover pipe, which runs left to right directly behind the alternator. It connects 4 rubber hoses, which you should replace (except for the large one in the rear which runs through the firewall - this is where the special pliers will help) - dont cut or damage the original. For the record, I did not see a significant difference between the original and the remodeled crossover pipe, it must be subtle. On reassembly. Replace the 6 intake manifold gaskets. As you are lowering everything down into place, be sure to install the fuel line screw (front right) while you can still reach it. Lower the whole assembly into place and drop a few bolts into the manifold holes. Before tightening down the manifold, be sure to get that pesky little egr gasket back in place. After that, the rest of the assembly is pretty fast. I replaced the thermostat, which of course drained more fluid. My refill was just under 6 qts, but I expect to top it off a little today. So, just plan on plenty of time, don’t drop anything into the engine holes, and make sure to properly “burp” the coolant system by following Subaru’s instructions in the official manual. I hope that helps someone. I will post a photo from my desktop in a little while.
-
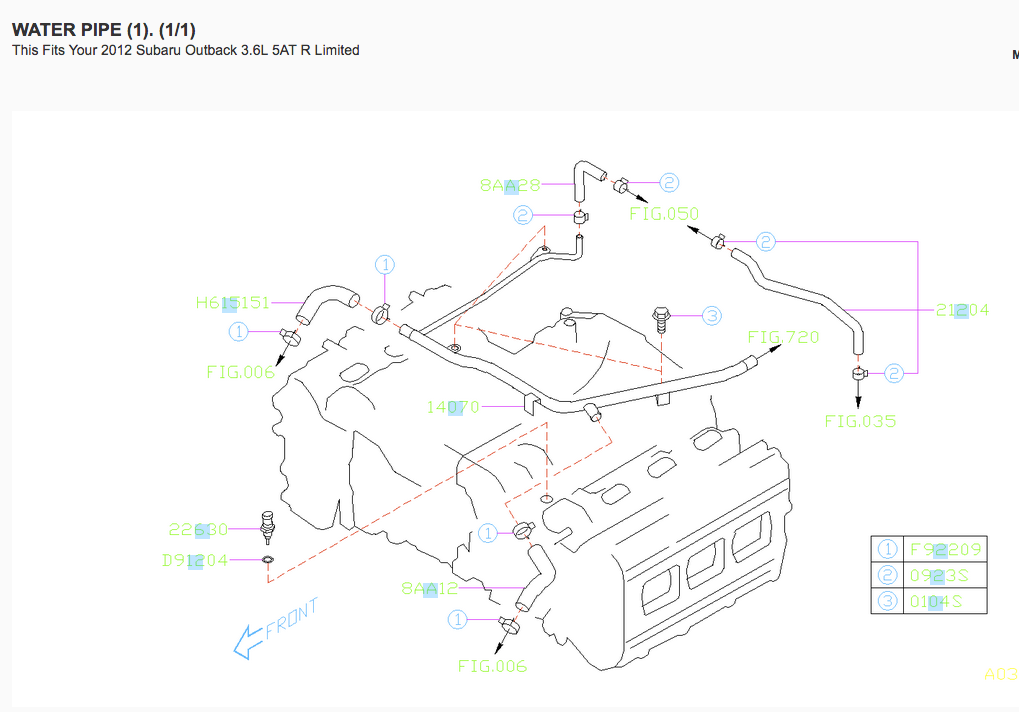
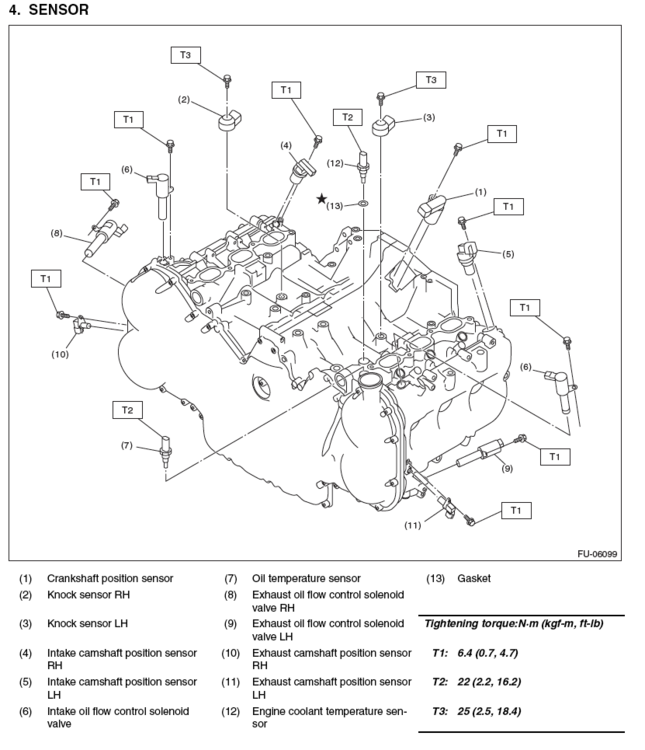
craigmcd replied to craigmcd's topic in 1990 to Present Legacy, Impreza, Outback, Forester, Baja, WRX&WrxSTI, SVXRampage - THANKS - I had considered that I was seeing the engine from two different directions, but without the inclusion of some major components in the diagrams, I was not positive. On another close look, I can see where the transmission bolts on, and the oil filler and coolant inlet. Very helpful - thanks again. One temp sensor.
-
craigmcd replied to craigmcd's topic in 1990 to Present Legacy, Impreza, Outback, Forester, Baja, WRX&WrxSTI, SVXHere is a different diagram only showing the one coolant sensor. I will bring this with me to Subaru when I pick up parts tomorrow. Curious
-
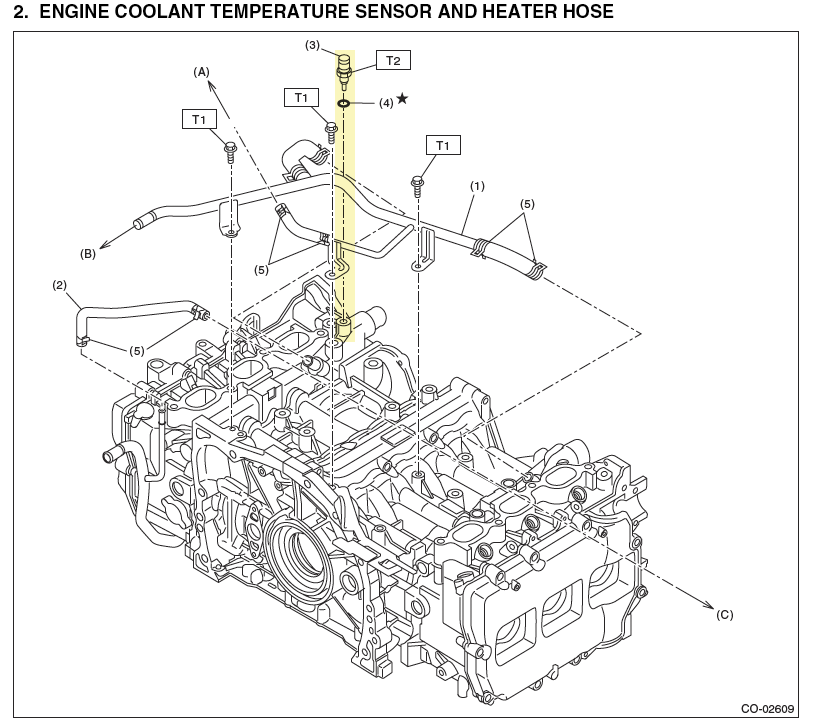
craigmcd replied to craigmcd's topic in 1990 to Present Legacy, Impreza, Outback, Forester, Baja, WRX&WrxSTI, SVXThis is from my official repair manual - the highlighted one is the rear sensor.
-
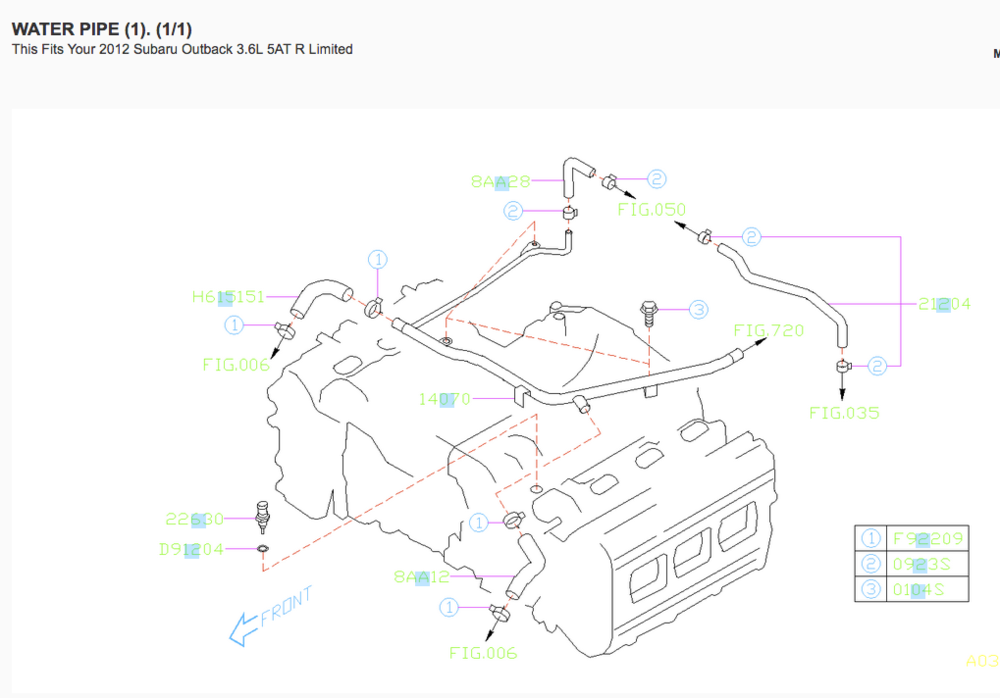
craigmcd replied to craigmcd's topic in 1990 to Present Legacy, Impreza, Outback, Forester, Baja, WRX&WrxSTI, SVXYes Mike, when I ordered parts online from my local Subaru, I started with the VIN number, and my car showed correctly. As far as I can tell, one is driver side at the front, the other is passenger side at the rear. In the parts catalog - and I looked a few - the front one is shown as a good photo. However, the back one is shown as a stick drawing, so not helpful. The illustration above does not show the rear one - but I have seen that drawing. Heartless, I did order a Subi thermostat. Thanks. Craig
-
craigmcd replied to craigmcd's topic in 1990 to Present Legacy, Impreza, Outback, Forester, Baja, WRX&WrxSTI, SVXLucky T, I know you have done a few of these repairs. Would it be okay if I just do the crossover pipe (and hoses) for now -- and SKIP replacing the sensors for now? If I still get the code I can always replace the sensors. I will do the thermostat since I have to drain the coolant anyhow.
-
craigmcd replied to craigmcd's topic in 1990 to Present Legacy, Impreza, Outback, Forester, Baja, WRX&WrxSTI, SVXSo they are different ?
-
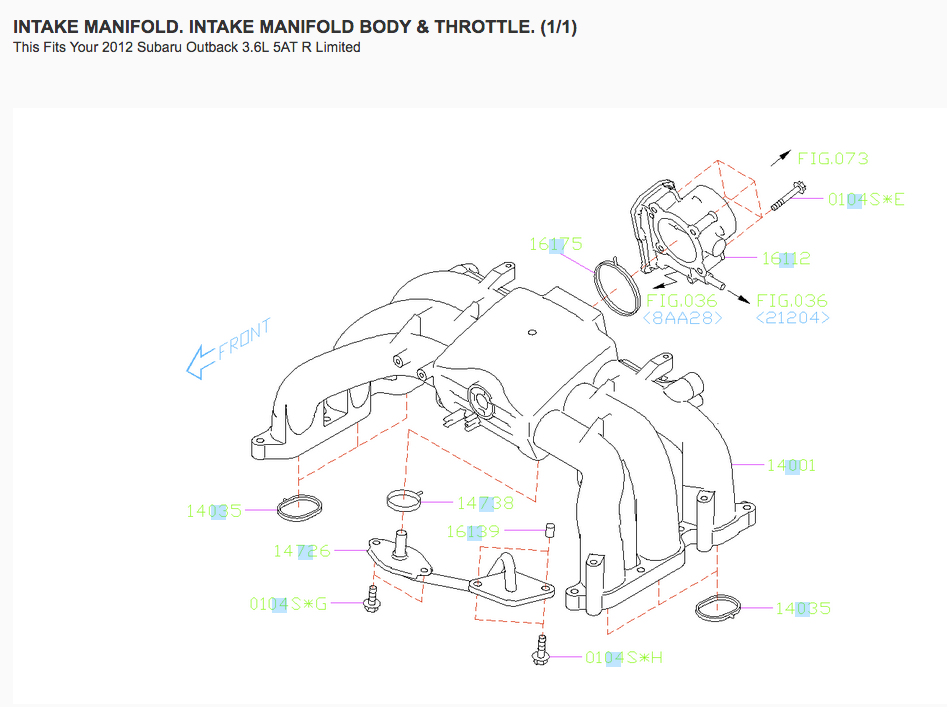
Howdy, I am working to repair the PO128 error code, and will replace the crossover pipe which runs below the intake manifold. As part of that project I was going to replace both "sensor assembly - temperature", since part of the problem may be a bad reading of the temp. There are TWO very similar temperature sensors: 22630 AA140 (36D) which is about $19, and 22630 KA140 (30D) which is $32. Are these interchangeable? Can I buy the cheap one for both spots? I am buying all new gaskets for the intake manifold. Is there anything else I will encounter or should consider as I replace this pipe and all the nearby hoses? I do not plan on touching any fuel lines. Many thanks, Craig 2012 Outback 3.6 R Limited
-
craigmcd replied to craigmcd's topic in 1990 to Present Legacy, Impreza, Outback, Forester, Baja, WRX&WrxSTI, SVXLucky T, thanks for the response. In my initial research I noticed the tech bullitan about that crossover tube. The part is only about $45, but it looks like a serious amount of labor. I would have to remove the intake manifold and very possibly other engine components. Not sure I want to get into that right now - and particularly without a little research. I assume I would need a few new gaskets and maybe other reassembly parts. Would you consider this a difficult repair? This is the second time I have had the P0128 code since we bought the car four years ago, the first was November 2016. I am doing about the same fix as I did at that time. It is probably a bad thermostat. I reset the code with my OBD reader and app, and so far the code has not come back. THANKS
-
Question SPEED ROUND, I need to replace the thermostat on our H6 engine (2012 Outback). That means draining the radiator. How much coolant should I have on hand to refill the radiator / coolant system ? I believe this thermostat is down low, in the lower radiator hose. 2) There are two coolant sensors located right next to each other. In the parts diagrams, the one to the left is 22630 36D, and the one to the right is 22630 30D. The part numbers are very similar. Can I order 22630AA140 for both locations ? It is $10-15 cheaper than the other one, 22360KA140. 3) What is the normal operating temp for the coolant in this engine? Using an OBD tester while driving, I can see that it is 195 to 205 degrees after warmed up good. I am trying to fix CEL engine code P0128. This code is saying the engine is running too cool. Thanks, Craig
-
craigmcd replied to craigmcd's topic in 1990 to Present Legacy, Impreza, Outback, Forester, Baja, WRX&WrxSTI, SVXIt took 5 stops, but I finally found the socket you recommended. It is not described specifically as thin wall, but it should be thin enough (as thin as many much smaller sockets). Also got the OEM Subi oil sender, and the gasket for the oil cooler should I need to lower it. Perhaps Thursday I can get back on the lift. Chow
-
On our 2005 Outback, our backup lights have been collecting water during rainstorms. Usually it appears as heavy condensation or fog, but after a big rain when I open the tailgate hatch and remove the backup light bulb, water runs out of the assembly. So far it has not shorted out the electrical outlet. I searched the forums but had a hard time finding exactly this problem on this car, so I just want to provide some info and couple helpful links for someone down the road. This is not a difficult repair with basic tools, but do allow at least a couple hours, more like 3 or 4 if you take your time. It took me a long time because once I got the tailgate bezel off (the part where the backup lights are), there was a lot of clean up to do - and of course you want to take your time on a careful reassembly. Body panel clip removal tools are very handy, but not essential. Harbor Freight has a cheap set. I was careful, but still managed to break one of the clip anchors and two bolts. This necessitated getting creative with a different screw and anchor, which took a while to figure out. Both of the breaks were caused by the nut/bolt being rusty, and not loosing. You will need some silicone sealant for the lights themselves, and 3M Strip-Calk, which is about $17. The Strip-Calk is specifically made for assembling body parts and light housings, etc. This was originally described to me as, "Dumdum comes in 12 inch long string sections (like the very thin red licorice)". I also used a lot of 409 and paper towels getting everything nice and clean. I have noticed in the past that most leaks are associated with a build up of dirt and grim in hidden or hard to reach areas. This first video covers removing the interior panels. You do not need to remove the long horizontal panel above the window. Also, on the rubbery weather striping, the small white clips popped right out, which is better than separating them from the strip as Tony does. I taped the strip back in place so it would not be damaged if the tailgate closed. You need to unclip one electrical connector, which on my car was kind of a pain. In this second video, Bruce removes all those interior panels, but also the tailgate outer bezel with the reverse light assemblies. If you only have time for one video, watch this one. I think Bruce misses a set of nuts on each side of the tailgate bezel, far left and right. They are covered by skinny black panels, which I only partially removed (I could not budge the visible clip, but the hidden ones came right off). If you have removed all the 8mm nuts inside the tailgate and the bezel does not budge, look for those other four nuts. Besides using the Strip-Calk on each side of the light foam and around all the bolt hole locations, I put a strip along the rubber edge below the window, wear the bezel makes contact. That is the first place for water to enter under the bezel recesses. I used the silicon to seal all around the light assembly, where the clear part meets the black assembly. That should about do it. Time for a beer.
-
craigmcd replied to craigmcd's topic in 1990 to Present Legacy, Impreza, Outback, Forester, Baja, WRX&WrxSTI, SVXThanks FerGloyale, once I learned of the blue coolant, what you described for the oil cooler is what I imagined. It is very similar to how coolant flows through an engine, but never comes in contact with the air or oil or fuel. I am going to buy the O-ring, but hoping to not remove the cooler at this time. Thanks again.
-
craigmcd replied to craigmcd's topic in 1990 to Present Legacy, Impreza, Outback, Forester, Baja, WRX&WrxSTI, SVXThanks FerGloyale and Numbchux - great ideas which I will pursue. We had tried a regular deepwell socket, and it was close. I will buy one special for this. Just to clarify - I thought that oil ran through the oil cooler, is this an incorrect assumption ? I have NO IDEA where to add the blue coolant for this particular system. So please tell me what you mean by ‘blue coolant’, and how that works with the oil cooler system. Is the oil cooler really just part of the overall radiator cooling system? Sorry if this seems basic, but as I do more and more DIY stuff, I run into more difficult questions. I did a transmission valve body, so I am willing to learn. Thanks, Craig
-
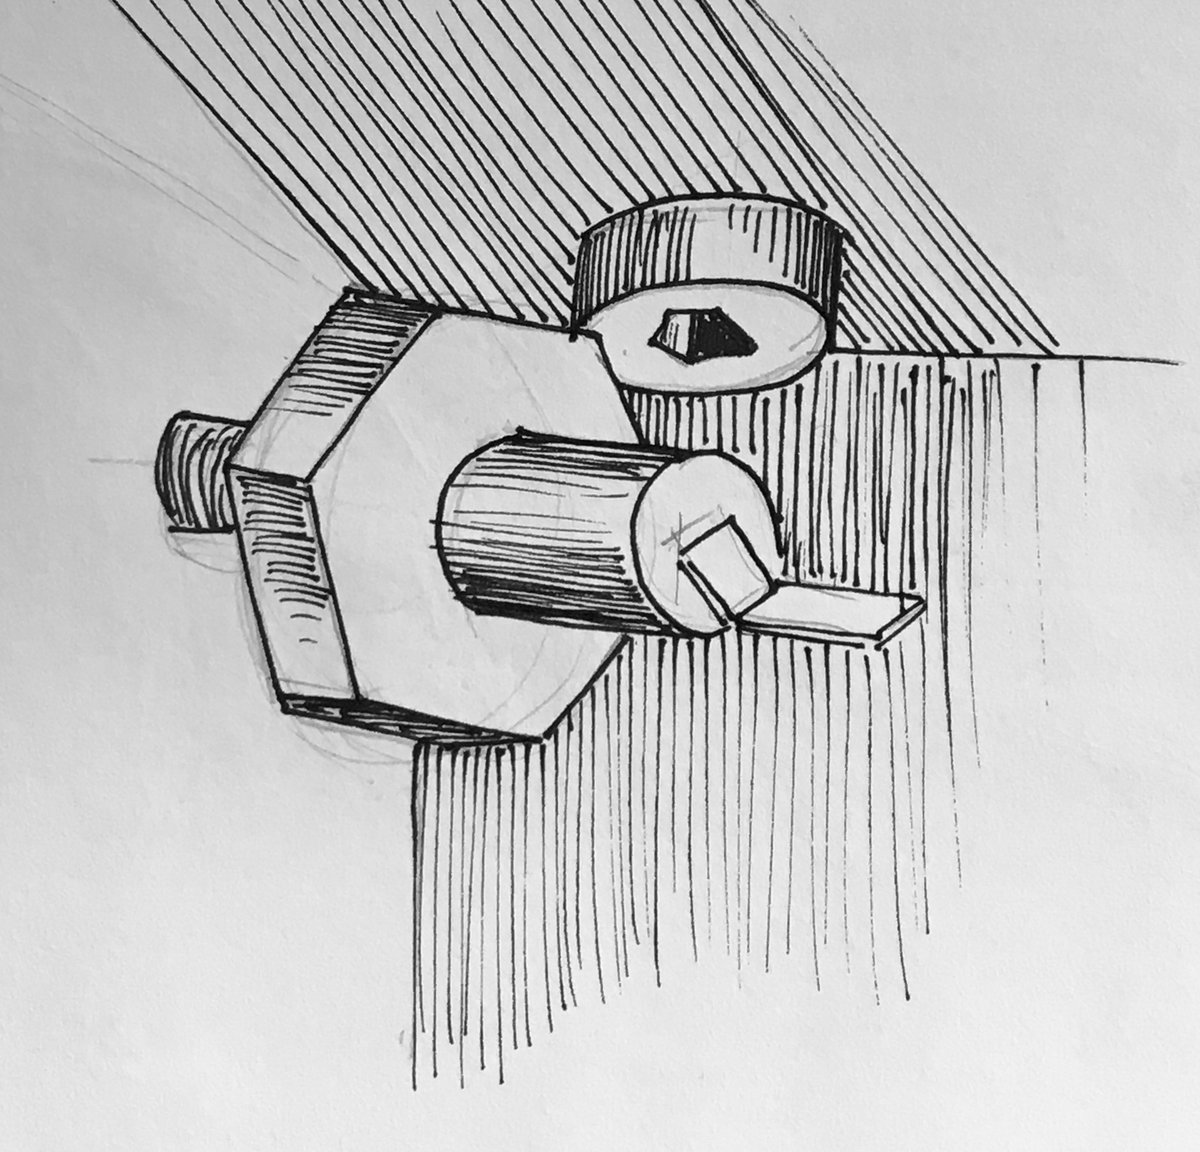
craigmcd replied to craigmcd's topic in 1990 to Present Legacy, Impreza, Outback, Forester, Baja, WRX&WrxSTI, SVXHi - there is an unexpected wrinkle in what should have been a very simple repair, hopefully one of you can enlighten me on the best way forward. I put the Subaru (2012 Outback, 3600cc empi dohc) on the lift Saturday. I had a hard time fitting a large socket onto the sensor because there is another small bolt in the way, which prevents the socket from sliding on. We tried every kind of socket and wrench and plier, but nothing can get onto the sensor, and if I can grip it, I can’t turn it because of the narrow space. The solution seems to be removing the offending bolt, which has an Allen wrench head. I hesitated because I don’t know what that bolt does or what it may be securing in the engine block. It is also pretty hard to reach. See my drawing. Another factor is that the orig sensor is 24mm, and the new aftermarket sensor is 27mm. I already can not get a socket on it, so increasing the diameter seems to only make the problem worse. Perhaps the new sensor would hit the other bolt before I could get it screwed in all the way. I will visit some parts stores and try to get a narrower (orig size) sensor. Part of the solution is to remove the oil cooler, which should be attached by a single center shaft. This would give me room to remove the Allen bolt, and/or put a wrench on the sensor and be able to turn it. I see that it would need a new gasket, but other than that is there any mechanical reason I shouldn’t just get the oil cooler (and filter) out of the way? On Saturday I had some extra oil and filter, but I wasn’t ready for a complete oil change. I did not pull the oil filter because that did nothing to solve the problem with the Allen head bolt. The sensor is directly above the oil cooler, with about a 2-3” space between them. Your thoughts please — and thanks. Craig

-
craigmcd replied to craigmcd's topic in 1990 to Present Legacy, Impreza, Outback, Forester, Baja, WRX&WrxSTI, SVXSounds great, I’ll do this little job later today. Thanks for the input. C
-
craigmcd replied to craigmcd's topic in 1990 to Present Legacy, Impreza, Outback, Forester, Baja, WRX&WrxSTI, SVXI understand, but how much oil are we talking ?