Tofutti
-
Posts
27 -
Joined
-
Last visited
Content Type
Profiles
Forums
Gallery
Store
Everything posted by Tofutti
-
Damn, I wish I lived closer and found this thread a month earlier. I would have LOVED to have had your old car. I've got a '92 Loyale, auto, same colors and everything that I'm planning on fully restoring next summer. Your car is far cleaner and less rusty than mine (from what I can see). Would be a better platform to build on. I hope your car has found a home by now. I just hate to see these things get crushed. Good luck on your search for a new lovable Subie! (If you haven't found one yet)
-
Thanks folks! I figured they'd be fine, but I certainly am glad to have the expert confirmation. Yeah, free is indeed free. Luckily, his struts and springs are only 4 months old. Plus, my springs are old and weak/saggy so I'm just swapping the whole assembly. I'm not tearing the struts themselves out. Didn't care much for it the one and only time I ever did it before lol
-
I've searched a bit and haven't found an answer. I'm sure most of you know this just off the top of your head. Backstory: One of my house-mates just junked his 97 legacy wagon (non-outback) and gave it to a local Subie-Guy, after Guy put the 2.2 from it in to housemate's "new" 99 SUS Sedan (Purchased from Guy). The plan was to have Subie-guy use what was needed to get SUS on the road, save a few parts for me and my 96 Legacy L sedan, and Guy could have the remainder of the car to part out or scrap as he wished. Guy also works at an auto parts store, thus can look up numbers, get parts cheap, etc. My car was in severe need of rear struts when I bought it a year ago. Knowing this deal was coming, and knowing that my housemate bought new rear strut/spring assemblies for a car he'd be junking in 4 months ('Cause that's the kinda guy he is...) I was offered the assemblies when the time came, with the assurances from all sides that they would work. Now that the deal has happened and the housemate is looking at buying new spring/strut assemblies for his "new", just-as rusted-out 99 SUS (and he knew his new/old ones from his 97 wouldn't fit his new car when he bought them ..) Guy was looking up part numbers and telling me that I probably wouldn't be able to make them work on mine. He wasn't sure if the bolt holes were different or what, but the part numbers were different from 96 sedan to 97 wagon, thus probably a no-go. I'm okay with a slight lift or heavier spring ( I tend to carry a bit of weight around, via trailer or junk in the trunk). I just need to know if those are a fairly direct bolt-on replacement or not. Thoughts?
-
..And probably one that has been asked before, but after a couple hours of searching here, I haven't found an answer. 1992 Loyale has original all-metal radiator that actually doesn't leak, but the fins are mostly corroded and have flaked away, thus not cooling well. Does alright most of the time, but pulling a hill during the summer requires full heat on to keep the temp in-check. This is a fairly low mileage engine and I'm not willing to let this slide and risk it anymore. I'm finding both types of replacement radiators available: All-metal (CSF Model #933), and Aluminum-core with plastic tanks (APDI/ProRad Model #8010935). I know there are pros and cons for each type, and I've read various opinions on other forums, but I'd rather take advice from a more vehicle-specific point of view. There is only a $40 price difference that I'm not terribly concerned about. Thoughts? Opinions? Experiences? What would YOU do, or what have you done? Thanks.
-
1980 ea71 hatchback needs a good home (Portland, OR)
Tofutti replied to sumoco's topic in Old Gen.: 80's GL/DL/XT/Loyales...
I would LOVE to have it.. but getting it back home over here would be a thing. -
Automatic Transmision HELP
Tofutti replied to taz ride's topic in Old Gen.: 80's GL/DL/XT/Loyales...
Miles, I would LOVE a right side taillight for a '92 Loyale if you've got one. Shipping ZIP code would be 05647.. PM me! -
Just put a fuse-block/ separate fuses/ fusible link in on each extra line you run from the Bat to your Accessories and call it a day. No harm in extra protection (even if it turns out you don't need it..) (Hell, even toss a fuse in after the new alt to the battery.) . Besides, it'll cost like, maybe 30 bucks for a fuse block with 4 100-amp circuits, so what's the big deal... Agree to disagree if you must and just put something in. Surely all the time we all spent reading and responding/arguing here cost us more than $30 of our time, since we're all electrical professionals.. If you KNOW you don't need to add fuses/blocks/fusible links, then don't. If you're not sure, then do it; it's cheap insurance. Just stop freakin' arguing already. No harm will come either way. /rant
-
Automatic Transmision HELP
Tofutti replied to taz ride's topic in Old Gen.: 80's GL/DL/XT/Loyales...
HEHE, great advice, but I can tell you; it's outdated. You might want to rule out Vermont unless you're looking for an EJ... Millions of those around here. Literally, when you drive 70 miles (round trip) to work every day over here (probably in a Subaru), every second or third car you meet on the road is another Subie (and anything that's more than 10 years old has 250k miles on it.). That being said, the EA's are GONE. With the rust issues we deal with, even the best EA's ended up in a junk yard ten years ago due to fatal cancer, and got cubed five years ago. It's been probably 17 years since I've seen a Brat in person.. I can't even find a tail light housing or fender for my Loyale... Junkyards don't have a single EA82 still around. Dealers in this area have already done away with EA parts, and certain parts, even fan belts are special order from part stores. And, even most of the die-hard EA fans have given up on their beloved because of unmanageable rot.... It's really discouraging... I see pics from people out west that bought a junk, non-running EA for like a hundred bucks because it was going to scrap if they didn't buy it, and they're wondering if it's worth putting parts into it to get it running again, etc, and the body/underside of the car is just incredible. Like, over here it would be something somebody would pay a grand for without any drivetrain, just because there's no rust under it. Yet, it's just junk over there.... Again, it's really discouraging. Anyway, My rant has ended. My apologies. I'm trying to do what I can to rehab and save these wonderful old machines but I'm afraid you'll need to scratch Vermont off your list of "go-to" places. -
If one were to upgrade the alt, but still use the original wires, then the wire still goes through a FUSIBLE LINK, as per your second paragraph above. So, if the new alt shorts, it's still protected. I'm not disputing the fact that if one upgrades the alt, then one SHOULD ideally update the wiring (age of the vehicle, degradation, etc.). However, as long as one does not go crazy with adding other electrical loads, one should be fine using the factory wiring, as it was originally set up from the factory with fusible links for protection. An alternator will only provide the amperage it needs to to overcome the load. Luckily, a good battery can overcome the sudden need for lots of amperage in a short burst, and if it can't, folks add a capacitor (This is why the battery cables are much larger than the main charge wire from alt to battery). But the alt still does it's thing, providing a steady flow of current to charge the battery. If the battery can't handle the amperage draw consistently, thus is discharging, THEN the load gets pulled from the alt. That becomes an issue. Just because the new alt is CAPABLE of 90 amps, doesn't mean it will constantly throw 90 amps in to the system if there is no 90 amp draw. I've been running with my alt for 9 months now. I still haven't cleaned up my connections any from my pics above. However, my car had no other electrical issues to begin with. But, I've added a 900 watt amp and band-pass sub set up (running separate lead direct from battery (8 gauge POS and Grounded to chassis with 8 gauge) without upgrading factory alt wires, nor upgrading factory ground wires from Bat to chassis. I almost always have audio turned up, thus, the amp will draw amps. No issues yet. No dimming lights. No nothing. I'm just stating that this has been MY case. And Gloyale, I absolutely agree with the differences you stated regarding slow-blow fuses, fusible links and normal standard fuses. ^^ This guy is right on the ball.
-
What is the purpose of the damper piece?; What does it actually do (if anything)? I get that I can remove it safely, but what was the idea behind putting it there to begin with? What was it designed/intended to damper? ... just always wanting to expand my knowledge and understanding.. Also, FWIW my VIN starts with JF2...
-
Here in Vermont, we get snow and ice. We're in it six months of the year. We all have winter tires for this reason. I can't count how many times EACH SEASON I drive home literally plowing snow with my front bumper. Never used tire chains on any of my Subies. I've also never seen tire chains on any of the Subies in my area. (And trust me, just about every third vehicle you see on the road up here IS a Subie.) It's practically the State Car. Also, there is no place around here that we are REQUIRED to have chains available to enter. I understand that geographically, we are different. I suspect that winter tires simply aren't that common in your area, because they're generally not needed, hence, Public Safety folks need to ENSURE that a motorist is equipped in certain areas. If you show up driving on a set of Cooper Weathermaster S/T2 's (Studded), there's a good chance that after they figure out what the hell those are, they'll say you're okay lol. Yes, it's probably not practical for you to go to a junkyard and get a spare set of rims, order these tires and just keep them mounted on there, and change over in your driveway when you're headed to the hills, but you'd probably be fine. That all said, davidlm1954 is on point about the AWD system in these cars. It is VERY different from traditional 4x4 systems. I notice a difference even in my old Loyale, which is four-wheel-drive, not all-wheel-drive. All that aside, I've seen two types of cable chains: One that is just a cable system that runs over and around the tire, like a traditional tire chain would, and another type that has small coil springs that surround/wrap around the sections of cable that run across the tread area. The latter kind tends to "bite" a little bit more in deeper snow, but doesn't have much more effect than the plain ones do on clean ice. If clearance is suspected to be an issue, go with the former "plain" cable chains. I cannot speak of specific brands, but as long as they are approved for your vehicle/tire size, you should be fine.
-
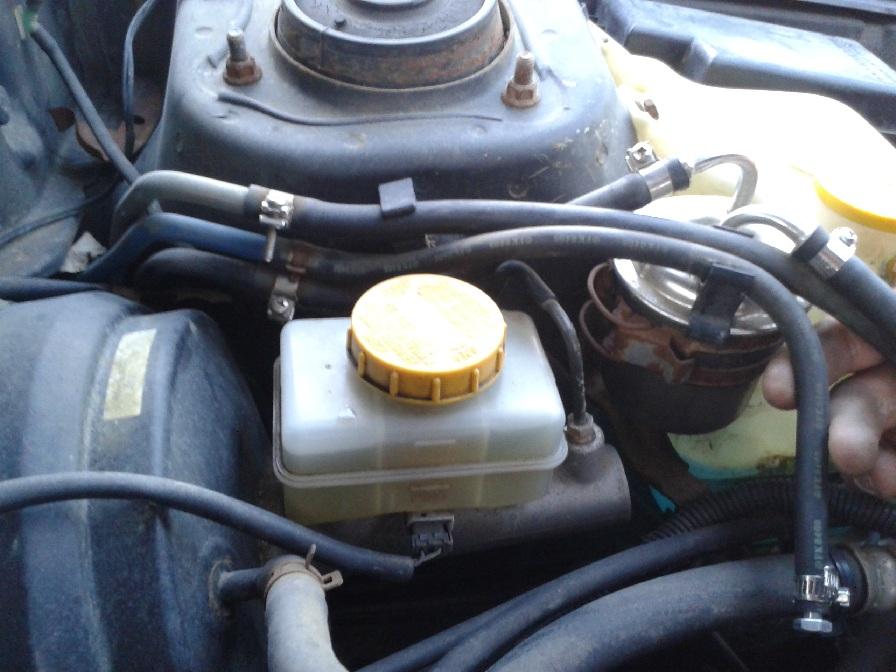
Victory is mine! (But not without the help and support of all of you.) So, Thank you! heartless, a picture really is worth a thousand words, especially with a person like myself who sometimes has difficulty understanding what another is trying to say, even more so when the two of us use different terms. This is why I try to articulate and explain so much and thus, end up writing a novel for a simple response. Sorry about that everybody.. Also, to that end, MilesFox, after having a chance to look over the FSM, I was able see what you were suggesting, but I think for now, if all seems well for a little bit, I may not go further in to putting the rest of it all back together, as there are other lines plugged off around that evap box under the rear-end, as well as a couple more in the wheel-well by the filler tube. I see the main vent in to the tube is hooked up, but none of the other lines that run up and down the filler tube are connected... From what I can tell under the car, mine looks, according to the FSM to be the "With ORVR" model. I can only guess that "ORVR" stands for "Overcomplicated and Ridiculous Vapor Recovery". ...it's a bit much for me at the moment. And, FairTax, you were spot on and thank you for explaining the jet pump. Makes perfect sense to me now. Also, a coworker has a '99 SOHC Forester, 5-speed (mine's DOHC auto), both EJ25s and I popped his hood today. I found that amongst being a couple quarts low on oil LOL his is just a straight hose on the main feed, as everybody was saying it should be. This isn't something to do with the differences in auto or manual, or maybe more likely, a difference in single or dual heads? Whatever that thingy on mine is, it looks factory anyway. I dunno, maybe my engine is a transplant/mutant and that thing came in with it... who knows. Anywho, I was going to reconnect the original jet pump line as it seemed to still be holding up, such that I had a hell of a time plugging it off the other day, but I ended up puncturing the hose trying to get my bolt back out. So, I decided I would use the ( O ) line as suggested. I also wanted to verify if my assumptions were correct about it being the same evap line that's plugged off up front. I pulled the front plug, then pulled the ( O ) line, got a bunch of gas, and could not blow through it.... Went down to the floor and pulled the unmarked line that was supposed to be the return line, as it was plugged in to the return port on the sender, blew through it and expelled a bunch of crap out the evap line up front... Okay, mystery solved. Pulled the ( O ) line off at that junction and stuck the unmarked line on that spot. Cut and fit the ( O ) line in place on the jet pump ports, kicked the key over and let her idle for about 20 minutes. No leaks, No smells. ETC cleared and drove home. (MIL had been on for O2 sensor.) Thirty-five miles without incident, odors or MIL thus far. We'll see how the week progresses. For now I think unless I develop symptoms/issues, I'll leave that evap pinched off up front. If she throws any codes, I'll dig in a bit. Thank you folks so much again for your help and patience with me! You guys rock
-
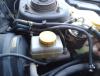
Well according to the FSM that heartless linked me, On this one, it looks like that IS the jet pump line (going back in to the sending unit) The same line he tapped on to with the rubber hose I marked with ( O ). Assuming there are only three lines running back through the car, (and that the send and return lines are correct, (since the car runs great), would this mean that the third line that he has connected to the jet pump inlet on the sending unit would actually end up being this evap line that is plugged off here under the hood? I'm just trying to get my logic straight. (Also trying to understand how this all works.)
-
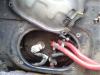
Lol you got me dude. It is how it was when I picked it up. "There is another cover on the drivers side, pull that cover up and see if that one hose leads to the top of the sender assembly on that side." Sorry, I meant to include this shot before. Whatever it is in here, is factory. Miles, I'm not sure I'm understanding your advice here. If you could dumb it down a bit for me, I'd really appreciate it. I need to be able to drive this thing home tomorrow afternoon. It's currently sitting at my workplace, and I'll be riding in tomorrow with a coworker. I'll get a chance to play around a wee bit tomorrow afternoon after work, (with very limited parts/supplies) before driving it the 35 miles back to my house. If it can safely make this trip home tomorrow, I'll have WEEKS to figure it out and make it right before I need to drive it again. It shouldn't take weeks at all though; you folks are clearing this picture up rather well so far, and I thank you for all your help.
-
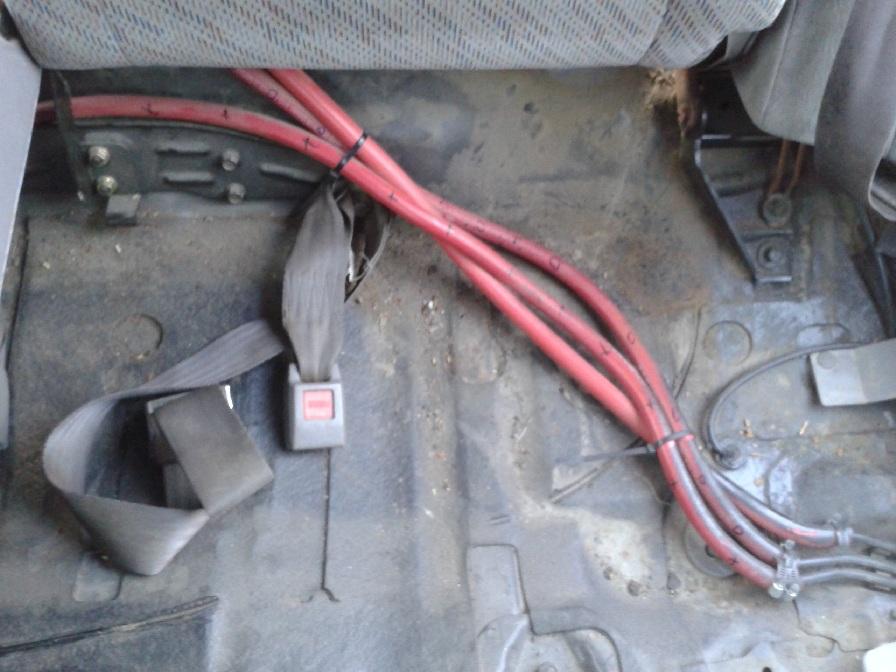
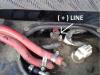
Also, took a few pics to add some light to the situation... I traced the lines and marked one with a ( + ) and another with ( O ), and left the third blank. Everything look in the right place? Also found the Evap line(?) under the hood had been plugged off (I added those clamps out of shear paranoia.) Make sense? If there are only three lines running through the interior of the car, back to where he tapped in with the red rubber hose, (assuming the main feed and return are properly placed) would that mean that the ( O ) hose would actually be this one that's plugged off up front?!


-
Thank you VERY much for the link, heartless! I can now do some research.. At a cursory glance, it almost looks like I could add a "T" and tie old line back in, assuming of course, the other ends on that whole assembly are still where they need to be in the tank, and not leaking. Not sure on that one yet... Grossgary, I know that just a couple days after I bought the car, I was in there, under that panel tracking down the fuel gauge issue, and it wasn't plugged off at that time. I appreciate the thought, and that would make sense, but if it had blown out prior to that, why would it have taken a month and 1500 miles to begin leaking? Especially considering the rate at which it's spraying out now. I think we're on the right track in thinking something changed somewhere, since it was ok before. Also, the car runs GREAT: Smooth idle and lots of power, decent mileage too. Also, my apologies for the noobish question, but could somebody explain to me what the jet pump actually is, and it's purpose?
-
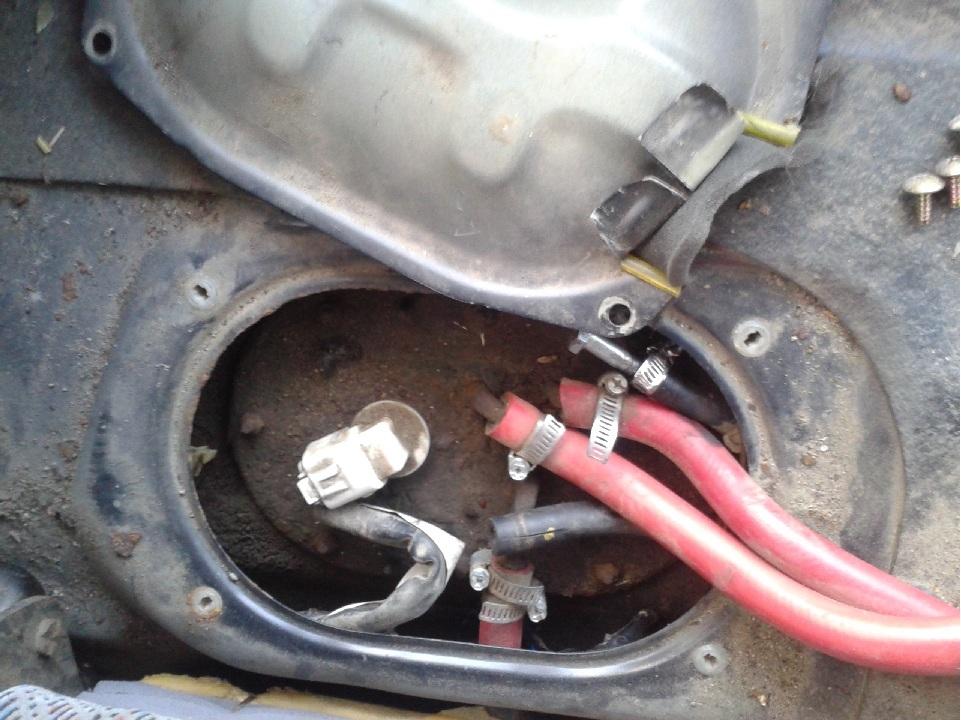
The line that I plugged off tonight (found pouring gas all of the sudden after 1500 uneventful miles, since I've owned it, and probably many more since the "repair" was actually done..) is the one that originally went in to the sending unit where the red (replaced) line right next to it now goes. I was assuming hoses were properly traced and hooked up accordingly on the interior side of the car. I can post more pics of that if needed, to clarify. I'm wondering why all of the sudden it's dumping gas out of this old line (which is/should be also open on the other end, unless it T-s off somewhere else nobody knew about..) ... (and not any of the other ones that were also bypassed). I don't like taking chances with fuel lines either. This is also why I say I don't know these delivery systems intimately. I've seen that inside the car, down by the Drivers side rocker panel, there are three lines going to the front of the car. I have seen that these three lines have all been cut and fixed on to those red hoses, where the steel lines would have gone down through a grommet to beneath the car.. Those red hoses ( three of them separately) run within the interior of the car back to that cover panel, and attach as seen in the pic above. I'm not sure if this clears anything up. I can post more pics as I get them tomorrow. I wonder why everything was fine after months and many miles, then just now this old, disconnected line is dumping it out.
-
Hi all, First time on this side; I usually lurk around the EA threads... Here's the long and short: (mostly long..)(sorry) I picked up a '98 Forester S from a friend/coworker for cheap. He'd had the car for about a year and had lots of little things fixed and amongst other things, related to gas leaks, included fuel lines. He was frustrated that as soon as one thing was fixed, a month later something else would let go. The person that does this work for him is another Subaru guy, and works on everybodys Subie in the county, basically. In replacing the rusted fuel lines in the back of the car, he simply notched out the cover, and drilled a hole and got on to the the top of the sending unit with some big, heavy reinforced rubber hose. All three lines to the sending unit were fixed/attached to. These were run internally down to the drivers' side (underneath the seat, etc) and reattached where the steel lines come back in to the car, effectively bypassing all the rusted junk underneath the car. I also noticed there were a whole bunch of rubber lines all around that "emmisions box" under the right rear corner that were plugged off with bolts in the ends of them. The car has not thrown any codes, except for the gas gauge not working. (He nipped a wire while drilling back there. I found and fixed.) So, this was done quite some time ago. Previous owner later had fuel leak issues while filling the car. Claims it was only an issue while filling, not while running/driving. New OEM fuel filler neck was installed (old one found rusty, go figure.). Previous owner still had issues and assumed it was the rubber hose AFTER the metal neck that was leaking. He also wasn't able to see how much fuel he had, due to the gauge no longer functioning. Instead of tracking his milage and adding gallons accordingly, he would "drive it a little bit and put gas in it." Not knowing what exactly the issue was, (tank leaking or not) I showed up with 3 gallons of gas in a can and poured them in, and proceeded to watch at least a gallon drip out. I planned to drive until it ran completely out, then put 5 gallons in, track mileage untill totally out, and do the math from there. I drove over 350 miles before it initially ran out. = Tank already full upon pick up. I had assumed maybe previous owner was just overfilling it and sending some back in to some of the lines that had been plugged off or something. After all that reading, we finally get to the meat of it. I apologize for the long winded-ness, but I feel it helps to know a bit of the back-story. The previous owner throughout all of this would also complain of smelling gas inside the car after refueling. I also had noticed this. Additionally, I had found (While finding the cut wire and thus restoring the fuel gauge) that the cover/hatch over the tank/sending unit was not really sealed up, after having notches cut out of it, thus any leakage back there could easily be smelled in the car. I fixed this as well, and have not had any gas aromas inside the car that were not of my own origin I have now put over 1500 miles on the car without any leaks or incidents. I drove it to work yesterday, and about 15 minutes prior to leaving work, another coworker started it for me to let it warm up. While walking to the car, I noticed it was raining gas underneath the rear end of the car. I shut it off and it stopped. I restarted and it resumed dumping my paycheck on the ground. I rode home with coworker and rocked out the loyal Loyale today. Started the Forester this afternoon and no leaks.... Until after about ten minutes of idling. It was pouring it again. Pulled the cover back off and was able to find that one of the lines that had been bypassed (so we thought) and left open was the culprit. (if you're kneeling on the backseat facing the rear of the car, the lines come out of the sending unit in a triangle pattern, pointing towards the front. This one would be the top right. ( only assume that's where this hose would have connected, lengths seem to match.)) I threaded a bolt in to it and found that after enough time it was building up pressure sufficient to still leak past the threads. Also added a hose clamp and found it to still want to weap until I really torqued the clamp down. I let it idle for a little bit while checking things over and didn't find any other issues. I'm not intimately familiar with automotive fuel systems and am only minorly worried about some big Hollywood-style explosion after a pressure build-up and release somewhere bad while going down the road... So, looking for some insight and thoughts on this as to how I should really proceed from here. If this no longer leaks, am I just ok as it is? Should I be looking for some valve malfunction, or other plugged line/canister? If he bypassed all of this, and correctly rerouted, where is this pressure and fuel coming from? (To which, I might add, the repair technique he performed here, he has done several times without issue over the years.) I am just trying to handle this myself as the guy is very busy as a single father, working a full time job and always has six Subarus in his yard to work on after work.. Also, the car had just under a half tank when I parked it yesterday morning, and while it was doing it's thing, it reduced itself to a quarter of a tank. In the pic, the line on the top right with the bolt and the clamp is the one I just plugged. All other original hoses in here were left open. The red line (obviously) was the other guys' work.
-
Well done TallonX! Such a simple solution to our electrical needs! There will be more work involved involved in pretty much anything other than the Nissan alt, but if you need the power, then have at it! I did one on my '92 Loyale, single pulley, WITH AC. Lots of folks specified procedures for the older dual pulley setups, so I wasn't sure if I could make it work or not, but it was easy as hell. I used an alt for an '87 to '94 Maxima. Specifically, I ordered a '92 alt, same year as my car and was in the range, so I would remember in the future what would work. Nice 90-amp, direct bolt-on upgrade. My response post on a nice step-by-step guide that somebody else wrote: http://www.ultimatesubaru.org/forum/topic/97208-bolt-in-ea-series-alternator-upgrade-nissan-maxima-alt-installation-guide/page-8?do=findComment&comment=1150123 This thread is worth reading from start to end. It is a lifesaver. If you're a Loyale person trying to see if this alt upgrade will work, look at the reply directly above the one this link will send you to. It is my first reply to the thread trying to answer and clarify some questions for us Loyale folks.. Just based on my experience with my swap.
-
^^ I second "if your looking to get rid of it, how much do you want?" and preface that with: What's the rest of the car like? How bad is the body?
-
The best I can tell you is, first of all, Welcome to the world of Subaru! I'm not new to Subaru's but I am fairly new to this site (and very new to actually CARING about my subies) and I'm still learning "terms" but as far as I know, "EJ22" is referring to one of the 2.2 liter engines used in the early to late '90's Subies (with exceptions, like anything else). They are referring to the engine model numbers. Just like if you dig around under your hood on the back of your block or up near your bell housing, you'll see "EA82" in there somewhere, so whenever you see EA82 on this site, you know they're talking about your 1.8 engine. Again, congrats on the new-to-you Subie! I've had many over the years and am just now trying to treat them right, hence learning about them a bit here. I've always bought them for less than $500.00 and drove them for years without ever even changing the oil, and thrown them away when the body rotted off or got in to something structural beyond repair. ..But the damn things always drove themselves to the scrapyard, even after 200k miles that I put on AFTER I bought them.. . I've never had a vehicle just go and go and go without ANY maintenance like a Subaru, so now I'm just trying to do the right thing with an oldie. I also had the same reservations about engine RPM with the Loyale 3-speed auto (My current Subie is my first Loyale that was an auto..) But NorthWet fixed that lol. He is wise, as are most others here. (Myself not-included) lol Good luck to you my friend.
-
Loyale more trouble than it's worth?
Tofutti replied to GlenSz's topic in Old Gen.: 80's GL/DL/XT/Loyales...
LoL, Mine either stays in current gear, or drops itself down one gear based on how fast I drop the pedal. At 25~ish if I MASH it, it'll kick down. If I take about one second to travel the pedal to the floor, it'll stay in current gear and pull. Regarding downshifting to first.... I blew a front brake line a couple days ago.. One of the front calipers sticks on a little when I use/release the e-brake so I was using engine braking as much as I could. I kept it in 4WD to balance what was left of braking ability. Whilst slowing down for an intersection, (I've never tested my engine compression but I'm gonna guess it's just fine.) fifteen miles per hour into first skidded all four wheels for a second while engine came up to speed. Over the years, with many different types of vehicles that I've been intentionally evil to, still had not prepared me to expect that out of this little 1.8... Especially at 15 miles per hour.. -
Wouldnt you know it...
Tofutti replied to 92_rugby_subie's topic in Old Gen.: 80's GL/DL/XT/Loyales...
An old thread, yes, I know. But one that still may be worthy of helping others. I myself scoured the wonderful USMB for hours before finding it here at .http://www.ultimatesubaru.org/forum/topic/97208-bolt-in-ea-series-alternator-upgrade-nissan-maxima-alt-installation-guide/ -
Just to try and clarify even further for the first-timers (like me, last week): Sorry, you may have to find a way to zoom in for the pic.. What I did here was mechanically and electrically sound, but it was still temporary. This will get you on the road again safely, but you will probably still want to find the alternator pigtail connector from the Nissan alt at some point, just so water doesn't wreak havoc in there (puddling inside the cup of the connectors on the new alt). On a side note, I've seen people talking about having to split the ring on the main connector of the alt charging post.. I too, found the original ring terminal to be too small to fit on the post of the new alt, but, not by much. I used an old trick. Take a flat-blade (regular) screwdriver and use it to "drill" the connector out a bit. Go a little bit on one side, then flip connector over and go from the other side. Doing this will help you to not over-enlarge the hole quite so easily, and will still do a neat job.
-
Sorry to be that guy that revives an old thread, but I feel this one is not only worthy of reviving, but should be sticky'd somewhere, maybe in the "how to's" as it helped me immensely. Plus, I had to dig around forever just to find it.. In response to rain_man_rich above, He re-hosted his pics on page 6 of this thread (But here they are again, above) After seeing this particular post, I wasn't sure my new alt was going to work in my '92 Loyale because I was scared of this same insert on the new alt. In my case, it fit just fine, except I had to add a washer between the outside of this offending part and the original alternator mount bracket to close up a gap that was there. OP (GD), I absolutely love this thread, and I thank you so very much for finding/making this upgrade so clear. I was reading several posts about this and still wasn't sure this would work with my non-turbo EA82 Loyal, as I do have A/C and a single pulley alt. It took me longer just to get the pulleys off the alternators than it did to do the rest of the very minor modifications required for this upgrade project AND install the whole thing. *Note to other Loyale owners: I found that in my particular model of car, this new alt will hit the mounting bracket when you try to rotate it down, at about the midway-point of the adjuster bracket, thus not allowing you very much slack in the belt. When putting a NEW belt on, you will have to remove the upper bolt and try to drop the top end of the new alt down a bit. Once the belt is on, wiggle it back up and install the upper bolt, THEN tension the belt as normal and tighten the lower bolt. I went from crap To great!