Leaderboard
-
carfreak85
Members2Points4595Posts -
idosubaru
Members2Points26995Posts -
GeneralDisorder
Members1Points23391Posts -
lmdew
Members1Points4694Posts


Popular Content
Showing content with the highest reputation on 11/14/18 in all areas
-
1 pointI'll say it again, for those in the back: Generally speaking, there are no Subaru engines that have an inherent weakness or Achilles heel regarding the cooling system. The radiators are large enough (for any non-racecar engine), the water pumps move enough fluid (even for 800+ hp race engines), the blocks flow well enough to keep things from melting. The only reasons you hear about Subarus overheating is 100% related to either: head gasket failures, using non-OEM thermostats, old cracked/plugged radiators or electrolysis due to lack of maintenance. I will say this, however. It has recently come to my attention that factory turbocharged EJ engines can benefit from installing a coolant tee between the driver's side head and the HVAC heater (GDT Cylinder 4 Chamber Cooling Kit). This modification doesn't have anything to do with overheating engines, but everything to do with balancing thermal loads between the cylinders.1 point
-
1 pointActually the cavitation will damage the block. I've seen it (and had to repair it) a couple times. Always on modified turbo cars from running water due to track requirements, etc. Not properly warming up the engine, insufficient bypass..... blown HG's also can contribute. If the system is properly assembled and proper antifreeze is used it isn't a problem. We build 600+ HP engines and run STOCK thermostats and water pumps without any issues whatsoever. So no you don't need to relocate the thermostat - that's not going to do anything useful on a 165 HP 25D. GD1 point
-
1 pointI've never heard of this mod on a Subaru engine, which don't really have issues with cooling (blown HGs not withstanding). To burp the system properly, I usually raise the front end of the car as high as I can, turn the HVAC temperature to hot and run the engine while occasionally squeezing both radiator hoses. You need to wait until the thermostat opens and the radiator stops bubbling before the burping is complete.1 point
-
1 point$150 is a great deal for an unavailable windshield. With two drivable brats - drive them while you fix the other? or sell one to fund some extra/spare windshields.1 point
-
Did you plug in the coolant temp sensor on the cross over water pipe?1 point
-
1 pointsomeone else will guide you more accurately but I'm pretty sure you need to keep it around 5-7psi and I'm not sure how much of a stellar choice the EA82 turbo's are..1 point
-
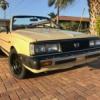
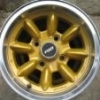
Well, I finally took the plunge after limping my 13" maypop baldies with belts showing along as long as I could, till one did pop. Just didn't want to buy any more 13s. So after many hours of reading about 6-lug swaps here, I decided that would be the cheapest, easiest route. The problem with most of the threads here is they are all about off-roading with lifted cars. There was very, very, little I could find about doing this swap on a stock height car with low-profile tires. What little there was had no pictures anymore because of photosucket. So I took a trip to the only pick-n-pull in the area. Really, a terrible yard, with absolutely no organization whatsoever. You have to go over the whole yard usually, just to start and see what's available. And many of the cars are so packed together, you can't even walk between them. I found one set of 15" steel Isusu 6-lugs in the offset I figured I would need. 60 bucks for the set... pretty happy about that. And they were actually going to charge me extra for the mixmatched, flat, half-bald tires that were on there (??) but they removed them for free. Now, these wheels are well made, but HEAVY!! The center flange that I had to drill was 3/8" steel and the rest of the center was a healthy 1/4". I was gonna weigh them before I got them on the car, but I was too excited to stop and do so. Really, part of me just didn't want to know. I was gonna hit up someone here to send me a front hub, maybe one with stripped splines, to use as a template, but I ended up just taking one of mine off, and bopping two of the studs out. I then made a drill bushing with a nut by first drilling out the threads with my pilot drill bit, and then, with the nut spinning on the pilot bit, I dressed down the OD with a right-angle grinder (shadetree lathe), till it just pushed inside the stud holes. Bolted the hub to the wheels, drilled the pilot through the bushing, then drilled to 1/2", Bob's your uncle. After hours of brooding over tire size, I finally settled on 205/50R15s, which are ever so slightly taller than stock, and filled out beautifully on the 7 inch rims. Wallyworld got me Hankooks for 50 bucks each, and they really look like great tires. Took hardly any weight to balance, which is a good sign for the rims and tires. Fit without issue on the front, but it gets close in a couple of spots. The rear... was going to rub the inner fender lip under compression. I've never rolled any fenders, but I remember an old hot rodder telling me about using a baseball bat to do so. I couldn't find a full-size wooden bat anywhere locally, but I did have a piece of 2" PVC electrical conduit. Started out driving the car forward with the conduit rolling between the tire and body. With a stick and a string on the loose end of the conduit, so I could guide it (would work better with 2 people). Then finished by letting the car roll back down the driveway while levering the conduit down to push the flange up. Worked great. Then, after some cleaning and Krylon, I can't stop looking at it!! Now, I have yet to try and drill a chamfer on the new holes so it will accept a traditional lug nut. For now, I just have regular nuts and lockwashers on the drilled holes, and center the wheels on the car with the factory holes. It's smooth as glass at 80 mph, so I think I can go back now and chamfer the drilled holes, as long as they are perfectly centered around the stud. Or, I could just get some flat-bottom chrome acorn nuts, and leave well enough alone.1 point