Corvid
-
Posts
89 -
Joined
-
Last visited
Content Type
Profiles
Forums
Gallery
Store
Everything posted by Corvid
-
 I have a feeling there is something obvious that im missing here, but this has been a long project and I need to eat something, so I'm getting frustrated. I've got the transmission hanging from an engine hoist. It's a JDM 1997 4EAT that is off a 2.5l car, but is supposed to have a 4.11 ratio. I want to check the front diff visually before I commit to installing it. I pulled the drain plug, and marked the tooth in front of me with a sharpie. What is the detailed, correct technique for getting that gear to turn so I can count teeth? I've tried a couple things that made sense to me, but nothing that has made the gear seem to move. I'm gonna go get food, thanks for reading.
 -
While I'm at it, can anyone give good feedback on the refill procedure for the 4EAT when the torque converter is believed to be emptyish?
-
So annoying, but it makes sense. I'm hustling 1 engine and 2 transmissions around carefully with one hoist, which is a pain in the neck.
-
In car, I believe this is correct. I was specifically thinking about seperating and reattaching the engine to the transmission after they have been removed together as a unit. I think this would work well if you are pulling them both anyway, I may be prevented from reinstalling them as an attached lump, simply by the overhead clearance I have under the carport.
-
A month or three ago, I inherited a 1991 Legacy with almost 200K miles and a completely FUBAR automatic transmission. I set myself to researching which other years and models would be compatible, and after reading several threads here (mostly answered by johnceggleston) I began to look for any TZ102Zxxxx transmission with my final drive ratio. The TZ102Z2xxx is to be skipped since the EJ25's came with 4.44 final drive, and I have 4.11. So I pulled the engine and transmission together, and rounded a torque converter bolt trying to work through the crappy timing window on the bellhousing. So I removed the intake and had to work across the top of the block to get the 3 normal bolts and 1 dremel victim before I split the bellhousing. I didn't rip out the TC, although I noticed afterwards, that on the bottom of the bellhousing, the little flywheel cover plate wasn't there. In my FSM parts catalog, that cover plate is listed at Manual Transmission only, which seems to tell me that as long as you are pulling and installing the engine and transmission together, you can get real tools on the nasty little TC bolts from underneath effortlessly, and without pulling the intake. That would be excellent. I'll report back on this later. Resealed just about the whole engine. Full new timing, cooling, and oil everything. If you search my older posts, I have a write up with part numbers for everything I ordered for the job. I went with a Dorman oil seperator plate this time, half just to see if it was any good. I'll report back on that too. Then I found and ordered a JDM transmission with vaguely 50k on it from Foreign Engines in Lynnwood WA. They were nice on the phone and prompt and delivered to me for free since I'm prettty close. I asked on the phone to make sure the oil pan wasn't dented, since that'll starve the oil pickup, and I didn't want to deal with trying to reseal the transmission pan, which is supposed to always leak afterwards. They told me that they would try to get me an undented one, but that the engines and transmissions come from Japan, stacked FOUR DEEP ON TOP OF THEMSELVES in shipping containers, often seperated by a car hood, but not always. I assumed since my garbage 4$$ engine stand from harbor freight comes with like a half ton of packaging, also across the Pacific, that maybe they would spend just a little time securing objects with a higher perceived value. Well, here's your warning. Transmission arrived, tail housing dust cover cup mangled, oil pan smashed in, dipstick tube bent, and with a different sized torque plate to go with the different sized torque converter. The transmission has both EJ25 and 4.11 written on it. Great. Spent the day cleaning it up and replacing all the broken parts and parts that don't match my car. The tailhousing dust cap came off and went back on easily with a chisel against the rear ring and some gentle hammering. I ended up swapping the 1991 oil pan onto the 1997 JDM transmission, and noticed immeadiate differences in mounting surfaces. The damaged 1997 oil pan has a flange that looks stiffer and appears to make flatter surface contact. If someone told me that it was part of the switch from gasket to sealant, I would believe them. The 1991 oil pan is in good shape, except for the deformed bolt holes from the gasket compression, and the dark silver house paint in the bottom of the pan. The stamping work to stiffen the flange on the 1991 seems shallow and much less aggressive, creating more rounded bends and much less contact surface. The case flange on each 4EAT was different too. The 1997 mating surface was smooth except for the bolt holes. I only looked at the mating surface for the dead 1991 case briefly, and at night, but I could have sworn it had shallow relief cuts from the face. Don't know why, maybe someone can explain the concept to me. So I ended up using a socket supported under each bolt hole, with a small ball peen hammer held with the round point on the bolt hole deformation, and then hit the flat side of the ball peen with a deadblow hammer to flatten or barely invert the protrusions. I checked all the boltholes with a small straight edge and worked slow until they were flat. Powerfully boring. Then I hemmed and hawed for 10min about whether to use anarobic or a new rubber gasket. I went with anarobic, I'll report back once its running. My next step is to start attaching everything and plumbing everything back in. There are a lot of older posts about the TSB/recall/factory add-on inline ATF filter that goes on the fenderwall, below the battery. The kit is part number 42098aa032, and the dealership says it is discontinued, so that may not be part of everyone's plan anymore. I'm going to take my old one out, since I assume its clogged with dead clutchpack guts. More notes on things I've found or strugggled with as I crawl towards the finish line.
-
Do a google search for "torquemada lite". Pages of conversation and pictures. And to ruin the ending for you, I don't think they ever do the handbrake mod.
-
Justy Flywheel compatibility
Corvid replied to faralder's topic in Old Gen.: 80's GL/DL/XT/Loyales...
I'm not familiar with this outfit, but I found this with a little dredging. Worth following up on as an option. http://www.phoenixfriction.com/p-32249-rfw0866-fw-reground-subaru-justy.aspx For other stuff, I think dustysjustys.com is still a thing worth looking at. I was reading on there and found out that Subaru stopped BUILDING the Justy in 1995, but kept selling cars under that model name for years... they just rebadged the Suzuki Swift, known here as a Geo Metro. -
I've got a pullled EA82 unit I can sell you for a couple bucks, but I bet when you dig it out to replace it, you'll see what needs to be cleaned up or bent back into place on yours. I've looked at more than one where the contacts were green and crunchy when we finally went to go examine the sender.
-
Water Pump Pulley Damage. WTF? w/ Pictures!
Corvid replied to Corvid's topic in Old Gen.: 80's GL/DL/XT/Loyales...
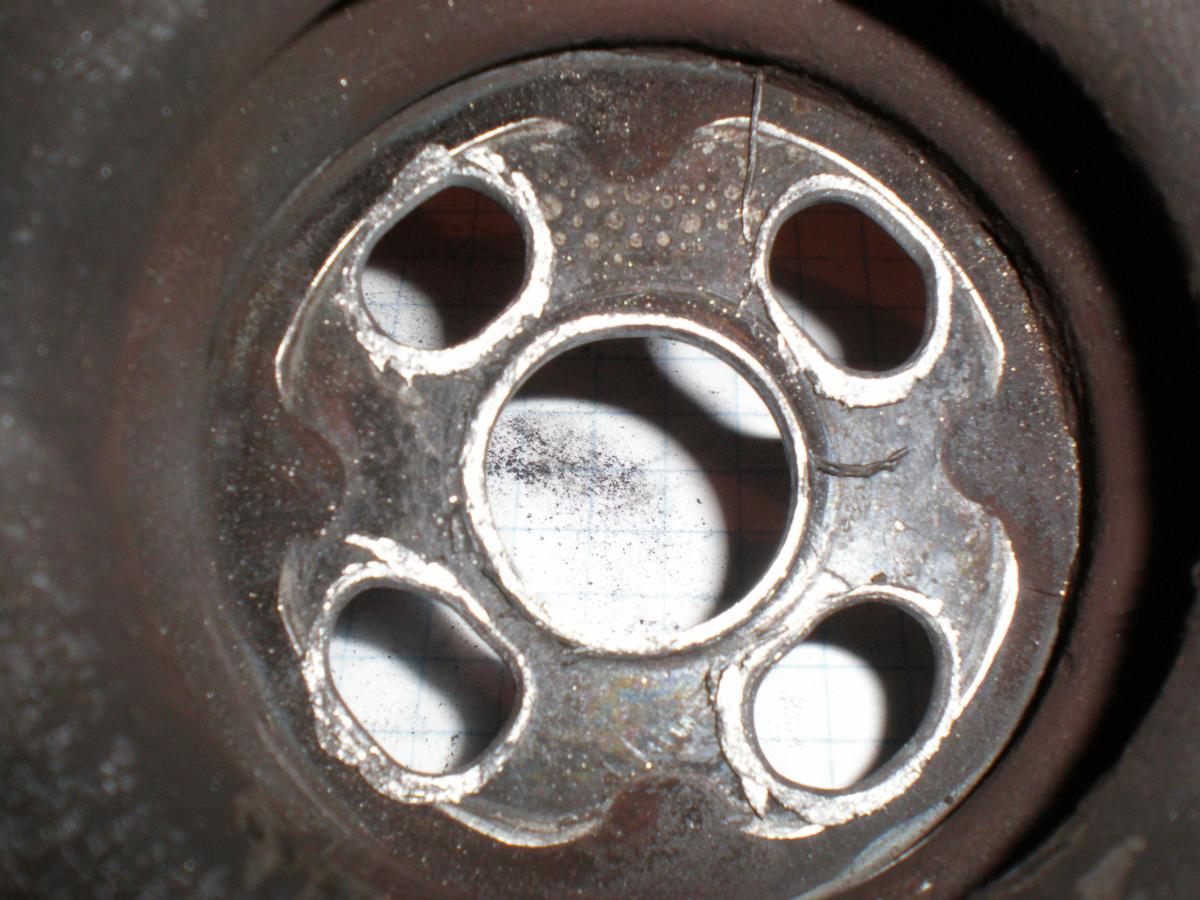
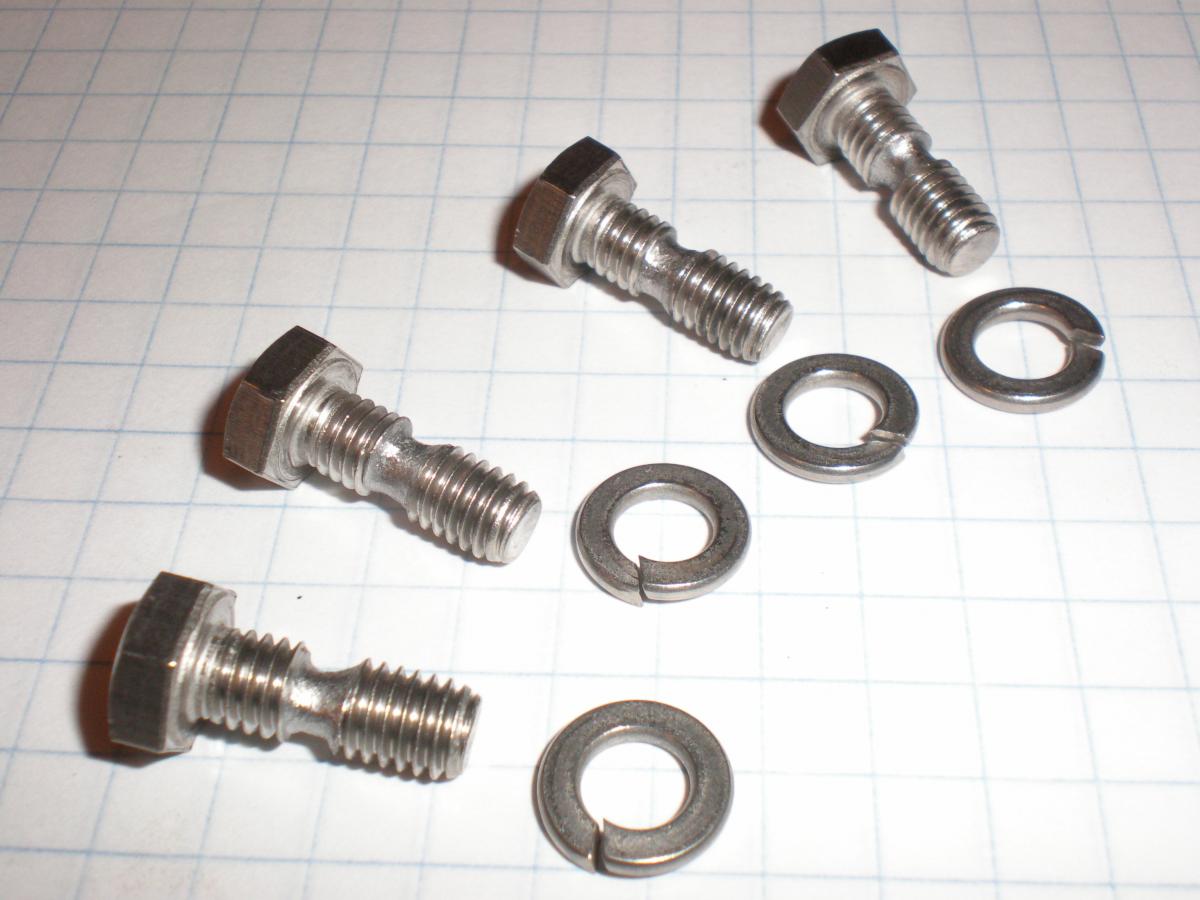
Repair finished, as of 4am last night. My final analysis is that this damage was the intersection of 2 events. The first was the short water pump (factory part number 21110aa026) was installed, when the longer one was needed. Somehow, I missed the visible 5mm offset on the pulleys the first time around. The second event was that when I replaced the studs with bolts, as I had seen work successfully in other threads here, I kept the torque on the bolts and lockwashers equivalent to the FSM torque for the nuts. This didn't completely engage the lockwashers, and when the pulley had additional side forces put on it by being out of position, I imagine that they walked out quickly and destroyed themselves. Solving this without replacing the water pump with the long factory unit, as a time and money issue, was a matter of installing longer studs, placing a stack of three 1.5mm thick washers on the studs beneath the new pulley, then reassembling. The annoyance was finding the correct automotive studs and trimming them to fit. I went through 3 sets of studs before I got the ones that would engage correctly. M6x1.00x30mm with the unthreaded shoulder in the center, are 1mm too short overall after being trimmed to fit the pump side, and cant fully engage the nuts. M6x1.00x40mm with the wide, offset, unthreaded shoulder look perfect after trimming to fit, but the unthreaded should sticks out above the surface of the fan clutch by .5mm, preventing nuts from clamping parts. M6x1.00x37.5mm is the answer, with a much shorter offset unthreaded shoulder. Fit is correct for WP side, and after trimming the long side to fit, they allow firm torque on both ends, and don't hit anything. You can get them from Tacoma Screw. I'll give it another couple weeks to make sure stuff holds the way it should, but I think this one is done. -
Water Pump Pulley Damage. WTF? w/ Pictures!
Corvid replied to Corvid's topic in Old Gen.: 80's GL/DL/XT/Loyales...
Ok, I hit the yard and came home with an undamaged pulley and 4 studs. When visually comparing everything, it seems like the math on the bolts was pretty right on. They don't look long and the wear mark is spaced pretty close to the bulge on the stud, which lends to the idea that the bolts were the size desired. The bulge is interesting, and the idea that the bulge centers and takes up slack on the pulley holes sounded promising to me. Upon examination, the bulged area on the stud is still smaller than the diameter of the pulley bolt holes. Maybe the bulge is better able to hold up to contact with the pulley than the bolts, but if you go up to the OP, the picture of the damaged pulley shows that the pulley can't handle it either. This makes me think of EJ22 crankbolts, where if they are improperly torqued, the woodruff key becomes exposed to rotational forces and annihilates itself, the harmonic balancer, and the crank pulley. This never happens normally, because the clamping force of the bolt pinches everything together with the end of the crank snout, and everything turns together. So, at this moment, I think Gloyale nailed it. I think that I didn't crank down on the bolts hard enough. The split ring lock washers I think were a decent idea, and even made the spacing desirable. Unfortunately, I couldn't get a torque wrench in there, so I cranked them down by hand, and I think the lockwashers made them feel done prematurely. That doesn't even take into account a possible difference in the correct torque for studs vs. bolts. I'm gonna go put fresh batteries in the headlamp and try to slap this thing together tonight, so my friend doesn't have to take the bus to work tomorrow. If there are more ideas or info, keep 'em coming. I'm going to see if this takes care of it. -
Water Pump Pulley Damage. WTF? w/ Pictures!
Corvid replied to Corvid's topic in Old Gen.: 80's GL/DL/XT/Loyales...
Also not too proud to admit that i have done that before to force other things out of threaded holes. That's what I get for working on cars instead of sleeping. Thanks Crazyeights. I'm still curious as to how these bolts failed, or if WoodsWagon is correct, what they bottomed out on? -
Water Pump Pulley Damage. WTF? w/ Pictures!
Corvid replied to Corvid's topic in Old Gen.: 80's GL/DL/XT/Loyales...
I'm not too proud to say I didn't know how to remove them without damage. I thought the threaded holes on the water pumps go all the way through? That sounds like a good answer given the witness marks and damage, but how would they bottom out? -
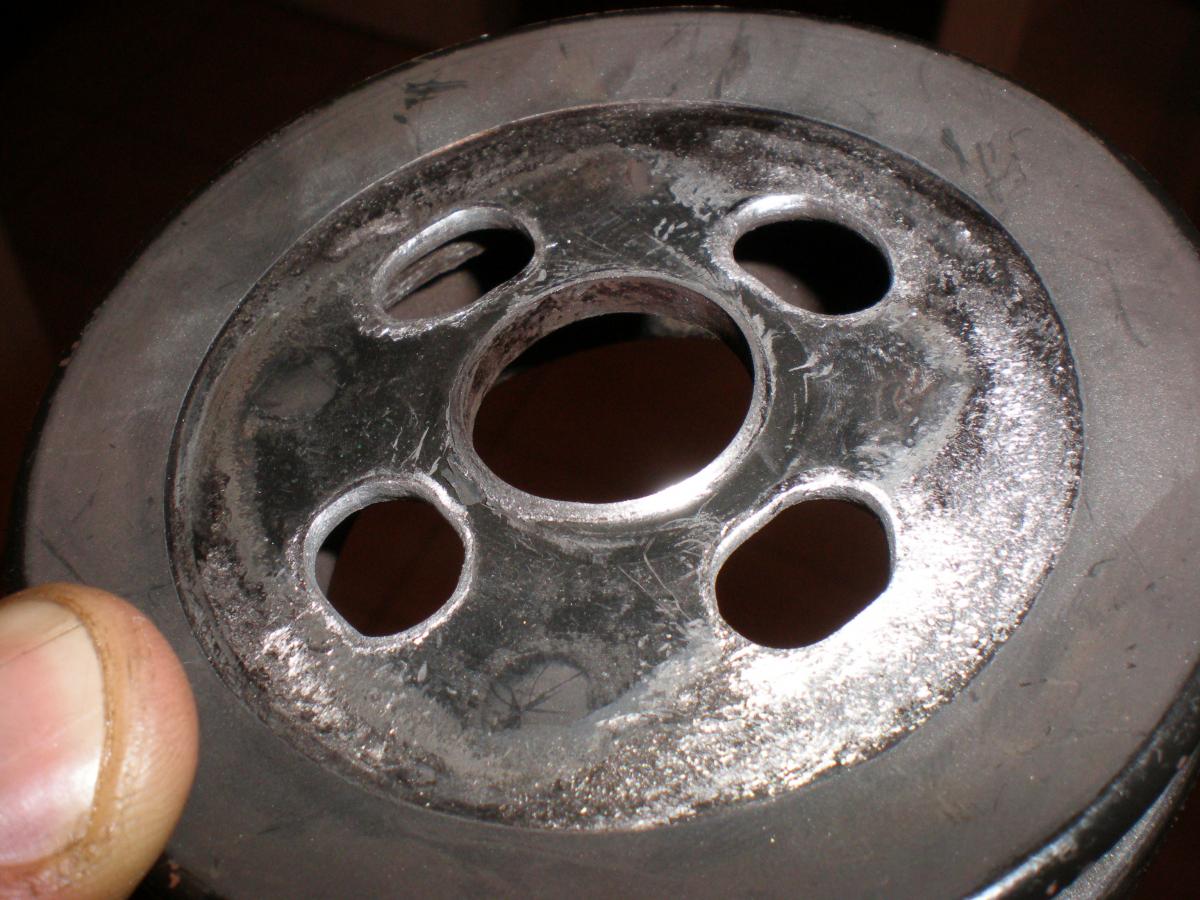
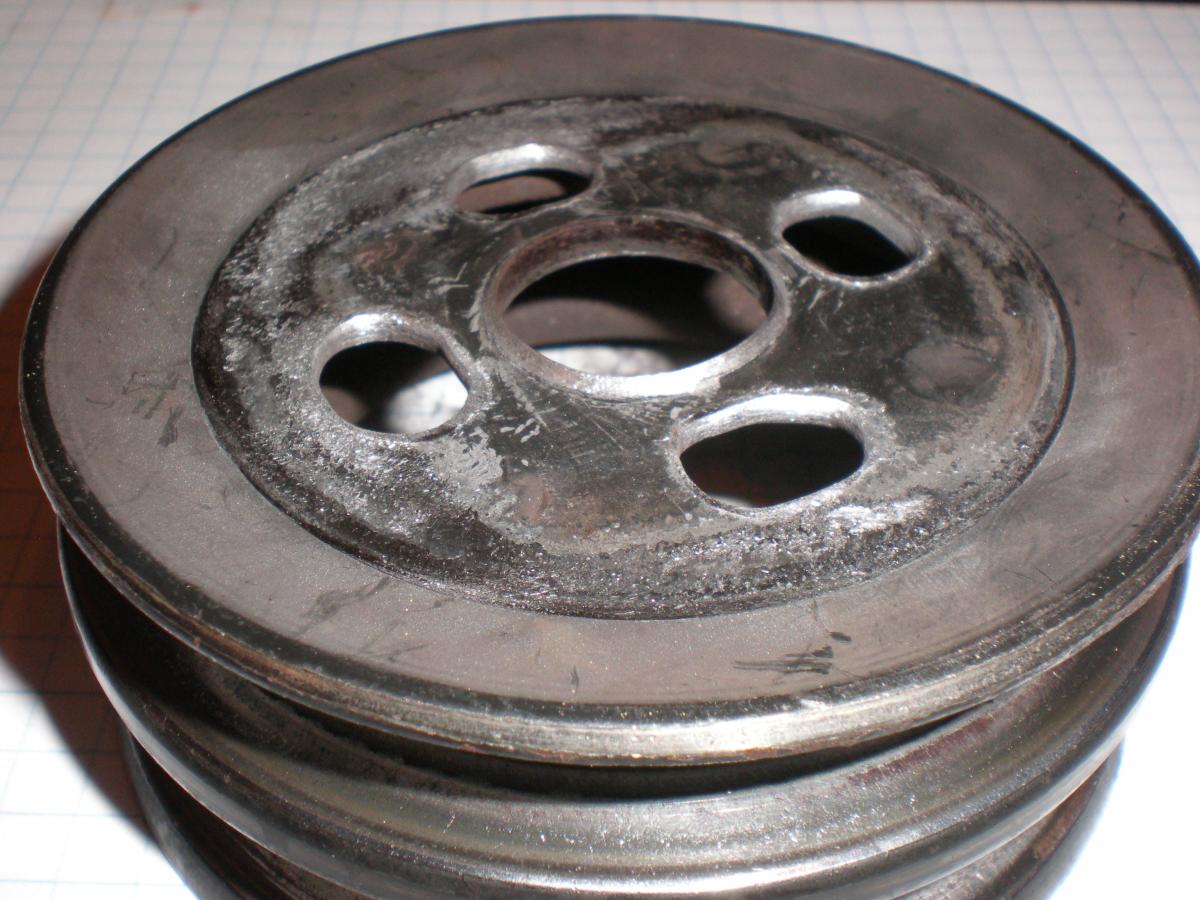
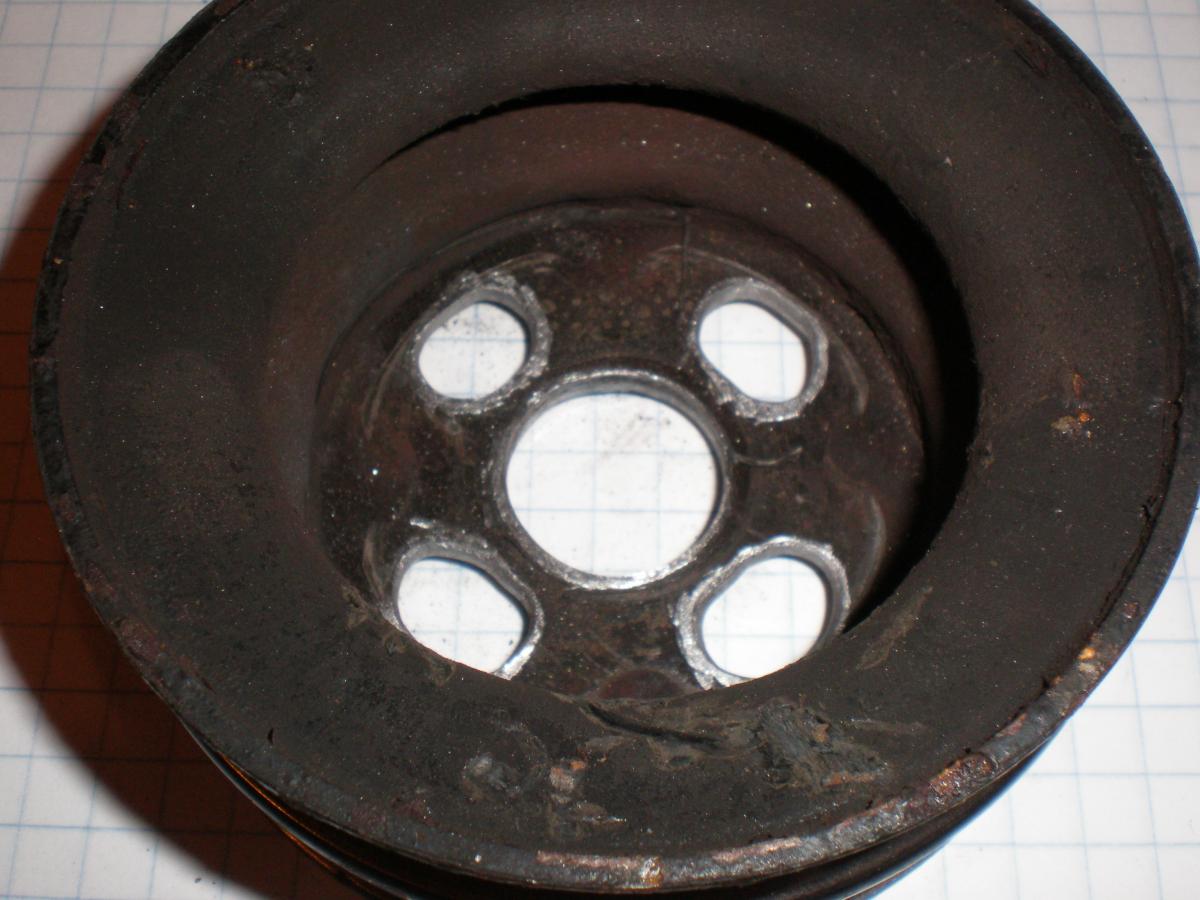
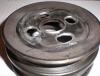
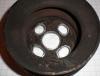
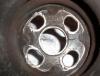
The car is a 1991 Loyale, EA82 SPFI with AC, and the AC compressor is mounted inbetween the Alt and the PS Pump. 3 weeks ago, the bearings in the water pump gave up the ghost and it was flopping the clutch fan around and puking coolant. I replaced the Water Pump, Gasket, and Water Pipe O-ring with factory parts. Water pump was Subaru #21110aa026. That water pump came without studs, but I've seen that before on correct water pumps, so I picked up some bolts and snugged it down. Ran great for 3 weeks, then started making terrible noises. I opened it up today, and found 4 tight fan bolts, which have huge grooves worn through them now, and a water pump pulley that has beat its holes into ovals. FML. I search quite a bit, and I'm tired and sick. Can someone please tell me why this would happen?


-
http://www.ultimatesubaru.org/forum/topic/123318-rebuilding-ej22/?hl=frankenmotor&do=findComment&comment=1040287 As usual, WWGDD? Case closed, will someone please sell me an EJ25 shortblock for almost nothing?
-
I totally hear that. I don't exactly need the engine for anything at the moment, it was just leftover from a replacement. I guess I'm just trying to figure out what I should do with it, since its taking up space in my small garage. Am I hearing you right on thinking that the cranksnout and bearings are toast? Is there any reason the heads and intake would be shot as well?
-
Through a series of unfortunate events, I ended up with this engine that was even worse than I thought when I made the deal. Known to me beforehand: 1994 EJ22 250K Trashed keyway / harmonic balancer / crank pully Valve cover leak Bad knock sensor But it turns out there's more... Upon further examination, the last 1/2 inch of the crank snout is turned down on one side from the woodruff key acting like a lathe bit. Bummer. After the engine was in my garage, on my table, I found out that the valve cover gasket leak was "treated" by adding Stop Leak to the oil. And that the engine was run for almost a 1000 miles on 15w40, to "slow leaking". (Even better, this was against my advice on the phone. Awesome.) So now I'm staring at this thing, trying to figure out how much damage I should expect inside. For those of you who have had a lot more time with these, should I... 1. Reseal the engine, replace the knock sensor, JB weld and file the woodruff keyway, ignore the worn down crank snout, replace the frontend and timing components and drop this thing in one of my EA wagons? Maybe run Seafoam in the oil for a weekend and then change the oil again? 2. Call it a loss, scrap the short block, practice rebuilding the heads, and store the rest as spare parts? 3. Scrap the short block, find a good EJ25D short block, and spend my winter gettin weird in the Frankenstein lab... 4. The obvious answer I haven't thought of yet...
-
Well, I'm home with a sprained neck tonight, so I thought I would give a report back on this project. The engine fired up inside its new host car a week ago, and is currently on a large roadtrip, so I'll have a final report when it gets back, but so far it is behaving well. The clean up and reseal was pretty straight forward, only a couple little points to share. Someone had already had the oil pan off, and resealed it with Grey RTV. Inside edge of oil pan was covered in flappy little bits of loose RTV crumbs, and there was a decent amount caught in the screen of the oil pickup tube. Got rid of all that, and resealed with anaerobic. Last I heard, not a drop of oil anywhere. One of the very last things I did was change the spark plugs, and I almost had a meltdown because I thought the stuck spark plugs were cross-threaded, and I envisioned having to tear the whole thing down for helicoils in the head after all that work. So I took a break and read threads on here, and found that its pretty common for old plugs to feel like they are going to rip the threads out. I liked the technique of hosing them down with Breakfree and working them back and forth, 1/2 turn out, 1/4 turn back in, repeat slowly. The first spark plug took 10 minutes to ease out, no joking. No stripped threads! Thanks USMB! I went thru and labeled everything I unplugged on the way out, pulled the bad engine, dropped the new one in, and hooked everything up as before. Hit the key and it cranked but wouldn't fire up. I triple checked everything and couldn't find anything wrong, so I took a break and got a drink, and read threads on here. Turns out I somehow switched the fuel lines, like a dozen other people had on here. Corrected that, and hit the switch. VROOOOM. and clack-clack-clack. Luckily, I had already read about that, so I laughed, and in 20 minutes, the HLAs silenced themselves, like clockwork. Thanks USMB! It took a while to purge all the air from the coolant system, but I got it done, and now the engine runs cool, pulls hard, and doesn't leak a drop of anything. 1994 Legacy Wagon, resurrected. So as I enjoy my success, I wanted to thank the folks on here who help out and share their experience freely. It makes all the difference.
-
Need a car.... Putting out the feelers Seattle area
Corvid replied to skishop69's topic in Old Gen.: 80's GL/DL/XT/Loyales...
$650 legacy on mercer island via seattle craigslist today... -
I wanted to thank you for all your help on here, and ask if you have time to drop in on that original Maxima Alt Swap thread. I have questions about wiring that I can't get satisfactory answers to. Thanks.
-
The incoming engine is from an auto, but the car and the bad engine are manual, so I'm swapping the flywheel and throwing a new clutch on as well. My thoughts about pulling the intake were mostly based on disconnecting fuel lines on the car, as I'm annoyed by working with gas. The other thought was replacing the gaskets on the crossover waterpipe that sit beneath the intake. But if that's not something to worry about on a 100k EJ22, than there is no reason for me to make a bunch of extra work for myself. Thanks for the input.
-
Pretty staight forward question, I'm replacing a 1994 EJ22 with a 1994 EJ22. To my knowledge, neither has any intake problems. Should I disconnect the original intake and pull the engine with the intake still attached to the fuel lines and wiring, and just drop the fresh long block back in? Sorry if this has been addressed before, I searched some and didn't see it.
-
C&D Engine Performance 12417 NE 124th St. Kirkland WA 98034 425-821-7172 http://cdengines.com Chuck DeBois owns the shop, and I have only the best things to say about the work and the customer service. His website says that personal referrals are the basis of his business and I believe it. Also, I believe he does the machine work for All-Wheel Drive on the eastside...
-
I agree.
-
I'm in the midst of a bearings-up rebuild on an EA82. Overbore pistons, deves pistons rings, acl bearings all around, delta cams, mizpah rebuilt HLA's, all new everything consumable from the dealership, was carbed and I'm going to SPFI, plus paying an engine machine shop to inspect, helicoil, true, etc etc etc. Let me tell you what my opinion is from here out: The EA82 is worth rebuilding, as an educational experience. The engine itself is cheap and forgiving, and doing a full rebuild allows me to touch every aspect of the engine, so I have experience with fixing whatever comes up on these engines now. The rebuild has been pretty doable for me as a first timer, although rebuilding with good parts and no short cuts is expensive. When I get done, I don't expect this engine to have much if any real power over stock, and I don't expect to ever fully rebuild an EA82 again. I think people recommend to swap an EJ series engine when they hear conflicted messages. You can want to rebuild an EA82, or you can want to get a huge boost in performance over your current setup, but those are two different things.
-
So we got this repair done yesterday, and all in all it was pretty straight forward. We pulled the fans and radiator, and took down the V-belts and front end. Then broke off the square snout from my 3/8" drive ratchet, leaving it snapped off in the socket sitting on the crank bolt. Feeling a little dumb, I dug out they heavy box of 1/2" drive socket stuff, got a 3 foot cheater pipe from the neighbor and got the crank bolt off. With the belt covers off, there wasn't anything worse inside, that missing chunk from the picture is the worst of it. Money and time were a serious issue on this repair, so we didn't do the cam seals or oil pump, since nothing was leaking. It was the owners call. We got everything lined up, and pulled the belt, at which point the drivers side cam pulley jumped out of alignment. We took a lunch break for internet research, found 2 threads on here on the subject and realized we were fine, and realigned the cam by hand. The old toothed idler pulley sounded like a dry, beat up skateboard bearing. Scary. We took off the original factory water pump at 150k miles! Also scary. Then we found out that the Gates Kit water pump has a cardboard WP gasket. Should have expected that. No one that was open had a metal gasket, so we did more internet research and I put it in with anaerobic. WWGDD? Cleaned and installed new parts, marks on the belt made it easy, followed NOTCHES, never arrows. Reinstalled everything except the plastic diaper under the engine, and torqued the crank pulley bolt to 140 ft/lbs. Fired it up, sounds great, runs great. And the only thing we found when we dug in, was behind the passenger side rear timing cover, where it looks like it is slowly weeping oil, right between the block and the head...