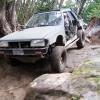
August 29, 201213 yr I'm not done yet, but thought I'd share what I've done. Last time I'll ever see it like this: I spray glued around the window and covered it with plastic to keep the mess to a minimum All prepped up: Started cutting: Started with the bed tops/gate opening Then the bumper subframe(the piece going across the bottom is what the new bumper will attach to) Welding it in: Then the sides and roof bar: Figuring out the tail light housing:
August 29, 201213 yr Author I used 2x4x3/16 wall tube for most of it, 1.5x1.5x3/16 in the outside corner and 14ga sheet for the tail light housings. I don't have turn signals yet, gotta wait till payday..
August 29, 201213 yr Looks freaking Awesome man!:headbang:zzz That's some beefy tubing:eek: Can't wait to see the finished product. Nice work. Jesse
August 29, 201213 yr awesome your going to like it, looks strong enuf to be a intrical roll bar, lookin at the pics makes me wanna chop up another wagon, maybe a Legacy this time Edited August 29, 201213 yr by Scott in Bellingham
August 29, 201213 yr Author Thanks guys! I used 3/16 because the bed frame will be part of a hybrid exo/subframe. I'm hoping to get the turn signals and reverse lights done this weekend, a tailgate, weld up some brackets for new mirrors(so I can go doorless) and hopefully get started on a removable divider to seal in the passenger compartment. Josh
August 29, 201213 yr Do you think the weight is about the same? Or will this be heavier in the end? Looks awesome, and strong as hell though!
August 29, 201213 yr Author My rear used to sag a little and now its higher than level compared to the front, so I'd say I've reduced weight on the back end. All the metal I bought only weighed 246 pounds and I haven't even used it all. I didn't get a weight of the cut off metal from the back end+glass+interior plastic and sound mat, but driving it feels lighter and not so dumpy on the back end.
August 29, 201213 yr damn! nice work. are you going to close it off from the cab like a mini truck bed?
August 30, 201213 yr Author damn! nice work. are you going to close it off from the cab like a mini truck bed? Yes. It will have a weather tight steel removable divider that will go up to the same height as the bed top. It will also have a piece of abrasion resistant acrylic that fills in everything above that, like the glass that was in the stock hatch. The new rear seats will be a custom "stow and go" and when folded down will be even with the bed. The idea being, I can run it sealed up in winter, take the window out in the summer, but still have a divider to keep cargo from sliding back and forth, or I can take both out for full ventilation or if I'm hauling something larger than what the bed can hold. The tailgate will be a swing-down design which will also help with hauling larger stuff, loading/unloading, or a place to sit and drink beer.
August 30, 201213 yr Author Dude that's awsome!! Makes me wanna do the same thing!! Thanks! feel free to copy me in every way if you like, your not gonna offend me.
August 30, 201213 yr Thanks! feel free to copy me in every way if you like, your not gonna offend me. thanks man! i was thinking last night what it kinda reminded me of, a HUMMER!! its the shorter length thouse awsome tires and the square look in the rear, pretty awsome! (not a big fan of the non army hummers though, chine cr**) PRWA AAE
August 31, 201213 yr are you gonna close it up? i saw a pic of one where they used the tail gate to enclose the back making a small bed as well
September 6, 201213 yr Author Got some more done: The tailgate pins are welded to the tailgate, so if I pull the tailgate, the pins stay with it The start of my divider, this is the removable section: Gonna fill in the sides soon, weld on some mounting tabs, and get the top sealed up with a piece of plexi. Theres also a rain channel at the bottom of the divider to keep water out. It drains just in front of the gas tank.
September 6, 201213 yr Very nicely executed! That could be one of the cleanest chop jobs I've ever seen! What you plan to do with the insides of the quarter panels?
September 6, 201213 yr Author Very nicely executed! That could be one of the cleanest chop jobs I've ever seen! What you plan to do with the insides of the quarter panels? Thanks! The inside quarter panels are getting removable panels so I can access wiring. Thats what I'm doing next with the material I have. When the bed is done, it will look like a normal truck bed, just a lot smaller. With the new tailgate, it almost sits level, which means I'm still lighter than before the bobb. Next pay check I'm getting a piece of plexi! Josh
September 8, 201213 yr seriously awesome work you have been doing. very very clean work. i can't wait to see the finished product!
October 24, 201213 yr Author Been a while since I updated, but I've still been welding away. Got the bed boxed in Added a little support using some grade B sch.80 1 1/2" pipe
October 24, 201213 yr Author Got a flange welded in the opening and a piece of plexi cut to get it all sealed in. Started finishing up missing welds like on the rear quarter panels. I had to bird turd some beads up to fill some bad fitting work, but it is a wheeler, it is getting covered in bed liner, and it is strong. What the interior looks like right now Edited October 24, 201213 yr by El Presidente
October 24, 201213 yr Author So far so good. Theres been some heavy rains around here the last couple weeks and other than a couple expected leaks, it all stays dry, even without a gasket for the plexi. I've got some final welds on the roof and c pillar to finish up, then the entire exterior will get covered in bedliner to seal up the fresh metal. Now that the rear is almost done I'm getting a better idea what the rear seats and center console will be like. I'm also giving some thought to cutting about 12"(from the front of the front bumper) off the front of the car. The radiator will go in the hood and vent straight up, so I can put whatever grill/panel I want an inch or two away from the belt cover as long as it is removable for service and engine removal. I've already talked with a radiator shop for a customized radiator and got headlight buckets and turn signals planned out. Thinking of going with 7" sealed beams...I might convert them to halogens later, but the sealed beam design is familiar, simple and easy to work with. Josh
October 25, 201213 yr That is serious! A 1,000 years from now that bed will still exsist! You got me thinking about doing something like this to my legacy. Well maybe after I smash the rear window out or roll it. Lol.

Please sign in to comment
You will be able to leave a comment after signing in
Sign In Now