TheLoyale
Members
-
Joined
-
Last visited
-
-
So unbeknownst to me until today, Photobucket has changed their Terms and now require a $400/per year fee to keep IMG codes active on 3rd party sites. There for, all Build threads and Write-ups I have made on the USMB (Including hundreds of other threads) will no longer have pictures. I will work on fixing this issue and restoring the threads the best I can so they can still be usable. So as always, stay tuned for more! -Tom
-
Any endevours for another SUBARU in the future?
-
So here is where we're at right now. Had a few decent days recently (Mostly Rain and cold though) But I did manage to get the new rear frame made up and 3/4 of the way welded up solid. So the Header is made from 3/16" C-Channel, the 3 welded nuts on the bottom are for the rear of the fuel tank to bolt to (Top 3 were a spacing mistake lol) That piece is fully welded to the original frame rail ends along with the cargo floor, I reinforced the area with angle iron and need to do a little more bulking up on the factory frame areas. The side rails where the bumper would originally bolt to are now made from 3/16" 5x3 tubing, The bumper will now mount to this, I am planning on using 2 lengths of 2x2 or 2x4 3/16 tubing to make the new mounted that are welded to the bumper, so they can slip into the new side rails and be bolt with 7/16" thru bolts (2 per side) The front most header is made from 3/16 5x2 tubing and tie the two rail ends together, this piece will be hidden with body skin/roll pan so it looks factory. I am also planning on making a few reinforcing areas for the inside corners of the rectangle, then I am planning on making a type of small tube skeleton for the floor (Where the Crash box used to be) which will also tie the front, back and sides together to make it ridge (Probably over kill, but just want to make sure it is strong) 3/16" holes for new bolts. I welded everything with a Fluxcore Lincoln 100HD (Gasless) so far it is doing the job. Once I finish the box and get the rear quarter panels and floor done, I can then focus on the roll pan area (Hoping to have a clean one cut off so I can easily match them up and weld it in place (Like I did with the Rocker/sill panels) As to why I want this new sub frame to be more solid and stronger than the original is for the fact there will be a hefty bumper mounted, along with a swingout and a 30" Spare tire. This is also a recovery point, so it must be strong, period. Cheers all and thanks for sticking with the build and updates -Tom
-
Installed an oil catch can which seems to have removed the smoking from deceleration and the PCV looks to be free of oil! Still need to make a bracket to fully mount it up and run full HPS Silicon hosing. On another note, I have made this UEL header with Mandrel bent 16ga 1.75" mild steel tubing, all welded up and mounted. Ordered some more tubing to make the 2.25" mid-pipe which will run to some type of Can style muffler, Looking at Apexi N1 or similar, 2.5 In and a 4" Out. Should sound pretty wicked. More updates to follow!
-
They could of offered AWD as an option as they did with their models till 94 (93 for Impreza) But the idea behind this car was to be a RWD N/A corner machine. For SUBARU it worked out, but I think the FT86 was a sad attempt to bring back the AE86 Corrola (Hachiroku) drift machine that Toyota was so strongly trying to reinvision.
-
Pulling Autotragics anytime isn't fun. I'll gladly pull an M/T Over A/T anyday; they weigh so much less.
-
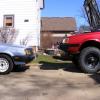
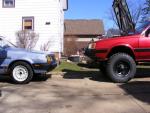
Time will tell. I'm hoping to at least have it mobile this year. Finished on the other hand, hmm... Good question mate! Tires are 30x9.5x15 with a 15x7 wheel with 4.5" Backspace (Same as Landcruiser) And close to factory Subaru.
-
-
-
This is pretty much what I used. Just a higher CFM. http://www.ebay.com/itm/12-Inch-12V-Universal-Slim-Fan-Push-Pull-Electric-Radiator-Cooling-Mount-Kit-/252239435344?hash=item3abaa45650:g:UMsAAOSw0HVWDN~U&vxp=mtr Cheers! -Tom
-
Spring Time Start! Runs like a beaut. Ordered $200 worth of exhaust tubing and a Merge Collector to finally make a proper UEL header. I'm going to revamp the entire exhaust system soon, never choice of muffler this time to remove the hollow can sound. Stay turned for an updated video; filled with Boxer splendor! <iframe width="560" height="315" src="https://www.youtube.com/embed/NI6CsPfae7k" frameborder="0" allowfullscreen></iframe>
-
Thanks man, yeah its been a long road and it'll probably only get longer. I'll be keen to see your GL and whats up with it! So this is where we're at now "I pushed away from the table and said, NO MORE CRASH BOX FOR ME MOM!" The idea is, I have removed the front and rear wall of the box and removed the frame rails (Where the original bumper mount was) I am going to replace the rear wall (Where the fuel tank captured nuts are) with 6" C-Channel about 46" long, then I am running new frame rails (5x3 1/8" tube) which will slip into the C-Channel and then weld it. Once both rails are in place, I will use another stick of 5x3 to which will be under the gate latch plate and will tie both rails together (In essence, making a rectangle box) no bumper mounting points will be added and it will be recessed just enough to allow a new roll pan to cover it up and appear Factory. Then it will be just a matter of finishing the rear quarter panels, and the rear flooring. Also need to finish making the front frame gussets and whatever else I may need to tidy up.
-
Stared at them and dreamt of the day when they are finished... :/
-