Search the Community
Showing results for tags 'Loyale 2.7 Turbo'.
-
 Hi Again! I Have the Idea (Maybe the Project) of Change all the Backlight Bulbs of at least one of my Wagon´s Dashboard, to H.I.D White L.E.D.s (High Intensity Discharge Light Emission Diodes) Have you seen those? They look like the White Ones on the Base-right of this Image: They´re so Bright!, not like Common Leds, so that´s Why they´re Called H.I.D. L.E.D.s. I have two in the Map lights at the Roof, but They Aren´t Extremly Bright, I think that if a Common Bulb do 5 Watts Output, those L.E.D.s may do only 7 Watts Output, but I´m not Sure... Why Change the Backlights? ... Well, both my Wagons got the Yellowish Backlight (Found on the early EA82´s), instead of the Greener backlight Found on the Newer ones, so, it looks Like it is Just the Direct Light of the Bulb, with no Tint at All... and the Dashboard is so Pretty for that illumination. :-\ This is how they Look: So, the seven Questions are: Did a Brighter Backlight illumination be Harmful? I think I can use the Dimmer lights on L.E.D.s, isn´t it? is Possible to Change all the Bulbs for those L.E.D.s? Are all of those Backlight Bulbs, the Same? What do you Think About? Have anyone Tried somethin´ like That before? Do you think the Dashboard will look Nicer with Brighter White Lights, or I will just make it look Uglier? Shall I use other color than White? Finally, I must say that those H.I.D. White L.E.D.s, Looks like a Standard Neon tube´s Light, Plain White, but Near to the Blue... Any opinions / Suggestions \ Ideas will be Wellcome! Thanx! ► Edited to add Tags, due to the New USMB's system.
 -
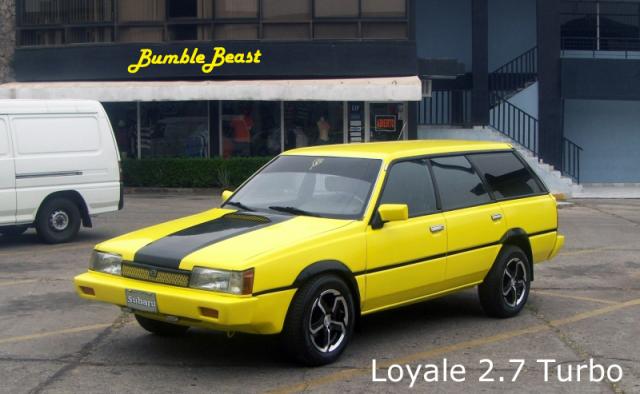
This Thread is a Continuation from This one ~► Here, which have more Background info of my Former White, Wagon. ______________________________________________________________________________________ My Dad Purchased This Subaru Wagon New from a Dealer in Hollywood, CA (USA) in 1985 and the Subie Came Runnin' new, from there to my Country, Honduras, at the caribbean central america... I Can't imagine any Better Way to Break New an Engine! This Subaru wagon is a GL and came with white paint, EA82 carburated engine and 5 speed manual transmission. Since child, I learned Automotive Mechanics with my Father, working in a 1969 Mercury coupé, a diesel Truck and this Subaru; With time I did all the maintenance on our cars and eventually this Subaru became mine; since then I started to modify it ... ... The Subaru ran Good for the First five Years, but then the Smog Stuff (Cathalytics, etc) got poisoned with the Leaded Gasoline (Here became available unleaded gas just until 1994) so we Removed both Cathalytic converters, the Carbon Canister, solenoids, hoses and everything related, even the EGR... This is a very old photo which I scanned: After hurricane mitch hitted and devastated our country in 1998 ( if you want to read statistics and see photos, click ~► Here ) a friend of my dad that owned a similar Wagon with a blown engine, sold it to my Dad as parts car; eventually we obtained the engine off from a wrecked Subaru Alcyone XT6 (ER27) and we managed to fit it on the former parts car, painted it on yellow and that was how we started the Project "Loyale 2.7 Turbo" and thus explains my Screen Name. That 2.7 Wagon lasted ten years, I had the Two Subarus, the White EA82 and the Yellow ER27 during that time. In the following photo, you can see them together: Despite that there were no place on engine's bay to put a normal Radiator on the 2.7 and it was running hot with a tiny pair of lateral radiators and electric fans, (You can read the complete details of such engine swap, ~► Here) the car worked, until it was wrecked in a huge frontal car crash, as you can read the details, ~► Here. Since I Lost my Dark yellow 2.7 wagon, I took some parts from it to Transform my Good Ol' White Weberized EA82 Subie onto a Much Better Machine, with the Best parts from the Two, and made many, many modifications to it. I still wanted to drive a Yellow Wagon, so I Choosed to paint my White Wagon in Yellow too, but with some Style Changes: ► I Used Brighter Yellow Paint for the Body and Deep Black Paint for Stripes! ► I "Shaved" the Subie's Body. (Paint thread ~► Here) ► Lifted it for medium duty offroading! ► Some minor Body Design Changes, ► and I made many, Modifications, Retrofittings & Swaps. Here in my Country, ALL the Taxis are White, and 85% are Wagons! ... ... So, My white wagon was Looking like a Taxi ... ... also I Really Love How those wagons Looks in Yellow; That was my Motivation to Change its Colour. Part of the Minor body Design Changes are, a sheetmetal Hood Scoop, which I name: the "InterFooler" ... ... the Original Idea was to Let the engine to Scream out Loudly thru the Weber Carb's throat during deep acceleration! ... ... Also I changed the Lug pattern redrilling the hubs to use Different Rims, and many, many more Modifications, which will be explained in this thread. After all that, my former white Weberized Wagon has been Renamed as: The "BUMBLE BEAST"

- 169 replies
-
- 6
-

-
- Loyale 2.7 Turbo
- Rear Park Brake
- (and 8 more)
-
Well... I Was Thinking that Usually in our Pictures, only Appears our Subies and other Things... But Not Us, the Ones Behind the Wheel! So Lets Share some Pics of Us! Kind Regards.
- 420 replies
-
- 7
-
-
- Loyale 2.7 Turbo
- JesZeK
- (and 8 more)
-
My 1969 Mercury Comet Sports Coupé, Today Reaches its first 40 Years of Non-Stop Work & Run History ... ... My Mercury has been Part of the Family since New, my Dad purchased it on Spring, 1969; and I came on it the day I was Born in 1975 ... After lots of Family Memories and Tons of Photos, Travels Videos, etc, Together; makes this MuscleCar to be a True Part of the Family, is somehow like my "Brother" ... I Named it "Herbie" when I was Child... so many Memories together makes this classic, Priceless! Now after 40 years and more than three full Turns (and counting) on the Odometer, it still Runs like a Champ! Here you can See "Herbie" next to my Former White Wagon, which Now is Modified and known as the "BumbleBeast" Here you can See "Herbie" parked outside the House, and my Former White Wagon, inside the Garage: Here you can see "Herbie" Parked in front of my yellow "Loyale 2.7" (Now Dead - Background Story here) Project Wagon: Engine Photo: Much More Photos in my USMB Photo Album: Here ~► http://www.ultimatesubaru.org/forum/user/13502-loyale-27-turbo/?tab=gallery I've upgraded it with Front Disc Brakes, a Brake Booster (Subaru, by the way), Chromed Engine Parts (Such as Head Cover, etc...), Under Body anti Rust Paint, Body Paint, a "Yamaha" Stereo, etc... Also I managed to "Made" (with the help of a Friend who owns a Metal Casting Factory), a Piece for the Engine: The Water Inlet (Where goes the Thermostat) is now Made of Thick Brass, instead the Weak one that Ford does (Made of Manganese?), which somehow trend to get destroyed after a couple of years of use. It Runs Great on its Manual Trans and Being just 250 Cui (4.1L) 6 Cyl. is economic to Drive for a Full Sized MuscleCar Coupe. I Just Wanted to Share our Celebration! Kind Regards. ►Edited to Update the Picture's Links and Web Links, due to the New USMB's System
-
Instead of cluttering a useful thread, I thought I would make another for a bit of information on these, http://puu.sh/bKmHR.jpg http://puu.sh/bKmJ3.jpg http://puu.sh/bKmIs.jpg http://puu.sh/bKmJQ.jpg Hydraulic lift suspension that sits on top of springs/shocks Both of the 1984 Leones I have (Wagon that I drive and spare sedan parts car) Have these on them. Note the really low spring perch mount, (Shock Subaru#21007GA280 made by SHOWA #90801) I presume the second # is SHOWA The pump sits in the left front guard http://puu.sh/bLIBV/af686db895.jpg Then seen through bumper http://puu.sh/bLIAX/b0b46e54ee.jpg Has a filler that bolts above and to left of radiator http://puu.sh/bLIBp/5ada10ac91.jpg Bolt on filler has a small air bleed hole in it. One line comes out of pump from here http://puu.sh/bLIzc/9f19657560.jpg Which runs to front left strut and splits off. So, if anyone has more information on these that would be cool, or questions that I might (not likely) be able to answer. No obvious marks on pump unit but i haven't had time to clean it down yet, so there may be. Cheers, Tom
-
My Wife wanted another car to keep as Backup, since the Series of Unfortunate Events that we faced with our Beloved Subaru "BumbleBeast" after the 7.3 degree Earthquake. I have another car, but my '69 coupé is at my parents' home, far away... I believe is a Good Idea to have a Backup Car, so if I need to Fix something on my "BumbleBeast" Subaru, there will be another car available to use, also She want to drive her own car sometimes ... ... So, we Found a LADM (Latin American Domestic Market) Specs Subaru Legacy Wagon... (1990) ...we have not seeing it yet, but by Phone we talked to the owner and he said it was owned by the Local Subaru Dealer's CEO, it is a Sporty Wagon in Dark Golden Champagne Colour with Luxury Rims, also they said that it was a Special Request for the Dealer's CEO to be "Sporty" and has some Upgrades, which they didn't explain Yet ... ... Little is Known about that Subie so Far, and we Expect to Meet the Sellers by the next Saturday, I Will Take Photos of that Subie (if they Allow me to do So) and I'll Post 'em Here. But while we meet, I Kindly Ask you for any Advice about that Model, any Idea, anything that might be a Must Check... any advice is Very Welcome! Kind Regards.
-
So, Subaru is doing a Limited Edition of the Subaru BRZ, in my kind of Yellow Colour, the "Sunrise Yellow" Have you seen it? Here's your newest Wallpaper! ... ...
- 5 replies
-
- 2
-
-
- YellowBRZ
- Limited Edition
- (and 4 more)
-
So, since I lost my Job after Fourteen Years, due to political reasons, (and I am Not a political person), I've been helping more people to Fix their Cars' problems, not only old-school Subarus, and as the Newer models has OBD / OBD II systems, I am really in Need to obtain a Good Scan Tool for these cars, because I don't want to bother a friend who has one, each time I need to use it. So, which one is considered as the "Best Option" balanced between price and usefulness? Somehow I am some sort of "Newbie" with this scan tools ... ... so please share with me your Knowledge, any advice will be greatly appreciated. Kind Regards.
-
My beloved Subaru "BumbleBeast" has been with me since New, from june 1985; I changed the Lug pattern on it since year 1996, from 4X140 to 4X114.3 to gain easy access to a more variety of Rims; I posted photos and more information regarding that, ~► Here. I choosed originally fifteen inches Rims, as they're easier to find Tires in many sizes, brands and styles; and their price is not high, so, I choosed this ones, which were Five Spokes 15" X 7" wheels, and 25" all-terrain tires: But after that, I never Liked too much their looks, because they were somehow "Too Much Bling-Bling" for my style and the offset wasn't perfect, they came a little to the outside ... Some months after I obtained them, I had financial problems, so I sold them, and obtained as Gift, the old ones from the Buyer's car, which are also 15" but beated steelies + half worn tires, out from a Hyundai Elantra, see: I decided to run my "BumbleBeast" like that for a while, because I planned to reunite enough money for a New set of 15" Rims with five spokes but all Black finish ... But suddenly I lost my Job, after fourteen years being there, due to political reasons, and I'm Not a political person... (Photo taken my last day at my ex-job's parking lot) So I had to stay with those ugly steelies for around a year so far ... But my Spare wheel is a 15" rim that came from a '93 Nissan 240SX, it is a lightweight aluminium, seven spoke Rim: These has the very Perfect offset (40) for the Subaru, and are somehow "age correct" for my "BumbleBeast" So, lately I've been Thinking about obtaining a Complete set of four Used rims from a 240SX, as I already have tested the one I have, and somehow its look grown on me... also used Rims are Cheap to obtain here, in Honduras, and I'm in "Low Budget Mode" If I obtain a set of four of those, I plan to: ► clean them, ► polish them, ► paint them, with Black powdercoat, so, let me Know what do you Think about that idea. Kind Regards.
-
Ideas on Swapping a Weber Carburetor on a Subaru EA82 Engine In this Writeup you'll find The Basics: ► A complete installation Guide. ► Solving problems untold by the Manuals. ► Jetting for the EA82 to be used between Sea Level and ~ 6500 Feet (2000 Mts) Altitude. ► Proper routing for the P.C.V. (Positive Crankcase Ventilation) System's Hoses. The Advanced: ► A much better Adapter Plate than the one designed for the EA82. ► What to do with the ASV, EGR, etc... The Optional: ► Installing an Oil Catch Can on the P.C.V. System. ► Distributor's Advance Modifications. ► intake Manifold Modifications. ► ignition Coil upgrade. ► Exhaust Piping Modifications. ► ...and Much More! Pay attention to the "Important Notes" Introduction: On early 2006 I Swapped a progressive Weber 32/36 Carburetor on my 1985 Subaru White Wagon (which isn't white anymore),, that swap job required more things to be done than what the Manual included with the kit, stated; so I'll explain here everything that is needed to successfully do the Swap, and I will add Photos describing all the problems I faced and the ideas I had to solve them; Hoping that this writeup will Help you to Swap a Weber carburetor on an EA82 Subaru engine, flawlessly. Many of the Ideas that I explain here, are also aplicable to the older Subaru EA81 engine as well, basically talking, almost everything except the adapter plate. REMEMBER: Use this Ideas at your Own Risk! First of All: the Redline-Weber K-731 Kit, which is designed to install a Weber carburetor on the Subaru EA82 carbureted Engines, came with the following items: A Progressive Weber 32/36 Carburetor, an Air Filter Box plus its element, a Throttle Cable Bracket, some Gaskets and a two plate Adapter, which consists on one Lower plate designed to be mounted directly to the intake manifold, and one Upper plate, designed to be mounted over said Lower plate; this last one receives the studs which are intended to Hold the Weber Carburetor in place; and needs the Gaskets inbetween ... Also this kit, comes with a bag with different screws and the studs. All the Weber carburetors that are Sold in the USA, comes with a sticker with a Statement that says something like: "For Racing -or Offroading- Purposes Only" due to Smog, pollution and other Legal Regulations which varies from State to State, so They're Not "Street Legal" on certain areas and that statement shall be placed on all brand new Weber Carburetors, due to said Legal Regulations; so you must be sure that you are legally allowed to do this Swap on the Area where you Live, prior to start. Determining which type of Weber carburetor you do Need There are many different Weber Carburetors' Designs on the market, however the two models used more often on Subaru Engines, are those who features two Barrels. (Forget about using a single barrel carburetor on these Subaru engines, simply it doesn't worth the effort.) Basically talking, there are two variations of the two barrel design on Weber Carburetors, that works good with these Subaru engines, one design is known as the Progressive Models (being the most popular, the 32/36 DEGV) and the other design is known as the Synchronous Models (being the most popular, the 38/38 DGAS). Each of the two barrels, has its own butterfly that opens / closes according to the Throttle position; if you want to be Sure which model you do have, just take a look at the Linkage that opens the butterflies between both Barrels, it is located behind the throttle plate: If Both Butterflies on both barrels, opens at the same time, always when the throttle position moves, it is a Synchronous Weber (like the 38/38 DGAS); But if one barrel's butterfly starts to open only after the other one have already reached the half way open, then it is a Progressive Weber. (like the 32/36 DEGV). The Synchronous Webers, like the 38/38, are used mainly for Racing purposes due to the Higher Fuel usage (Both identical barrels works / opens at the Same Time, all the time), and thus means that if you use a Car with such kind of carburetor as daily driver / commuter, it will become a Gas guzzler. The Progressive Webers, like the 32/36, are used for all mixed driving needs, as you commute using only one barrel which is known as the Primary -Low- Stage (usually with a Smaller Jetting); and the other barrel, which is known as the Secondary -High- Stage (usually with a Bigger Jetting) is only in use during deep accelerations, so you have the Best Balance between Power and Fuel Consumption. I chose a Progressive 32/36 Weber carburetor, which is, in my own humble opinion, the best option in Carburetor that you can choose for this retrofitting job; however this writeup is still applicable, if you have a synchronous Weber. That been said, lets Begin to explain the Problems I Faced during the Swap Job, and How I Solved them. ~► First Problem: The Lousy Adapter Plate. As I stated above, the K-731 kit that I obtained from Redline Weber, came with a Lousy Adapter, conformed by two separate Plates, Lower plate and Upper plate, each one has its own flaws ... ... The Lower Plate needs four screws to be Held properly in place, directly bolted to the intake manifold; each screw has a cone shaped, flat top head, whose angle is approximately 60° and is designed to fit on the also cone-shaped seats of the plate's openings; the matching angles holds that plate in place. Then comes the Upper plate, which goes directly bolted to the Lower plate; finally, the Weber carburetor mounts on that Upper Plate. The Flaws of the two-Plate adapter: While the weak thin walls on the threaded openings for the Studs, is the main flaw on the Upper plate, (Look for further information and photos regarding the Upper plate, on the following post of this writeup); the way to bolt the Lower plate to the intake, is another flaw, let me explain: The Redline-Weber K-731 kit came with two different sets of screws provided to bolt the Lower Plate of the adapter, to the intake manifold; one set of four silver screws, comes with the appropriate size and pitch for the Subaru EA82 intake manifold's threads (6 mm ~ 1/4"), but the heads of those thin screws are very small, around the half size of the cone shaped seats on the lower adapter plate. The other set of four black Screws provided, are thicker (8 mm ~ 5/16") and their heads fills completely the cone shaped seats on the lower adapter plate; but their thread and pitch are big and do not fit on the intake manifold's threads. Here you can see a comparison photo, of one of the silver 6 mm screws (I call it "Subaru Standard" screw) provided, next to one of the black 8 mm screws (I call it "Weber Special" screw) provided, for the same Lower plate: (sorry for my Cheapo Cellphone's camera photo) It is impossible to bolt in a ►"safe"◄ way, the Lower plate to the intake Manifold using the thinner 6 mm screws provided; but I bet that they included both sets, in order to let the unexperienced or Lazy mechanics / owners, to swap the carb fast and easy. Those tiny silver screws will make the first plate to get Loose, developing vacuum leaks sooner or later, because their small size, makes the screws to have enough room inside the plate's opening, to move and slowly unscrew, from the engine's inherent vibrations; it's only a matter of time. Also the tiny silver screws only covers half of the seat, on the openings of the lower plate, making a weak union. I already faced a vacuum leak: I was unexperienced when I did my first Weber swap, years ago, and I used the tiny silver screws as they matched the threaded openings on the intake manifold... it developed a Vacuum Leak between the intake and the lower plate, in less than a couple of months, despite that it was bolted tight, using a shellac smeared gasket. After that vacuum leak, I removed the intake manifold to check the install, and then I understood the reason why they put a second set of screws by seeing how loose the Lower plate became with the tiny silver screws... I decided to use the Bigger diameter black Screws, instead. In the Photo Below, you can see how the Heads of the silver 6 mm (~1/4") screws, doesn't fit properly on the cone shaped seats of the lower plate adaptor; they only covers the half from the cone seat and their heads doesn't fill completely the space of the opening in that plate. Next to it, you can see how the Heads of the black 8 mm (~5/16") screws, really fits perfectly there, they sits on the whole cone shaped base, while filling completely the opening, giving a much safer flush mount, which prevents the screws from getting loose with time and vibrations, as they doesn't have space for moving, because the Upper plate will be placed over them. So, some modifying job to the intake manifold is required for sure, if you want reliabilty: to drill and tap it, re-threading the intake manifold's threads to match the size of the bigger black screws provided, in order to use them to bolt the Lower plate properly, and firmly in place. To make those Bigger diameter black screws to fit, You will need to Drill and tap new Bigger Threads to the intake manifold, but Be Careful when doing that: The intake manifold is also a coolant crossover, so you must take the proper depth measurements to avoid drilling onto a water passage. I Kindly Suggest you to remove the whole intake manifold from the Engine, prior to do the rethreading. Here you can see how the intake Manifold originally was, right after removing the old Craptachi carb and gasket, just before removing it from the Engine: I took off the whole intake manifold to Drill the New Oversized Threads From 6 mm (~ 1/4") to about 8 mm (~ 5/16") Also I Sent the intake manifold to a Machine shop, to polish the flatness of the Carb's base: Here, you can see how the Bigger black screws Now fits perfectly there: Then, I Washed clean the intake manifold using Household Detergents, to remove any debris Important note: I kindly suggest you, that the inbetween gaskets should be placed Smeared (the two faces) with a thin layer of Shellac, because shellac is Coolant / Oil \ Gasoline Resistant (more info on Shellac ~►Here) other gasket makers will fail in that place; the idea is to avoid any kind of Vacuum leaks. ~► Second Problem: To Seal the (Now Unused) Water Passage for the Old Craptachi Carb. If this procedure is not done right, the cooling system will spill coolant on the intake manifold, right to the carb's base opening, so be Careful! My first solution was to place the Gasket completely smeared with Shellac over that water opening, and also I cut in half the tiny Hose which supplies coolant for that Passage, and cap closed both ends of said hose, using screws and clamps... That lazy solution worked fine for five years, but you must consider that there is still a coolant flow inside the water crossover of the intake manifold; so there still will be coolant flowing on that Area, even without said hose. You might use Cold Welding Compound such like the 4 minutes "JB Weld" to fill close that opening ... as I wrote, I ran my subie for years with only a Shellac smeared gasket and a removed hose without problems, but that setup was about to Fail after five years. Continue reading, in further posts of this writeup I will show you another Idea which is a definitive and permanent solution for this problem. After placing the Gasket, smeared with Shellac on both sides, inbetween the intake and the first plate, I bolted it there: (Notice the Bigger Screws and how their Heads fills the Plate's openings) Then, the Upper plate went over that first one, Also with a gasket smeared with Shellac on both sides, inbetween: And Then you can place the Weber Carburetor. ~► Third Problem: Power Steering Equiped Models. If your EA82 engined Subaru, has a Power Steering Pump, the Choke's Spring mechanism on the Weber Carb, will hit the Power Steering Pump's reservoir ... ... and even removing the Choke's Spring, the base for the said spring, impacts the bolt's head at the back of the power steering pump. (Here, the Choke spring was already Removed from the Weber Carburetor) At the Caribbean Tropics of Honduras, we don't need the choke too much, so... ► My first solution was to Remove the Choke's Spring, but it wasn't enough: also I had to cut Half of the head from one of the Steering Pump's Rear Bolts, to prevent the Base for said choke's spring from hitting it. ► A second Solution consist in, besides from removing the above mentioned Spring, to Completely Remove its Base from the Carb, along the choke's Butterflies (or choke plates), so you don't need to cut nothing. ► A third solution done by other persons, is to install the Weber Backwards, with the Choke facing the windshield instead to the front; it is doable, but in my own humble opinion, it might lead to another complex set of Problems. You can see photos and read further, in this example: ~► http://www.ultimatesubaru.org/forum/topic/156836-installing-weber-3236-backwards/ ► After lots of Research, I found a fourth and definitive Solution, which is easier than all the others. Continue reading, because in the next posts Nº 2 and 3 of this writeup I'll explain with details this better Solution ... ... which does Not require to modify, to cut nor to remove anything, so you can keep the Weber carburetor with a working Choke on the Models that features Power Steering, as easy and simple as install and go. Hooking properly the Accelerator Cable I installed on the Weber Carb, the throttle's Cable Plate Taken From the old Craptachi carb... ...Plus the part of it that works with the Air Conditioner Accelerator Actuator, which with a simple twist on its metal plate (due to the new carb's different angle) I managed to made it work good. The K-731 kit from Redline-Weber, also includes a Bracket to hold the Accelerator's Cable in Place, you must install it Carefully without Bending it, on the two rear screws that holds the Carburetor, on the Adapter plate; and you'll notice that the Accelerator's Pedal really covers the complete Acceleration Travel on the Weber Carburetor. In case said Bracket is bent Towards the Carburetor, the accelerator's Pedal will never get the Full Acceleration from the Carburetor because the Cable doesn't go Back enough to fully Open the Secondary -High- stage; in that case you'll need to bend it back; but Never do it when it is installed, it could damage the Adapter Plates; so take the Bracket out and bend it there. Once the Bracket is properly set, the accelerator pedal provides full travel for the accelerator on the Weber carburetor. So, the Intake Manifold + the twin Adapter Plates + the 32/36 progressive Weber Carburetor + the accelerator cable's Bracket behind, ended looking in this Way: (Yes: Those are my dirty Hands) Once installed, the EA82 Engine started at the Very First Try and Purred like a Kitten... a Boxer Kitten! ... ... you know. The Weber carb reveals somehow the Hiding potencial of the engine, and the Boxer Rumble Sound of the Carburated EA82's at its Best! ... ... While lets you Clean the crowded engine bay, removing lots of unused smog stuff. It is a Win-Win Deal for sure. I Noticed a Huge Improvement inmediately! ... Summarized in a quicker Engine Response and Faster Acceleration, smoother Idle and a really noticeable Better Low end torque. Fuel Consumption remains close to the Stock Specs ... (if you drive carefully) ... but the Weber swap could make you to want to keep the gas pedal floored ... ... in that case, fuel consumption will increase for sure
- 10 replies
-
- 2
-
-
- Carburetor
- Adapter Plate
- (and 8 more)
-
Hi All !!! I use to Drive too much during Night Times, sometimes during huge Rainstorms. To drive on the Roads at Night's Deeps can be Dangerous due to the many problems we got on our Developin' country, like Huge Potholes on the Roads, not enough Signals, Some Roads are just Ground (no Pavement at all) and many beasts (Like Cows, Horses, Donkeys, and Drunk Drivers) are ussually Crossing the Roads very fast without any care... (Yes, Honduras is called "The Alice Country" due to its "Wonderland" Features ) ...so, a Good Light Beam is Really Necessary here, to reach your destination alive. Sometime ago I've posted about Changin' the 9004 Halogen Bulbs (Ussually 45 Watts Low / 65 Watts High - Wider Range) with 9104 Bulbs (80 W Low / 100 W High - Larger Range) See this comparison Photo for Reference: But they became scarce here, as many Good Quality Parts... now only low quality chinese parts are widely avaliable. So, this is the Light Pattern I have on my Subie, using: ► the Headlamps on Low: ► the Headlamps on High: ► High Beams + the Under Bumper Halogens: So, You clearly notice that the Under Bumper Halogens are Much More Brighter than the Headlamps. I use Flösser 100 Watts Bulbs on the Under Bumper Halogens, also the HeadLamps' bulbs are suppossed to be rated at the same 100 Watts too... but Under Bumper ones are really Much Brighter, big Difference. I've Already Checked the Connectios, Relays, etc ... every single Thing is just Fine, so I think that those 9104 Bulbs (or 9004) aren't really Enough for those huge Headlamps ... I don't Like that the Under Bumper Small Halogens gives me the only "Good Visibility" for the Road, as the main HeadLamps are weak. But that seems to be normal on those 9004 / 9104 Headlamps if you Compare their Brightness with Modern Standards, even with the more common H4 halogen bulbs. By the way, the Later EA82 Subarus, featured H4 Halogen bulbs instead the lousy 9004, also their headlamps' Housing is Plastic, despite of keeping the Glass lense; but that is in our LADM (Latin American Domestic Market) Specs Subarus, those were not offered in USDM. Let me show ya: But to Swap my 9004 Headlamps with H4 Headlamps, is very expensive. So: Time to Upgrade to H.I.D.'s ? I Don't wanna Hurt anybody's eyes with Extra Illumination Power on the Main HeadLamps, so if I go H.I.D, I'll Adjust 'em to the Best; I think I Really Need that Extra Power, for Safety. So, here goes the Questions: ► If I Will Do the H.I.D. Conversion, Which Kind of Light Colour is Better? I Really Dislike Blue Coloured Light, 'cos it Seems to be "Absorved" by the Wet Pavement... Too Dark to be Safe, so: 6500K, 8000K? ► Here in the Market are easier to Find 6000K Kits ... They seems to be not too Blue, around "White" ... What do you Think about? ► If I Do the Conversion, I Will Need more Space to Place the Ballasts, so the Overfill Plastic Tank for the Radiator, Should be Moved... Any Advice? Any other Idea / Suggestion \ Advice is Welcome! Thank you, Kind Regards & Blessings.
-
Suspension Improvements For the third Gen Subaru Leone (also known as: DL, GL, GL-10, RX, RS, GT, GTi, ST, Omega, Winner, Loyale Royale, Vortex and even as Isuzu Gemminett II, depending on the Market, but here will be referred to, as the "EA82" for easy reference.) However, since the Second Gen Subaru Leone (EA81 / Brat) uses the same diameter and tall coil springs on the Front, being different on their spring rate and load rates only; you can use the third gen Leone's (EA82) coil springs on the second gen Leones (EA81), also you can use the Alternative coil springs from another automotive makes, which I mention here, on the second gen Leones, but their suspension could get way too stiff and might need a small cut off on the coil spring's wire, to work. Remember: going too weak or too stiff on the suspension on any car, could make you loose control of it, mainly on irregular terrains, so this could be Dangerous if you don't know what you're doing. Disclaimer: Use this information, and All the information I post, at your own Risk! Introduction: Please note that this writeup is intended to give you ideas to make stronger the Suspension, intended for rude use / offroad \ heavy loads; it gains a Sporty feeling, but the suspension could become harder, Stiffer. The modifications written here, has been tested with great results on the third gen Leone (EA82) Wagon only. My dad purchased this 1985 Subaru Wagon EA82 new that year; I've done regular maintenance and lots of repairs on it since then; when this subie became mine, I did many modifications and named it: the "BumbleBeast" I've Been part of this Great Club since year 2001 and I've Learned a Lot (mainly here, in this Awesome Website) about how to fix and improve many Things, but I personally have Discovered by myself, many other things about those older subie Models, things which I've Shared here with you, like the following suspension ideas... Let's begin! In this Writeup: ► Shock Absorbers and Coil Springs. ► Alternative ones from non-Subaru cars. ► Their part numbers. ► Photos. First Part: modifying the Suspension with other cars' Parts: About The REAR Suspension: In my own humble opinion, the subaru's weakest suspension part is the Rear shock absorbers; no matter how careful I drive, if I hit a pothole with some Load on the car, is almost sure that a Rear shock absorber will say Good Bye... Those are somehow, the "Achilles Heel" of the Subie: The trail arms, of the front wheel drive (2WD) Subarus, have a different mounting point (perch) for the Shock Absorbers than their four wheel drive (AWD) counterparts, as you can see in the following photos: The 2WD ones mounts the shock absorbers in the position where normally goes the constant velocity joint (Axle)... ...while 4WD ones have the said mounting point, raised, two inches higher on their trail arms, to let the axle pass. So, Subaru made two different Rear Shock Absorbers for the EA82: The Front wheel drive (2WD) Models' Shock Absorbers, has the base plate for the coil spring, welded to their bodies, two inches (2") Higher than the four wheel drive (AWD) ones, to compensate the lower mounting point (perch) on the trail arm; and both models use Same Coil Spring. 2WD .Vs. 4WD ► Using a 2WD shock absorber, on a 4WD subie, will lift the rear, due to the Higher position of the Coil spring's base. Then Subaru Suddenly changed the Production of those two, for one "Universal" Rear Shock absorber, which featured Adjustable Base for the Coil Springs, so you can place said base Up or Down (2" of Difference) and also included a "Middle" (1") Position; Despite the Coil Spring's Base position, the Total damper travel of those "Universal" Subaru Rear Shock absorbers, is 160 mm / 6.3" inches. Here is a Photo of said "Universal" Rear Shock Absorber, with Part Number and KYB equivalence: The Subaru Part Number for the Spring Coil's Base (seat) is: 21025GA230 But those Rear Shock Absorbers are Still Weak to handle our Horrid Roads, plenty of Potholes -and even Potholes inside the Potholes- with my Loaded Subaru "BumbleBeast", especially during my Usual offroad Weekend Mountain Travels; and I wanted my Subie to be Taller without a Lift kit in the Rear. Chapter 1: How to Improve the Rear Suspension: First I Needed Stronger Coil Springs for the Rear of my Wagon, because Usually I Travel with it Fully Loaded and many people in our very Bad Roads; also I do many Weekend "Mountain Adventure" Family Travels offroading; so, let me explain my own Method for searching and finding suitable replacements: I took off one of the Old Rear coil springs in order to take measurements of it with my vernier scale (Caliper Tool known here as "Pie de Rey" = King's Foot), and then I carried it as a Sample for comparison purposes, to the local Junk Yards; then I searched, and searched for suitable replacements, among piles of coil springs and strut assemblies, found on many different local Junk Yards, called here "Yonkers" as you can see in the following photo: Honduran “Yonkers” are different from the regular “PaP” (pull a Part) or any other USA version of a Junk Yard; they receive the cars and disassemble everything; sending the unuseful things such like crashed metallic bodies and cracked plastics to the Recyclers; and then they classifies everything in “Areas” so, you can find in a Latin American “Yónker”, one area dedicated solely to Doors, other area dedicated to Engines, other areas for Starters, Alternators, Seats, Headlamps, Struts, Mirrors, Transmissions, etc, etc, etc, let me share with you a photo of a typical Latin American “Yonker” (Junk Yard): I went there carrying my Vernier Scale and made annotations of the Measurements found on the Coil Springs that could be suitable replacements; then I came home, contrasted those measurements and researched online further information regarding those coil springs that I found to be as possible candidates; because they don't only need to have similar size and shapes; they must be of similar capabilities. The variables that I compare, are their Measurements, Spring Rates, Load Rates and Wire Diameters, to find the perfect ones for the application. I wanted taller coil springs with similar diameter and shape, but with increased load rate / spring rate, under certain margin, because you can not go too stiff nor too soft on them, otherwise the stability and safety of the car would get compromised. So after many search and research, I found that the Subie's Rear Coil Springs are almost the Same Size, Tall and Wide than the Honda Accord's Front Coil Springs (1986 ~ 1989) but the Honda ones have Thicker wire and it has Two More Turns than the Subie ones; so I Swapped the Rear Subaru Coil Springs with the Honda Front ones; it Makes the Subie More Capable to Manage the extra Weight when is Loaded, without going too low; also the Honda's Coil Springs does Lift the Subaru's Rear in two inches (2") and its Movement & Handling while Driving in Unpavemented Roads / Pot Holes, becomes Firmer and Sportier. So they gets rid from the Bouncing and Saggy Butt. The Front Honda's Coil Springs that Fits on the Subaru's Rear, came from the 1986 ~ 1989 Honda Accord, (The Prelude from that Era has them too) it could come either from the Manual or Automatic, With or Without A/C, but Keep in mind that the Hondas with manual trans and without AC, does have weaker Coil Springs than the Hondas with Auto Trans and A/C, so I chose the Stiffer ones. The Part Number for the Honda's Coil Springs, is: ~► MOOG CC248 for "Moog" Brand. ~► NCP 2775298 for "Napa" Brand. So, How to get Rid of those weak Rear Shock Absorbers? My Subie was in dire need of Stronger Rear Shock Absorbers, so after Searchin' and Researchin' a Lot using "my own method" that I explained above, I Found This permanent and simple Solution: To Swap the Toyota 4Runner's Front Shock Absorbers in the Place of the Subaru's Rear ones! (Despite that this two photos says: "Subaru 4WD" the shock absorber shown on them, are "Subaru 2WD" the ones with taller spring perch. Sorry, that was an involuntary mistake while editing the photos on a hard day's late night...) As you can See in these Photos, the Toyota ones has the Same extended Tallness than the Subaru Ones; Also the Toyota ones has the Same Wide Base for the Coil Spring and they use almost the Same Design; But the Toyota Ones are Thicker and Heavier, have a thicker bar, they're more Capable to manage the Stress of Riding in my Crazy Country Roads, especially for offroading with a Fully Loaded Subaru Wagon. (Subaru 2WD shock absorbers shown on this photo) The Subie Ones had their Threaded top of Nº 10 mm and the Hole opening on their Base is for a Nº 10 mm Screw; While the 4Runner ones has them Nº 12 mm Screws; So the Subie's Nut on the Base for Nº 10 mm Screw had to be Removed in order to Use a Pass-Thru Nº 12 mm Screw with its own Nut and locking washer. The Subie's Part for the Shock Absorber's Top shall be Modified too, in order to Accept the Nº 12 mm Screw Size instead the Older Nº 10 mm One, I Just made the Hole Larger; pretty easy! For Those who want the 4Runner's Shock Absorber Part Number, it is: ~► KYB 341232 in KYB (Kayaba) Japanese Brand The salesman from the Aftermarket parts store where I purchased those KYB 341232 Shock absorbers, said that those are for the Front of a Toyota 4Runner for the 1998 model year; However, Toyota used the same platform and shared these shock absorbers in the Hi-Lux Surf, and the Land Cruiser Prado / Colorado (J90) Which is a very Popular car here, in LADM (Latin American Domestic Market). The Following is a Screen Caption of a website that I Saved long time ago, where you can find the Original Toyota's Part Numbers for their OEM Shock Absorbers... According to online databases, it does interchange with: ~► Monroe D8344 ~► Sachs 230631 ~► BOGE 27-D67-A I Tested the KYB 341232 only, any other Toyota Shock Absorber could be "Visually" Identical, but might have some differences, such like even shorter travel, Harder ride, Thicker Body, etc ... So I Kindly suggest you to Stick to the KYB Part Number I Provided, I can not guarantee to work the other ones... My Subaru "BumbleBeast" Runs very well with that Setup: Toyota Shock Absorbers + Honda Coil Springs in the Rear, since many, many years ago... ...despite that they has only 4.3" of total damper Travel. (as I wrote above, the Subaru rear Shock Absorbers has 6.3") But that shorter travel is not an issue, because the Coil Springs won't let it go down more than 4" under compression, and the total expanded -extended- lenght is Equal to the Subaru's ones, as you can see in the photos above. In case you need to do a Rear Alignment on these Subaru Models, here is the Factory Guide about how to do that: ► IMPORTANT NOTE: You can use the 4Runner's shocks along with the subaru coil springs, to keep the original height of the suspension. If you use the Honda coil springs, the rear suspension will be lifted two inches (2"), stressing the angle of the rear axles in 4WD (AWD) models only. (You might drop the rear differential a little to compensate the lift) The 2WD (FWD) models doesn't have any problem with that configuration. ► LEVELING ISSUE: Since Those front Honda Coil Springs does Lift the Subaru's Rear two inches (2"); after that Swap, I had to Lift the front of my "BumbleBeast" an equal amount to compensate, using lift blocks, as you can read the complete information and see many photos about that, ~► Here, but also, below you'll see a photo of said lift blocks already installed. About The FRONT Suspension: The 4WD (AWD) Shock Absorbers has a 5.75" / 147 mm in Total damper travel, While 2WD (FWD) Shock Absorbers has a 6.12" / 155 mm in Total damper travel. Since I couldn't find any 2WD (FWD) Shock absorbers locally, I installed into my "BumbleBeast", new Monroe Front Shock Absorbers for the XT; this are their part Numbers: Passenger Side: ~► 71876 .................Driver Side: ~► 71877 Chapter 2: How to Improve the Front Suspension: Next, I wanted to install Firmer Coil Springs for the Front of my Subaru, as I already did on the Rear, to have equal balance of handling and sportier feeling (Harder / sportier Suspension). Initially, I searched for stiffer Coil Springs for the Front of this models of Subaru, on year 1999; Because my 2.7 Wagon (now dead) Project, had the Heavyweighed ER27 engine, plus a Fiberglass & Metal sheet Reinforced Front Bumper; I Needed Something Stronger than the EA82's coil Springs to better carry that extra weight. So, using "my own method" which I described with details above; I Found that a suitable replacement are the front coil springs from a Ford Tempo; which looked pretty similar to the Subaru ones, but having around two more Turns and a thicker wire. I found those Tempo Coil springs on year 1999, already taken outside their car; (they only had a Mark done with white paint marker on them, that said: '94 Tempo) and originally I used them on my Loyale 2.7 wagon project; but since it is dead (More info, ~► Here) I decided to remove certain parts from it to make my EA82 Weberized Wagon (Now renamed as the BumbleBeast) a Better car, with the Better parts from the two; including the front Tempo coil Springs. So, I installed those Tempo's Coil Springs on the front of my "BumbleBeast" and those add to the Front Suspension the Same Firm & Sporty Feeling that the Rear suspension obtained with the Above written Modifications. ► IMPORTANT NOTE: The Ford Tempo Coil Spring's total radius -diameter- is Half inch (½") smaller than the Subaru ones, but that is Not a problem, I Drive my Subaru "BumbleBeast" with them since Years ago and they doesn't "Shift" nor make any clunk noise. Somehow these front coil springs from the Ford Tempo, aids to keep the Camber / alignment within specs; other coil springs that has been tested on the front of these Subarus, makes the camber to be even Worse... Further information on the subject, photos and even a Video can be found, ~► Here. (thank you Bryan Dudas / Subaru Adventures \ Anderson Design and Fabrication, for your kind words) According to the info I obtained back then from the Junk Yard's salesman, the Front coil Springs came off a basic 1990's "Second Gen" Ford Tempo with in-line 4 Cylinder engine and manual transmission; Those are "Non-Progressive" Coils, so they measure the Same between each turn. I searched on internet for The Part Number for those Ford Tempo Front Coil Springs, So those should be: ~► MOOG CC854 for "Moog" Brand. ~► NCP 2775375 for "Napa" Brand. These are the Lift Blocks I had to use in the Front, to compensate the Rear Lift, as I explained in the "Leveling issue" note, written above: ► IMPORTANT NOTE: The Ford Tempo Coil Springs I used, came out from a used 4 cylinder Tempo, so they were used and not as Stiff as brand New coil Springs, so I didn't had any fitment problems nor had to trim them; but People who has brought those Coil Springs brand new, had to Trim them up to 1.5 Turns, especially the Moog CC856 because those are "Progressive" which means that they has different spaces between coils and they're intended for heavier V6 Automatic Tempos, and are even Stiffer than the Moog CC854 I Used, so I don't recommend to use those uncut, they might be too stiff for the Subaru. Also, I found that the Front Coil Springs from the Kia Sephia (first and second generation), are almost identical to the front coil springs on the Subaru Loyale; but the Kia Sephia ones have a thicker wire (around 2 mm) and the Sephia ones have a slightly bigger total radius, but they fit on the Subaru's shock absorbers; and the Sephia ones have an increased load capabilities. Let me Show you: They're almost identical, here are the Sephia's ones, Load Capabilities: Even the first gen Sephia, has an increased load ratio than the second gen Sephia. The ideas in this writeup are for those who are interested in Improving the Suspension of their Subies (Specially for Off-Roading), let me Tell you again that this Mods are intended for a More Rude Use and Longer Lasting Parts; not for Confort; so be adviced that the Ride will become Harder, with the stiffer suspension. Despite that, I use my lifted Subaru "BumbleBeast" as daily driver on city roads & Highways during weekdays (60% usage) and offroading on Weekends (40% usage) on our usual "Mountain Adventure" travels with my Family + Luggage, toys, food, etc... ...to Drive my Modified Subie with those 4Runner Shock Absorbers + Accord's Coil Springs in the Rear, and the Subaru XT Shock Absorbers + the Tempo's Coil Springs in the Front, Changes the Handling & Feeling of the Subie in the same way you'll notice while Driving a Police Car after being Driving the Civil Version of it before. I've Test Drove it Unloaded and Loaded, up to 160 KPH (100 MPH) in Highways... ...Bad Pavemented Roads and gravel off roads... ...and it Feels Really AWESOME! ... ... but rides Pretty Hard to be a "Family Wagon" anymore. Please see further details on the Second Part of this Writeup, below!
- 1 reply
-
- 17
-
-
- Struts
- Loyale 2.7 Turbo
- (and 8 more)
-
Long time ago (as you can see the Background Story ~► Here in a Short thread), I wanted to do a Li'l Front Lift of 2" to level the front of my "BumbleBeast" because with my Suspension Mods (Which can be seen ~► Here) it gained two inches of lift in the Rear... Back then I Couldn't buy the 2" Lifting kit because Paypal Didn't Had Honduras in their List (Four Years Ago) But Now, that story is about tho Change... I Really Need to Lift Two inches (2") the Front to Level my "BumbleBeast", but Without Loosing the Safety and proper Camber / Caster, also I Want to Keep the Axles' angle the more Straight Possible, So, I Believe that a Pair of 2" Blocks at 15º for the Front Struts, plus Dropping the Engine Crossmember 1" will do that, isn't it? I am Kindly Asking your Advice, Because I Really Need to do a 2" Front Lift but as Cheaper and Easier as it could be, without Sacrificing the Subie's Safety + Alignment. Please, Help me... Any Advice will be very Welcome! Kind Regards. ► Edited to add the Tags for the New USMB Search System.
-
Subaru Gives A List Of Names For Its Tribeca Replacement: ~► http://www.subienews.com/2015/06/whats-in-a-name-subaru-give-a-list-of-names-for-its-tribeca-replacement-we-pick-a-winner/ Somehow I'm one of those persons that like to see Cars' Names that continue Living, despite that the model Changes a Lot with ages; Names such like Corolla, Mustang, Skyline, etc... has been for decades among us, Subaru used to have a "Legendary" name with the Leone and it was a shame that they Discontinued its Use; now seems that the same will happen with the Tribeca, according to the information given on the link above... What do you think about that? ... Kind Regards.
-
Appreciated Fellows, Today, I was driving my beloved Subaru "BumbleBeast" doing my usual daily errands, when I noticed that the GearBox was noisier than it used to be; despite that somehow it always has been noisy when I left the gas pedal only; but now, besides that such described noise is louder, it also developed a New noise that sounded like a fast little gear, almost similar to a turbo whistle, but coming from inside the GearBox; that fast pitch noise is mainly noticeable during acceleration on Second Gear. So, I came home to lunch, and right after that, when the Drivetrain cooled down, I went to check the dipstick on the GearBox, and it came out dripping dark fluid, it showed oil up to the full mark, then such oil was covered with something that seemed to be Water, whose mark went up more than Twice on the Dipstick, than the oily full mark. I did the old paper napkin Test: Let a drop from the dipstick to drip directly on a clean paper napkin, and the oil mark stayed dark and solid in the center, and a surrounding ring of wetness grown around: thus usually means Water in Oil. I have been with this Subie for the last thirty years and never experienced such a thing, nor in any other car, so I wonder... ► How the Heck, water found its way inside the GearBox? ► Or could this be some sort of moisture buildup? Please let me know your experiences with this issue / similar issues, the possible causes and ways to avoid it from happening again. I check the fluids on my cars on a weekly basis, it was alright; and the last time I went driving on a pond, was ~ a year ago; also I've not washed the engine in around two years... For those who don't Know, my Subie is a 1985 GL wagon with its original EA82 engine and 5MT GearBox, runs with a 2" Lift + 25" tires. Kind Regards.
-
Hi All! ... ... Please Correct me if I'm Wrong, this is for my EA82 Wagon. if I Have a PCV Setup like This one... (This Awesome Clean EA82 Engine Belongs to Kanurys) ...and my EA82 is Blowin' Oil thru the PCV setup, I Must install an Oil Catch Can, Right? Recently I Obtained an Oil Catch Can that Looks similar to This one: The Questions Are: Should I Hook it Between the Driver's side Head Hose and the PCV intake Valve, isn't it? The Passenger's Side Hose Doesn't need any Oil Catch Can 'cos it will only "Suck" Air from the Air Filter's Box, at the Carb... isn't it? Any Suggestion, advice or Idea will be Greatly Appreciated. Kind Regards.
-
Greetings, This time I am trying to do my Best to help a Friend, Mr. Mariano, who owns a 1980 Subaru GFT-5 Coupé, which came factory with an EA71 engine that features Twin Hitachi carburator setup. Here is a Photo of his Subie: Here's a Photo of that Subie's Engine Bay: Photos of the Actual factory intake manifold: He is in the middle of the Restoration process of that Subaru, and he really wants to get rid of those hitachi craps that seems like now they're bad beyond any repair, he dreams about to obtain a single carb intake manifold that fits his Subie's engine and fit there a Weber Carb. He already obtained a 32/36 Weber and the Trans-Dapt 2107 adaptor, also he obtained a Single carb intake that was sold to him as "For the Subaru 1600" which is the EA71, but the intake was longer, so we believe it was for the EA81 ... and he already welded with aluminium the Trans-Dapt adaptor to that unuseful -for him- intake manifold, as you can see... By seeing this Photos and seeing the Position of the Starter behind the engine, on a side, I want to Ask (To be sure): ► is that a Fat Case EA71, isn't it? ► Does the Twin Carb EA71's comes with Reversed Valves as the Twin Carbs EA81's does? Here is a Photo of his Original Owner's Manual about the Valves (in Spanish): Words in spanish over the Valve's drawing means: "Exhaust Valves" while words in spanish under same drawing says "Intake Valves". The main Question could be: ► Will a Single Carb EA71 intake manifold fit right to this engine, or not? Due to the Lack of Spare parts, we were crossing Private Messages, planning to cut the Upper part of the EA81 intake, along the welded adaptor, and cut the upper part of the Twin Carb EA71 intake, and weld the EA81 part to the Twin carb EA71 one, without touching the Water passage... Sounds crazy enough, isn't it? Please let us Know your Ideas about that, and the Answers to our Questions, which will be Greatly appreciated. Kind regards.
-
Fuel injector cleansing procedure I use: Remove the Fuel injectors. Spray carburetor cleaner Upside down on them, to clean their inlet strainer. Plug a 1.5 feet long Hose, tight on their inlet. Secure it in place with a Clamp. Plug a couple of long wires to their power input, to connect them to the Car's Battery. Hold vertically the Hose, hanging the Fuel injector. Fill up the Hose with enough Carburetor Cleaner. Ask the Help of someone to Connect the Wires to the Battery, intermitently. (1 second intervals) Blow the crap out of the injector, by bursting high pressurized air to the Hose. When the Cleansing fluid is gone, fill up the Hose again... Repeat this procedure until the injector is Completely Clean! WARNING! The 12 Volts power should be Connected / Disconnected on one second intervals, otherwise the pressure buildup on the Hose, could cause it to Blow, spraying dangerous solvents and dirt all around. Be Careful! Important Notes: ► I forgot to shoot a photo while the cleansing process was ongoing, so since I already re-placed back the battery on the car, I did the last shot for the photo, there, and then I Cleansed the Battery properly; do Not do this Fuel injector cleansing procedures nearby the battery to avoid a spark that might start a fire with the chemical solvents; also Never forget to wear safety goggles during this procedure, please Take Care. ► You have to be Creative to Hook the Hose Properly on certain Fuel injectors, such like the Older style Subaru ones. ► I highly recommend to obtain brand new o-rings for the injectors, to be placed after the cleaning procedure has finished. ► The ideal carburetor cleaner usage, is around 4 to 5 oz of the can to each injector, or a whole 16 to 20 oz can of good quality, concentrated Carb Cleaner, distributed among four injectors. ► You'll need to fill up the Hose and blow with air several times 'till the injector sprays with a clean, defined pattern as it should. ► An average air compressor, has a common working pressure of 90 psi, while an average Car's fuel pump delivers much less psi. The mixture of that higher pressure with the amount of concentrated chemical solvent used, gives as result an incredibly clean fuel injectors, beyond any fuel additive could do. Disclaimer: Use all the information & Photos I share, at your own Risk! If you find this information & photos, Useful, Let me know by hitting the "Like" Button Kind Regards.
-
- 4
-
-
- JesZeK
- Loyale 2.7 Turbo
- (and 3 more)
-
Automatic Transmissions' With shared or independent Differential Lubrication. Very Basically Talking, there are Two types of Lubrication Systems for the Differentials, that comes integrated onto the Automatic Transmission's Case, or "Transaxle" as those combos are known nowadays. ► First Type: The Differential has its Own Lubrication, independent from the Rest of the Transmission's Lubrication System and also uses its own independent Lubricant. ► Second Type: The Differential shares the same Lubrication system and the same Lubricant that is used for the Transmission. Also, very Basically Talking, there are Two types of ATF Additives, which independently from the benefits they could do and their disadvantages; the ATF Additives could be divided in Two Big Groups: ► First Group: Are all of those ATF additives which actually "Thins" the ATF (getting Lower Viscosity) and works as detergent. In this group, you can find additives such like "Trans-X", and many more. ► Second Group: Are all of those ATF additives which actually mades the ATF to be "Thicker" or more Dense (Getting Higher Viscosity), and works as an added "Cushion" between moving parts to prevent shearing. In this group, you can find additives such like the "Lucas Transmission Fix" and many more. Why is this very important? Because if you pour an ATF Additive that thins the ATF and works as detergent, onto an Automatic Transmission's Fluid which also lubricates the Differential, and you drive long term like that, there will be a very high Risk of Breaking the Differential Gears due to improper Lubrication. Independently from the advantages that such additives could do to the Transmission; they simply are Not intended for the Differential, period. However, you might pour the same ATF additive onto transmissions which does Not share the ATF for the Differential, in such case there is No Risk for the differential, because it is isolated from the ATF and has its own lubricant. So, in case of Automatic Transmissions that shares the Same ATF for the Differential, you might pour those detergent ATF additives for short term use only, in example to do a chemical cleansing of the internals prior to do a complete ATF drain and then Refill with fresh ATF; but if you really need to Pour an ATF additive for long term use, on this kind of Transmissions that shares the ATF with the Differential, I highly recommend to chose wisely, from the ones that doesn't thin the ATF. ► Important Note: Not all the ATF in the market, has the same additive package nor are suitable for all the automatic transmissions; in fact, if you use the Wrong ATF, the Transmission might get damage, such like premature wear and shearing; Always follow the Manufacturer's recommendation on the Manual. In my case, for my Wife's car which has a version of the 4EAT, I pour Valvoline's High Mileage ATF plus a quart of Lucas Transmission fix additive, and that combo makes the transmission to work smoothly and flawlessly; I do change all the Transmission ATF with said combo, on a yearly basis. Remember, if you find this information useful, let me know by hittin' the "Like" Button. Kind Regards.
-
- 8
-
-
- Differential
- Automatic
- (and 8 more)
-
Overview: If your stock carbureted Subaru EA engine feels Gutless, slower than it used to be, and some times, it overreacts during acceleration and sounds louder while your subie runs like a bat out of hell, and the Hitachi Carburetor has a Vacuum Operated Secondary (high) Stage; I Bet that the Vacuum actuator that activates it, is failing. Even with non failing vacuum activated secondaries; I've made Mechanical Conversions on those carburetors, always with Great Results. The Difference between the Vacuum operated and the Mechanically operated Secondaries (high) Stages, lies in the Moment for Reaction, and how the engine reacts to your acceleration behaviour; let me explain: In the vacuum operated carbs, the Secondary (high) Stage which gives the "Power", will work depending on the engine's vacuum; which depends on RPMs, and thus means that it will work accelerating indirectly; while on the Mechanically operated carbs, the "Power" is always there, to react at your very will, each time you press the Gas Pedal, and thus means that the acceleration is Directly. The mechanically activated secondary (High) stage on the Weber carburators and its Robust, pure smart simplicity, are the main factors why a Weber Carb is super desirable on the Carburated EA engines; it also helps you to get rid of tons of unuseful things from the crowded engine bay... on those states in USA with not too restrictive laws, regarding pollution control. But if you can't afford a Weber carb, or don't want to do ~► the Weber Carb Swap Job, then a Mechanical Conversion on your Hitachi Carb will help your ride to be more reactive to your accelerating behaviour. There is absolutely No Downsides with such Mechanical Conversion on the Carburator, if it is Done properly. How to do the Mechanical Conversion: Prior to explain that, I must say this: If you really don't understand and don't have too much mechanical experience, then I kindly suggest you to Ask to a Qualified Mechanic with Knowledge / Experience in Carburetors, to do that Mechanical Conversion for you, instead of trying it by yourself; because to instal a badly assembled / damaged carb, could be pretty Dangerous in many different ways, so Be Careful! (Disclaimer: Use all the info I post, at your own Risk) Basically talking, the Mechanical conversion is done at follows: ► Remove the Vacuum actuator attached to the secondary (High) Stage, along all its hardware, ► close any open threads with screws; ► then attach a piece of hard, inox wire, firmly secured to the mechanism that opens the primary (low) stage Butterfly, which is directly connected to the accelerator plate, (in the other side) where the accelerator cable goes. ► Then, Twist that wire giving to it the shape of a Hook or a curved finger that wanna pull something, in order to let the primary (low) stage butterfly, to touch and move the mechanism that moves the Secondary (High) stage Butterfly, just after the primary (low) has been moved and it reached around its Half (50%) opening. You must "Calibrate" that movement on the Secondary (High) stage, by twisting the Wire, in order to achieve Full Opening of Both Butterflies when the Accelerator Plate is at fully acceleration (Maximum) which equals to the Gas Pedal being floored, and also the Secondary (High) Stage butterfly shall remain completely closed, during the first half movement from the primary (low) stage butterfly. Let me Show you a Short Video that Demonstrates how it Works: Here is an easy Repair guide for those Hitachi Carburetors, plenty of pictures (Not mine, Found it online) Download it here: ~► Hitachi 2 Barrel Carburetors Visual Repair Guide If you find useful information here, let me Know by hitting the "Like" Button. Kind Regards.
-
- 8
-
-
- Carburetor
- Hitachi
- (and 8 more)
-
Where could I Find a Cooler temp Thermoswitch for my EA82 BumbleBeast? The Stock EA82 one is designed to start the electric Fan at 203º F while the EA82 Turbo one is Designed to Kick on at 200º F. I am Looking for something even Cooler to swap there, Because I am Removing the Fixed Pulley Driven Fan and installing another Electric fan instead, as you can read ~► Here. So, does anybody know of a Cooler thermoswitch and its part Number or Make/model of the car? Kind Regards.
-
This writeup is for the Third Gen Subaru Leone, a.k.a: "Loyale" or "EA82" etc, but the ideas given here might work, with some changes, to other vehicles as well. ________________________________________________________________________________________________ Have you ever felt the Seat on your Subie like a Rocking Chair? The Subaru EA82 GL has a Complicated Air Conditioner Distribution Design, which includes a couple of Ducts under the Front Seats, one ends there to deliver Air to the Rear Passenger's Feet, and the other Duct delivers Air to the Rear Doors' Windows; this last Duct, passes through one of the Front seat supports, weakening its structure somehow. The Weakest Front Seat Support, is the one located at the Rear of them, next to the point where the Seat Belt Anchors; there is the A/C Duct passing in the middle of said Support. I've seen some local Subies with those Supports Broken, especially the Driver's side one, and the owners didn't knew the reason why their Driver's side seat was loose and / or way too much reclined to the Back... (when said support is not only Broken, but also Deformed for using it like that) ...I Bet that many Subie owners could have same issue on their cars, without even knowing, nor completely noticing it. So, that support on the Driver's Side in my Subaru "BumbleBeast" has broken for the Second Time... I Know: I am a Big Guy, 6' tall and over 110 Kg driving an Old Subie Wagon with Hardened "Reinforced" suspension, so the autogenous welding I did a couple of years ago to simply put that broken support together, will never last too much... so this was the Perfect Time to Reinforce that Seat Support and permanently getting Rid from that problem.
-
Look Here: ~► http://www.carthrottle.com/toyotas-done-the-dirty-on-us-gt86-saloon-confirmed/ So sad it is not April 1st, so it must be True... Kind Regards.
-
In This Writeup: ► Understanding How a Relay Works. ► Knowing which Wire is for, at the Round Relays. ► How to Swap the Old Worn Relays with Newer, more Capable ones. ► Finding the Location of the Relays on a Subaru EA82 (Third Gen Leone / Loyale) ► Learning to Wire New Relays if Desired... in case you wanna Run Halogens, Bigger Horns, etc... ___________________________________________________________________________________________________ First of All: I Hope this Write Up will Help anyone with Electrical Problems due to bad Relays, Such as Power Windows, Air Conditioneer, HeadLamps, Halogens ...etc... also you'll learn how a Relay Works and How to Easily Wire New Relays. You Know that when you Switch Almost Anything Electric in your any car There is a Relay Takin' the Main Job of Sending the Power to the Accesory you Switched On; the Switch that you Touch or Handle, is just a "Remote Control Signal Sender" to those Relays. Very Long Long Time Ago, I had Problems with my Subarus' Electric Powered Windows, and then Long time ago with the Air Conditioneer too, I Found that the Fault of Slow Workin' / Non Workin' Power Windows was due to a Bad Relay; Also The good ol' subies had A/C Engaging & keep workin' Compressor Problems. An Easy Fix Would be to Just Change the Round Original 22 Amps Relay, But Those Relays aren't Easy to Find, They Need the Whole 12V Power to engage Properly, they are Expensive, and they are only 22 Amps Rated ... ... Beside that at this point of the wirings' life, their Sockets (Plugs) Could be burnt too... In my Own humble opinion, the Best Solution of All is to Swap There Bosch Standard Relays. I've Done it to the Main A/C Relay, the Two Auxiliary A/C Relays, the Power Windows' Relay, and the two HeadLamps Relays. I'll Explain How To do that swap Here, with Photos. Bosch Standard Relays comes in Many Quality Brands, Not Only Bosch (By the way, I Saw Bosch's Made in Portugal, Germany and Brazil, rated at different Amps) There are many Other Brands that Make the Bosch Standard relays, like Hella, Wagner, Flösser, Osram, Sylvania, Potter & Brumfield ... etc ... so They are Easy to Find, They are Cheaper than stock round relays, and Give Better / Faster Response; they just need as Little as 8 Volts to Engage, also Bosch Standards are more Reliable, and are Rated from 30 Amps to 40 Amps, so They'll Last Longer too ... ... Warning! - Please Forget about Cheapo bad quality relays. In Example, This is a photo of a "Potter & Blumfield" 40 Amps Relay, Made in USA, The one that I've Swaped in, instead the Main A/C Relay Under the DashBoard: But to Swap a Bosch Standard Relay in your Subie, You'll Need to Cut off the Subie's Plug and Weld there a Bosch Standard Plug ... Or use an Adaptor. I'll Explain How to do That Too, is Easier than you Could Imagine, but keep Readin' Carefully, and Do Not Forget to Remove one of the Battery Terminals prior to Start Cutting / Welding any Wire. Please: Be Careful While doing this, follow this instructions at your own Risk. The Plugs' Swap is needed to be Done just once for each Relay Unit; then in the Future if you Need to Change any Bosch Standard Relay, the Plug Stays, you only Need to Pull the old Relay from it, and put there a Fresh New Relay; and That's it!
- 6 replies
-
- 2
-
-
- Fix
- Electricity
- (and 8 more)
-
This year my Family and I celebrate my Subie's 25 Year Anniversary! My Dad teached me Mechanics since I was a Very Young Child... I Started Learnin' in my 1969 Mercury Comet Coupe, which by the way, reached 40 Years in my Family last Year... You can see Pics & info of it, ~► Here. My Dad Purchased The Subaru Wagon New from a Dealer in Hollywood, CA (USA) in 1985 and the Subie Came Runnin' from there to my Country... I Can't imagine any Better Way to Break New an Engine! Some Old Pictures that I've Scanned: In this old Pictures, The Front Rims came from a Subaru XT and the Rear Ones, which are much Wider; came from a Renault. (Cheviot Brand ~ Made in France ~ 4X140) Actually I Changed all those for a complete Set of Newer Rims, by changin' the Lug Pattern. The Odometer is About to Reach 300,000 Miles without Changin' Almost anything inside the Engine, except: Head Gaskets (a Couple of Times), Valve's Seals, the Heads themselves, and the Oil Pump so far... But Outside the Engine I've installed a Weber Carb, plus a Different vacuum advance on the Disty and it has a Free Flow Exhaust, plus Lots of Changes in the Rest of the Car... Here you can See it Parked next to my Other Wagon (The 2.7 wagon, now wrecked) I have been in this site since Year 2001, So I am Reaching this year 25 Years of Being a Huge Subaru Fan, and almost 10 Years to be in this Great Club! ... ... I Must say that I've Learned Many of my Subie Repairs Here, without this Amazing Club I would done many Mistakes ... Also I've Shared my Own Ideas & Experiences on How to do Many Repairs and to do some Improvements to our Beloved Old School Subarus, Posting my Writeups Full of Pics & Detailed info in the ~► USRM. During this Time and with the Kind Help of other USMB Members, I Compiled a Database of All Subarus made & Prototypes, which can be Viewed ~► Here, where you can Find Rare Models like this one: Rare Options, like a Digital Dashboard's Buttons, like the ones in this Pic: Or the Complete List of Subaru Prototypes, with Pics & info: And More Strange & Weird Subaru Stuff! ... ... Like the Subaru "Royale" which is a Stretched XT6 ... Please visit that Thread for Further Details & info. So the Purpose of This Thread is to Say: Thank you So Much to all of You here, in USMB; for being Always So Kind & Helpful! Kind Regards. ►Edited to Update the Links and add the Tags for the New USMB Search System.
- 5 replies
-
- 1
-
-
- Origin of the BumbleBeast
- EA82
- (and 4 more)