TheLoyale
Members
-
Joined
-
Last visited
Everything posted by TheLoyale
-
-
So unbeknownst to me until today, Photobucket has changed their Terms and now require a $400/per year fee to keep IMG codes active on 3rd party sites. There for, all Build threads and Write-ups I have made on the USMB (Including hundreds of other threads) will no longer have pictures. I will work on fixing this issue and restoring the threads the best I can so they can still be usable. So as always, stay tuned for more! -Tom
-
Any endevours for another SUBARU in the future?
-
So here is where we're at right now. Had a few decent days recently (Mostly Rain and cold though) But I did manage to get the new rear frame made up and 3/4 of the way welded up solid. So the Header is made from 3/16" C-Channel, the 3 welded nuts on the bottom are for the rear of the fuel tank to bolt to (Top 3 were a spacing mistake lol) That piece is fully welded to the original frame rail ends along with the cargo floor, I reinforced the area with angle iron and need to do a little more bulking up on the factory frame areas. The side rails where the bumper would originally bolt to are now made from 3/16" 5x3 tubing, The bumper will now mount to this, I am planning on using 2 lengths of 2x2 or 2x4 3/16 tubing to make the new mounted that are welded to the bumper, so they can slip into the new side rails and be bolt with 7/16" thru bolts (2 per side) The front most header is made from 3/16 5x2 tubing and tie the two rail ends together, this piece will be hidden with body skin/roll pan so it looks factory. I am also planning on making a few reinforcing areas for the inside corners of the rectangle, then I am planning on making a type of small tube skeleton for the floor (Where the Crash box used to be) which will also tie the front, back and sides together to make it ridge (Probably over kill, but just want to make sure it is strong) 3/16" holes for new bolts. I welded everything with a Fluxcore Lincoln 100HD (Gasless) so far it is doing the job. Once I finish the box and get the rear quarter panels and floor done, I can then focus on the roll pan area (Hoping to have a clean one cut off so I can easily match them up and weld it in place (Like I did with the Rocker/sill panels) As to why I want this new sub frame to be more solid and stronger than the original is for the fact there will be a hefty bumper mounted, along with a swingout and a 30" Spare tire. This is also a recovery point, so it must be strong, period. Cheers all and thanks for sticking with the build and updates -Tom
-
Installed an oil catch can which seems to have removed the smoking from deceleration and the PCV looks to be free of oil! Still need to make a bracket to fully mount it up and run full HPS Silicon hosing. On another note, I have made this UEL header with Mandrel bent 16ga 1.75" mild steel tubing, all welded up and mounted. Ordered some more tubing to make the 2.25" mid-pipe which will run to some type of Can style muffler, Looking at Apexi N1 or similar, 2.5 In and a 4" Out. Should sound pretty wicked. More updates to follow!
-
They could of offered AWD as an option as they did with their models till 94 (93 for Impreza) But the idea behind this car was to be a RWD N/A corner machine. For SUBARU it worked out, but I think the FT86 was a sad attempt to bring back the AE86 Corrola (Hachiroku) drift machine that Toyota was so strongly trying to reinvision.
-
Pulling Autotragics anytime isn't fun. I'll gladly pull an M/T Over A/T anyday; they weigh so much less.
-
Time will tell. I'm hoping to at least have it mobile this year. Finished on the other hand, hmm... Good question mate! Tires are 30x9.5x15 with a 15x7 wheel with 4.5" Backspace (Same as Landcruiser) And close to factory Subaru.
-
-
-
This is pretty much what I used. Just a higher CFM. http://www.ebay.com/itm/12-Inch-12V-Universal-Slim-Fan-Push-Pull-Electric-Radiator-Cooling-Mount-Kit-/252239435344?hash=item3abaa45650:g:UMsAAOSw0HVWDN~U&vxp=mtr Cheers! -Tom
-
Spring Time Start! Runs like a beaut. Ordered $200 worth of exhaust tubing and a Merge Collector to finally make a proper UEL header. I'm going to revamp the entire exhaust system soon, never choice of muffler this time to remove the hollow can sound. Stay turned for an updated video; filled with Boxer splendor! <iframe width="560" height="315" src="https://www.youtube.com/embed/NI6CsPfae7k" frameborder="0" allowfullscreen></iframe>
-
Thanks man, yeah its been a long road and it'll probably only get longer. I'll be keen to see your GL and whats up with it! So this is where we're at now "I pushed away from the table and said, NO MORE CRASH BOX FOR ME MOM!" The idea is, I have removed the front and rear wall of the box and removed the frame rails (Where the original bumper mount was) I am going to replace the rear wall (Where the fuel tank captured nuts are) with 6" C-Channel about 46" long, then I am running new frame rails (5x3 1/8" tube) which will slip into the C-Channel and then weld it. Once both rails are in place, I will use another stick of 5x3 to which will be under the gate latch plate and will tie both rails together (In essence, making a rectangle box) no bumper mounting points will be added and it will be recessed just enough to allow a new roll pan to cover it up and appear Factory. Then it will be just a matter of finishing the rear quarter panels, and the rear flooring. Also need to finish making the front frame gussets and whatever else I may need to tidy up.
-
Stared at them and dreamt of the day when they are finished... :/
-
-
Don't redrill wheels. Its chincy to say the least (Plus you are limited on what wheel you can run, you'll be stuck with Steel wheels for the most part) Do it right and follow the write-up in my signature. As for lift kits, check out Patrick Anderson over at Anderson Design and Fabrication. He will make anything you can think of, and is fair with price. -Tom
-
Camber won't change in the rear, the only that changes is the geometry of the rear wheel. As you put a longer strut in without lowering the rear suspension tube, the wheel will push more forward (Closer to the rear door) So to center the wheel again, you will need to drop the tube. On a 2" kit it isn't really noticeable, but if you start running 4+ you will need to drop the tube. The front camber is basically adjusted with the angle cut into the Lift blocks. And Patrick will make the blocks with nice flat camber.
-
Probably something '85-'87 like you said Possibly GL-10 trim or Turbo wagon, basic GL maybe have had them too.
-
I don't think any EA82 had adjustable rear struts (XT6 did have air shocks) If I'm not mistaken some older EA82s had an adjustable spring perch on the front much like the EA81 4WD cars. I'll be interested in see the car with the lift on it! Cheers, -Tom
-
Are those Douglas tires btw? I didn't even know they were still made (Had a set long ago) haha...
-
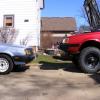
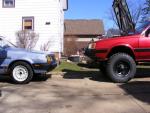
That kind of rake seems about average for a 4WD wagon. You also need to figure they expect cargo/payload in the rear and they don't want it to have the Carolina squat. Also having the front a little lower helps with handling characteristics, it also helps with when pulling a trailer, using a cargo hitch or any weight that extends past the rear axle, having the rear become lower sooner will take load off the front wheels and make the vehicle unstable as the struts unload. But again, I know it would be nice to have the vehicle sit a little more level. If anything, combine the 2" lift and change the front springs to another (Ford Tempo etc.) There is actually another front spring which directly swaps into the EA82 front struts. JesZek made mention of it on Facebook, I think it was from a Kia of sort. JesZek, correct me if I'm wrong. It looks like your suspension is original, and depending on miles, it very well may be.
-
Do you have a side pic of the car? I'm curious to see how it sits. Depending how much space is between the top of the tire to the bottom of the wheel arch, it might actually be something with the front. And as robm said, if these springs have more preload than factory because of variations with the rear struts than I wouldn't see an issue with cutting Half up to a full coil off the springs to level it would. You just want to make sure not to remove too many coils otherwise you'll get the "Honda hop" from cut springs. Also removing a coil or so may not be the best idea anyway, as it will give you less tension, and possibly less/slower rebound making the rump roast end of the car want to wash out or float. FYI, when installing the rear lift plates you will need to turn the strut 180* to reinstall because of the angle of the lift plate. -Tom
-
Also, if your going with a 3" in the front, you'll need to lengthen some stuff since you need to drop the motor/trans as least 1" for axle geometry. So it'd be more beneficial to go with a 4" up front and a 3" in the rear. I wasn't keen on having the front lower on mine, so I finally got it level with the 3rd and final sized kit Lol. If you lift once, you kinda can't stop
-
Yeah these cars always sat a little higher in the back, At least on the 4WD ones. Seems more noticeable on the Wagons. Talk to ADF (Patrick Anderson) on Facebook. He'll give you some good ideas and such, he used to work with Bill Omlin on lift kits back in the day and now he's cornered the market on Subaru lifts (For all generations)
-
That looks absolutely horrible mate! I hope its not like that either, although, I don't see any other culprit now. Kinda running out of things to point my finger at If I were to replace Rings and or Pistons, I would try not to split the case. I've seen a video on how to do it just taking the heads off etc... But again, if I'm replacing pistons, I might as well do some research on what can be done to bump torque, milling heads and changing pistons out with something, and dropping in a cam. I dunno, thats a lot of stuff, and it would be far off on a back burner across the ocean. Right now, the car runs and drives really well, took it on a good cruise today actually. I've only noticed some smoke once while stopping from higher speed. Its quiet sporadic if I may say.