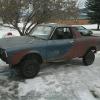
October 9, 201312 yr I recently was given a 78 Subaru Brat, which i am already in love with. I have a few plans for this thing needless to say. My first and foremost project is to build the lift kit for it. Now i have read every single thread there is on lifting a gen 1 brat, trust me, but i still need help. i have all the materials i need for a 5 inch drop lift and 6 inch strut spacers, but i am just wondering if anybody has block specs or maybe just some last minute advice? This thing is never going to be my daily driver, i have a full size Chevy for that so it doesn't need to be comfortable on the highway just somewhat safe. My brat sat in about 9 inches of mud on the side of a road for just about 20 years before i got it, and before that it was not treated well, so its really rough. But it will be perfect for an off-road toy! all i did was drain the fluids out of this thing, put new fluids in, clean spark plugs, put a new fuel pump, coil, and air filter on it and it started up perfectly and runs like new surprisingly! The transmission is pretty noisy, but it's getting quieter the more i drive it. The previous owner decided to spray red primer right over the old paint 20 years ago, and that's why it looks as bad as it does, its not rust. I will keep you guys updated with any new progress! Mine is the red/blue one in the pictures needless to say. Edited January 10, 201412 yr by RustyBrat
October 11, 201312 yr Oh, yeah. I've seen your videos on youtube. Did you get the title, yet? Welcome to the forum! You will love it here.
October 20, 201312 yr Author yeah just got the title today! im so excited! i have to replace my fuse panel first though, none of the lights work. also, i am in need of a few parts such as mainly the speedometer cable... i think.
October 21, 201312 yr Author oh also i need help... how do i remove the push bar from my brat? the bolts that hold it on are the same that hold the engine crossmember in place and im afraid if i remove them to get the push bar off the whole crossmember will come loose
October 21, 201312 yr I'm not sure about that one, as my Brats are of the later style. I'd just put a jack stand, wood, brick, or something under there and take them off. That should keep it from moving too much, if any. Be sure to use tons of PB blaster... you will need it by the looks of your brat. Also, what's the story on the silver brat?
October 21, 201312 yr Author Alright i will do that. Well my grandparents had both of these brats and offered to give them to me, but i had no way to get them home as they were 6.5 hours away and had to be trailered. Well anyway one day i was talking to my boss and brought the brats up, he offered to go and get both of them if he could have one, so the silver one is his. He is restoring his brat so we decided he should get the less rusty one.
October 21, 201312 yr How kind of you. I would have kept the better one without second thought. Best of luck on your project. Remember to post pictures: we love pictures.
October 28, 201312 yr Author just ordered two 22" glasspacks for the brat, im going to cut the exhaust right before it comes together and go true duals exiting on each side before the rear tires, should sound like a harley haha! oh and im having troubles getting the idle to come down under 900 or so, is that just caused by a vacuum leak?
November 7, 201312 yr Author Just got new seats for the brat! $50 out of an old dodge caravan, no tears just dirty. Dont have them bolted in just sitting in there. Also feel free to laugh at the mini roll bar i made hahaha Edited January 10, 201412 yr by RustyBrat
November 10, 201312 yr Author Did some more work to the brat today, gonna do even more tomorrow. Took a chisel and hammer to get those stupid glued-down plastic mats off the floor. That took a little over an hour. Then vaccumed the floor pretty well. Found some more rust holes, gonna cut those out tomorrow and start patching it all up! Took my inner bed sides off, used aircraft remover on them, and primed/ painted them rustoleum moss green, which is the color the entire brat will be soon! Will post an update tomorrow! Edited January 10, 201412 yr by RustyBrat
November 11, 201312 yr Author Cut out all the rotten metal, ground out all the rust, killed the rust, primered the floor, and made one patch. Edited January 10, 201412 yr by RustyBrat
November 17, 201312 yr Author Got all patches done, riveted, and used body filler to seal them up. Sanded it down and bed-lined the whole interior, floors, roof, everything, used body filler on the dash, sanded it down and bedlined that too. Painted the trim pieces moss green. Almost done!! Im getting a set of 6 lug 15s to redrill and put atv tires on, anybody know how i can get some wheel spacers for the rear so i dont have issues clearing the control arm? Edited January 10, 201412 yr by RustyBrat
November 18, 201312 yr Author Started building seat frames to adapt the new seats to the old rails. This is as far as i got before the school's stupid welder quit... Edited January 10, 201412 yr by RustyBrat
November 18, 201312 yr Author Your brat made me decide on this color! Love your brat! Around here i cant have a lowered rig though, but if i could i would have two brats, one lifted and on slammed
November 19, 201312 yr Author got the speedometer and the temp gauge working today! bent my passenger side exhaust pipe a little so it could seal around the gasket correctly, sounds much better! got the heater to work finally! and the headlights decided to work today, so thats good haha! took her for a little cruise around town and up to the lake. Edited January 10, 201412 yr by RustyBrat
November 19, 201312 yr Author in my eye it looks so much better, plus they are easier to see out of up there.
November 19, 201312 yr Japanese Domestic Market Fender mounted side views have become synonymous with "JDM style" of cars from the 70's and 80's that were sold in Japan. Old skylines, celicas, etc.
November 19, 201312 yr This is awesome, from dead in a puddle for 20 years, to driving around! Only a Subaru Brat can do things like that. Keep up the good work on this one.


Please sign in to comment
You will be able to leave a comment after signing in
Sign In Now